Everything I’m doing right now is for structural parts of the robot, so looks aren’t all that important. I just need something to print well and not cause me headaches. I went ahead and ordered some atomic… free shipping thankfully since its pricier than hatchbox off amazon. I’m still new to 3D printing… been happy with performance of the hatchbox on my Ender 5 Pro. Once I made an enclosure out of a clear vinyl shower curtain and a bunch of sticks of wood, I’ve not had a single print problem. My “lab” has a pretty strong vent for the AC and the draft kept popping my parts off the build plate.
And some really good Gummibears ![]()
1 Like
I have heard you say “atomic” 2-3 times on these forums. And you’re just telling me they come with gummy bears now!?
2 Likes
It was a tough choice on whether to spoil the surprise or not.
1 Like
They say it right there on their website. You didn’t check them out?
Two things I’ll say for Atomic, they got a spool to me in two days when the COVID thing really had Amazon backlogged and it was going to take them more than 3 weeks to get me a spool, even though I was on a Prime trial, and I really didn’t mind paying a little more for a US made product.
2 Likes
I been using Overture Pla+ and Sunlu from amazon, Price went up, I was use to pay about $20 and now it is going for about $30 but they still 2 days shipping.
Long story short, the hatchbox filament arrived this morning though Amazon says its still out for delivery. So now I’ll have an extra spool when the atomic arrives… not necessarily a bad thing.
So while the parts continue to print, I need to figure out a jig to allow me to drill really accurately placed holes in a 3-inch PVC pipe. The plan is create a ring that will be used to support the various plates and bolt the rings in place through the PVC pipe. This is what the F360 mockup looks like.
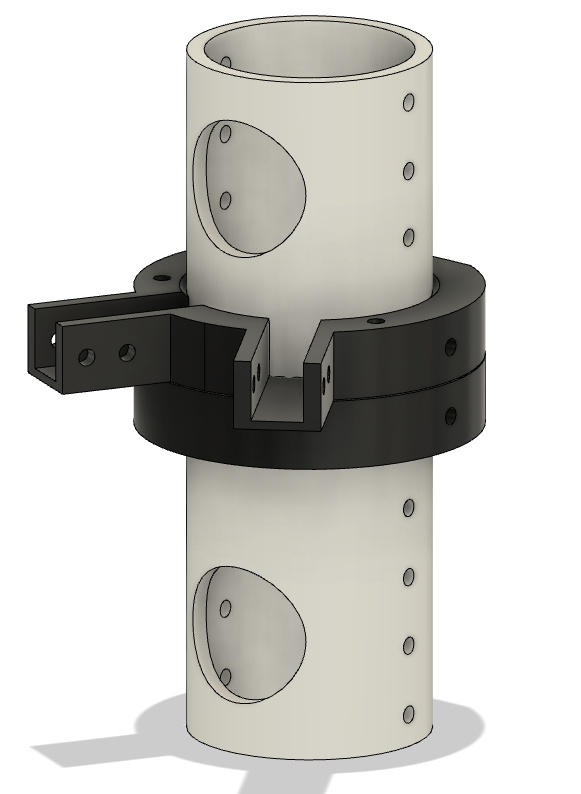
The lower piece will be fixed with a bolt all the way through to the other side. The top piece wont use those two bolt holes (need to get rid of them) but will be “pinned” to the bottom through those holes you can see at the top of it. The two channels is where I’ll bolt in some pieces of wood to extend out like arms to hold the plate. If the top part is unpinned from the bottom, it should be able to rotate to give me access to other plates below it. The big holes are where I’ll run wires through (leaving enough slack to allow me to rotate the plate).
The big holes aren’t really critical, but the small holes are as if its rotated at all, then the plate will be rotated and it won’t line up well. So I’ll need to build a jig for my drill press.
It looks like you’re trying to make holes for shelf pins. You can make a story stick with the same holes in it. Use a straight edge to make a line straight down (it will only rest on the edge if it’s parallel to the cylinder). Drill the two end holes first, and hold the story stick in place with pins in the two ends.
1 Like
It would be easier to make a square/rectangular box that will fit the pipe in with all the holes and drill on a drill press or even by hand, something like this.
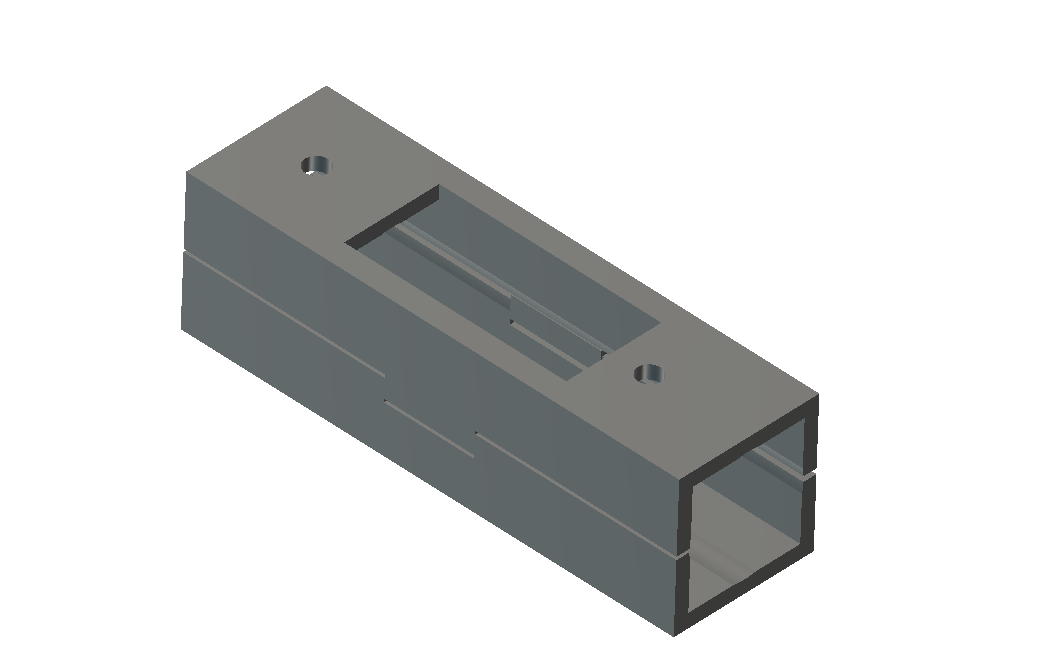
2 Likes
After sleeping on it, I think there’s a very easy way to do it. The design for the plate support pieces (the ones that have the channels with arms) have holes in them that I was going to get rid of since they aren’t needed. However, as I’m planning on building three plates initially, I can take the three plate supports and two of the lower supports, stack and bolt them together, and use the holes in the plate support pieces as drill guides. It doesn’t matter if they get boogered up a little from repeated drilling since they won’t be used in the final product. But this would allow me to precisely place holes and even use a hand drill to do it. And I don’t have to drill all the way through one side to the other. After drilling the first set of holes, I would slide a bolt through it to lock the assembly in place and then drill holes through the next two sets. When those are done, I shift the whole stacked assembly up, bolt the bottom one through the top holes, and repeat. This should guarantee that all the holes are perfectly aligned and center on the pipe.

1 Like
One of the last things I will need to do before assembly is to cut a 12-inch long 1/2-inch diameter stainless steel shaft into two 5-inch pieces to use as axles. I have a ridgid stainless steel tubing cutter that will fit on the shaft (I used it to cut the tubes for my lowrider). Does anyone know if it’s a bad idea to try to use it as a “starter” to make a groove to allow me to use a cut-off wheel to cut the shaft? I’d rather not damage the cutter if its a really bad idea.
I’ve never used a tubing cutter on solid stock, but I think it would work.
Also, the “blades” on tubing cutters are usually replaceable.
1 Like
Thanks… I’ll give it a try then. I’m terrible at cutting things by hand (hence the lowrider) so if I do have to do something by hand, I like to use a guide or template.
Tip of the Day… “M92 is not the command you are looking for.”. Spent 30 minutes troubleshooting why my lowrider would reset every time I try to start a cut only to realize that it was G92 that I wanted to use (to set position).
1 Like
Haha. I’ve done that. M92 sets the steps/mm. So M92 X0 Y0 Z0 sets them all to zero. Try to move and it crashes Marlin. I was going to make a fix and PR it to Marlin. There isn’t a good reason to accept 0 steps/unit. I bet you hundreds of people have made that mistake.
What’s worse is that I did the exact thing 3 months ago. I’m afraid I suffer from permanent CRS. I think I need to make a sign to remind me to use G92.
On a side note, I managed to cut my new base, attached to axle mounts and epoxy up the axles to the wheels. I’m worn out from all that and will post a few pictures tomorrow. Everything bolted up well and seems much better aligned than my first build.
You really should make that into a sign and hang in your workshop ![]()
1 Like
Maybe I’ll name the robot “G92” to help me remember… though honestly at this point, MPR is a better name (Mostly Printed Robot) since it’s taking 3 spools of filament, but that might step on someone’s toes.
1 Like
Plastibot