You made me smile. Good idea!
1 Like
It is kinda tough to decide what tool to use and even what method to use with that tool. For text “Carve” works really well, for you want to sculpt out a boat though something like a Amazon.com is probably closer to what you should be using with a larger ball used for roughing while using the 3D sculpt.
This. I’ve always used Wifi, but I’ve not done any huge 2.5D carving files (which really are HUGE by comparison). Probably on a file that big (and rare) it’d be worth it to manualy load and carry the SD card.
2 Likes
Congrats on the progress!
1 Like
I’m glad I read this before I got out of work today. I’m looking to do some 3d carving tonight and definitely would have uploaded through wifi.
I am curious to test this against a current version. This definitely used to be a problem but changes were made in 3.7.18 (which has other issues) to resolve this.
Lots of memory fixes to help with WiFi and large SD file transfers
I’d probably upload a large file, then download it, and diff it against the original.
1 Like
Hello all, meant to report back on a few things.
Transferring files. I create the files on my workstation and then save them to OneDrive, then upload them to the Jackpot via WebUI (sometimes using workstation, sometimes wifi laptop). Then I go to the machine with my iPhone and refresh and the file appears. Have not encountered any issues yet. I have found that uploading them using the iPhone from the OneDrive does not always work so I stopped trying that. Just use my iPhone as the “go” button after homing and probing. This routine seems to work unless y’all have better solutions. I find it very convenient not having to remove the tiny sdcard ever.
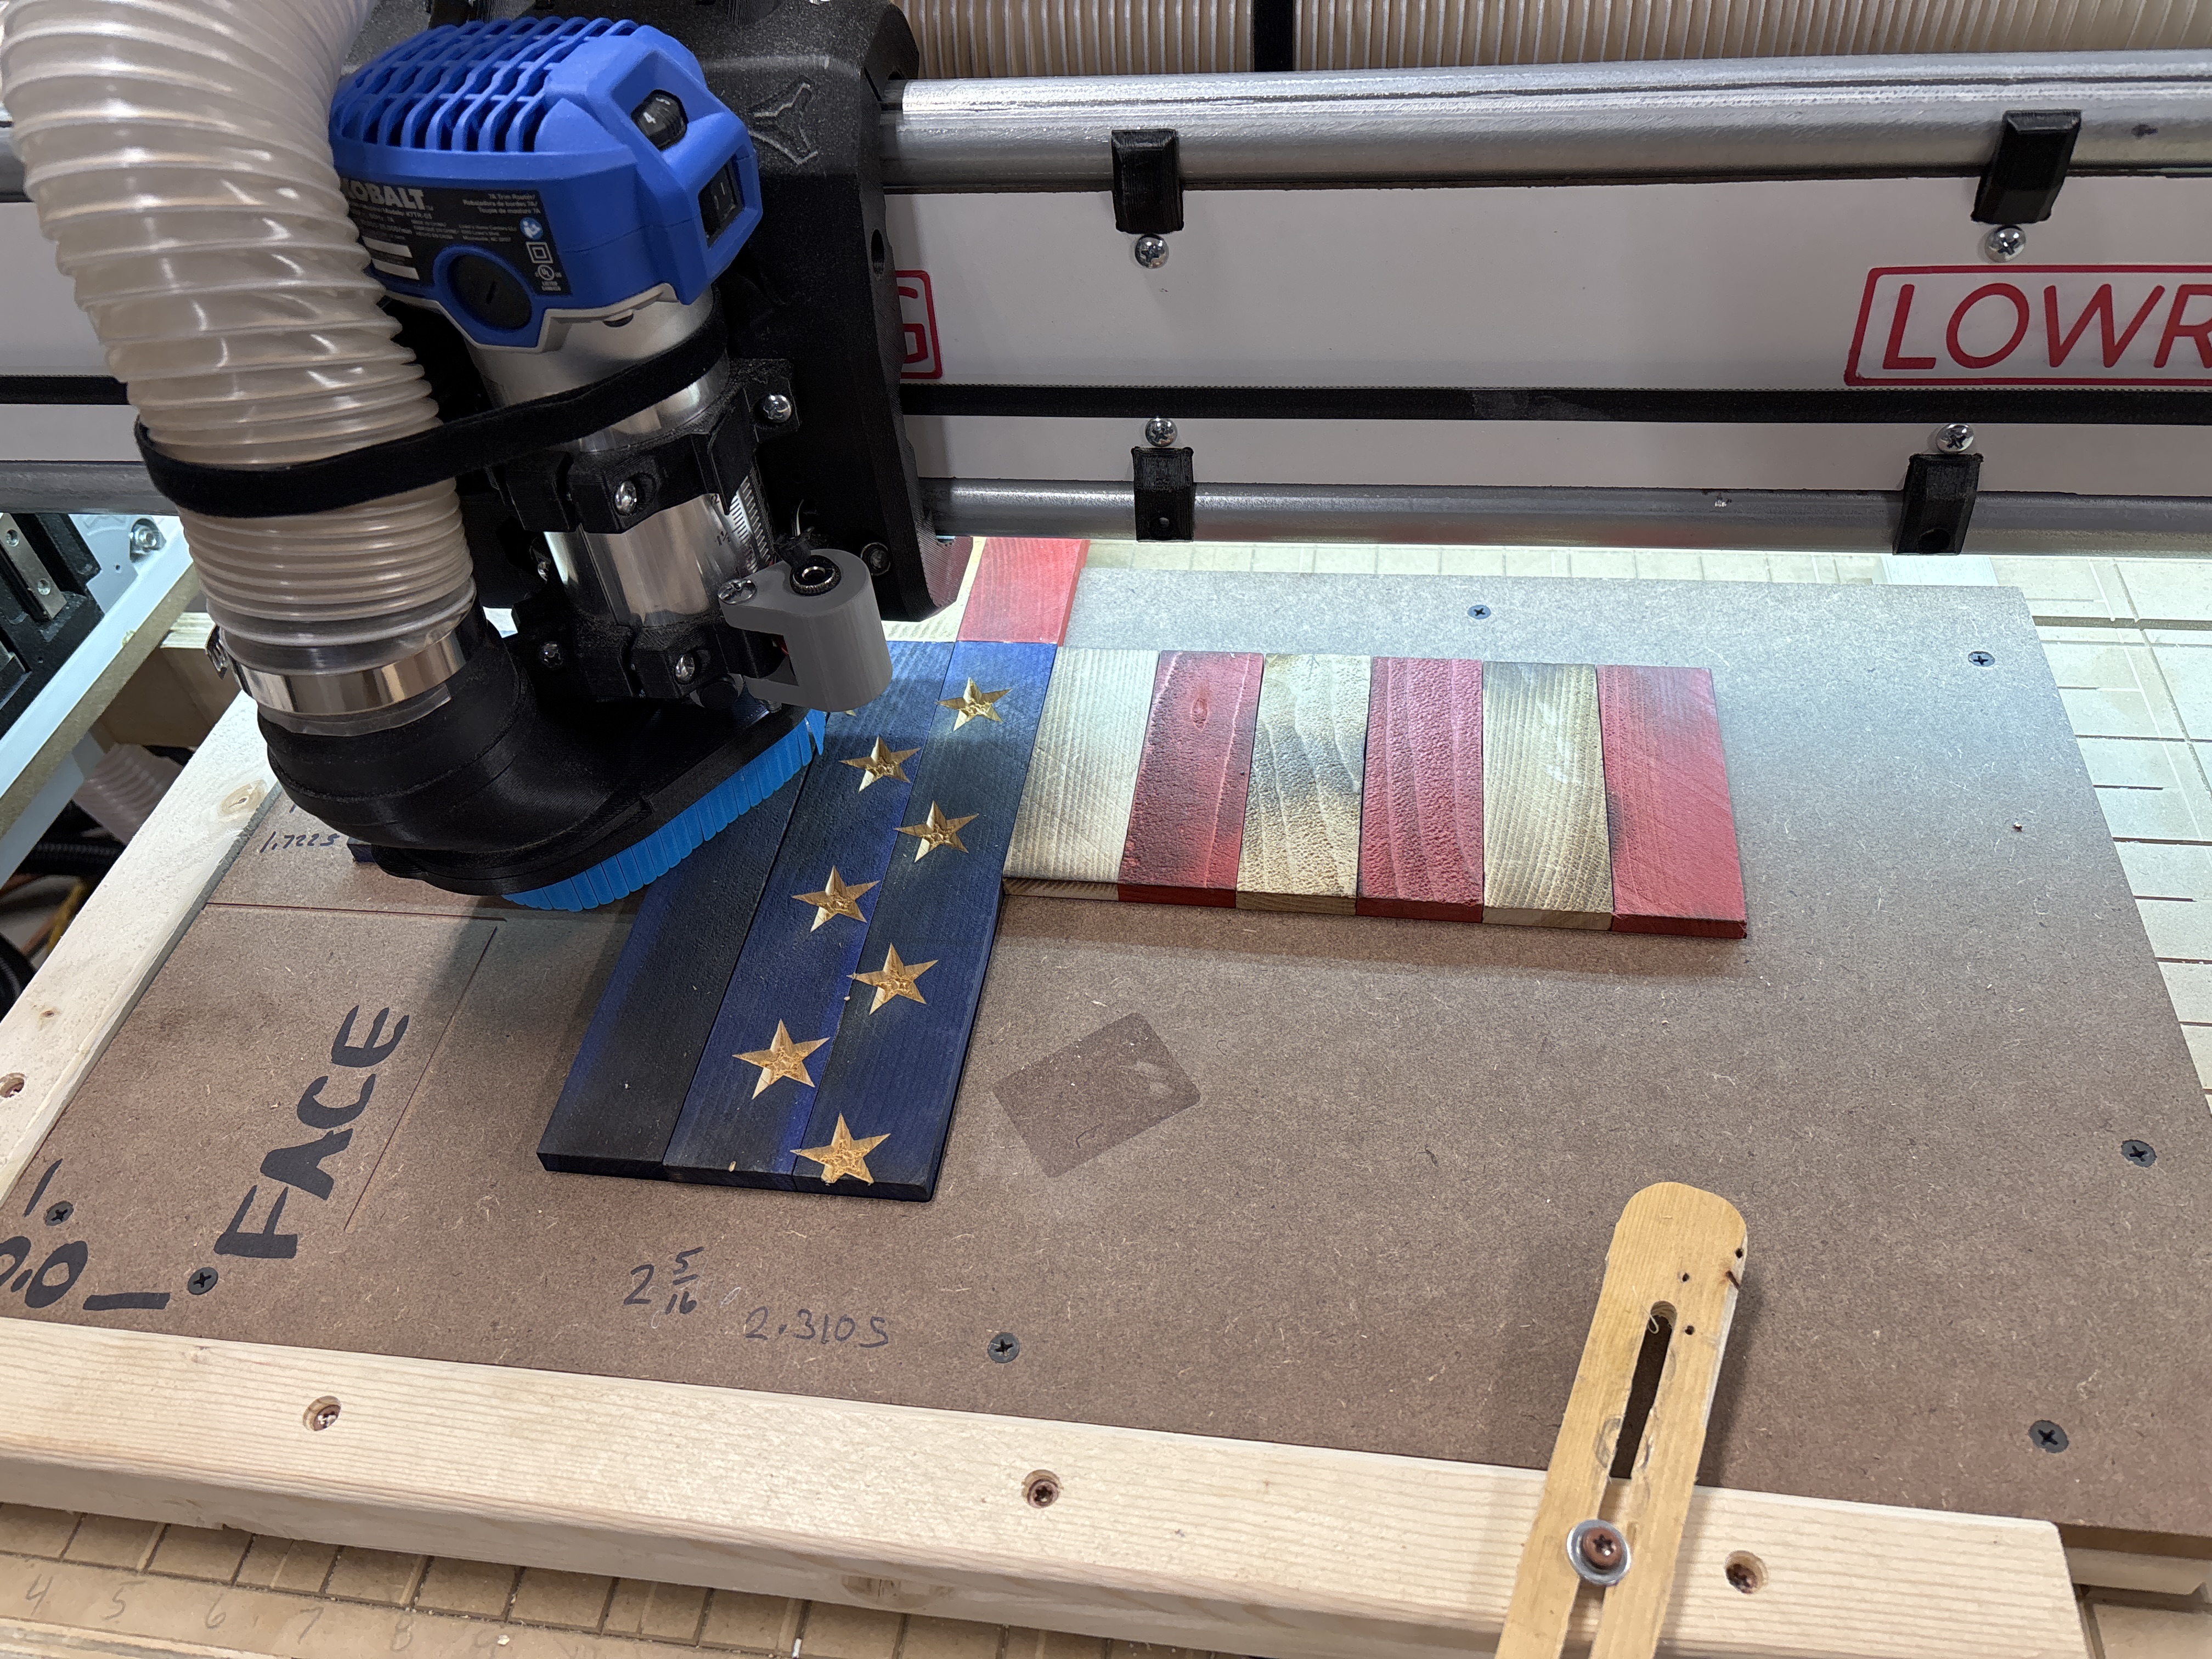
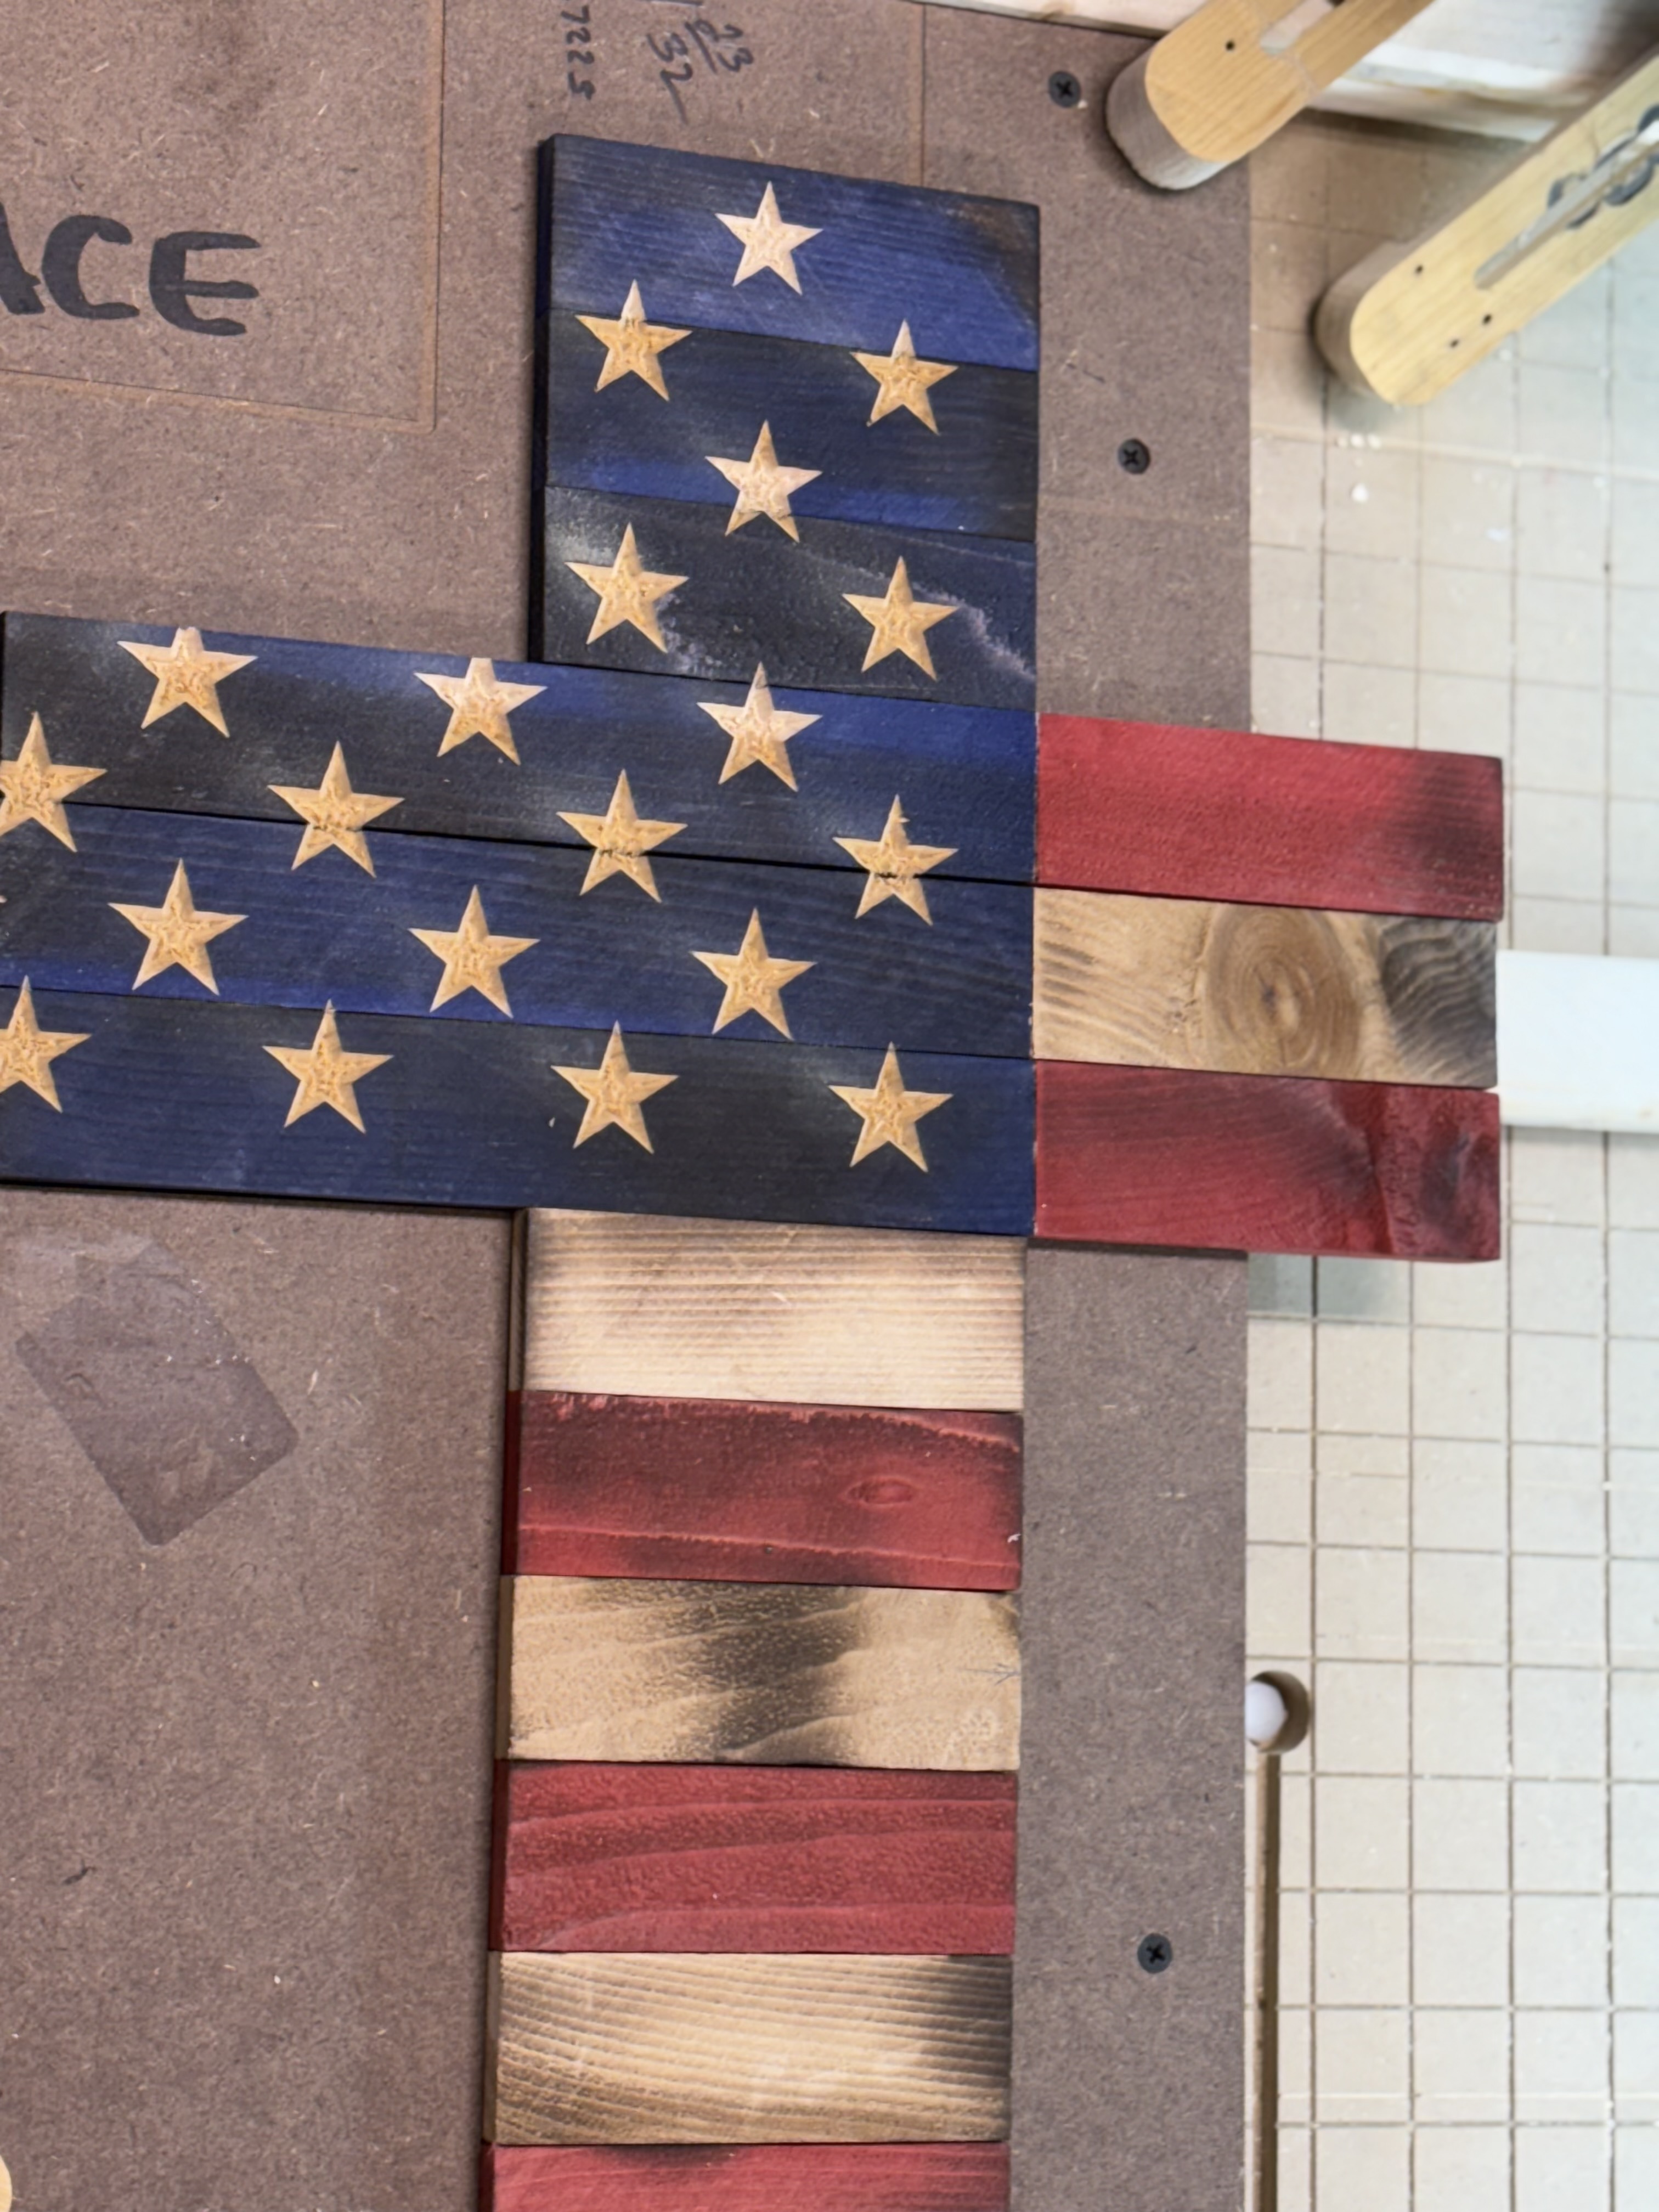
Second item of note: i seem to have a slight hump or crown to my table/spoil board. Noticed my carvings were deeper as the tool moved towards the center when I cut the grid on the spoil. It also appeared in the stars when I did the American Flag. Maybe a simple surfacing might help. I did do the routine with the Y-axis’ and adjusted the pull off to equal distance on both sides but that does not fix table crowns ![]()
I had this issue of my z probe not working in that the tool would continue to drive into the spoil and not back off. Before probing, i even manually checked the little green light was lit when touching the V1E probe to the magnetic holder (thanks Doug ). Then on accident during one of the times the tool kept going despite hitting the probe I noticed the issue. The magnet was sooooo strong that although it appeared to be magnetically connected to the bit, it was cockeyed and the force of the magnet was holding it in place without even touching. LOL. Definition of “too much of a good thing’ indeed. Fixed the issue buy using a magnet with a hole where i mounded a ringed wire so no plastic will ever fool me again. ![]()
Finally, absolute success with the stars on the flags. Rather than carving one and wearing out my hands holding rotary tool (surprised how the hands hurt after hours of hand-carving) I can now crank these out in 20 minutes and finish up with hand rotary doing several per day.
I love the LR4 indeed.
February 16, 2025

9 Likes
It’s very satifying to see you having success with your build, surely it’s quite satisfying for you.
Congratultions, and looking forward to seeing more of what you make with your machine.
3 Likes
Congrats on the awesome progress!! ![]()
1 Like
I think the first completion after building the machine, drawing, doing the cam, and then running it is always the best one even if it doesn’t quite work like you planned. Finish it and hang it! I still have the very first cnc piece from 5 years ago hanging in my garage. I just gets better from here. Thanks for sharing your journey!
2 Likes
Usually, tables settle a little bit and then usually become pretty stable. I would do the probe at the high spot and only take off a 0.5mm or so at a time. Perfect is not usually needed, just knocking down the highest peaks. And really only because you are doing 3D carve without a surface of the part itself. People that don’t do carves or always surface the material don’t usually need to surface unless the table is super bad.
I am interested to see how my first full sized table since the LR1 came out.
1 Like
That makes sense. So given its a full 4’x8’, have any feed/speed advice???
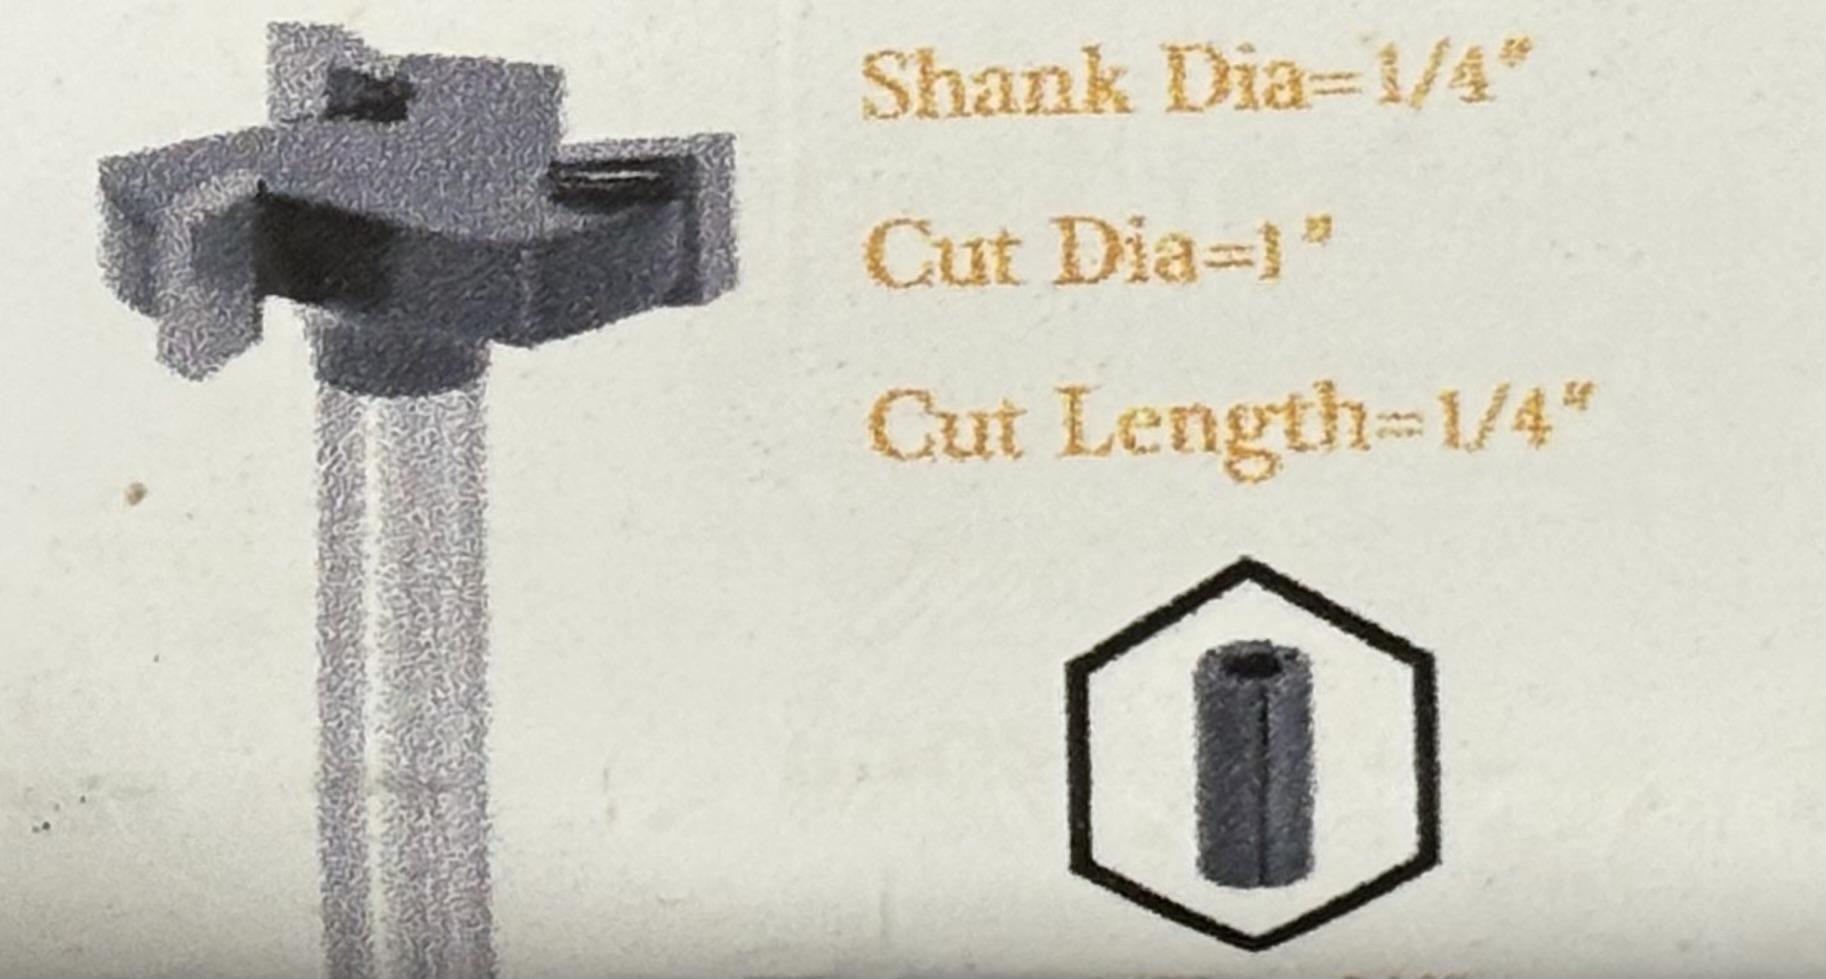
I have a 1” cut diameter surfacing bit that i used once on the Primo. Only used primo for 2D cuts thereafter so yeah it was not necessary.
Probably gonna take a minute or two ![]()
My only advice here is more general: take it easy. On both speed and depth of cut. And really really pay attention to what @vicious1 said about starting “from” the high point. Early on, I literally burned up a Makita router by not knowing to do that. I started “from” the end of my table, and as the resurfacing job progress into the higher spots, the dept of cut unintentionally got way too deep, and I was too green to catch what was happening. The relatively low speed on the router was, I guess, limiting the airflow for cooling, and that combined with the high chip load meant the router was being called upon to work too hard, and it got unbelievably hot, unbeknownst to me. I paid Makita to repair it, and they were kind to me on the repair cost, as the rebuild was close building a new router.
1 Like
That is HUGE and means your Tramming needs to be nearly perfect not to get scalloping. The largest I would go is 1/2", Freud 22-124: 1/2" (dia.) Dovetail Bit with 1/4" shank, 2-5/8" overall length - Amazon.com.
Honestly this is a perfect time to do some test cuts. Grab a piece of scrap, set your depth to 0.25-0.5mm, stepover to 60%, and start at 8mm/s and work your way up. (probably end up 20-40mm/s). You want the cuts to be very low load so nothing flexes and makes the best surface possible, you just don’t want it to take all day.
Test cuts will very quickly build an intuition of what is possible.
2 Likes
Still have not surface the table, but I did put it on a lower table the table top that is because I need my table saw table. I like it better being 24 inches off the ground, makes a big difference
Today I’m carving stars
@vicious1, you’re correct, watching the axis move All 3 at the same time is quite entertaining.
6 Likes
Noticed on the stars. Just a bit of a consistent nudge on the same edge of each star. Who gotta idea?

I’ve had this happen before when I was making flags, and had 2 different issues. 1 I was using what I thought was a good SVG, but it wasn’t. 2nd time I noticed I had 1 star layed over another. I believe I was using Vcarve at the time.
Well, I will look at my dfx file. I drew the stars myself using lightburn so pretty sure they are not drawn that way, however I would not bet my thumb on it. LOL.
I am using Etslcam to create the v-bit tool paths. Might be the star since it is consistently doing that …. Thanks for the tip. Hope its my star and not the machine. ![]()
I just looked at the cross and the stars are the same. I used the full flag layout to make the cross. Bet you are correct.
It stumped me for quite some time, then I noticed a couple of my stars were just ever so slightly darker, so I started selecting each one and deleting until all were gone, then I used the undo button to put the last one back in. Lol
Star drawing are perfect and no wobbly lines. But the carve has on in exact place each time.
Might try again by rotating a few b/4 cutting and see if is drawing. .