@kd2018
Thanks for the great thoughts and advice! The idea of the dedicated magnetic pen mount is cool, although I’d have to do the work to generate it. Conventional wisdom might say that creating the metal strips of the right shape is easier than salvaging more magnets, but for me it was the other way around. I located the metal strips on the secured side and put the magnets on the removable side. Processing by cutting metal with the bandsaw was required for both the magnets and the strips. Of course once I get the CNC plasma working, I could easily cut the strips in that shape. Maybe then I will reprint and flip the magnets onto the secured side and put the metal strips on the removable side. The bandsaw work on shaping sheet metal to match the shape of the magnets was harder and more risky than processing the magnets. If I could locate another old PC hard drive I could get another set of those strong magnets, for whatever.
I think I will be ok on the pen holder re. stick-out. Will know for sure once I get it running.
Following with interest, I’m planning on a floating mount for my LR3 plasma but it’ll need to fit a hand held torch rather than straight machine torch like you have.
I posted the “Part 1” video about 3 weeks ago. Sorry for delay, between then and now. Here as promised is the “Part 2” video on getting the plasma torch mount with floating Z setup:
I need to rearrange my workshop to better use the space and to make room for the plasma cutting table! I had been delaying that but I’m headed into it. I actually plan to make a portable assembly table
out of the 4x8 previous “base” “shelf” that was under the LowRider table (previous version). I’ve been trying to decide whether to leave it whole and add legs and casters, or cut it down the middle and stack it on itself, with legs and casters, to make a long, half-wide double decker.
I posted some of this elsewhere (in another V1E forum thread) so please forgive the double post. I just wanted to add this bit of info to my plasma build thread here!
Whenever I input the project/cut details into the G-Wizard calculator software, (1) I’m always pleasantly surprised with how fast it tells me I can cut, and (2) I’m always pleasantly surprised with how fast I can actually cut by following what it suggested. I don’t think my LR3 is significantly different from stock. I am using 1" stainless steel tubes, and 1/4" thick plywood struts. But the G-Wizard calculator does not know that!
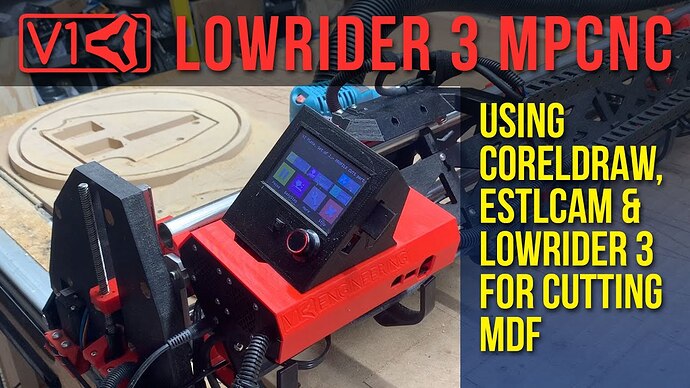
On my batch of cuts I just finished (using LR3 to cut more YZ plates for the other LR3 I’m building for plasma cutting), I did profile cuts in 19mm MDF, with a 1/4" bit (2-flute, up-cut, I think), DOC (depth of cut) at 4.39mm, ramp (angle of attack) at 30 degrees, cutting speed of 34.5mm/sec, straight down cut (pierce/drill) speed of 23.3mm/sec, and the router supposed to be running 17,000 RPM. I shot video of it, and hope to post it. I’m just thrilled with this thing!
PS: I am using ESTLCam for my CAM output of gcode files. Really like it too, as well as loving the LowRider 3.
Once again, many thanks to @vicious1 Ryan (and to all beta test crew) for the amazing LowRider.
Maybe I missed the explanation, but why did you cut the outside circle?
Also, on the finishing passes, you should be able to do them at full depth. Since you’ve already removed most of the material, that skim pass should have zero load, even at 3/4". That should give you slightly better finish and save some time.
I used my 1/8" bit to just go in 2mm at the top and bottom holes for the linear rails. Then I used a hand drill to finish them and do the other holes. I’m not sure if that was risky. Your approach seems more safe.
Your LR is really moving though. That is such great progress and the pieces look awesome.
Outside circles had nothing to do with YZ plates, and were only to shape the remaining scrap into hoops, which can have unrelated uses in crafts or other pursuits. I mentioned it briefly twice, once that did not make the final cut of the video because it was getting long, and again when explaining deletion of one of the two inner circles.
It’s a bit humorous to me that my first LR3’s YZ plates unintentionally got connected to circles that were cut in a previous, unrelated job, and now round scrap from that same previous, unrelated job, have resulted in my second LR3’s YZ plates also unintentionally getting connected to circles — just leftover scraps.
I’m happy with my work around. I’ve now done it twice. First time I think I used electrical tape to beef up the drill bit shank, and this time I used painters tape. Both seemed fine.
It is based on the tool parameters. There are settings for each tool, only for the finishing pass. They may be hidden and need to be shown. The max finishing depth of cut for the tool should be there. Set it to however long the cutting part of the bit is and it will do the finishing in one pass.
@jeffeb3 thanks again for the helpful catch on the finishing pass depth. I did indeed find where that I could click to edit the tool, and supply the tool’s blade depth in the finishing pass area. I’m thinking that ESTLcam should automatically apply the tool’s cutting depth to this variable whenever the tool first gets created. Nevertheless knowing this is helpful. I was able to do additional cuts with the finishing pass actually working properly. Before, I didn’t get a smooth finish but rather it had “ridges” where the blade was not going down all the way. Now my finishing pass works as it should. And it’s faster on the job time to boot.
Today I am swapping out XZ plates on both my finished “router” LR3 and my (still under construction) “plasma” LR3. Back when I built the “router” LR3, V1’s steel XZ plates were sold out, so I went with aluminum. My plan was keep aluminum there and use 3D printed plastic (PLA) XZ plates on the new “plasma” LR3. So I printed the XZ plates for that, but I was not totally pleased with them (it may be due to some irregularity in my printer setup). So when I went back to the V1 store, the steel XZ plates were back in stock. I ordered steel. My plan now is to switch the steel ones onto the “router” LR3, and put the aluminum ones onto the “plasma” LR3. I will start by painting the steel plates. I’ll have to wait for them to dry before installing them on the “router” LR3. More soon.


")
