LowRider 3 - Plasma Build "On a Budget" - Clarksburg, WV

So I went back to pickup my order. There are three signs on the desk “we do not sell scraps” :rofl: That explains why he had some attitude.

But wait, there’s more.

I pay for my order, drive around back to pick it up. The guy loading my order says “Hey one piece is a bit short, we can sell it to you as scrap or I will cut the piece you need”. :upside_down_face: The exact piece I said I don’t need a full 5’ of it. Head back in to get a refund for taking a scrap, signed the receipt on the “we don’t sell scrap sign”. Overall better experience today, will probably go back.

4 Likes

Sorry for derailing your thread, Doug.

Back to the regularly scheduled program.

1 Like

That’s hilarious and entertaining! And totally pertinent to a plasma cutting thread.

(Option 1 of 2) Printed DIN rail mount for TB6600 stepper motor driver.

Download: Printables

  • Designed for M4 screws.
  • Print as oriented.
  • Prints with no supports.

My intended use for these is for my LowRider v3 CNC plasma table setup.

Change log:

  • November 16, 2022, 12:29 am (EST): initial posting of v1.0.5.

My PayPal tip jar: https://paypal.me/design8studio

Various LowRider 3 CNC remixes:

View all my models and remixes on Printables:

1 Like

I posted this on the LinuxCNC forum, but adding here too.

MESA 7i96s Dimensions in both inches and millimeters

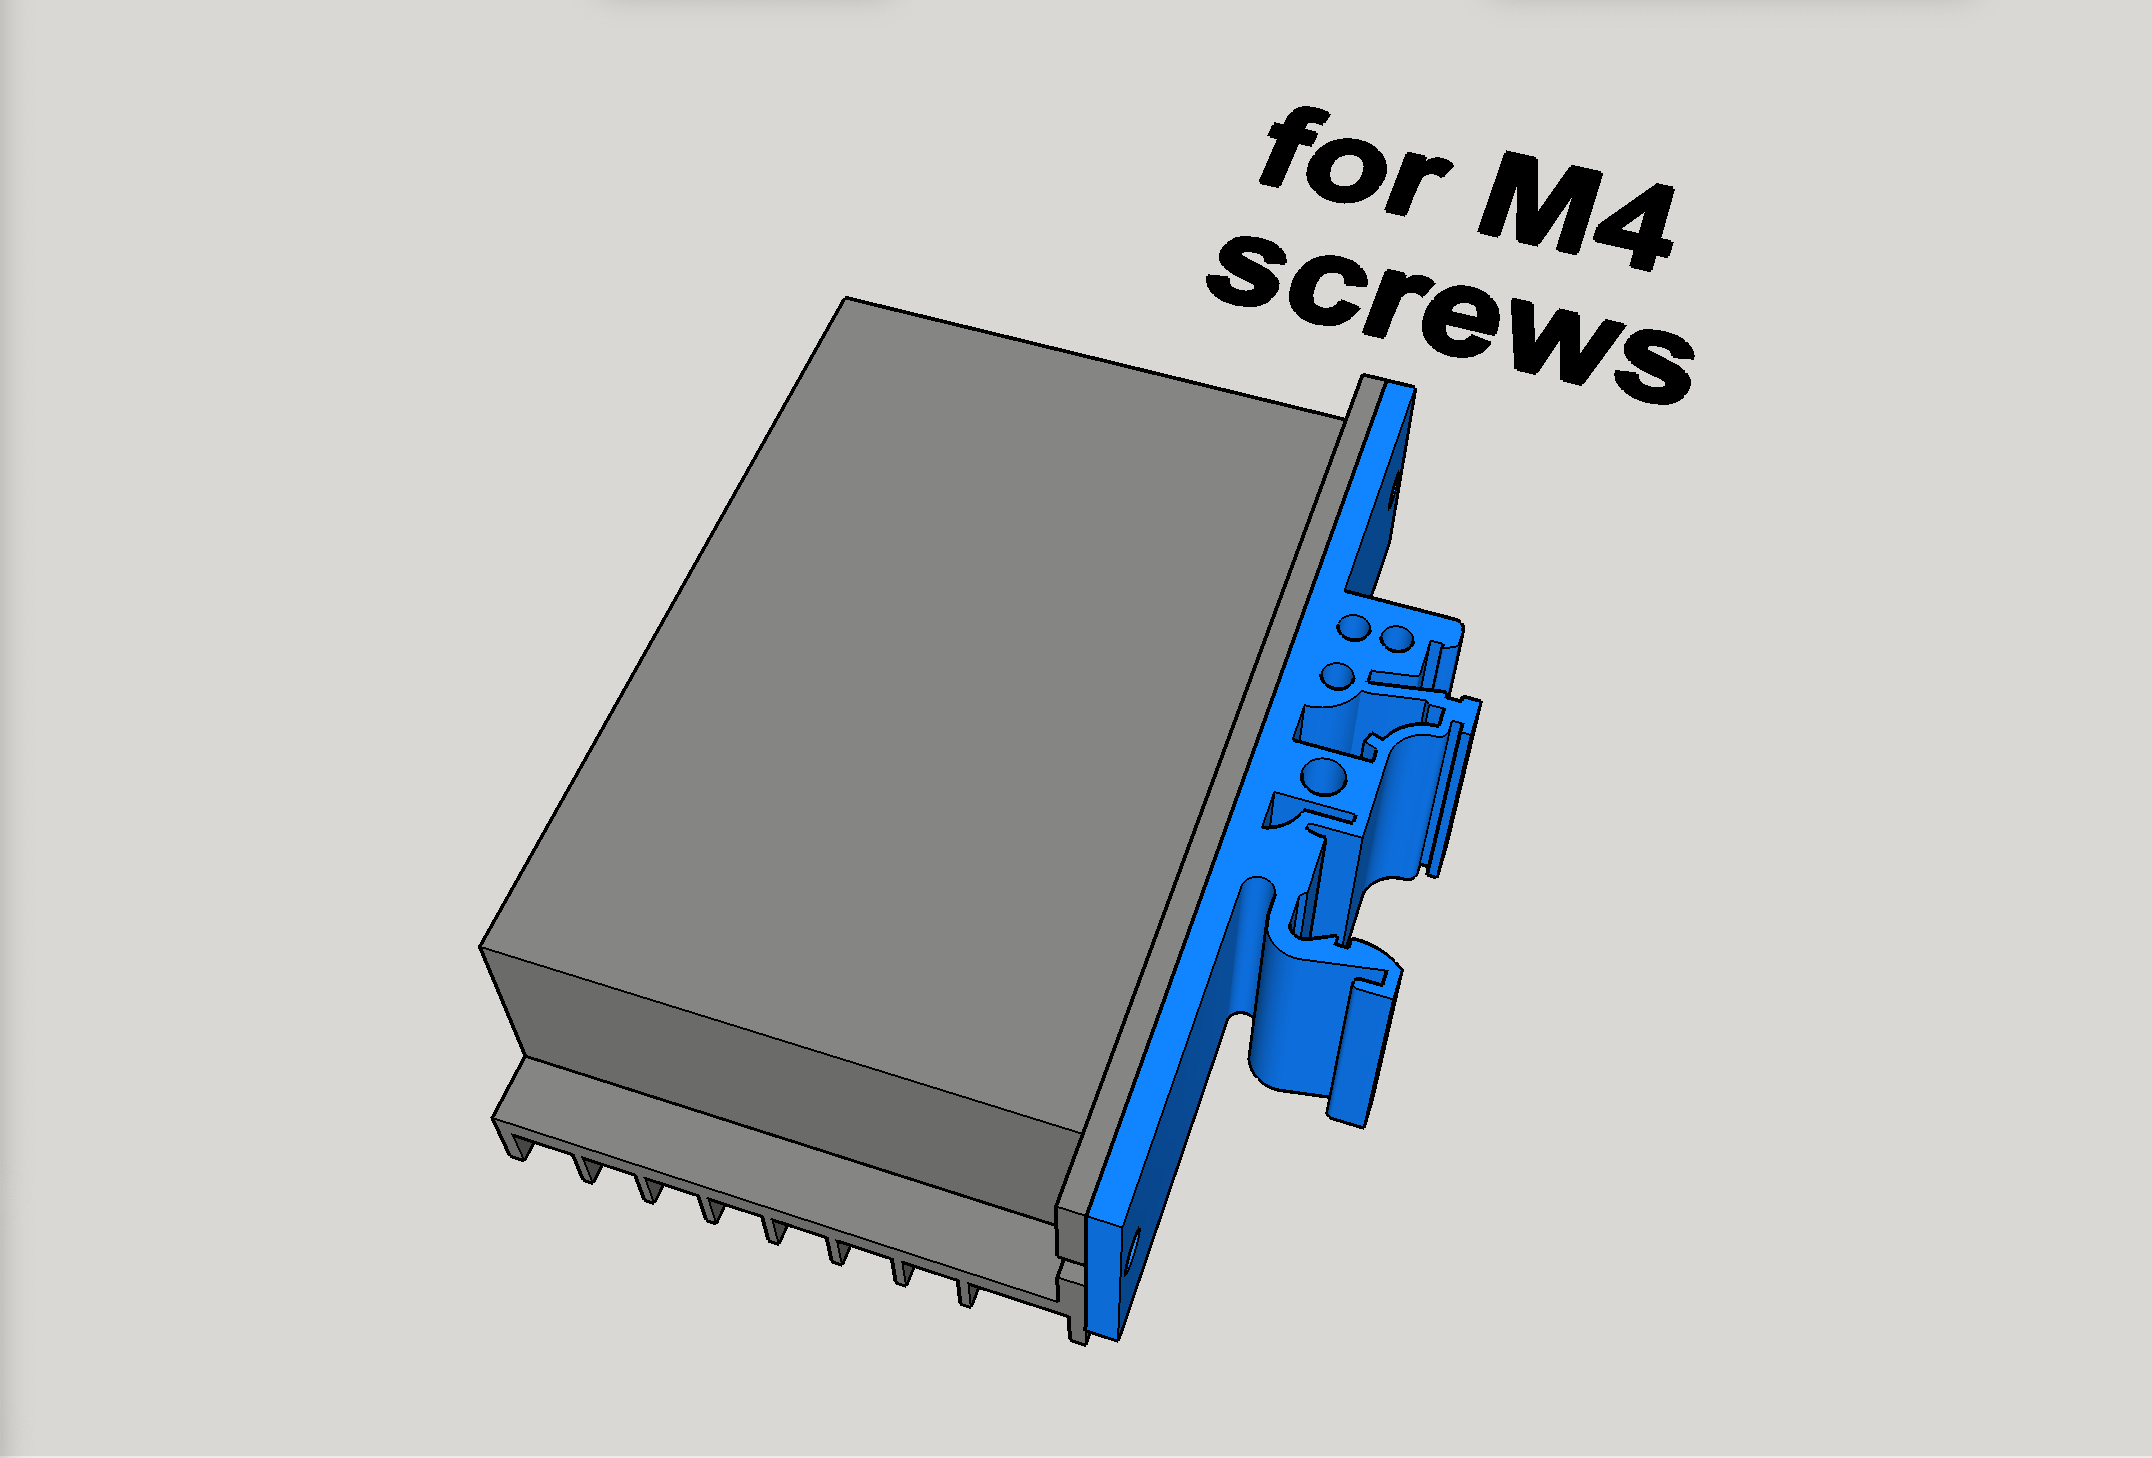
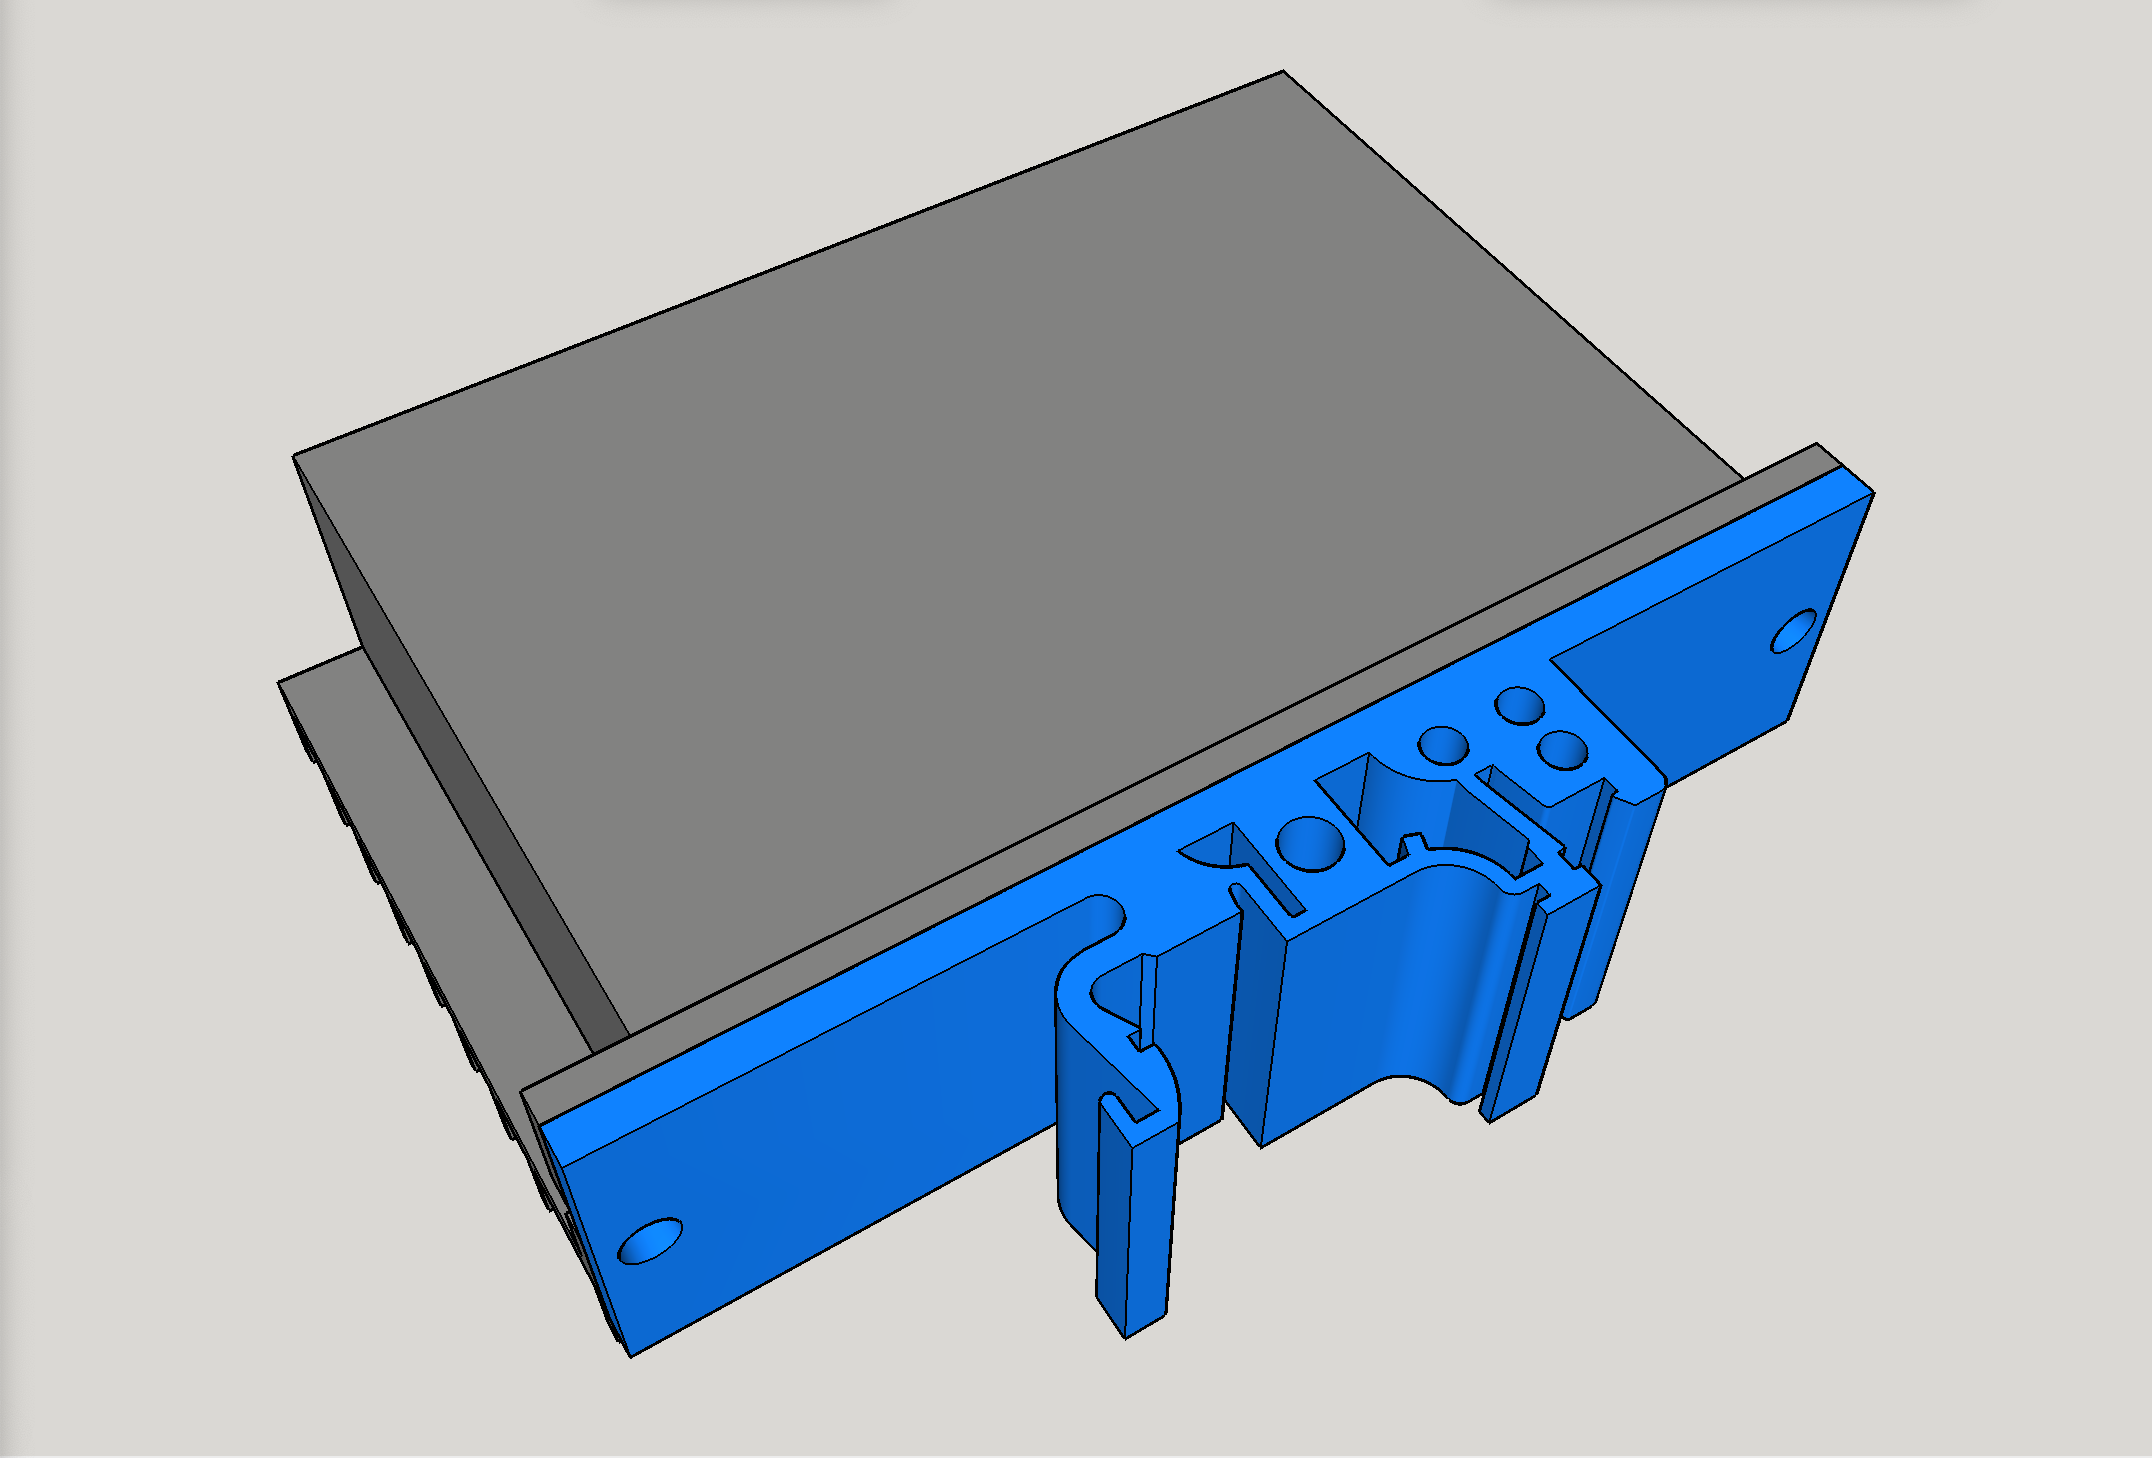
(Option 2 of 2) DIN Rail Clip-Mounts for TB6600 Microstep Driver (v2.0.0 & 2.0.1)

Download: Printables

This is the second of two options for DIN rail mounts for a TB6600 stepper motor driver. The other (1.0.5) is available here .

  • Designed for M4 screws.
  • Print as oriented.
  • Prints with no supports.

My intended use for these is for my LowRider v3 CNC plasma table setup. It’s basically a LowRider v3 that’s tweaked and modified to hold a plasma torch instead of a router. More on that here . You can also read about my router-based LowRider, which was originally built as a v2 , and later upgraded to v3 .

Note:

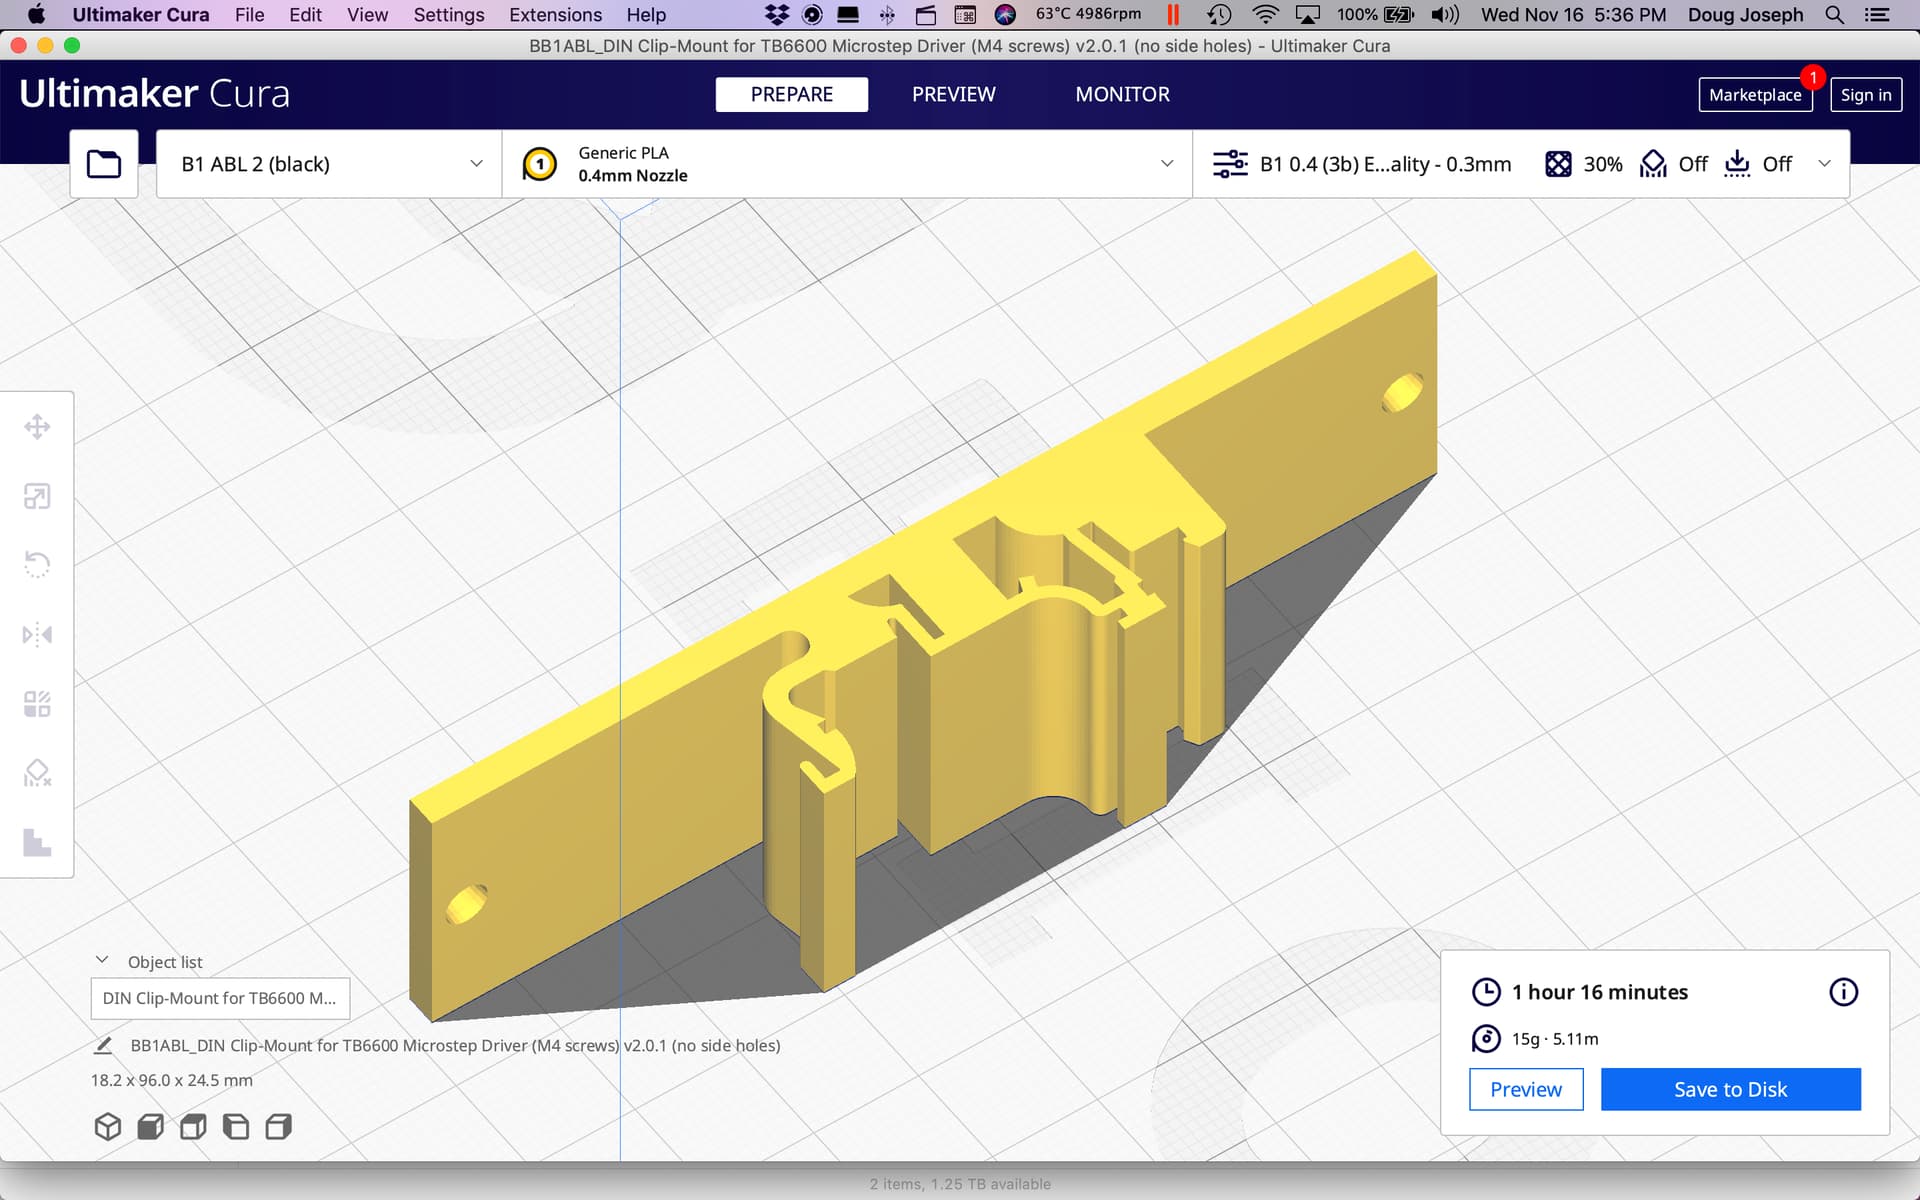
This is a remix of a design by Claus Dieners (February 18, 2022) that I found on GrabCad . His design had side holes, the purpose of which I do not know. Removing them from my remix made it print quicker (15 minutes less print time) and used less plastic (less perimeter walling). Since I don’t know the purpose of the side holes I am making two versions available, one with holes (2.0.0) and one without (2.0.1). If you don’t need the side holes, save time and print without them.

Change log:
  • November 17, 2022, 2:20 am (EST): initial posting of v2.0.0 and 2.0.1.

My PayPal tip jar: https://paypal.me/design8studio

Various LowRider 3 CNC remixes:

View all my models and remixes on Printables:

3D-printed DIN Rail Mount for MESA 7i96S I/O card for Plasma CNC

DOWNLOAD: Printables

This is a DIN Rail Mount for the MESA Electronics 7i96S I/O card for my Plasma CNC based on the LowRider v3 motion system.

  • Designed for six M3 screws.
  • Print as oriented.
  • Prints with no supports.
Note:

This is a remix of a design by Claus Dieners (February 18, 2022) that I found on GrabCad. His design had side holes, the purpose of which I do not know. Removing them from my remix made it print quicker (15 minutes less print time) and used less plastic (less perimeter walling). If you need a version with the side holes, let me know in the comments or by a direct message.

Change log:
  • November 18, 2022, 7:50 pm (EST): initial posting of v1.0.1.

My PayPal tip jar: https://paypal.me/design8studio

Various LowRider 3 CNC remixes:

View all my models and remixes on Printables:

1 Like

Your having so much fun with this din mount. It makes me want to try some on my tool wall for some prototype stuff.

1 Like

Being able to quickly remix and print needed custom items is such a cool thing. We live in amazing times.

1 Like

Two more short video updates, both regarding the ongoing control box build, based on “recycled” use of an old PC desktop tower, repurposed for the plasma CNC electronics.

Posting here for myself (and anyone else interested) some details, port schematics, & pics about the plasma cutter & machine torch I purchased for this project.

Plasma cutter

Brand Hynade
Model CUT60-DN
Type of plasma cutter Non-High Frequency Pilot Arc
Purchase link https://amzn.to/3Xw3agV
Arc Voltage Output (see pic for more) Pin1: [+], Pin2: [-], Ratio 1:1
Signal Control Port (see pic for more) 1/2: [Start Control Signal Input], 3/4: [Arc Starting Signal Output]
Input voltage: AC 110/220V +/-15%
Output current: 55 Amps Rated input capacity: 8.6 KVA
Output Current range: 15A-55A
Efficiency: 85%
Duty cycle: 60% @ 55Amps 75℉
Insulation class: B
Max cutting thickness: 25mm@55A 220V 70PSI (0.6Mpa)
Quality Cutting thickness: 20mm@55A 220V 70PSI
Cutting speed: 200mm/min at 20mm thick metal 70PSI (Air Pressure)
HF Arc starting: Non-HF Pilot Arc, Non-Touch metal
IGBT (insulated-gate bipolar transistor) Yes
Automatic voltage adaptation Yes
2T/4T Yes
CNC ready (comm ports on back) Yes
Low noise Yes
Fan exhaust Yes
Machine (straight) torch compatibility Yes, PTM80

What comes with the machine:

  • 120v to 240v plug adapter
  • IPT-65 handheld torch with cable
  • Grounding clamp with cable
  • Air hose
  • Hose clamps
  • 2-pin connector (aviation style)
  • 4-pin connector (aviation style)
  • Nozzle replacement x2
  • Electrode replacement x2

Q&A:

Q: Besides the 60% duty cycle at 55amps, what reduced level of amps would allow a 100% duty cycle for CNC cutting work?

A: When adjust to around 45A ,can allow a 100% duty cycle for CNC cutting work (source: seller)

Machine Torch info:

Brand Hynade
Model PTM80 CNC Plasma Cutting Torch
Purchase link https://amzn.to/3XCORHE

3 Likes

So, I found a Fusion 360 Post Processor for “LinuxCNC (EMC2)” but it was for use with milling, not for plasma cutting. I later found two that are for plasma (see post below).

Two (2) PlasmaC (LinuxCNC) Post Processors for Fusion 360

1 Like

Another micro update. More progress on my control box. Now have the 13 A fast blow fuse, EFI filter, 5 V power supply, 24 V power supply, two cooling fans, both of the Mesa parts, which consists of a control board and a THC board, and all of my stepper motor drivers in place, but I still need to run the wires within the board. Beyond that my next task on this control box will be generating a panel for the front that will have aviation style connectors for the various wires that need to communicate to the plasma cutting table. I have not been able to sink a lot of time into working on this which is why it has been delayed and progress is slow.

PS: Photos below show a DIN rail mounted on the larger power supply, but in the end I did not use that because it added too much height on the other power supply.

1 Like

1 Like

That’s are really nice print. I’d fill the writing with something white (paint pen, nail polish, white-out, etc.) for ease of reading.

If you’re relying on the metal outer shells of those connectors for bonding or grounding, you may want to add a strip of aluminum tape (commonly used for hvac ducting) on the back of your 3D printed plate so that it can be bonded to the rest of your system. Doing this helped with maintaining shielding on my cables into my plastic enclosure.

1 Like

@ttraband Thanks for the tips!

My plan on the white lettering is to use the silicone method described here:

Re. aluminum tape

I have some and had already been using it to plug holes in the old PC tower case I’m using, so the cooling fans would be more effective. Seems easy enough to do. My metal case is itself grounded. Power supplies and EFI filter are grounded as well.

1 Like

Panel for aviation-style quick connectors (for recycling old PC tower as CNC plasma control box) (v1.0.0)

https://www.printables.com/model/345371-panel-for-aviation-style-quick-connectors-for-recy

Description

I gutted an old desktop PC tower for the control box for the CNC plasma I’m building, which is based off of the V1 Engineering LowRider v3 for its motion control system. I custom designed printable replacements for the plastic covers over the bays where the CD-ROMs and disk drives used to go, in order to position aviation-style quick connectors for the various wires for stepper motors, endstops, etc.

Note: the holes for the aviation-style quick connectors are not completely round, but rather are what are commonly called “double-d” holes, with sides lopped off to match the connectors. It is intended to keep the connectors from spinning once installed.

My white “inlays” for lettering (labels, etc) and graphics were done using essentially the method shown in the video below, except I used caulk that was a silcone-acrylic mix, and it was “quick dry” (took only 20 minutes to dry, instead of 24 hours!) so my project work was completed much sooner than shown in the video.

If you should ever happen to want to reuse an old PC tower and you want to redo/redesign the plastic covers for its bays, you could do a lot worse than remixing or otherwise reusing my work here. :slight_smile:

I’m also including a “blank” version of the smaller plastic cover (for bays that used to hold what we called 3.5" floppy drives).

Print details:

  • Prints without supports
  • Filament: PLA
  • Nozzle diameter: can be either 0.4 or 0.6 mm. I used 0.6.
  • Layer Height: 0.3 mm
  • Wall thickness: 0.6 mm
  • Number of perimeter walls: 2
  • Number of top/bottom layers: 3
  • Infill: 20%
  • Print as oriented*

My print notes:

  • I printed as oriented with only one exception: I also rotated my prints by 45% so the layer lines would be straight across and straight up and down instead of on 45% angles.
  • This was printed on a heavily modified Ender 3v2 (modified with Ender Extender 400 XL, board and touch screen replaced with BTT items, and the extruder and hotend replaced with MicroSwiss direct drive extruder and all-metal hotend).

White inlay lettering details:

  • For prepping the prints before the caulk inlay, to protect the panel from caulk sticking everywhere, I used whatever dish detergent we had in our kitchen. It was blue. :slight_smile:
  • I used this caulk (see link) but bought it at Walmart instead of Amazon as the price that way was lower: https://amzn.to/3G8wuDu (DAP brand “Alex Fast Dry” 5.5 oz white caulk)
  • This caulk dries much quicker than shown in the video, and I was able to get done super quickly. Highly recommend this approach. Worked great!
Change log:
  • December 21, 2022, 5:10 am (EST): initial posting of v1.0.0

My PayPal tip jar: https://paypal.me/design8studio

Various LowRider 3 CNC remixes:

View all my models and remixes on Printables:

7 Likes

Here is my proposed wiring schematic, which is a revised version of the wonderful plan shared by @kd2018 for his plasma control panel:

UPDATE 2022-12-26: Corrected the graphic to reflect that I am using THCAD-2 instead of THCAD-10.

UPDATE 2022-12-26 - B: Corrected the graphic again to reflect tweaks based on input from LinuxCNC forum answers, re. THCAD-2 grounding (no) & placement (on plasma machine), and re. 7i96S (switching “Torch On” from output 0 (-/+) to output 4 (-/+).

UPDATE 2023-01-23 - A: Corrected the graphic again to reflect that my control board is a 7i96S instead of a 7i96. This also included reflecting on the wiring diagram that the 5v power supply wires go into the back right corner — as the former location used on a non-S version is now (on the S version) for control of spindles.

Thanks again to @kd2018 & @vicious1 for their welcomed eyes on this.

3 Likes

@vicious1

Hey, my wiring schematic is 5869 x 1970 pixels, but when I upload it, it gets downsampled to 1920 x 644.

I’m not asking for modification to the site to prevent this, just asking if there is a built in way to prevent it, or should I seek to host the image in full resolution on one of my sites and just link to it here?

UPDATE: Please disregard. I just uploaded it to my own site, and then linked to it in my post above.

UPDATE 2: After I had uploaded it to my own site, and then linked to it in my post above, the system here at V1E forum site automatically cached a copy at full resolution and edited the post to display it! So I found the work-around for this issue!