Losing my marbles... Well, not really

So, I got one of those laser cut kits for Christmas. Basically a little wooden marble run with a hand-cranked lifter and a couple of marble paths down.

It was fun to build, and of course, I was thinking about maybe replicating it to make more with my laser. But maybe different.

That got me looking around Thingiverse, where I found Tulio’s 3D printed Marble Machine #3 which looked like a nice candidate for the MP3DP Repeat. So I made it.


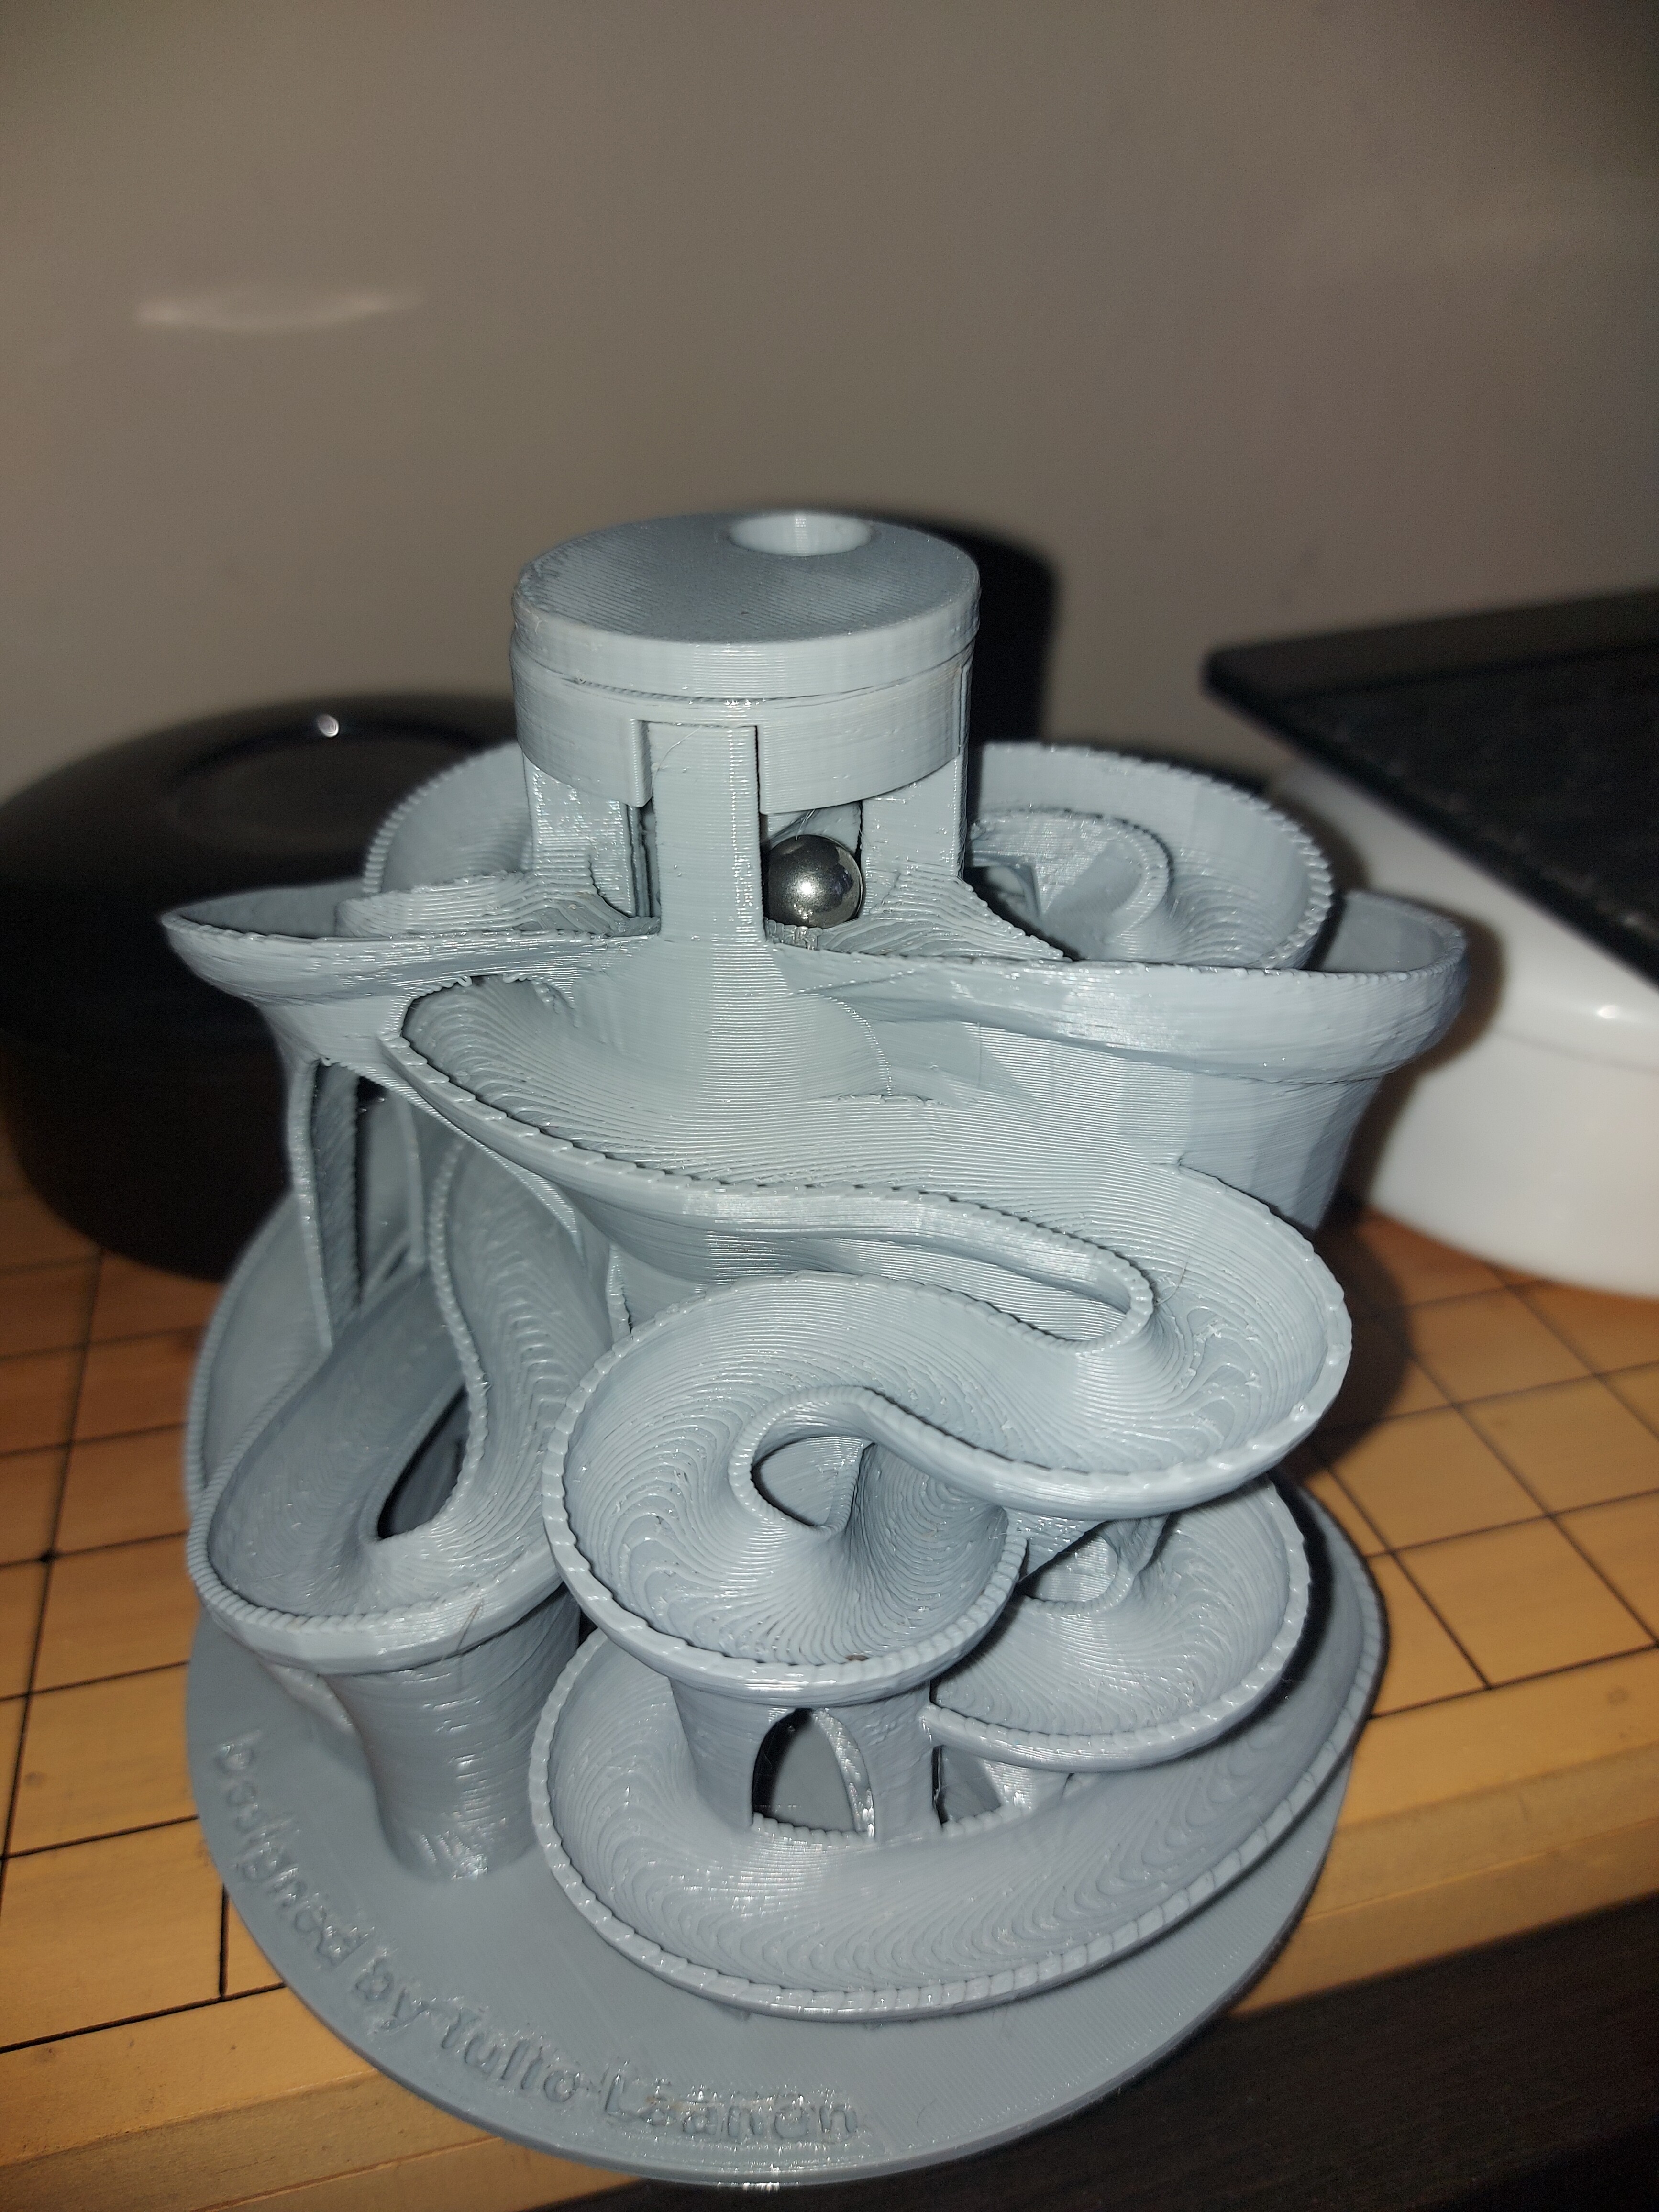
Bummer. It takes a different sized marble than the kit that I got. 3/8" (or 10mm) is what it calls for. On Amazon, I could get either a bag of 5(bearings) for $14, or 500 (slingshot ammo) for $17. I figured that the slingshot ammo was going to be more than accurate enough, and I wanted 8-10 to put in the thing anyway. Now I’ve got about 490 left in the bag…

Watched the little video on the Thingiverse file while it was printing, which led me down the YouTube rabbit hole, and eventually led to Out Of Marbles.

“Hey, modular marble runs! THERE’s an idea…”

Not sure if I want to buy the .STL files for their stuff, and of course it takes a different sized marble again, but the idea was pretty cool.

So… A modular marble machine. What ense would I loike to see in that?

How about stackable? They have the bucket lift thing on Out of Marbles that can stack 3 or 5. They have the “two wheeler” which can manage 3 side by side. That’s kind of cool, too.

Well, side by side is a bit much, but if I can print some parts, and mill others (Milled/printed, now where did I get THAT idea from? :rofl: :stuck_out_tongue:) then I could maybe do something interesting.

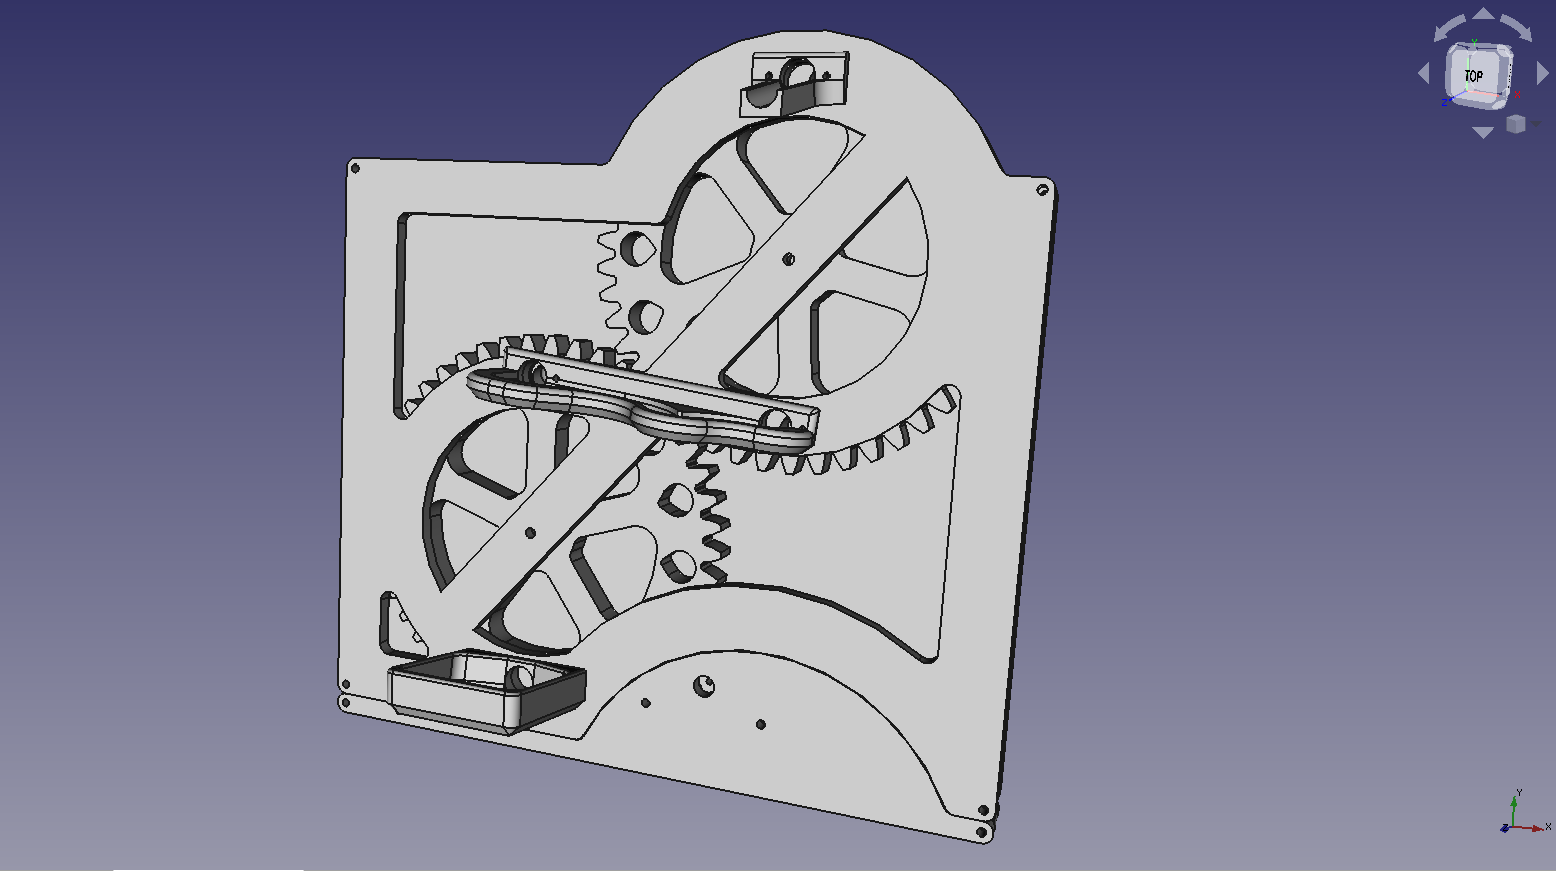
Well, I wanted to learn some more CAD stuff anyway, why not start with gears? Many of these marble machines use a gear mechanism to lift the marbles to the top of the stage, then drop them out onto a ramp. The auger for the Marble Machine is a bit of an exception, but I could probably do something using that concept, too. It would require a power take-off from the geared lift… But I’m getting ahead of myself.

I’ve also got plenty of Ikea in my house. Enough for me to have designed a PC case to go into the shelving units, so I also happen to have the dimensions for that memorized. I kind of thought that I could make a modular system that fits in there, too. So that determined the max width/height for a single module, but I still wanted to be able to stack more than one. If I borrow from the general idea that Out Of Marbles uses, so that the runs can ingterchange with the entrances and exits in the same place, then I can stack them in between however I want. Motor power (Or ceiling height) becomes the limit for how far I can stack them.

Okay, CAD time. I’m not entirely happy with the one transfer piece, so I’m going to rethink it a bit. My CAD skills are still a bit on the weak side, I know. I am getting a feel for putting different pieces together though.

So the results here are something where I can mill the frams out of 1/4" plywood, possibly the gears themselves too, or print them. There are printed inserts into the gears to hold the marbles and tip them out at the top, and I’'ve got a start on a piece to transfer them from one wheel to the other. Stacking the machines one atop the another will result in using a mirror image of that piece to move the marbles from one riser to the other, so you can just keep lifting marbles to the top. Then I need s piece to take a marble from the top exit to the start of a module, and one to take the marbles from the bottom of a module to the first feed. That will probably also incorporate some sort of motor mount to power the machine. I might also design a hand crank to come to the front of the machine. As it stands, this is meant to be at the very back of the framework. There should be a base with and without the power mechanism. Without the mechanism, it will direct the marble from the output at the top to the input at the bottom. With, will assume that the output goes into the lifter feed.

I was going to do this in Fusion360, but looks like I’m still working in FreeCAD.

7 Likes

Rabbit Hole Alert

If you haven’t seen it before, check out Quercetti Skyrun for the “toy” that sits at the intersection of marble run, train set, roller coaster, and Erector set. This search on Thingiverse leads to clips you could snap 3-d filament into to make your own, interface with standard block building sets, hang on walls, etc.

4 Likes

I’ve bought some of those sets for the kids, when they were small. Not quite the “wow” factor I’m looking for, now. I like how free-form they are though.

Once I get the base set up, with a run to take the marbles to the lifter and one to get them from the lifter to a start position, I’m looking at one module like the pachinko style, mostly flat with obstacles in it. That can have many and varied plates put in it for lots of variation. Maybe something like a mini pinball game where you keep getting more and more balls…

Another will be the sort of track runs. Honestly I’m not sure how to do the CAD for that. I could make flat pieces or 3D printed pieces that snap together maybe. Something like that marble machine from Thingiverse is beyond my CAD capabilities now for certain. One made in pieces I could maybe do in wood or plastic I think. Laser cut 3mm plywood would look nice.

Finally the funnel shaped pieces are kind of fun. Almost certainly have to be 3D printed, but could have some fun with milled wood. Maybe something laminated.

I think if I could minimize the 3D printed pieces, and make one from carved wood, I might be able to sell it for decent money, but it would be a high investment to set out. I can imagine something like that funnel run in a nice walnut or cherry wood with a decent finish would look stunning. Might be easier with a lathe though.

2 Likes

Seriously, I DO NOT want to follow this thread,
I DO NOT want to follow this thread,
I can’t look away! :shushing_face:

For a long time I’ve been contemplating an out of marbles style modular system, that mostly sits flat on a wall - say no more than 150mm (6") deep - then it could consume a whole wall of my shed which would only get used for useless things like tools and things anyway.

Go you good thing!!

3 Likes

I keep seeing this same marble tower around. But I can’t find it. The closest I can find is this:

There is also the Lego “great ball contraption” or GBC. If you search YT for Lego GBC, you will find a ton of videos of a bunch of them connected. I would love to have a modular design goal like that, for marbles. It would be pretty fun to make a bunch and stack them together.

1 Like

How about an open source envelope with an entry point and an exit point perhaps some connection system and anything goes for anyone to design a module? I’m a bit pre-occupied this week, but the more I think about it - design the connection system first and we’ll go from there! :smiley:

I’m definitely in.

Maybe.

3 Likes

The connection system follows the frame, because the frame determines the envelope size.

So far, my thought process has been around top to bottom, with mot much consideration to lateral expansion, but I think that lateral expansion is still possible, it’s just a connection method that needs to happen. Lots of path switching possibilities exist to have multiple tracks down for the marbles…

But first, I need the lifter framework.

3 Likes

Next thing you know, you’ll be building a Marble Machine X in your garage.

4 Likes

Yeah. I think something that drops the ball in a specific XY area, and takes up a specific footprint would be enough. We could try to design a mechanism for lifting from the bottom to the top. Then you could put whatever you wanted in between. Long roller coaster tracks, lots of gears, catapults, plinko, whatever.

If you wanted the things to sit on a table like the GBCs, then you should just accept the rules for GBCs. They are well tested at Lego cons (brick world?).

I should point out that there are a lot of toy marble runs that you can build up. We have a set of them. They aren’t as flexible as you would think. The kids usually end up building what is on the box. Maybe some custom parts for these would be interesting too. The balls have to be manually picked up and dropped in the top (which is kind of a feature).

2 Likes

Well, that’s what the machine that I started to draw up there is for.

The opening in the bottom allows a marble to enter into one of the geared wheels, where it is allowed to fall out at the top. Then the (unfinished) ramp takes it to the bottom of the second wheel, where it’s lifted and allowed to fall out again.

The gear spacing is such that if the machines are stacked, this process can repeat as many times as you have the power for, or as many of the machines as you build.

I’ve got 2 bases on the drawing board. One will house a motor and another gear to drive the lifter, and the other will just take a marble from one module and take it to the top of the one below it. That’s still to be determined, since I don’t know where the entrance and exit is going to be, just yet. I could copy the Out Of Marbles designs, roughly, but I want to see what makes sense for the lifters.

I’m working on the CAM to make parts now.

That was my kids’ experience with those as well. It LOOKS like there should be many ways to put them together, but you end up being kind of limited. You can’t put this under that, or you end up with whole structures that never get a marble in them, because the top got covered. Not enough branching options.from the top.

2 Likes

Lol, I totally understand!

1 Like

I don’t want to overthink this (yes I do) but since you blokes have got the smarts to work this out - what if you had a gantry on a core xy grid and a grabber to move the marbles?

A toy pick and place machine? Maybe it could have random destinations, or maybe a series of buttons so you could choose… honestly if I had the tech smarts I’d start work on it today… :wink:

1 Like

Mostly… Expense.

As is, I’m struggling to just trust a $5 DC motor and a couple of AA batteries to mve the lifter mechanism and not install an Arduino (With some sort of sensors for marbles) an A4988 and a stepper motor to drive the mechanism. Even that is serious overkill.

To me, part of the charm of this kind of thing is that even though it’s got these things going all over the place, the driving mechanism is predictable. I know that the track dividers will always send one marble down track A, then one down track B, and repeat. I also like the relative simplicity of the mechanisms, with less to go wrong with them. That’s important if I’m not going to be there to watch it and fix it if things go awry.

I’m going back to the drawing board (A little) too. I’ve made the tolerances for the marble wheels a little tight, and I’m concerned that they might be a little too dependent on things fitting tighter than I will really want to make them in reality. I think that I should allow a bit more for some real world variance in distances between the openings and the wheel, I realized that the ~1mm or so that I’ve permitted probably isn’t enough, and I’ll end up with inconsistencies in how things are. Since my FreeCAD skills aren’t at the “parametric” stage yet, that means going back to the drawing board for the wheels, but probably not for the frames. I also want to make the gears a little more coarse, so that I can mill them with a 1/8" bit and still have them come out fairly accurate. I think that the CAD above, they’d pretty much have to be 3D printed, and while that’s not BAD, it’s not what I want either. Those wheels have a 180mm diameter pitch circle, which will fit on most 3D print beds, so it’s an option at least.

Now, for the “overthinking/overcomplicated” type… There’s LOTS that I wouldn’t mind trying.

Have a coreXZ shuttle bring the balls to the top and use a solenoid to kick the balls out into one of various chutes. use a contact sensor (Basically 2 strips of foil with wires) to sense if a marble (Steels, so it conducts) is in the shuttle, so that it can move to the next target only when there’s a marble in it. The trouble that I see with the CoreXY crane claw is the variability in what kinds of tracks you might have underneath it, which would require more elaborate programming and reprogramming for different tracks, but having a simple funnel/shuttle at the bottom is pretty easy, then several chutes to drop the marble in at the top.

Oh, and for sensors… Lights/sounds when marbles get to certain points. Might still be able to do that anyway, with an LED and DC power, just flash lights when the marble shorts a couple of contacts.

Auto levelling. These things get weird if they’re not level. Use 3 servos to adjust tilt (within tolerances of course.) If it’s just too far off level, don’t start the motor.

Smarter switches. The track switches that I’ve seen for these marble machines are all A/B switches. A marble goes down track A ad moves the switch so that the next one goes down track B. The one going down track B resets the switch, and you get 2 routes. These can be multiplexed to give as many routes as you like, of course, but an A B C D E type switch would also be cool, and one that can give preference to longer paths, or make shorter paths less likely would keep more marbles “in play” all the time. I noticed this with the Out Of Marbles “Two Wheeler” where the sequence for marbles goes left, right, left, middle. The left track gets 2X the number of marbles that the other tracks get. It also gets the tipper mechanism, where it accumulates 4 marbles before it lets go, so it sort of works out, but still seems unbalanced.

Anyway, yeah, I’ve thought about making the machine smarter, but really, there’s not much point past a certain threshhold, and ultimately, I’d like to just have a setup to make more of them. As it stands, the combination of battery holder, switch and motor looks to be about $4 CAD. For that cost, it’s almost not worth adding the possibility of a hand crank to the machine. In fact the hand crank might end up costing more than battery powered. Aside from that, one of the cheap stepper motors looks like about $5-$7 each, Looks like an ESP32 is on the cheaper end for Arduino/control. Add a 5V AC adapter, and the cost is probably still reasonable… but still way more than the AA battery version.

3 Likes

It’s big words like that that make me love hanging around you blokes. I’ve been serious about this thing for many many years, maybe this is what I need to put aside a few other projects! :smiley:

2 Likes

The ESP chips are remarkably fast too. When they first came out, there were many designs that used the esp as a wifi modem, and the main brain was a much slower Arduino. I read several articles where people tore down devices and reversed the software, making the Arduino the gpio extender for the much faster esp8266 and got fantastic results. They really have changed the game.

I think the cheapest arduinos are the pro nano clones. They would do fine for a job like this. An esp8266 doesn’t have many IO. An ESP32 has a few more. If I needed as many IO as a UNO, I would probably hunt for a leonardo clone. Obv. The mega has many many IO.

It is hard not to do something with the wireless features though. If nothing else, it is so nice to flash new firmware over wifi.

I really like them. I use a lot of them with esphome, or tasmota firmware.

In fact, (another tangent), I bought some smart light bulbs that I thought were going to be esps inside, but weren’t. I still wanted to know the firmware was secure, so I replaced the chips inside with some esp32-c3 (which is a new variant and harder to use). It was fiddly work, but it worked.


It is hard to see, but the right most board in the first pic had to be replaced by the esp chip in the third photo. These light bulbs are very tight when everything is assembled. The board that stayed inside the bulb is a power supply, which provides 15VDC (it is labeled 12V, but I think it is just a 10:1 transform from the mains) and rectified mains DC (150VDC or so). Then the white board with all the LEDs has a transistor for the warm and cool LEDs, which run off of the 150VDC. The next board has a 3.3VDC power supply, the brain board (which I replaced) and transistors for the RGB LEDs, which run off of 15VDC.

4 Likes


Improvements!

  1. Changed the gear cog size. Increased so that it becomes reasonable to mill the gears out of 12mm material This does make things a little less smooth, but it’s not like a machine dropping slingshot ammo out continuously is going to be silent… right?

  2. Increased the tolerance for the marble pockets. The new ones are 12mm in diameter, hoping to accommodate 3/8" (9.5mm) marbles. The little bit of extra room should allow a bit more space.

  3. To go with the increased tolerance, the holes in the frame are enlarged, and slightly offset vertically. This gives the marble room to drop in (or out) of the marble pocket

I think I’m going to try to build 2 of these (Just to prove the “stackable” concept) and check that it works.

I still need to make the collector at the bottom and a chute for the top, but those should be relatively simple task. Also need to design the power module to drive the little gear. I’ll probably integrate that with the piece that collects the marbles at the bottom to feed the lifter.

4 Likes

So I made some stuff real…

3D printed the marble inserts and the transfer rail. Also the drive gear for good measure. 4 hours on the Repeat, check with calipers. Excellent!

Cur the main gear from some scrap plywood on the Primo. Not excellent. I haven’t used the Primo in a while, and it wasn’t behaving well. All of the holes came out undersize, so I couldn’t fit the bearings in the middle, and the marble inserts wouldn’t go in. Everything is about .5mm undersized. Also had some trouble that turned out to be that I had the router speed too slow making the surface finish poor. Might be the cause of the hole size mismatch. Got some wicked scorching on the mill too, so I’m going to throw that out. I’ll have to get some more material and try again with a fresh sharp bit (And proper router speed.) The LR is down for re-wiring to the Duet. I’m trying to get the wiring much neater than I had it before. Too many projects…

I should check the drawing though. FreeCAD does some weird things with gears trying to export as .DXF, so I had to export the main gear an an .STL, and then convert a profile of that to .SVG, which may be what resulted in the bad sizing… Hmmm…

2 Likes

For something like that, where you need accuracy, a finishing pass is a must too. But a full bit is what It sounds like anyway.

1 Like

I did use a finishing pass as well, I always do for the cuts that need to be accurate.

I’m going to 3D print one, and I’ll try again with a fresh sharp bit, too.

And so far, I don’t actually have any marble runs to feed with this! I was thinking bout taking the easy way out and using a 3/8" round bit to just carve some runs into a piece of 3/4" flat stock. I might even be able to do that with the CNC, come to think of it. Just need to CAD up some simple tracks, then make a holder for a flat plate at say a 45° angle tipped to the front.

3 Likes


Progress…

The motor housing on the bottom is tentatively designed for a turntable motor. It turns out that an AC powered turntable motor is cheaper than a DC powered one, and then there’s no need for batteries. I need to revise the drive gear for the turntable motor when it arrives. The specifications show a “D” shaft, and the pictures show something else, so I’ll need to see what arrives.

The collector bin at the bottom and the marble chute at the top… I’m not 100% happy with these, and I don’t think that they’ll be the final versions. I’ve printed them as shown, because I think that it will do for a proof of concept.

I’d intended to make the frames using 3mm (1/8") plywood, which would make them possible to laser cut, but I think that I’ll go with 1/4" instead. It won’t change the rest of the model, because everything else is based off of the front face of the frame.

Ultimately what I’ll end up with is something that has a basis for a marble run with specified base size (Currently looking at 200mm by 200mm, making it printable on many 3D printers) with an X/Y/Z coordinate for dropping the marbles into and an X/Y/Z coordinate for the marbles dropping out of.

With the motor base, this is 332.5mm tall and 335mm wide. An Ikea KALLAX shelving unit will hold a volume 335mm wide by 335mm tall by 390mm deep. (I don’t plan on this being more than 305mm deep.) As such one of these should fit into one cube of the KALLAX unit when assembled. Naturally, it will be able to free stand as well, and if you stack units, of course it won’t fit anymore.

3 Likes