Continuing to add to Johnny 5, the V5. Now adding multi color with a 3Dchameleon (@azab2c details the unit here):
I tied the 4 part Y into the entrance side of the SFS. Apparently this is a bad idea, but shhh I think with klipper I should be able to turn off the SFS to switch filament.
Bill at 3dchameleon shared a “pro” upgrade at RMRRF that would include:
- oled display to visually see what mode the system is in (I don’t need this, I’m using the octopus)
- runout sensors for each input. This is of great interest. I bought a set, but can’t find the model now for it.
- automatic filament cutter. Need a servo for this. I want to mount it on top of the hot end.
- extruder position sensor. This is an encoder on the back side of the motor. I’ve not been able to find any additional information about this other than i’ve seen one and it is in a couple videos. I’ll keep after it.
since I purchased the kit in November, it has been released as open source and can be found here.
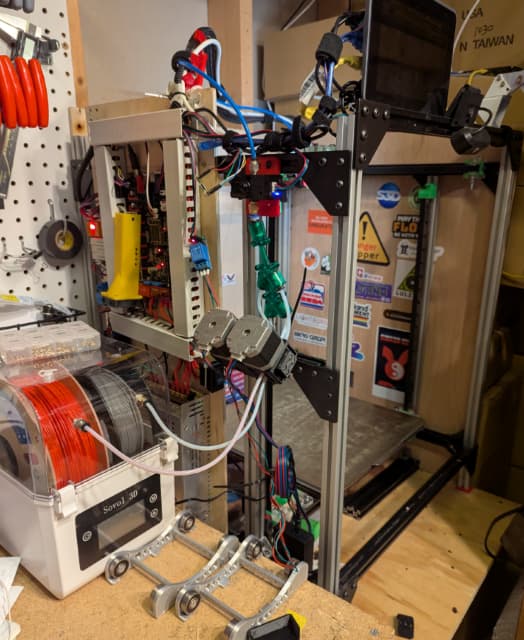
As you can see from my photo, the 3dchameleon motors are mounted on the side just below the Y merge piece which connects to the smart filament sensor (SFS) that is connected to the same reverse bowden tube that has been used with this printer since it was calibrated as a V5 in August.
The short tube length from the motor to the Y is of possible concern, but time will tell if that is a dealbreaker or not. The 3dchameleon came with 3 teflon tubes 1 meter long between the extruder and the Y, but I think a meter of tubing as installed on the kit was excessive, but it is nice to now there is enough to change lengths should it need to be reconfigured. The input to the extruder setup is from a dry box located right next to the printer. The 3dchameleon came with several extra tubing connectors, so a couple were installed in the dry box ahead of the extruder. My hope is to get this to run 2 colors and then go from there.
The 3Dchameleon control board with its two drivers is not connected at all. I found this github site with klipper code to set up the spare 2209 drivers on the octopus board.
# channel 7 on octopus.  goes to left motor as mounted on frame with output to Y pointed up
[tmc2209 manual_stepper selector]
uart_pin: PD3 # @ CS pin
#uart_address:
run_current: 0.4
hold_current: 0.4
interpolate: False
stealthchop_threshold: 0

[manual_stepper selector]
enable_pin: PE0
step_pin: PE6
dir_pin: PA14
microsteps: 16
rotation_distance: 2

#------------------------------------------------------------------------------------------------------

# channel 6 on octopus.  goes to the extruder that pulls/pushes filement to Y above it
[tmc2209 manual_stepper chameleon]
uart_pin: PE1
run_current: 0.4
hold_current: 0.4
interpolate: False
stealthchop_threshold: 0


#S7
[manual_stepper chameleon]
enable_pin: PD4
step_pin: PE2
dir_pin: PE3
microsteps: 16
rotation_distance: 34.408602151 # reverse computed from the ESteps value
The full config will be included below once it is functional. Macros included in this config file called by printer.cfg are in the github link above.
With everyting plugged in, klipper starts ok, but tool init macro runs, z drops, the extruder runs quite a bit, and then x moves back and forth. That isn’t quite right.