Ok, you have both Y motors backwards. Flip both connections.
1 Like
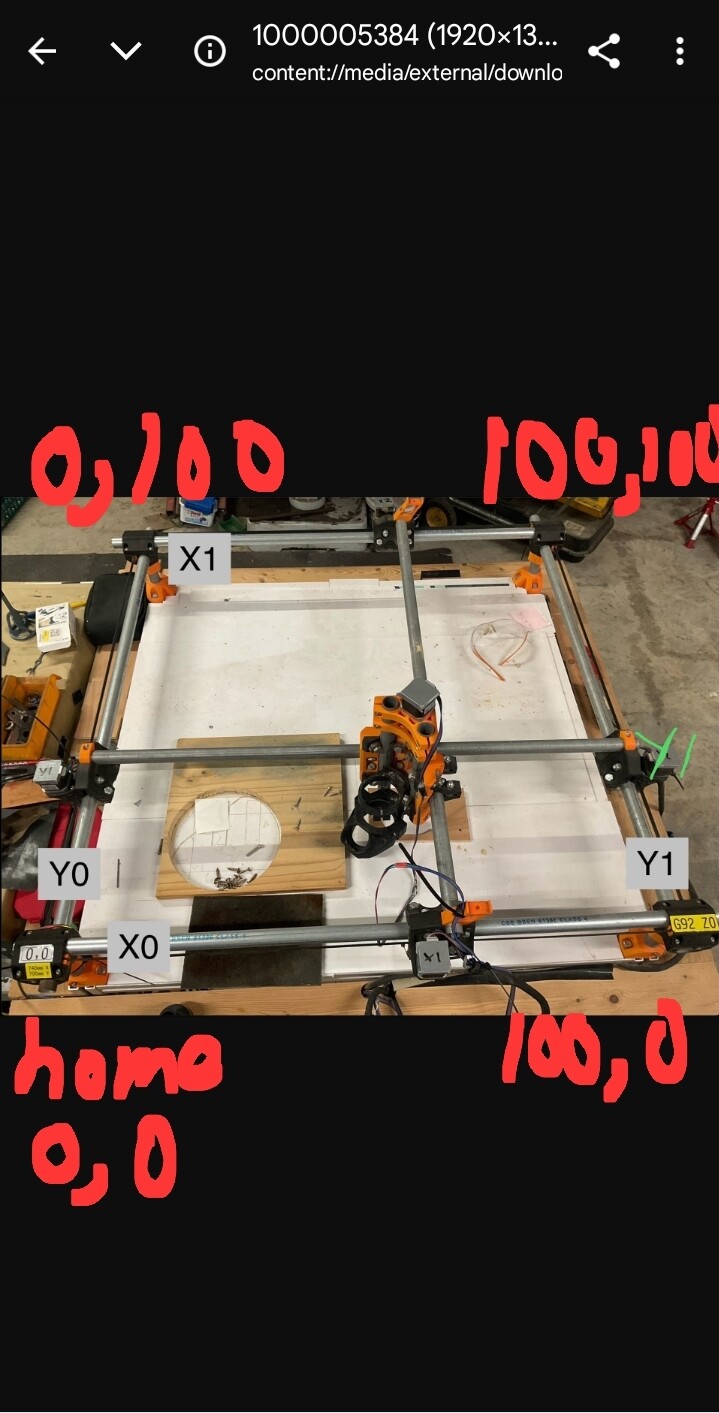
Y+ moves towards me
X+ moves right
So when it homes…it goes left and up from the pose I was in…towards the green… so was trying to flip Y+ & Y-
You have both X backwards, switch them as well.
You want y+ to move away, x+ to move right.
This puts your home as bottom left corner.
So flip on the board? I did it to the picture provided a few weeks ago.

So just flip the cables including the steppers correct?
Just flip the connectors at the board. The 4 pins can go in either way, having them backwards at first is super common.
Power off before you mess with the wires.
My apologies…x+ does move right
Just flip both ys then and you should be set.
And if Z+ moves down instead of up, flip it. Control wise you want x+ to move right, y+ to move away, and z+ to move up.
Your looking at a coordinate system like this, if you had a 100x100 work area. X is the first#, y is the 2nd.
As has been said before, one question at a time is a good way to troubleshoot the setup. You’re climbing a learning curve, to be sure. We’ll do our best to get you to the top, but you’re going to need to trust us when we say “don’t take that turn just yet” as we guide you along the trail (if you’ll pardon me mixing metaphors).
I also understanding having multiple questions, and not knowing which to ask first. Trust us that have been down the path to know which step to take next.
It’s also healthy to take a break when you need one. We’ll be here when you’re ready to take the next step.
This next section explains the “why” behind some of the suggestions up above. I personally like knowing the “why” behind the “what” when I’m being told to take an action. Feel free to skim or skip the rest of this post if you’re happy with your current understanding.
Something good to know as a beginner is that the colors of the wiring on stepper motors don’t follow any sort of standardized code, so you can’t assume putting the colors in the same order is going to get things rolling in the same direction. And even if they do roll in the same direction, that may not be the right direction, depending on how the motors and machine are designed.
Stepper motors have an odd number of magnets and two separate coils of wire inside. Sending an electrical pulse to one of the coils will shift the magnets one step, then pulsing the other coil moves another step. Feeding current to both coils holds the motor in position, so there’s almost always current running through at least one, and often both coils. The stepper drivers manage sending the power to the motor. Always completely power down the machine and controller before changing stepper motor connections, as you can damage the stepper driver if the motor is unplugged while the driver is trying to push current through the motor.
By rotating the plug of the motor connector at the controller board, you’re switching the sequencing of the powering of the coils, so you change the direction of motor rotation.
Getting all the motors moving in the proper direction is an important first step. Motors at opposite ends of the axis have to rotate in opposite directions from one another to get the axis to move. If the axis twists instead of sliding, then one motor’s connection needs to be flipped. If the axis slides, but in the wrong direction, then both motor connections need to be flipped. It’s important to solve this in “hardware” rather than flipping the direction in the software, to avoid homing in the wrong direction.
I chased my tail with this for a long time on my first CNC build. I didn’t have the benefit of this support forum at that time.
4 Likes
Hey Tom I appreciate the lengthy post I think also that when you ask one question that leads to another question so until you resolve the problem in this case the problem has been resolved so we can move on to the next issue which is I’m going to have to buy in stops for my z I don’t like the fact that there’s nothing there so once I purchase those then we can move forward until then I’m going to just be reading the learning documentation on the platform.
Nathan thank you for your attention and instruction it’s very helpful
In case I don’t get back on here you guys have a merry Christmas wherever you’re at
1 Like
It’s pretty common for folks to use a touch-plate for Z on the MPCNC and not worry about homing it. It can be tough to find room for them in thatt very tight Z axis.
1 Like
The MPCNC doesn’t use endstops for the Z axis. You want to get a touch plate for it.
I’ve seen some mpcnc where they have put them on there, So i thought maybe he just didn’t buy them with the kit.
I have a touch plate I have to get some longer wire so that I can run it from where I have the board to my home because the way it was initially wired from my friend it was just easier to do it that way.
I was just concerned that it may go up or down too much but I guess you control that by fluid .
Thanks for the response
I actually added z end stops to my Burly MPCNC (version before the Primo) when I built it, but that was motivated by my familiarity with 3D printing, where the slicer needs the whole machine envelope available so it can decide where to place each piece being printed. The end stops haven’t really been beneficial for individual cutting jobs. I do rely on the touchplate.
With the subtractive nature of CNC routing, the workpiece is really the driving “envelope” for the job, and it’s placement inside the machine’s movement envelope is pretty arbitrary, so you need to set it for each job. Some jobs you may want the Z “home” relative to the top of the workpiece, and others you’ll want it relative to the surface of the spoilboard/bottom of the stock. You can even move long pieces through and complete the job in phases or sections, as long as you can maintain appropriate alignment and positioning (with things like edge guides or location/alignment pins).
3 Likes
Hey, im glad you made some advance into your build/setup. What you asked has been responded correctly already, let us know what else you need!
Remember, a piece of paper and manual z ultil it touches the paper works too!
1 Like
@Fragmintz311 2days without replys, did you solved everything?
I know you posted this 3 days ago. And I should probably just let it go. But I want to add my $0.02 here and tell you what I think is going wrong.
This machine is not ours. We know how to use it (very well). But this is your machine. To run a successful CNC machine, you need a CNC machine and a CNC operator. I can give you a working machine, but you won’t be able to use it unless you learn how. None of us are going to be the ones running your CAM, or setting up your jobs or troubleshooting it when there is a problem. All we can do is help when you have an issue.
I am the last person so say “read the manual” and the manuals assume you are already somewhat proficient. They strike a balance. They try not to describe everything and they try to make sure you have enough to get to the finish line without help. But some help is usually needed.
The forums aren’t a service center and Ryan is the only one here working for money. We can try to get your informed. But as a teacher you know, students need to be willing to learn as well.
If you want to ask a good question, give us this information:
- Background information, like a picture of what is going on.
- What did you try to do? Stuff like, “I hit the +Y button” is great.
- What did you observe? Stuff like. “The machine went towards me.” is great.
- What did you expect? Sometimes the issue is that the machine was doing what it was supposed to do, but the users expectations are wrong.
This isn’t always necessary, but it helps to show that you’re trying to learn and trying to work on it. Sharing progress like when you got to the FluidNC screen is great. That means we aren’t just talking into the abyss, someone is really trying on the other end.
After the kerfuffle, I see a lot of the right responses on both ends and I think you’ll see a lot of good progress if you keep it up.
Sometimes the answer to your question is in the manual and you just haven’t found it. That’s OK. Nobody is perfect. But what people want is to see you looking for stuff, trying to follow the process in the docs to set things up, learning about the MPCNC, etc.
We can help you, Jared. But this is definitely not as easy as using a table saw. It is a DIY kit and a CNC machine. You’ll need to gain the experience to end up being very successful. Luckily, you’re gaining it by the fire hose right now. If you’re in danger of burning out, take a break and come back later. Pressure won’t get you to the results any faster.
The $300k machine is harder to use, if you can believe it, and you would have spent $10k on services already.
5 Likes
Jeffeb…
I’m not sure if you’re caught up on this thread so I’m just going to let everything you said go because we pretty much got the machine up and running and everything’s good…
Okay guys just for clarification because apparently it was on someone else’s reply.
The machine is that a standstill I don’t have any bits.
I’m going to be reading the documentation on plotting and learning how to Mill.
Over Christmas I’m going to buy the foam and all the stuff that comes with that and then after the new year I will probably get back on and ask more questions one at a time as previously communicated over the last week.
Thank you all for your tremendous help and have a Merry Christmas and a Happy New Year and case I don’t get on here.
2 Likes
I did read this whole thread before I posted. Please read my post before you ask any more questions. Thank you. I’m glad your machine is working.
3 Likes