Good idea!
You know I checked that a dozen times and was so excited that there was plenty of room. Your comment made me look again and realize that it hist eh tensioner…dang it. Back to the drawing board.
Good idea!
You know I checked that a dozen times and was so excited that there was plenty of room. Your comment made me look again and realize that it hist eh tensioner…dang it. Back to the drawing board.
Move fan left a bit to cover two mount holes (tapered M3 bolts, or, just let M3 button heads apply some anti vibration pressure on the fan? Will need to remove fan in order to remove mount, not that much more maintenance hassle.
If that mount already works, no reason not to just use that one?
+1 (tried to say that above - or intended to imply that - and agree)
If you see more fan mounts that will work, I am in. I took a quick look and did not see that one or nay I thought might work well.
Please post some links. That will save a ton of time. No need to reinvent the wheel.
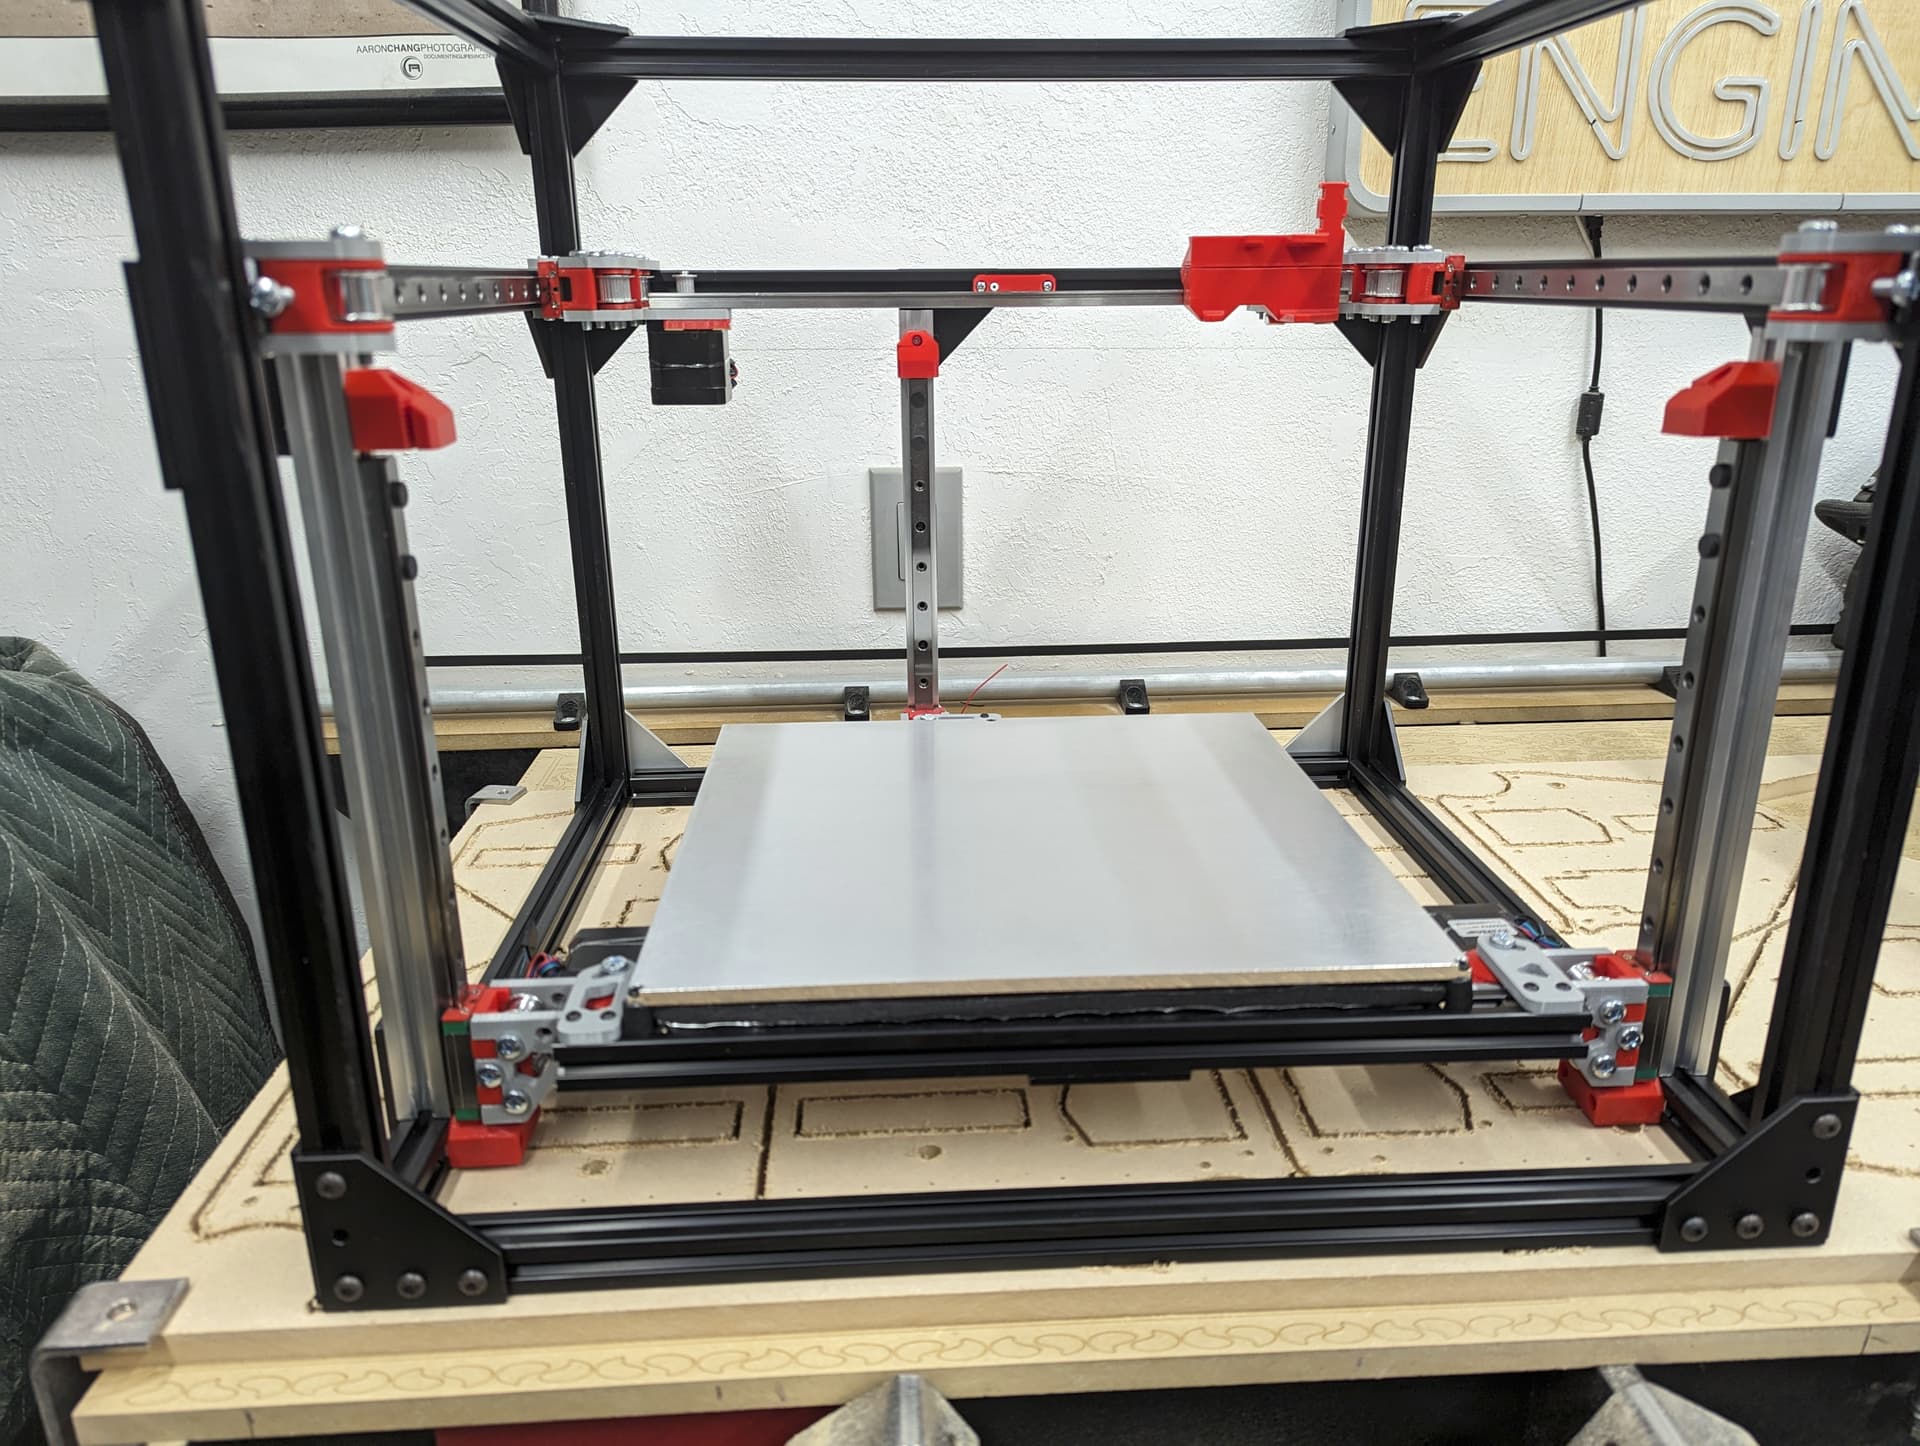
And with that the first full prototype build is done. I think I might start a build thread since from here on out it will be specific to the parts I use. I will add all the part links and things there for now until we get to the release.
Once I have a print that is done, I will start the “release” process.
If I find any issues I will post them here. Speaking of I found another small issue last night. The Z flat parts were not easily machinable and I updated the CAD to fix that. This first batch will use this style though and any after that will be the rounder ones.
Looks fantastic.
Do you have a cutlist for the extrusion you used?
Is the fusion CAD at the start of this thread updated?
Will be following that with interest.
No, I just looked at the CAD. but I know a 300x300x300 is really close to the limit for using 1M sticks and cutting them in half. It might get to 320x320x320 but after that you better pay real close attention to dimensions and how you are going to efficiently use 1M sticks.
Yes, V151 as of last night.
Try to get some prices going so people know what they are getting into. Some sources. Playing with the fan shroud for a few to see if I can tweak it quickly. Or just use an off the shelf part.
I know I have a 4, but I’d really like to make it a 5… is there any special considerations I should think about before going through with it? the belts are longer, but are the extrusion lengths similar?
I haven’t decided if I’m going to keep the V4 and build a new V5 or if I’m going to turn the V4 into a V5.
If I do go with turning the V4 into a V5 it looks like my 400mm Z might still be usable with the V5 as a 300mm. Since there is the upper section that isn’t there for the V4. But I think all of my other extrusions will have to be redone to get the additional space I would like to have around the bed. Have considered making the V5 350x350 and running a 330x330 bed to give me ample room for things like klicky and a nozzle brush. Just going to sit back and see how things play out. I don’t think Ryan is planning on anything like that so I may just have to build it and see lol
@vicious1 are you planning to completely finish out the cad at some point? Motors and all? Just asking for curiosity sake
Ohhhh good question. The Z is a bit shorter but he Y is a bit longer. I am not sure. I can set it to 200x200x200 and check against one of mine to see what it looks like.
That is not needed, I just put it there because it sounded like everyone was going to enclose it so I tried to include it in the parameters.
No I doubt it. It just makes the parameters more likely to fail. I am sure I will add a bit more but I am not doing the whole thing. I can’t, people want different screws and stuff. I will just make some sort of diagram or something for a few of the screw sizes.
Hmmmmm, the sendcutsend parts are coming tomorrow. I guess there is no point building it up more if I am just going to take it apart tomorrow.
Shoot, I could have this puppy working pretty soon. Depends on my schedule. I might play hooky Thursday for some snow but that means I can make it up on the weekend. Wiring, Klipper, Brakes…then calibrations.
Shoot I forgot I have black hardware coming, no rebuild without that. So maybe I start mounting boards. and figuring out some wire routing.
So far my moving bed stuff weighs 4.3 kg (9.5lbs) that is a lot.
edit - most of my hardware will be here tomorrow as well, that should include the black stuff…!!!
Not hard to get there lol. And that’s with a bed the same size I am running on the v4.
Ok I get that. And didn’t think you would but wasn’t sure.
I can’t make up my mind if I want to go enclosed or not. I was hot and heavy for enclosed last time home doing the ASA but the more I think about it 95% of the time I’m printing PLA. And I have the soft enclosure if I need it for anything fancy. But then that makes keeping electronics cool a real pain. So idk what I want to do lol
One of mine I will do the sides, back and bottom fixed, hinged door, sliding lid. Lid and door removable. Just to see how it work out controlling the environment a bit more in winter. Kinda depends what filament I swap out to for the “fancy” builds.
I’m very curious to see how your removable doors and top come out. That seems like a much better option to me since most of the time I’m printing pla and don’t want the excess heat. As long as it’s not too janky I’m all for it lol. That would make things a lot better with the electronics on the back and able to get good fresh air
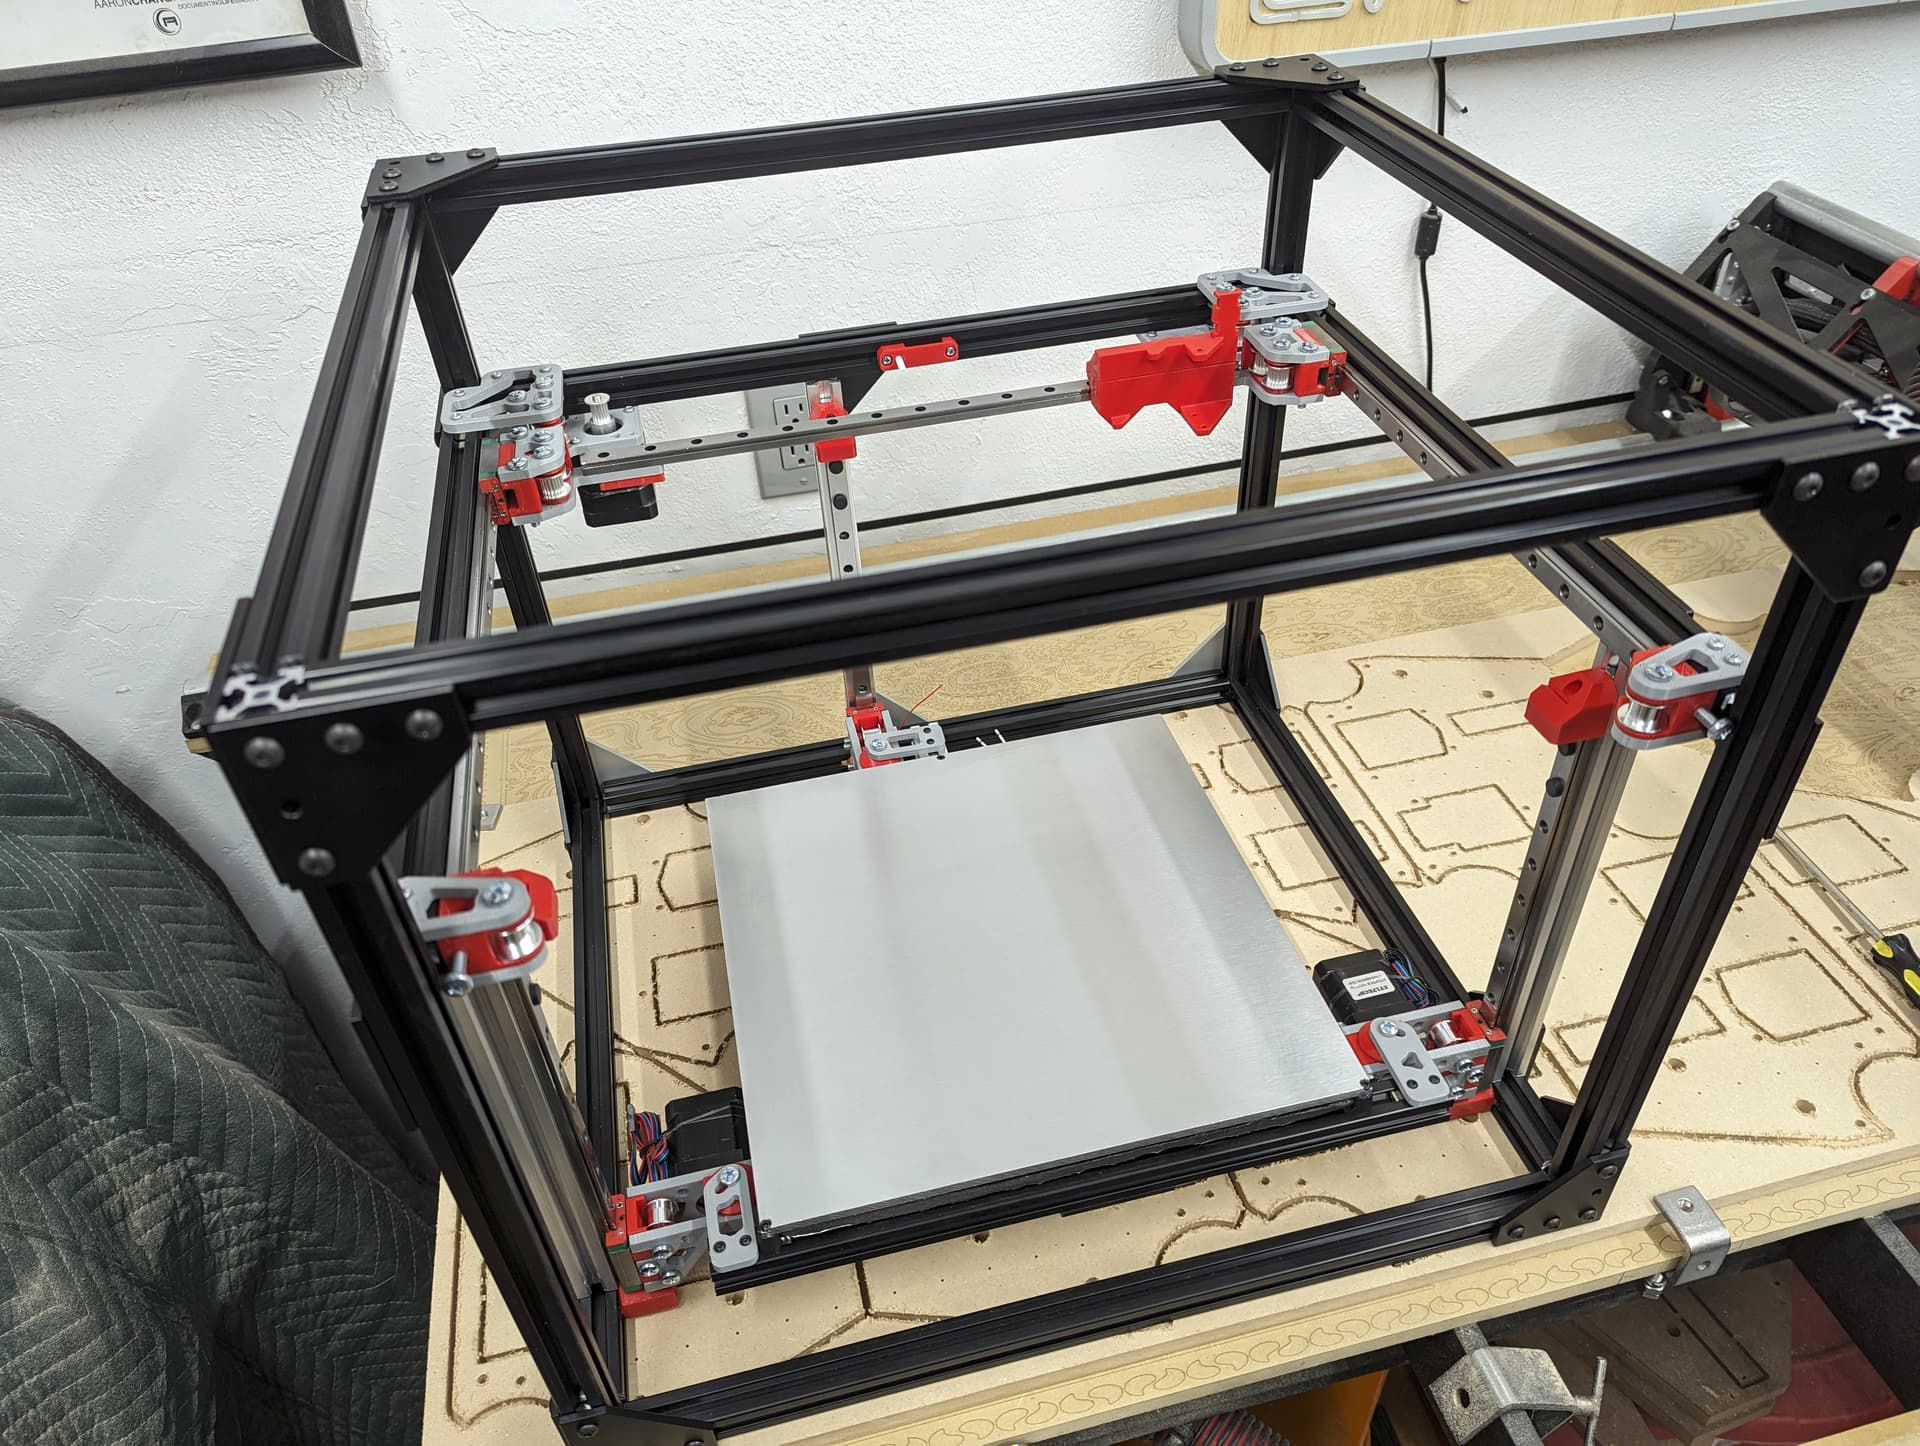
The screws did not show up with today’s delivery, so these are just some stand ins…my goodness am I happy with this so far.
looks really good!
Are you releasing this entire drawing or just the stl / svg’s? I’d just like to get my hands on the cut and print part files and get started.
Are we + 2 or +4 pulleys on this belt path compared with the V4? I ordered some from you recently and I may need a couple more…
Oh, yeah, did you get klipper up and running yet?