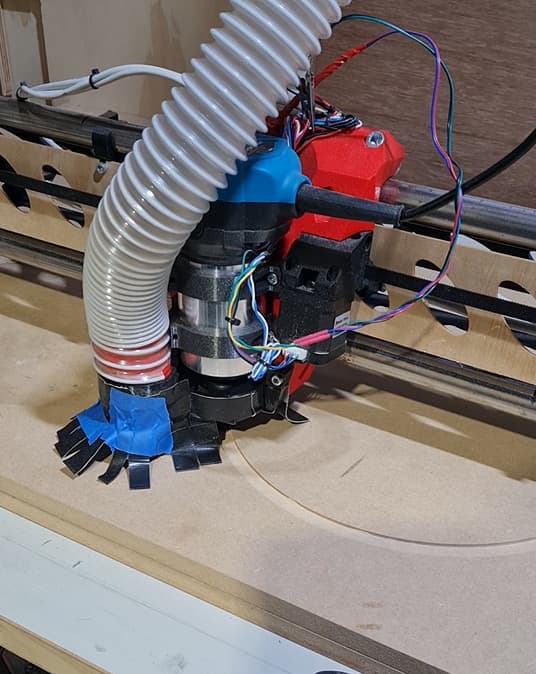
but it sucks really well, i will need to remix the dust shoe to accept some bristles that i can get here.
As the GETTO version using the gaffers tape or race tape was just not stiff enough and the vac sucked the “fingers” up into the holes. But even so its was moving a lot of air, and there is a lot of vac pressure there.
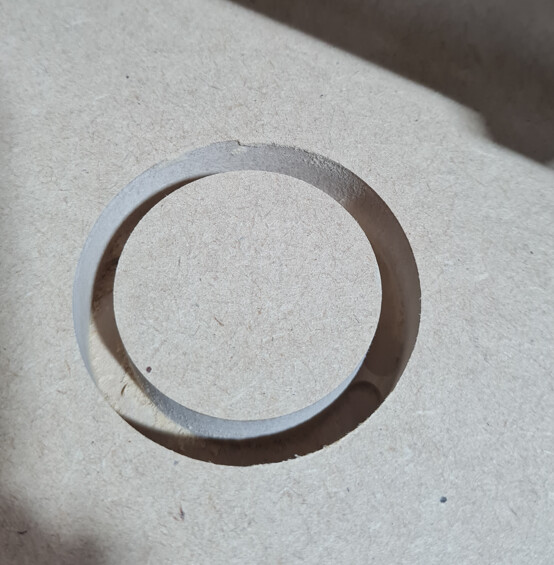
I cut two “rings” out of 16mm MDF, one was just a donut and the other was a donut with rebate sit on the top of the dust canister, i am going to fill that with some foam tape. the two got glued together and i will see how they fit tonight.
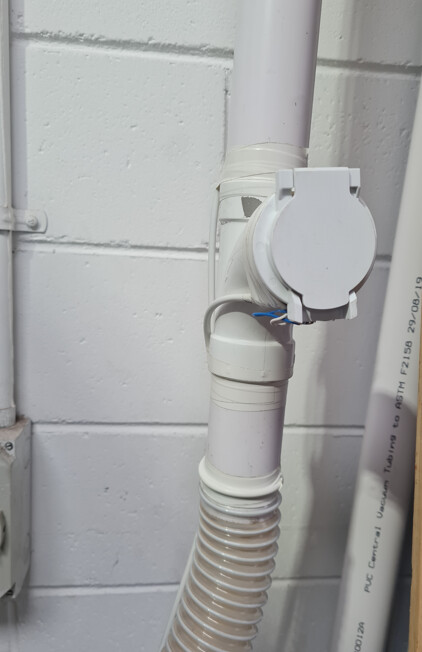
I ended up buyin some 51mm (2") flexi pipe someone from here linked to at a local supplier (carbatech) and went with some rigid pipe and ducted vac fittings.
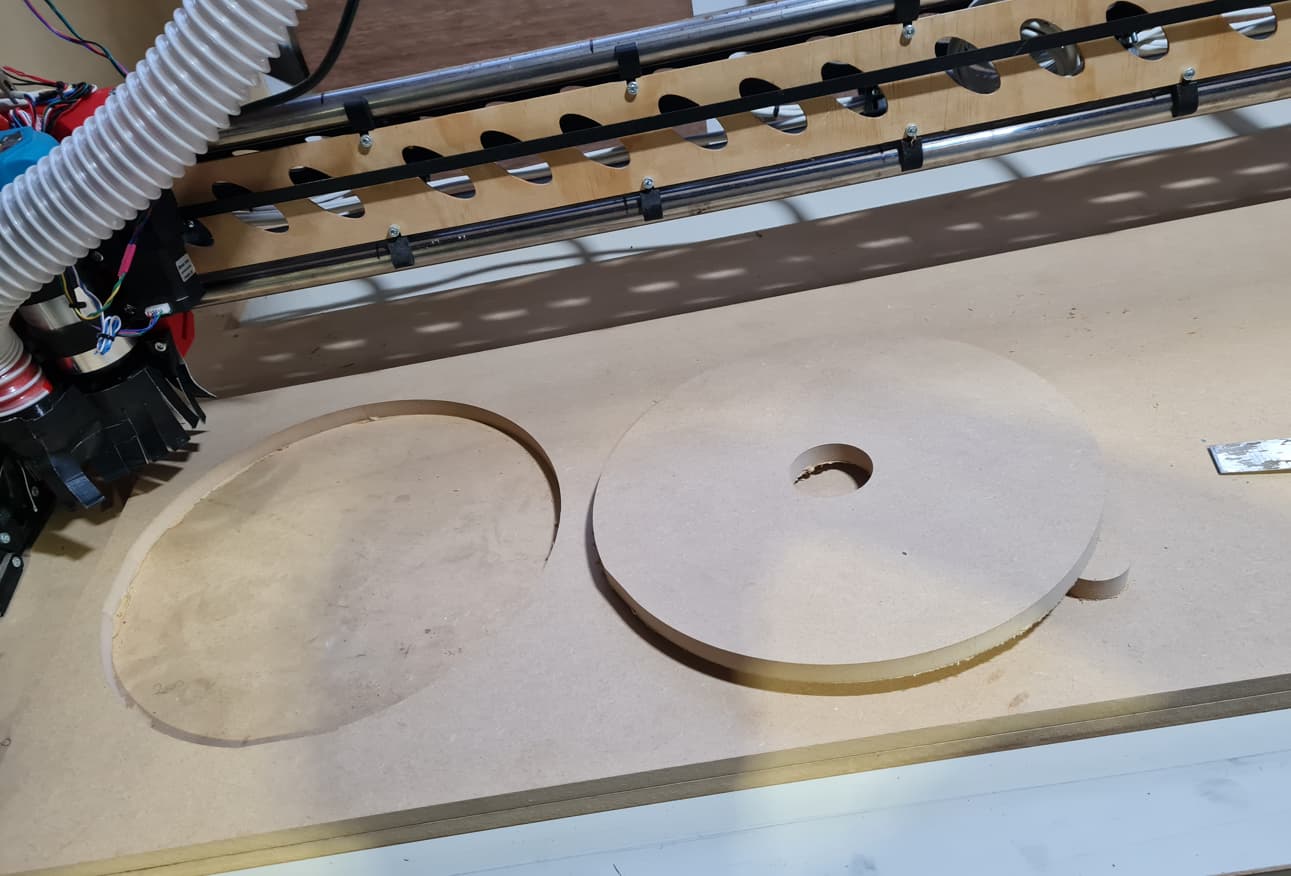
Dust collection wise, it did pretty good. Almost all the dust was collected, except for the deep parts of the cut. I am hoping with a bit of a mod to the dust shoe it will be better.
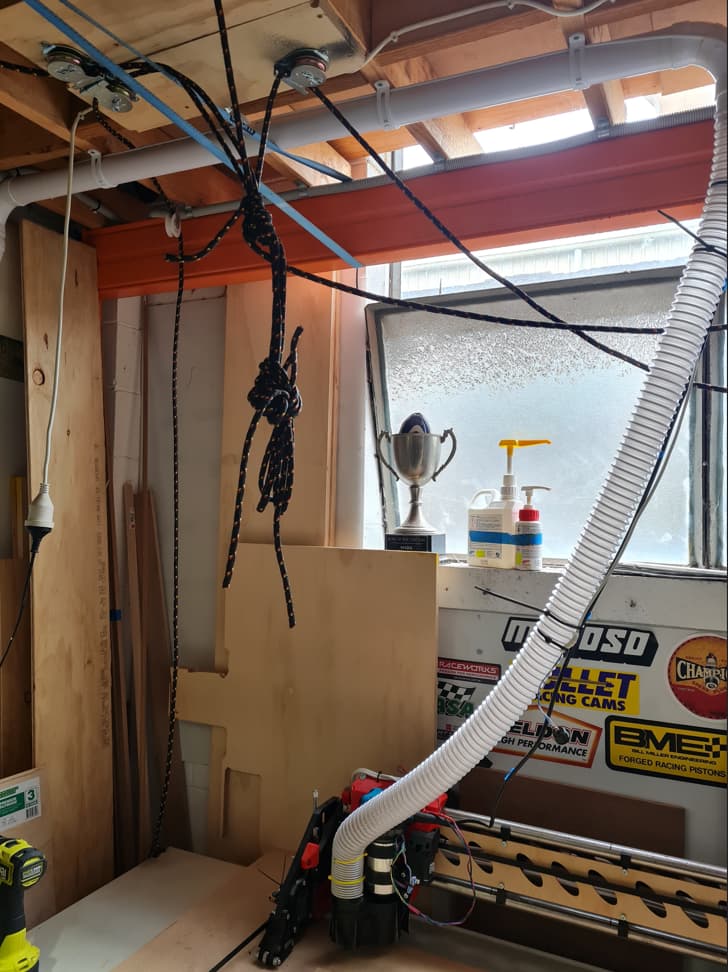
FrankenVAC leaks like siv, lol. these parts should go a long way to fixing that.
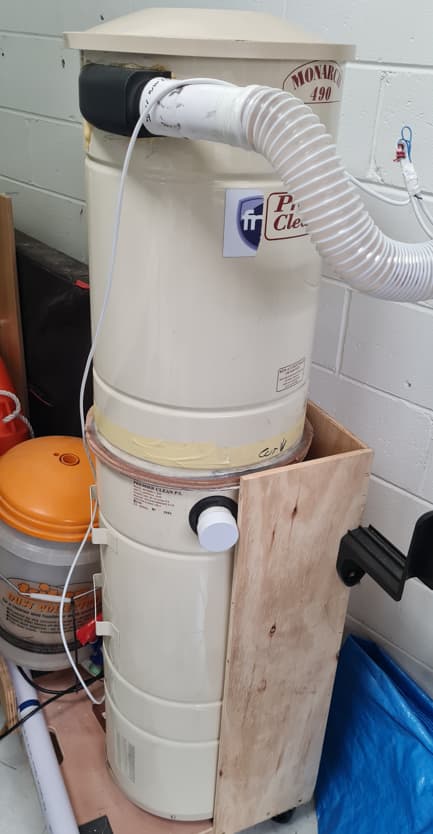
The “upside down” cyclone is not working, without using a clear lid i cant really see what is going on, but i suspect that the pipe to bring the vac pressure down to the motors (the bottom barrel) is not really allowing the dust to swirl properly. So looks like Franken VAC is getting a bit of nip and tuck.
Ontop of all that, the first two serious cuts of my CNC went off without a hitch!
I bought a length today, so I’m following you closely here.
I already have a ducted dust extraction system (2.5hp) but am going to connect to a shopvac. Budget wise things are stupid here - that’s a triton dust bucket I spy in one of the photos - What makes a 23l bucket worth twice as much as a Ryobi 1250w vacuum?
I’m thinking I could buy two Ryobis, put a $30.00 Chinese cyclone on one and store the motor part as a spare AND have a full cyclone setup just for the Lowrider for about the same money as a Triton bucket!!
I think I’ll wait for your long term test before making a decision (or for my Mk4) before copying!
Yep, that is the triton dust collection system, i used it a lot of the triton gear, actually.
A couple of there saw tables, great design for there time.
Unfortunatly the bucket is not one of them, its ok for its intended use, just the table saw. Throw any amount of fine dust at it and it really does shit its self.
I have a OZITO 23L shop vac that does a better job that that bucket for out use. (for our international friends, think bargain basement tools at Lowes or any other big box store. Ours come with a decent
warranty. In there defence if you use them for what they are designed for, occasional use, they are fine).
I understand the bucket is to separate the particles, but there is a dust screen in the top of the dome that is way two fine and just blocks up.
As for the hose, its pretty darn good quality, cant complain for AU$50 for 3m.
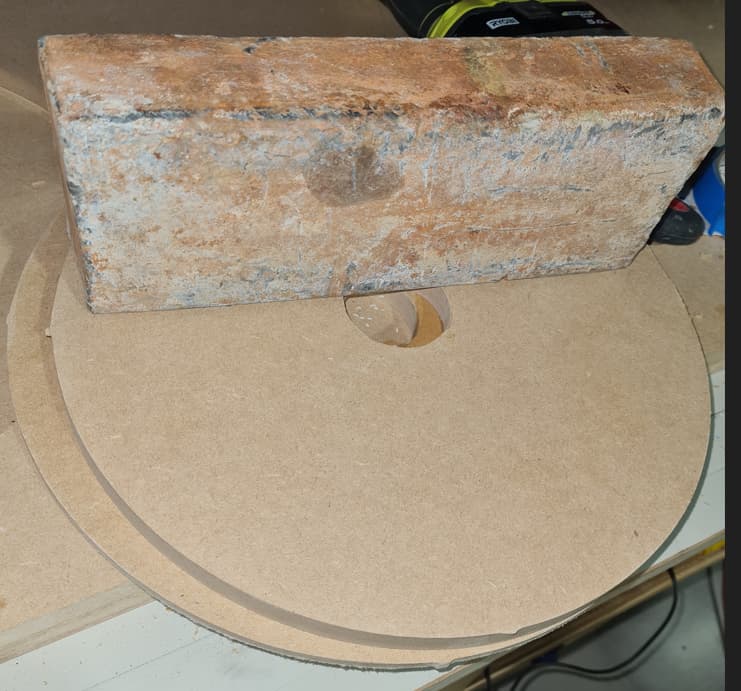
FrankenVAC has its issues that i am going to have to address. I cut the bits of MDF to start to address them, glued them up on Saturday before driving up and back to Country Vic (3hrs one way) on Sunday. I get back to the workshop Monday night after work to find i made a ROOOOOOKKKKKKKKKIIIIIIIEEEEEE mistake.
After I smeered the glue around I lined it all up and put that block of led on top. As we all know, MDF is a bit slippery and slides around. I thought the weight would have held them in one spot. SIGH.
I even had some clamps right under the table below it. honestly i thought the , like 20KG block of lead would have held it in place.
I am going to cut down the motor barrel so its quite short, just high enough to fit a HEPA filter i found we sell. Then i will use the existing vortex generator and cut its barrel down to be only like 200 or 300 mm high and then last will be another barrel with its motor section cut off, and turned into a bin.
The vac pressure will be from the top like all others, and the dust will fall down into the bin. Pro ones have a big plastic bag. I dont expect i will be making that much dust… (famous last words) but even so it should not be a gig thing to empty it.
The motor unit and vortex generator will be clamped together and supported with the original wall mounts for these units (relocating the mounts probably)
the dust barrel will have to sit on a platform that will raise up somehow.
Ok, i have a strange issue.
I got some free time on the weekend, very rare, and I went straight to the workshop to finish cutting the parts for FrankenVAC and kept running into this same problem, the touch plate not working.
Here is the strange part, after the first time the bit drove into the touchplate and kept going, i checked the endstops and probe with M119 and its was not “triggered”.
Ok, no worries I checked all the wires and found one of them had come loose. 20mins later withs some hot glue on all the little connections on the board, was watching the LR3 doing the same thing.
Again I reset the machine to stop it diving for china and checked the endstops with m119 and its all good the probe is triggered when i should be, but as soon as i run the program the probe wont trigger the machine to stop when it is touched.
So another 3 attempts and same issue the probe works with m119, to the point where i even lowered the gantry 0.1mm at a time, and ran m119 each time (when i was supper close) and the probe was triggered when it touched the prob on the surface.
All that was to prove that the cable what not broken or something.
So it seems that the machine is ignoring the touchplate, somehow.
I didn’t think to check the start code on the file, as its the same laptop and setup, other than some TOOL LIST changes, but maybe something got screwed up, i will check today.
;Project
;Created by Estlcam version build
;Machining time about hours
; code from V1 Eng
G92 X0 Y0 ; Set Current position to 0 on the X and Y axes.
M0 Attach probe ; Pause to connect touchplate
G38.2 Z0 ; Probe down to touchplate
G92 Z0.65 ; Set new Z position to thickness of touchplate
G1 Z2 F900 ; Lift off touchplate
M0 Remove probe ; Pause and wait for touchplate removal
M106 ; This will turn on an IOT relay to start a router or vacuum
G90
M03 S
Damm it.
Due to the $hit fight at work i cleaned off the computer and i am fairly sure i lost the file and defiantly the visual code install. I backed up everything but it was pretty rushed and not as clean or organised as it needed to be.
So short answer is that will not be happening anytime soon, i will have to rebuild the code while reading that long winded, bloated, rambling build log. SIGH.
So three questions.
can i use the terminal window to just type in “G38.2 Z0” to prove there is a problem with the firmware code?
Short of the “pain in the arse-ness” of having to set the height manually, is the any down side of just changing the code to
-=-=- start code -=-=-=-
;Project
;Created by Estlcam version build
;Machining time about hours
; code from V1 Eng
G92 X0 Y0 Z0; Set Current position to 0 on the X, Y and Z axes.
G1 Z10 F900 ; Lift off surface
M0 ; Pause for no reason ;
M106 ; This will turn on all “FAN” headers to 100%
G90 ; Set machine to absolute positioning
-=-=-=- end code -=-=-=-=-
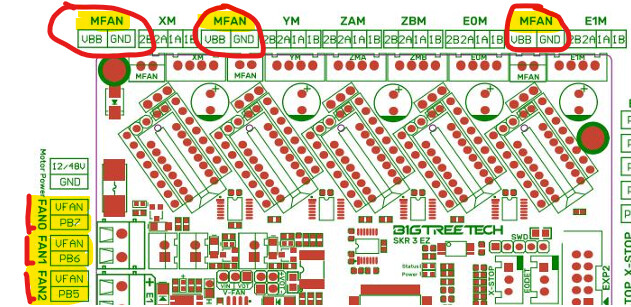
Can you please confirm that “M106 ; This will turn on all “FAN” headers to 100%” is correct?
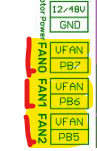
I figured out which terminals are fans on the board, its pretty clear on the manual, but there are some “NO fans” and then “CNC fans”
they talk about being able to turn on all fans with just M106 and specific fans with M106 P2 255
would the fan number they are talking about correspond to the these?
would the fan number they are talking about correspond to the these?
Yes.
P0 → Fan0
P1 → Fan1
P2 → Fan2
Though I’ve never seen it happen, there is nothing stopping a developer from assigning the fans differently than this list. In addition, I saw one case about a week ago where the firmware did not expose one of the hardware fan pins for use by M106/M107.
My own version of Herman Munster Vac (like Franken but not so serious) might happen shortly. I think I’m going to invest the money I received for my digital CNC sale in a separate vac ($59.00) two paint buckets ($12.00) and a bit of plumbing (lying around) and do something similar.
I already have a $30.00 Chinese cyclone set up on my vac, and it works really well, but I’m not going to fit it in the sound rated enclosure I have planned for under my Lowrider Bench.
If we are talking $ then sofar its free, the boss has not charged me for the two new motors. lol.
if we are talking TIME, about $2000.00
The reality is that i get all this stuff for free, all the barrels are old repairs that the customer upgraded there unit as usually its not that much more to get a 5year warranty with a new unit. if i didnt then there would be a lot more research before buying a decent shop vac (that is limited here in aus, as you know) and a cyclone.
But once i iron out the issues with the CNC, be it me or the firmware, i will be able to finish it. hopefully
I gave up bought the Ryobi (with a 5 year warranty) and a set of earmuffs.
Will keep that one as the shopvac and roll around gadget, and get another to go inside a cupboard. I have a “tiny” problem in that my workspace has a 1500 opening into my wife’s sewing space and a sliding door doesn’t cut it as a noise barrier even though I built it out of 30mm solid mdf more or less!