Fluidnc pen plotter board - getting it to work

So I got the TMC209 pen laser V2.0 board and esp from Ryan.
I got fluidnc installed and loaded the fluidnc_pen_laser.yaml file from here

I open up fluidnc and try to jog but get this message and get no movement.

$G
[MSG:ERR: sdmmc_card_init failed code 0x108]
[GC:G0 G54 G17 G21 G90 G94 M5 M9 T0 F0 S0]
ok
<Alarm|MPos:0.000,0.000,0.000|FS:0,0|Pn:XY|WCO:0.000,0.000,0.000>
J=G91 G21 F1000 X1 ERROR:8 Grbl '’ command cannot be used unless Grbl is IDLE. Ensures smooth operation during a job.
Error : undefined :undefined
J=G91 G21 F1000 X-1 ERROR:8 Grbl '’ command cannot be used unless Grbl is IDLE. Ensures smooth operation during a job.
Error : undefined :undefined
J=G91 G21 F100 Z1 ERROR:8 Grbl '’ command cannot be used unless Grbl is IDLE. Ensures smooth operation during a job.
Error : undefined :undefinedd

What am I missing?
I’m assuming it’s something pretty simple but just overlooking?

name: ZenXY
board: TMC2209 Pen/Laser

kinematics:
  CoreXY:

uart1:
  txd_pin: gpio.22
  rxd_pin: gpio.21
  baud: 115200
  mode: 8N1

stepping:
  engine: RMT
  idle_ms: 250
  dir_delay_us: 0
  pulse_us: 3
  disable_delay_us: 0

axes:
  shared_stepper_disable_pin: gpio.13
  x:
    steps_per_mm: 100.000
    max_rate_mm_per_min: 9000.000
    acceleration_mm_per_sec2: 200.000
    max_travel_mm: 300.000
    soft_limits: false
    homing:
      cycle: 3
      mpos_mm: 0.000
      positive_direction: false
      settle_ms: 250.000
      seek_mm_per_min: 2000.000
      feed_mm_per_min: 200.000
      seek_scaler: 1.100
      feed_scaler: 5.000
    motor0:
      limit_neg_pin: gpio.33:high
      hard_limits: false
      tmc_2209:
        direction_pin: gpio.26
        step_pin: gpio.12
        r_sense_ohms: 0.110
        addr: 0
        run_amps: 0.250
        hold_amps: 0.125
        microsteps: 16
        stallguard: 16
        stallguard_debug: false
        run_mode: StealthChop
        homing_mode: StealthChop
        use_enable: false
        uart_num: 1
    motor1:
      null_motor:
  y:
    steps_per_mm: 100.000
    max_rate_mm_per_min: 9000.000
    acceleration_mm_per_sec2: 200.000
    max_travel_mm: 300.000
    soft_limits: false
    homing:
      cycle: 2
      mpos_mm: 0.000
      positive_direction: false
      settle_ms: 250.000
      seek_mm_per_min: 2000.000
      feed_mm_per_min: 200.000
      seek_scaler: 1.100
      feed_scaler: 5.000
    motor0:
      limit_neg_pin: gpio.32:high
      hard_limits: false
      tmc_2209:
        direction_pin: gpio.25
        step_pin: gpio.14
        r_sense_ohms: 0.110
        addr: 1
        run_amps: 0.250
        hold_amps: 0.125
        microsteps: 16
        stallguard: 16
        stallguard_debug: false
        run_mode: StealthChop
        homing_mode: StealthChop
        use_enable: false
        uart_num: 1

    motor1:
      null_motor:
  z:
    steps_per_mm: 100.000
    max_rate_mm_per_min: 7200.000
    acceleration_mm_per_sec2: 100.000
    max_travel_mm: 5.000
    soft_limits: false
    homing:
      cycle: 1
      mpos_mm: 0.000
      positive_direction: true
    motor0:
      rc_servo:
        pwn_hz: 50
        output_pin: gpio.16
        min_pulse_us: 1000
        max_pulse_us: 2000
        
    motor1:
      null_motor:

spi:
  miso_pin: gpio.19
  mosi_pin: gpio.23
  sck_pin: gpio.18

sdcard:
  cs_pin: gpio.5

control:

coolant:
  delay_ms: 1000.000

probe:
  check_mode_start: false

macros:
  startup_line0: $X $HZ
  startup_line1: G92 Z4.0000
  macro0: 
  macro1: 
  macro2: 
  macro3: 

start:
  must_home: false
  check_limits: true
  deactivate_parking: false

user_outputs:

laser:
  tool_num: 0
  speed_map: 0=0.0% 1000=100.0%
  output_pin: gpio.27
  disable_with_s0: false
  s0_with_disable: false
  pwm_hz: 5000
arc_tolerance_mm: 0.002
junction_deviation_mm: 0.010
verbose_errors: false
report_inches: false
enable_parking_override_control: false
use_line_numbers: false 

This is the config.yaml that I’m using on my Bart Dring 2209 pen/laser board. I’ve added the servo Z axis to it, and the laser fires on D1 I think,

Some basic checks… Have you disabled tghe alarm that it starts with (send $X or click the alarm button?)

Caveat: I messed around with this a while, and haven’t tested limit switches on it in this version. Also ignore the startup lines. (It does, lol.)

I did not know that was a thing sooooo…nope. I did not. I have now and was able to move the X axis, but it was the Y that actually moved.
How do I permanently turn off the alarm? or is that not wise?

So this is what I’ve got so far.
When jogging X the Y moves but…
…when jogging Y, nothing moves.
Jogging Z does not move the servo either.

I’ve tried both the .yaml file from provided by fluidnc and what you (@SupraGuy ) provided above.

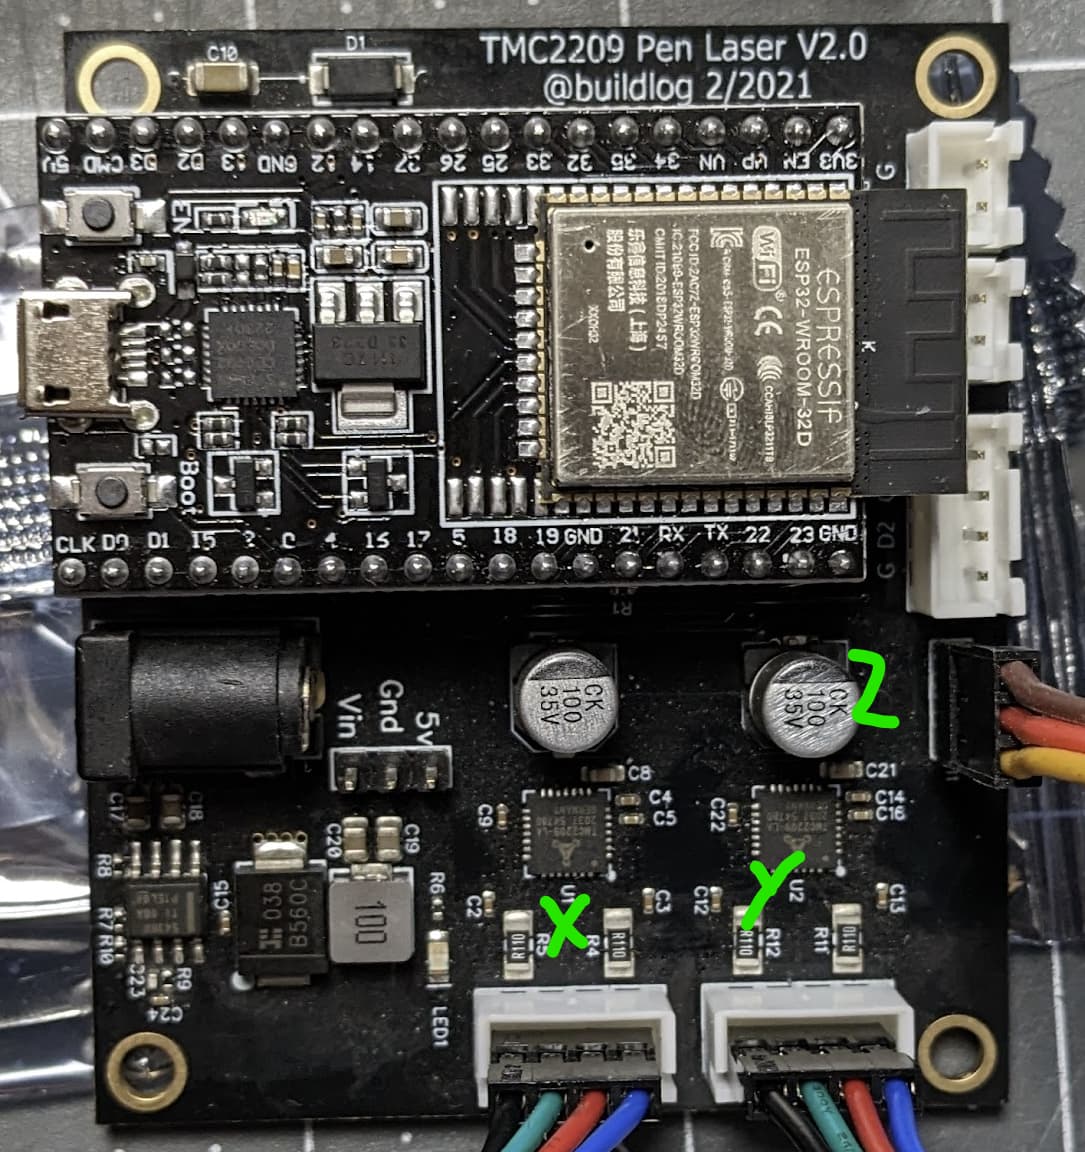
Here is a shot of my board with things plugged in. Yes I did double and tripple checked that y is plugged into y and X into x.

and just to make sure I understand correctly, If i have two .yaml file files for configs, I simply need to change the name here and that will dictate which one fluidnc will use - right?

Hmmm I don’t recall restarting the controller after changing the .yaml file name.

I’ll do that and see if your config file works.

Edit
Update - I changed the config name and restarted the controller to use the config file you provided above butt…
…now when I jog (or use G0 input) one or another axis, BOTH axis move the same distance.

My config is set for CoreXY kinematics, so yeah… that config was set il for my CoreXY laser, and I’ll be using it on the same chassis vinyl cutter. Another one will go on a ZenXY, all use CoreXY kinematics… sorry, should have warned you about that.

X jogging moves both motors the same way, Y jogging moves them in opposite directions. That’s how CoreXY works.

That would make sense. But at least both motors moved rather than just one! :

Pretty sure all you need to do is remove the 2 lines

kinematics:
  CoreXY:

And it will go back to Cartesian, but I haven’t tried it.

Yep, that worked. and the servo (z) works too.
thanks for the help @SupraGuy

update,

Z servo “sorta” works.
There is movement on Z however, it is not acting how I anticipate it would. Which maybe is the issue - my expectations of what it should do is not what is supposed to do.

Right now, I get very little movement. Just now, I would get small movements when I would jog X and Y. But no real movement when I jog z.

I see there is a max travel of 5mm. (max_travel_mm: 5.000)
If I understand right, this would mean that a Z movement in my cam software would only be effective up to 5mm relative to Zero (-5 to +5).
So I would expect that If I give a z movement of 5 it would rotate the full range. Give is a movement of -5 and it would return.

I’m assuming this is not correct.

So exactly how is the servo supposed to respond to Z input?

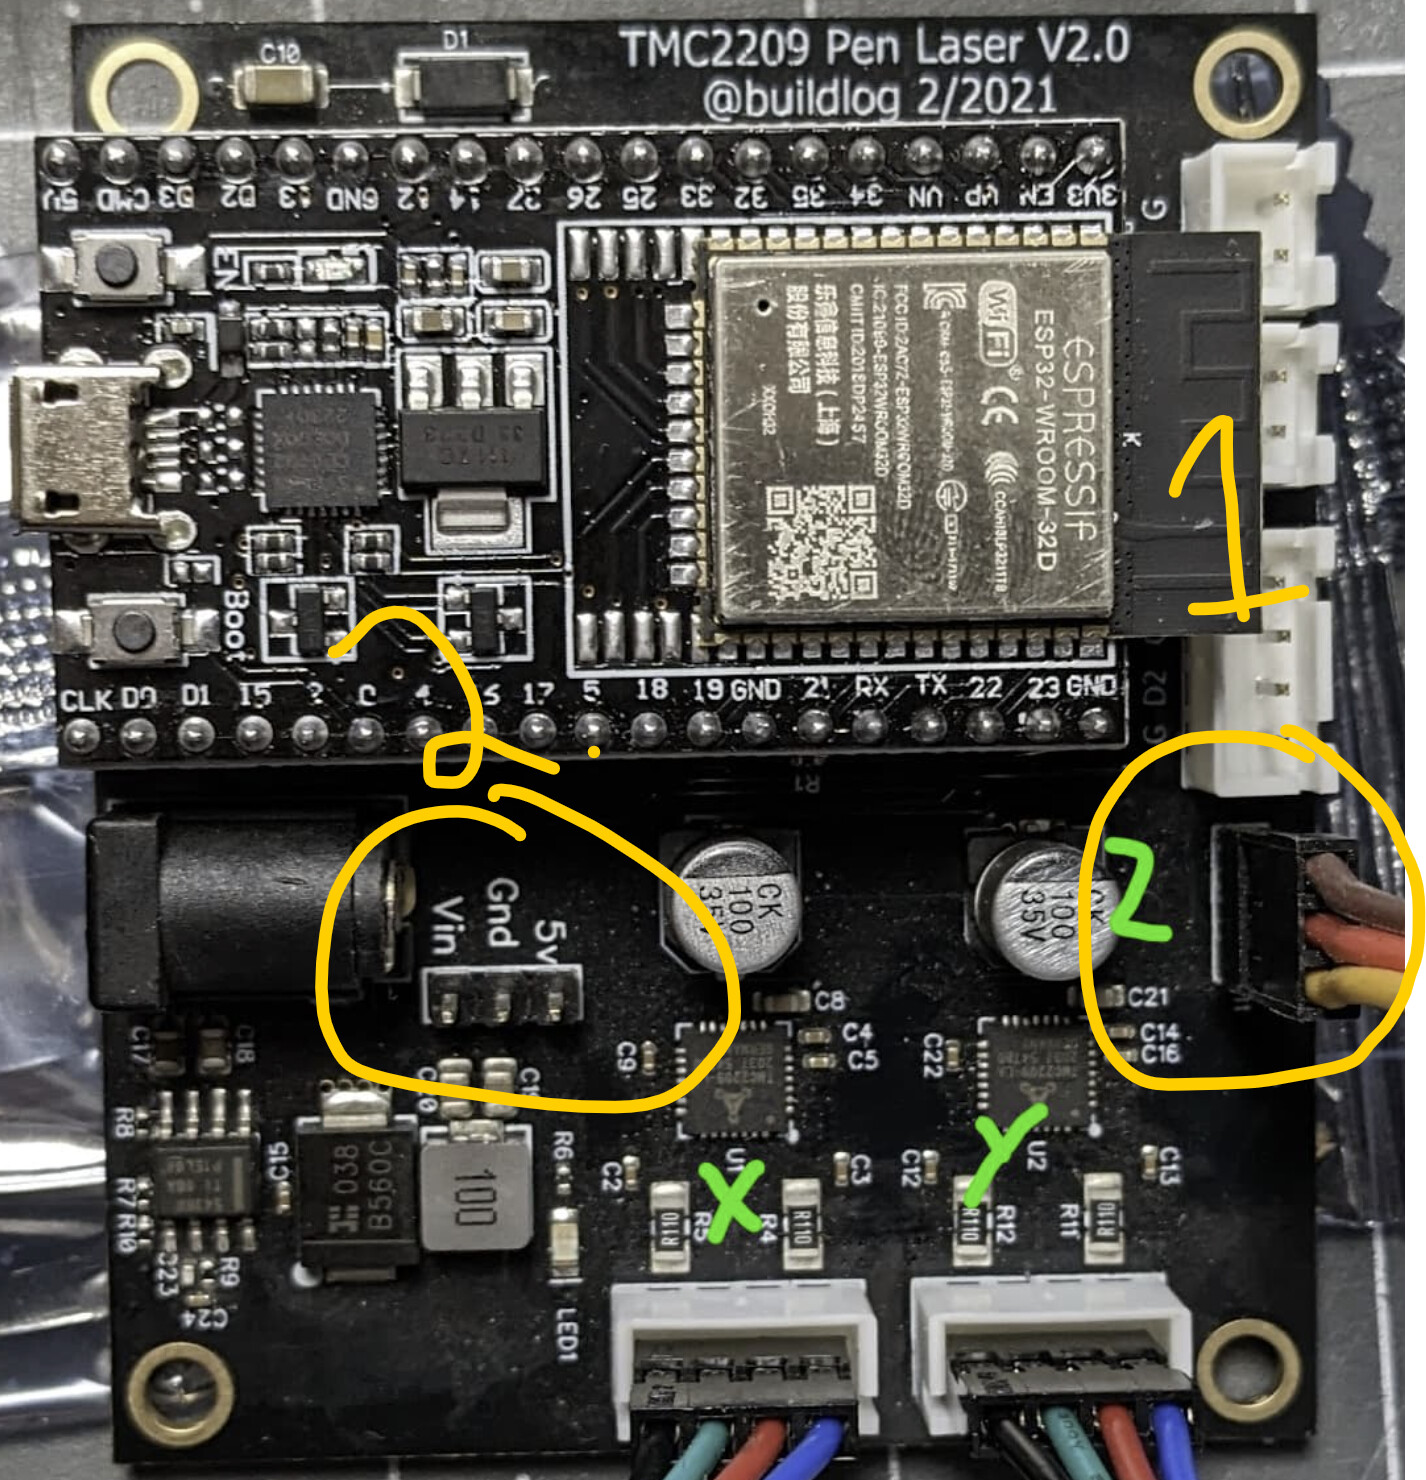
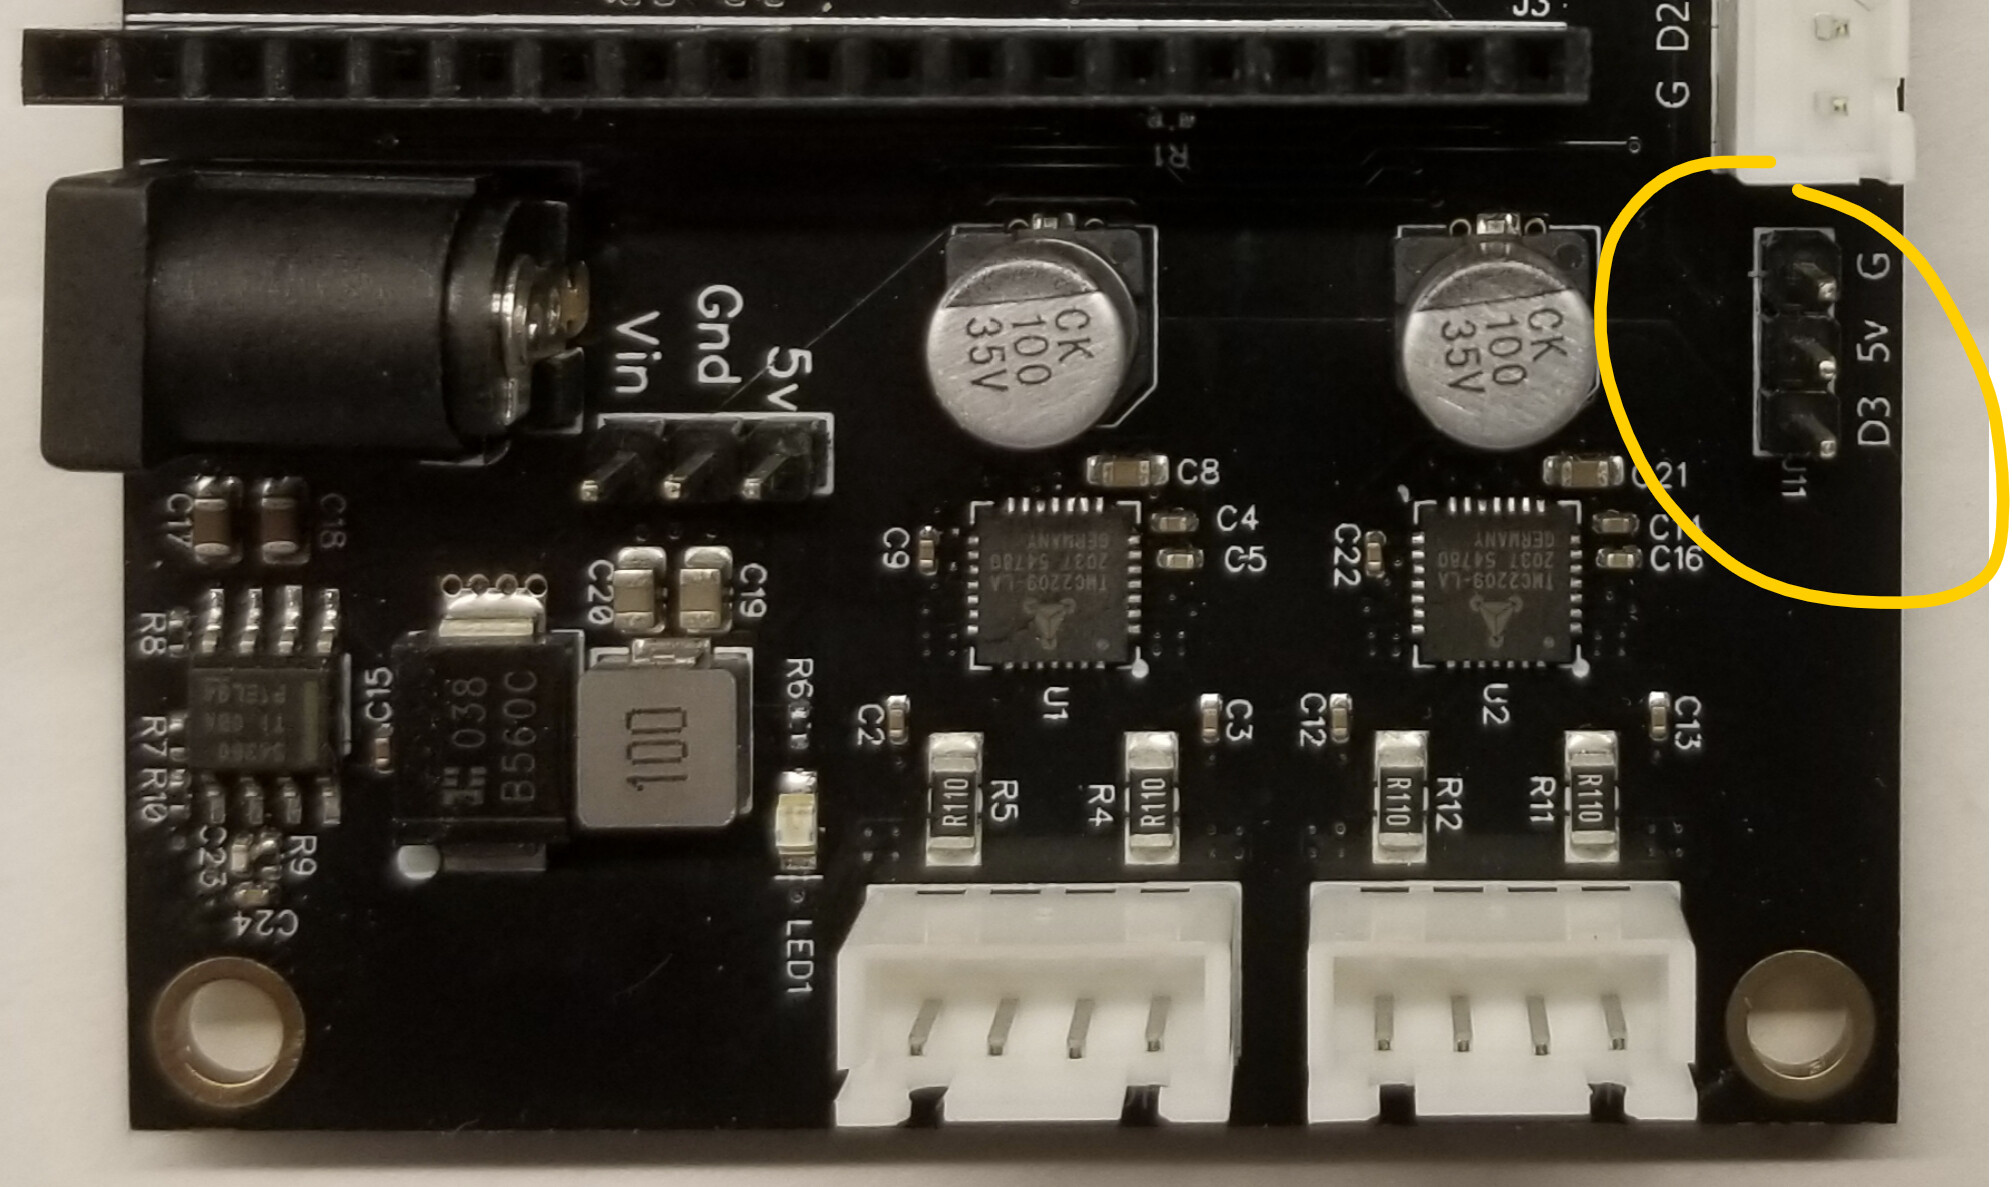
is my servo plugged in the correct place (#1)
or is supposed to go in location 2?

Update - again.
This time I’m making progress on the Z axis

The config file from Dan had the servo set to pin 16.
The board is labeled ad D3

According to an espressive pin out that I found D3 is GPIO 10

I updated the config file for this and using G90 the servo is working as I expected - so far.

So currently things are looking good. I just need to make a test plot (I’ll use the customary crown test) and see how things go. :slight_smile:

1 Like

I was trying to debug the servo. That might be it. No idea why it works on the gpio.16 then…

I found that the initial setup is weird, but it works predictably if I use $HZ first then G92 Z4, it works from Z-1 to Z4 repeatably.

If it works better on gpio.10 that’s even better for my vinyl cutter.

Sweet!

And this might be the first time that I provided useful information, vs asking for it.

Is there a badge for that?:smile:

Let me know how it works for you.

2 Likes

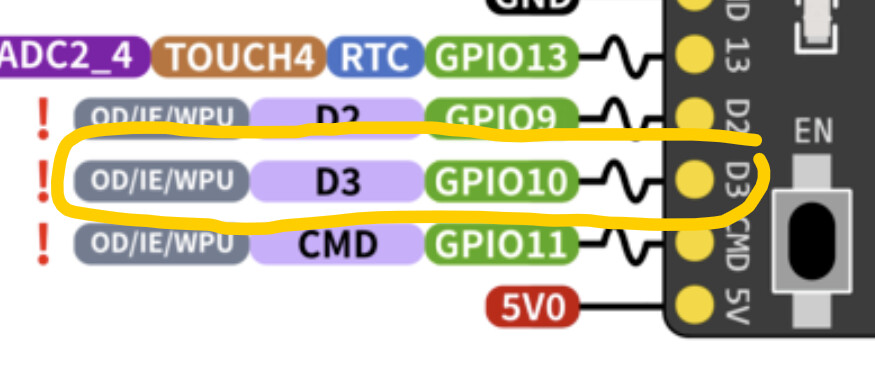
I’ll need to do some testing. The schematic I found on Github seemed to indicate gpio.16, I didn’t find the one you have there. The one I found works for the X and Y motors, and works to fire the laser. Maybe I misread something, and 16 is connected but not direct like that. That could explain why it sort of works.

So this morning I went to do a test plot and the Z did not work.
Odd since yesterday it was working just fine on GPIO 10

I did find on github firmware where you reference it being on pin 16
image

I don’t know…maybe yesterday, when it was working, I didn’t re-boot the board properly after I updated my config file from 16 to 10 and technically it was still using 16?

I’ll confirm it is on 16 tonight and re-test.

Ok…I was wrong. Take away my “first time useful comment” badge.
GPIO 16 is correct.

Here is a video of it - its 5 minutes.

at 00:43 it pauses and then resumes. I’m trying to figure that out.

I need work out a better speed now.

1 Like