Wow I am jealous and hungry! ![]()
Oh wow, now I’m going to have to try this.
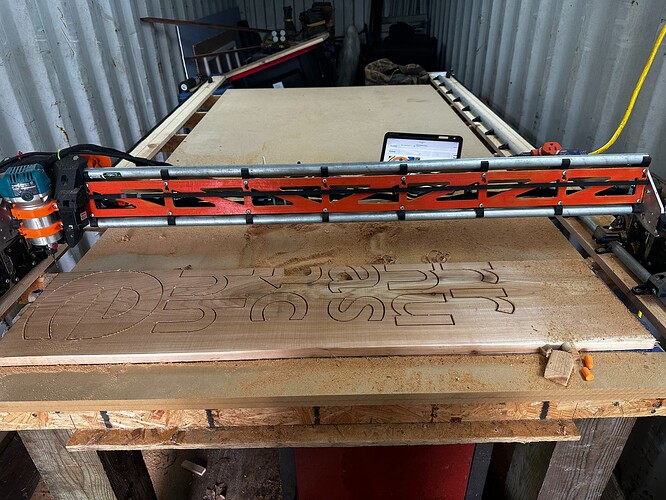
Broke the cardinal rule and changed more than one thing at once. However, I have a limited amount of cedar and this sign is for my church so whatever helps was done.
All of the suggestions here definitely helped. I cut the speed in half to 15mm/sec, changed the ramp angle to 45 degrees, changed to conventional milling and changed the step down to 4.75mm. All of which only added 9 min or so and turned out some pretty nice cuts with no failures.
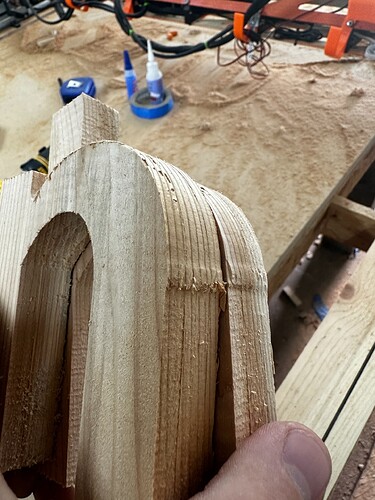
The main change is instead of having a “dent” now I have a “bump” I assume thats from changing to conventional milling.
Im cutting along the x axis for these parts. Maybe I shouldn’t be? Its just how the sign was designed in CAD and I didnt move it around. Also, like a ding dong, I once again forgot a finishing pass. I have one more board to cut and Im hoping to finally remember to add that and see how it turns out. I would much rather have a bump though, as that can be sanded.
In the Imgur link you can see at the end of the cut how the bit kind of jumps. I think it is flex in the x axis as I very closely watched the y motors and they did not move a bit when it came to that point. I dont know if there is a way to remove that. My struts are 1/4 underlay plywood. Should I cut them out of something else?
Looki n g very nice a little easier to sand out the bump than a dip
Finally remembered to add a finishing pass. Basically made the bump disappear. Barely anything left to see or sand which is nice.
However, seems like the flex is still an issue and at some point will bite me.
Does any one have any ideas to check or modify to remove the flex I have? (its 4’ in the x direction)
The bit still jumps quite a bit at the end of every pass.
Can you do another video showing the end braces, XZ Plate, YZ Plate and Linear Rails as you move (flex) the gantry. Something seems loose here, but it’s hard to tell where from the angle that you have shown.
You can flex every LowRider’s beam like that, mine too. The force you are putting on it with your hands is considerably higher than the spindle will ever put on it.
This is still the major problem of the LR in my eyes, but not too noticeable if you’ve got your settings right. I am hoping the LR4 is going to mitigate that issue.
Doesnt seem to be a lot of movement on the ends when flexing in the middle.
I’ll bet you’re right in that I can definitely exert more force. But it does seem like the spindle is flexing it. Every time the bit comes back to the starting point you can see the tension release, and the bit kind of pops out. I guess the answer is slow it down?
I can definitely see more movement on the non-rail XZ plate (moving up and down) than on the rail side,
You might want to check the screws holding the XZ Plate to the end brace, especially on the non-rail side.
Also you might want to tighten the strut screws a bit. Don’t go too hard - there should still be a gap in the slots on the braces, but try to tighten them until the screw feels reasonably tight.
What are your struts made from? I went from 3mm hardboard to 4mm aluminum (2 plys of 2mm each w/ no cut on the lower ply, and only the logo cut out on the upper layer), and it definitely made a noticeable difference.
I would agree with this. If the strut screws are too loose, then the gantry does not benefit from the torsion strength of the tubes (the tubes can slip). When tight, the tubes help resist torsion. But be careful not to tighten too much…
They are 1/4" underlay plywood. I was thinking upgrading to aluminum would be something that was needed. Im not sure Im able to tackle that at the moment though.
I will check all the screws again. I did before the last round of cuts but maybe I missed something.
This is always the tricky part! Hahahaha
I am sure that is fine, as is the triangle-cut pattern (Ryan designed it, so it must be fit for the job). I have a large span, and wanted to make it as rigid as possible, so went with the aluminum with fewer cutouts. Probably overkill…
Might be over kill but maybe worth it? The thing is it seems like it is that or run much slower. And I went overkill and built a full size machine to do plywood. Running really slow means a looooong time on a full sheet. Stiffening the beam = faster? Might be worth it.
Did you use aluminum X rails?
That is absolutely not normal.
What kind of endmill is that?
Not sure I know which part you are referring to here. Regular 3/4" conduit for the x rails. The strut plates are 6mm underlay plywood. The XZ plates are aluminum from your store. And the XY plates are 1/2" plywood. Or 3/4" I cant remember.
It is a Carbide Spiral Upcut 1/8 Inch Cutting Diameter 1/4 Inch Shank. I think… it was upcut and not downcut.
Is there any chance your braces are the wrong size? If you use 3/4" conduit but print the wrong brace size, then even if you tighten all the way, the braces will have a loose grip on the tubes and the torsion of the tubes will not contribute any torsion stiffness to the gantry.
If you grab the X gantry tubes, can you rotate them in place?
Pywood is no good. It is a wet noodle. MDF, plastic, or metal. is what you need to use on your next build.
Try a single flute, and if the design allows use a single flute 1/4" upcut.
Two flutes are not recommended for our RPM range.
Cannot rotate at all. And I did check that more than once. I think someone else suggested that as the culprit but they are all correct.
Well oke doke then! I shall swap that out. I am pretty rural where I am so I got what I could find locally. May have to take a road trip!
I will order some single flutes for sure.
You learn something every day! I did not know this.
Appreciate the help once again!

