If the belt path isn’t perfect the belt will walk off the pulley if it’s not flanged.
yep.
The distinction I was talking about was between flanged bearings (1mm flange) and the typical aluminum idlers with a 3mm flange. Much easier to climb off the 1mm flange than the 3mm.
I was sweating a little bit thinking about squaring up the X and Y rails but then I discovered that Klipper Firmware has my back: Skew correction - Klipper documentation
Software based skew correction can help resolve dimensional inaccuracies resulting from a printer assembly that is not perfectly square.
Some thoughts on bearings as pulleys:
In general, bearings with large balls/races will last longer than bearings with small balls/races. The pulleys sold for 3D printers that have the 3 mm bore have such tiny bearings I would not count on them lasting very long in a 3D printer. I tried some of those in one iteration of my first sand table and they became squeaky very quickly.
I specifically chose F608 bearings for UMMD because the diameter meets the Gates recommended minimum of 9 teeth in contact with a smooth pulley. I was using 9 mm wide belts and stacked F608s are 11 mm tall between the flanges. F608 bearings are made by the millions for use in skates and motors, so are readily and cheaply available in different grades.
You can’t use flanged bearings alone for very large mechanisms as the weight of the belt over a long span is enough to cause it to ride over the small flanges on flanged bearings. In UMMD, with 300x300 bed plate, the flanges were sufficient. In Arrakis sand table, the bearing flanges weren’t sufficient so I printed flanges and spacers. Your pulleys must have axles that are perpendicular to the belt path or you may not be able to use just bearing flanges to keep the belt on track. If you choose to stand the pulleys up on a bolt, especially if the pulleys/belts are stacked, the belt tension is liable to tilt the axles and you may have trouble keeping the belt from riding over the flanges. The problem is worse for small diameter pulley axles than for large diameter axles. Supporting the pulley axles at top and bottom helps keep them from tilting under belt tension. That’s why I used rectangular aluminum tubing to hold the pulleys in UMMD.
Running belt teeth against smooth pulleys is noisy at high speeds. You can minimize the noise by twisting the belts so that only the smooth back side of the belts contact the pulleys (except drive pulleys, of course). However, you can’t twist belts over a short span without causing problems with tracking and/or belt wear. 6mm belts can be twisted in a shorter segment than 9 mm wide belts. Twisting the belts would also allow one to use smaller diameter pulleys which would both prevent print artifacts and reduce noise (and moving mass). Gates has specs for allowable twist versus span versus belt width.
I’m not a big fan of using any kind of wood product in the structure of printers. My first bad experience with it was an old Makerbot that had a laser cut plywood frame that warped. Arrakis has a 1/4" plywood bottom that warps with changes in the weather. Sometimes it’s flat and the magnet that is supposed to be air-spaced away from the wood clears the entire bottom surface and it runs quietly, but sometimes the bottom warps and the magnet drags against it making noise. My next version will have a glass bottom which I have determined is pretty close to flat even when supported by just its edges, and will allow me to include an effective eraser system that depends on the bottom being nearly flat.
I also don’t care much for PLA filament, especially used to print parts for a 3D printer. If you can’t absolutely guarantee that the PLA printed parts will never be exposed to anything above room temperature, it is best not to use it. I’ve seen more than one post in forums about how someone was taking their printer to a demo or friend’s house and left it in a parked car for a while and discovered that all the PLA parts had softened and deformed.
Some people worry about the “ungreen” effect 3D printing has on the quantity of plastic trash in the world. If you’re one of them, maybe you should rethink PLA use because it’s likely that whatever you print with PLA is going to end up in the trash long before the same part made with ABS or PETG. Despite the marketing BS, PLA is only minimally biodegradable under very specific circumstances.
3 Likes
And the_digital_dentist himself makes an appearance! I’m honored/intimidated/flattered/etc.
As mentioned up-thread I read your UMMD build blog, reprap forum posts, etc somewhat early on in this little adventure. You helped hammer home the absolute necessity of parallel belt-segments in critical areas so I opted for eccentric idlers for the four corners of the CoreXY motion to allow for proper alignment. Whenever the Z axis gets built it will have 3-point kinematic mounting. I eschewed aluminum idlers for flanged pulleys (though smaller than is ‘optimal’).
There are obvious points of departure from your designs of course but I consider those to be either matters of taste, or questions of economy/expedience. MDF may prove to be too ‘dynamic’ in the face of changing weather/etc. and ABS/ASA/etc. is probably a more suitable material for the printed parts. But I have the ability to print PLA in-house right now and MDF is inexpensive and easy to work with hand-tools. Of the available plant-based substrates MDF is probably the least problematic because it does not tend to carry the same internal stresses (and himidity/temp induced warpage as laminated plywoods.
Thanks for your input and I hope you stick around to follow the build. I’m hoping to have at least a working CoreXY motion (possibly just a pen-plotter) to display at MRRF22 on the http://workshop88.com table and if I make any progress on the Z axis I might bring that along too.
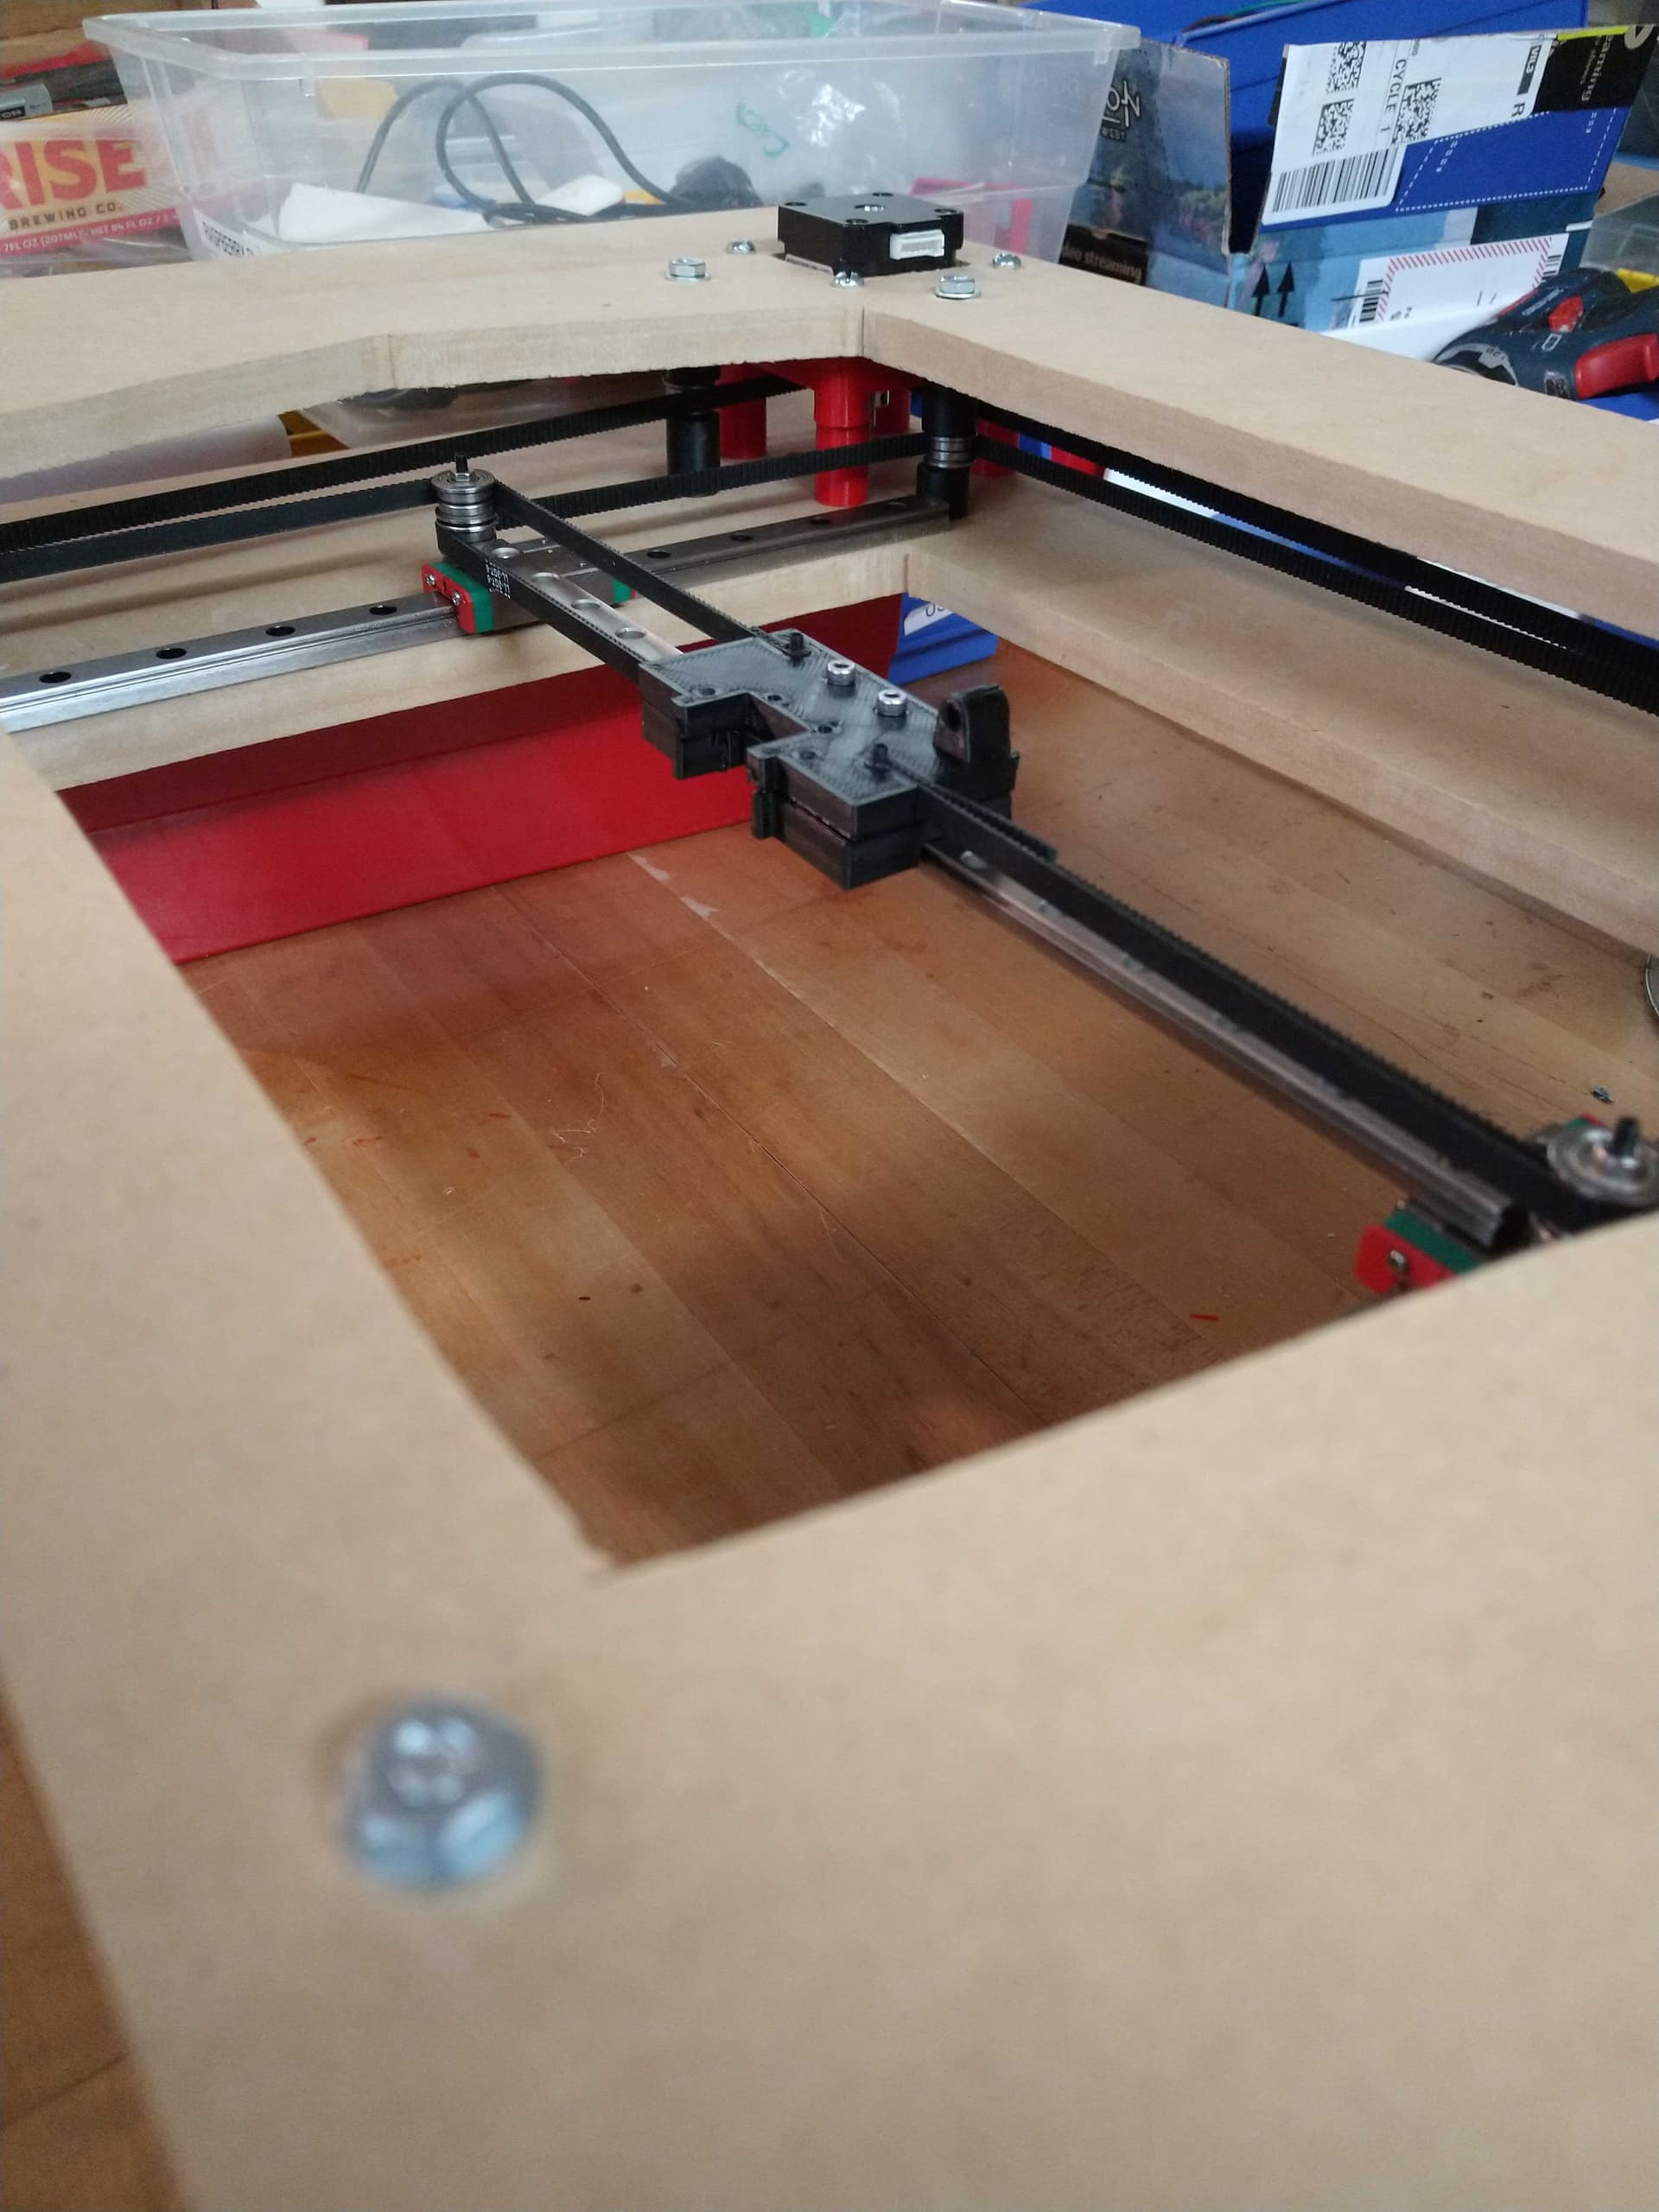
Belts are routed and roughly aligned. I replaced the stepper motor with the bent shaft. I have some DIN rail and a 24V PSU (used industrial PULS unit. 10A @24V) on order so I can start assembling some electronics early next week.
1 Like
I got my aluminum DIN rail and decided that was too flimsy to mount the PSU to. I ordered a steel one instead and that just came today. Still need to figure out exactly where to mount that DIN rail though. I discovered that the PSU must be properly oriented or I have to derate its output somewhat and the orientation I had envisioned (facing straight down) doesn’t even exist on their chart. I’ll probably end up with some sort of rear/side accessory plate eventually but for now I will just fab up something expedient and not bother joining it to the CoreXY frame.
I have my controller board in hand and decided (in keeping with the theme of this build) to try to run Klipper + the web console (probably Fluidd/Mainsail) on a Pine64 Quartz64 board. Their page has the following warning:
Warning: Software for the Quartz64 is still early in development, and therefore currently lacks features such as the ability to produce video output.
Granted I don’t need Video output but compared to just using a spare RaspberryPi this is playing on Intermediate/Hard mode.
Update time: I abandoned the idea of using the quartz64 board for now because I have a spare pi and almost no time. I ended up frying the pico pi soldered to my control board so I pivoted to using an SKR Pico that I had in my inventory instead.
I was able to home the machine last night and command a few moves which makes me pretty happy. Would have been happier if I could have done it with the other board, but oh well…
1 Like
Photographic evidence
2 Likes
Took the printer to MRRF to show off (and put in a new motor while I was there). Worked pretty well, but I lost the retaining nut on one of the X gantry posts so the bearings on that side kept walking off…
4 Likes
Was cool to see. Made more sense when you stuck the hotend on. I hadn’t seen this thread yet.
2 Likes
Sorry we weren’t able to connect in person, but glad you got to see my little passion project.
Mini-update: “E’s not dead. E’s just resting.”
I’m hoping to make the return journey to MRRF and have something (however meager) to show for the last twelve months.
I hope to have both a Z axis and some sort of HotEnd on the printer by then, though if it just functions as a pen-plotter I will consider that a win.
1 Like
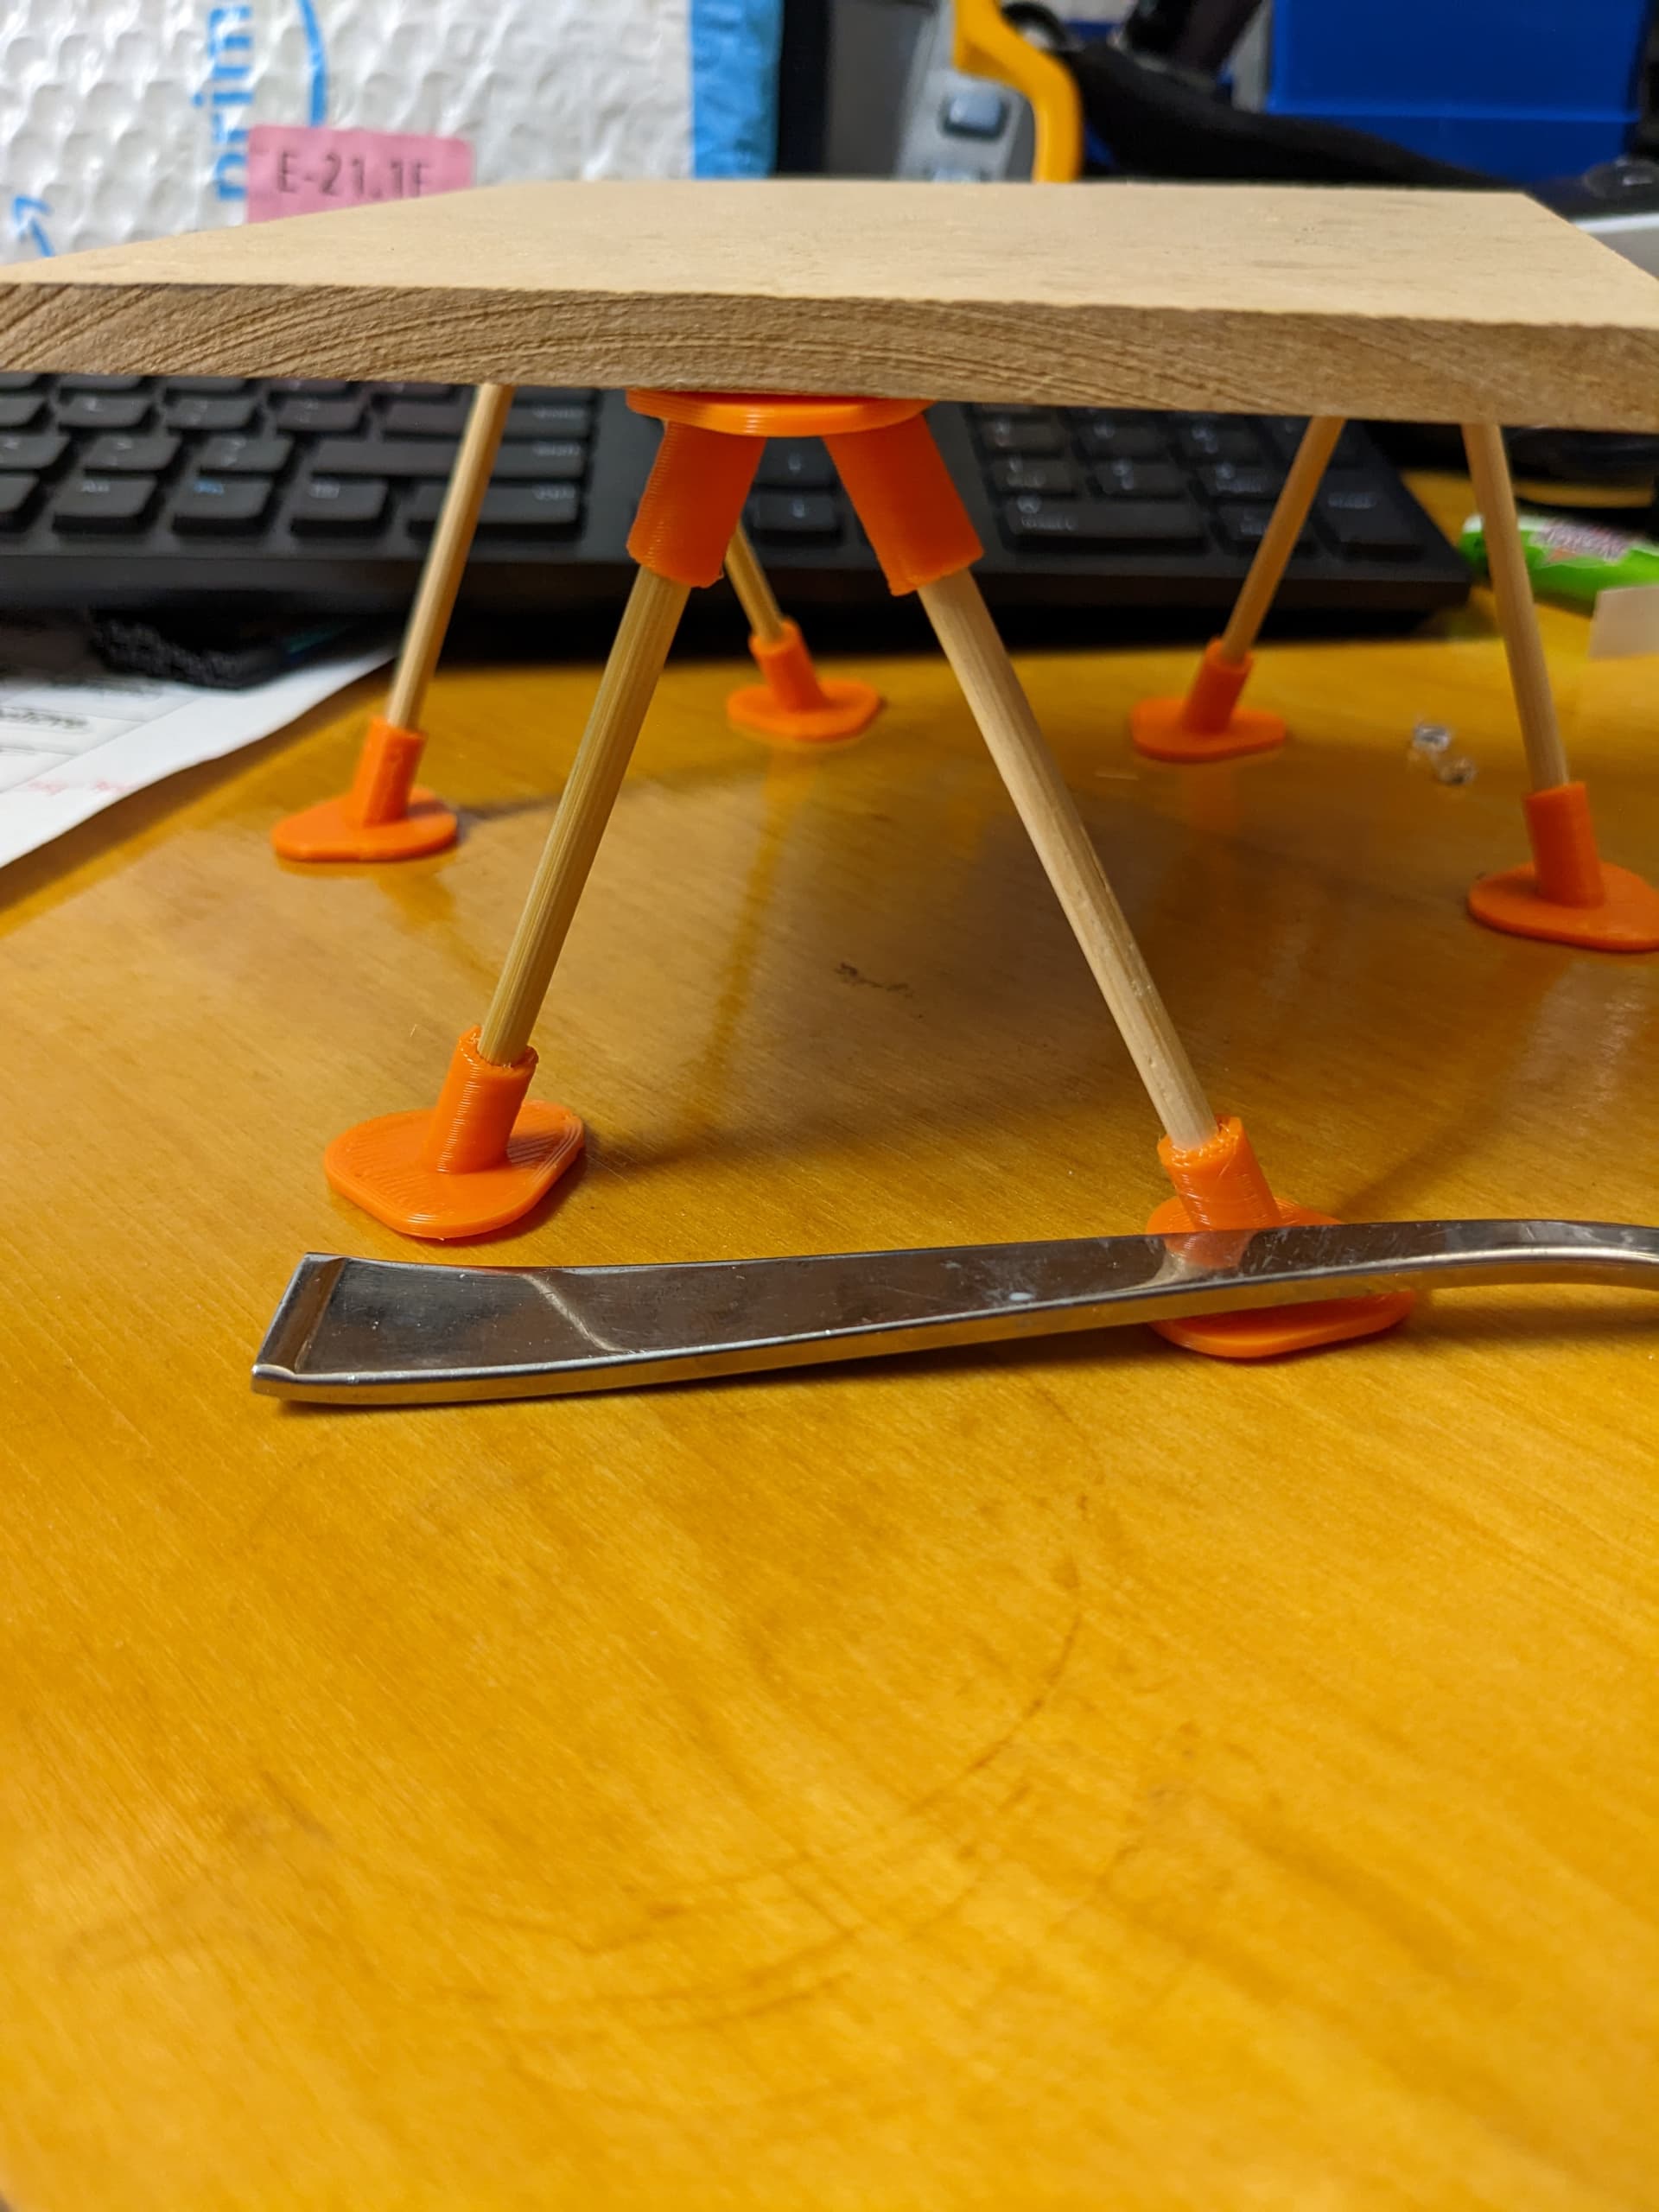
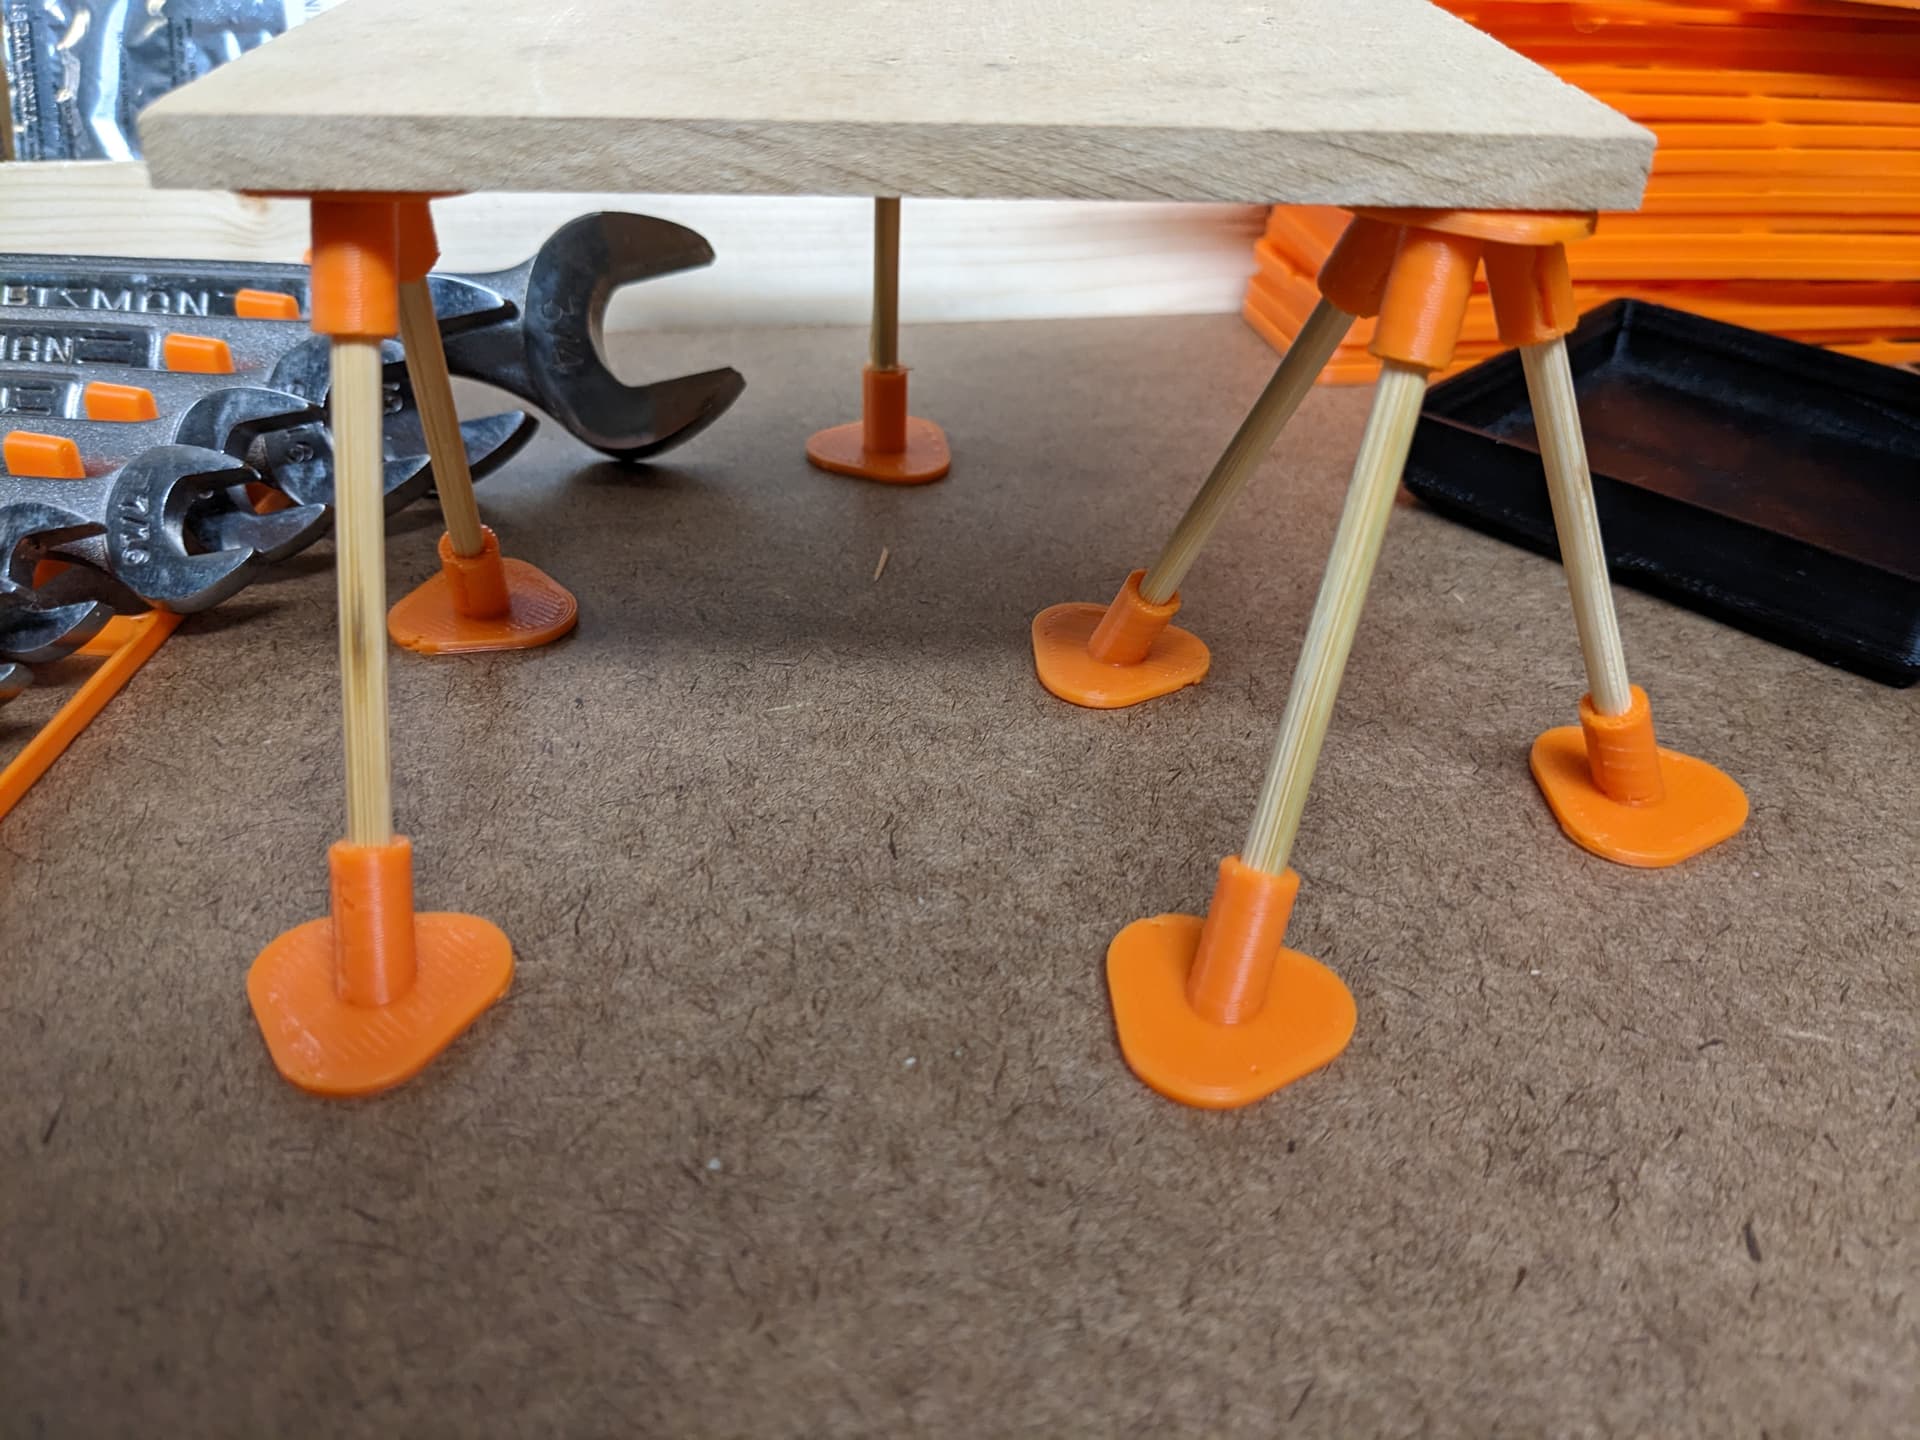
I use super glue to keep the bamboo skewers in the printed parts and I hot glued the legs to the printer and the table.

I think I need to fix some binding issues as I am skipping steps when I keep cranking the acceleration past 20k. I increased motor current significantly and things did not improve.
2 Likes
Never heard EDM made that way before, great tune ![]()
2 Likes
Nice work so far,
From my experience these linear rails kinda suck. They often bind slightly, epecially during slow moves.
Some are better than others, for some reason, but most of them are disappointing.
So I would check that first, make sure that all the roller blocks are really absolutely smooth. Otherwise the motors might miss some steps. If not, then the only way I found was to purchase lots of bearing blocks until finding one that’s good… I tried many other techniques to make bad bearing blocks work and none really succeeded.
One other thing: it is generally good practice to fit as large diameter pulleys as you can, the larger the bend radius on the belts, the better. It helps reducing the load on the motors from what I’ve heard.
Also I had some doubts on your only one screw holding all the belt tension but it seems to hold so far so maybe I’m wrong in thinking it will just bend. But be aware that any deformation on this screw will impact the final print accuracy so that’s a thing to keep monitoring.
I guess it’s time to work on some kind of Z axis now also!
2 Likes
My rails are decent as far as smoothness/backlash is concerned (at least for now). I disassembled, cleaned and lubricated them before installing.
Good observation about that single screw. Even if it isn’t at risk of shearing off the slop between the threads and the larger hole might cause things to drift.
Part of my noise/skipping problem was improper belt tension. I got that adjusted and things improved but one of the belts is still super noisy (and appears warped/skewed as it runs across the pulleys). Gotta find some other belts and see if swapping it improves things. Then get the carriage loaded up and see what klipper’s input shaper thinks.
Yes, I’m working on z-axis plans in the background. My six-legged platform (currently 100mm high and built with 5mm bamboo skewers) is performing admirably. Going to upgrade to 1/2" EMT and go up to 200-250mm when I’m ready to actually mount the Z motion.
I replaced the belt, swapped motor drivers (previously I had replaced the “noisy” motor), tensioned the belts, checked all the fasteners and that same belt+motor+idlers are noisy.
Going to pull off both belts and test each idler separately looking for binding.