I think we need to come up with a good simple way to explain Leveling and Squaring better. For someone that has never messed with a CNC before this can be pretty daunting and I think there should be a way to make this much easier for the new user.
Ryan Edit - This section, LowRider CNC V4 - V1 Engineering Documentation
I guess I still need to go through the docs a lot more ![]() That looks way better!
That looks way better!
From my recent entry into this adventure, I’d say I could have benefited from a section before here with something along the lines of “New to 3D printing as well as CNC? Start here!” and have some good crayon-level explanation of why it’s important to run the CantiLantern (or other) calibration prints, and why you can’t just toss a spool of filament on your printer and expect things to work perfectly ![]()
A surgeon generals warning that building this is addictive and adding this tool to your toolbox will have you continually trying to find ways to use it and upgrade it.
“To a hobbyist with a CNC, everything looks like a project…”
Well it could still use some work…but Jason’s leveling script makes it a lot easier.
We do have a section here, highlighted. I am very open to wording this different if you have suggestions.
anyone making suggestions please link the section you think needs to be looked at, or where your suggestion would fit.
I am not going to be around much today so don’t expect to many responses from me until tomorrow.
My comment is less a criticism of the docs, and more of my ability to read them…
You have the info there, it just didn’t scream at me like I may have needed ![]()
I guess my next suggestion would be a stronger suggestion to introduce yourself to the community before jumping in, in order to get some initial info like I didn’t… but really I’m again just thinking of ways of others avoiding my mistakes…
There always has been and always will be the problem of “You can lead a horse to water but you cant make him drink”
100% here
manual… it is a book about a spanish guy. I should read it sometime.
I’m waiting for the mental download link with included comprehension. ![]() Just click a button and wait for the complete understanding.
Just click a button and wait for the complete understanding.
In all seriousness though, I should go through the current docs. I haven’t really looked at them since i built mine in 2016 or so. Could probably upgrade to better follow along with the cool forum projects.
The grok button…
Neo: Can you fly one of these?
Trinity: (short pause) I can now.
Nice topic.
The more LR4’s I see being built using DIY printed parts, the more strongly I feel about Calilantern being strongly recommended to help save Makers time and material, and reduce risk of downstream assembly and operation related frustration.
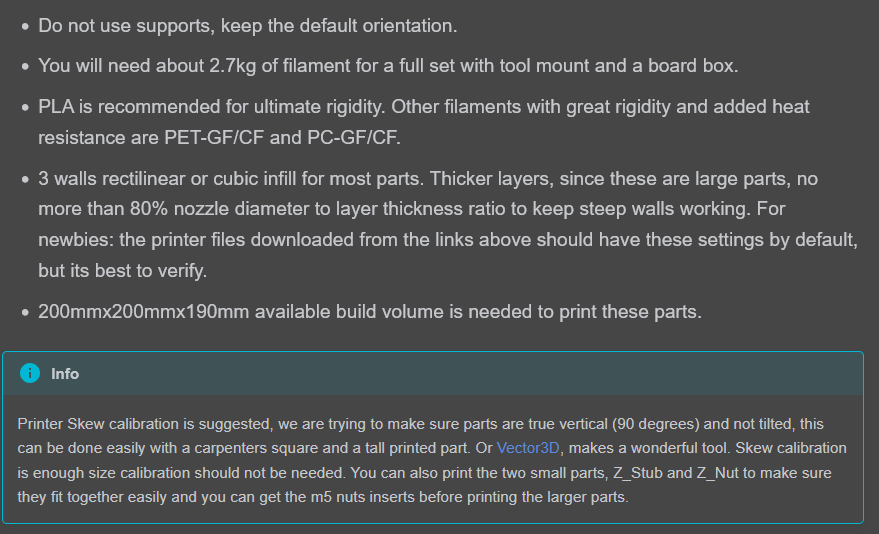
Including a canary test of fit of the Z Stub and Z Nut, including verifying fit of captured nuts. e.g
Ryan already has that in there. Maybe just a flashing neon sign pointing to it ![]()
Yep, exactly, the “Info” tip is too soft of a suggestion. My recommendation is a stronger “Warn” dragons be here if you don’t pay heed. A strong endorsement of Calilantern (and hopefully the owner provides a discount/affiliate to Ryan).
I think instead of it being at the end of the info section like that, it could be its own step, like:
Step 1: print these 3 parts at these settings, and see if they fit together. If not, proceed to printer calibration.
Step 2: ???
Step 3: profit
Step 1: Printer Calibration - CHECK SKEW!!!
Step 2: Print these parts to see if they fit
Step 3: ???
Step 4: Profit!
![]()
Boom! Perfect example of why you gotta spell everything out for people in exacting detail, cuz I’m people and I don’t read good sometimes ![]()