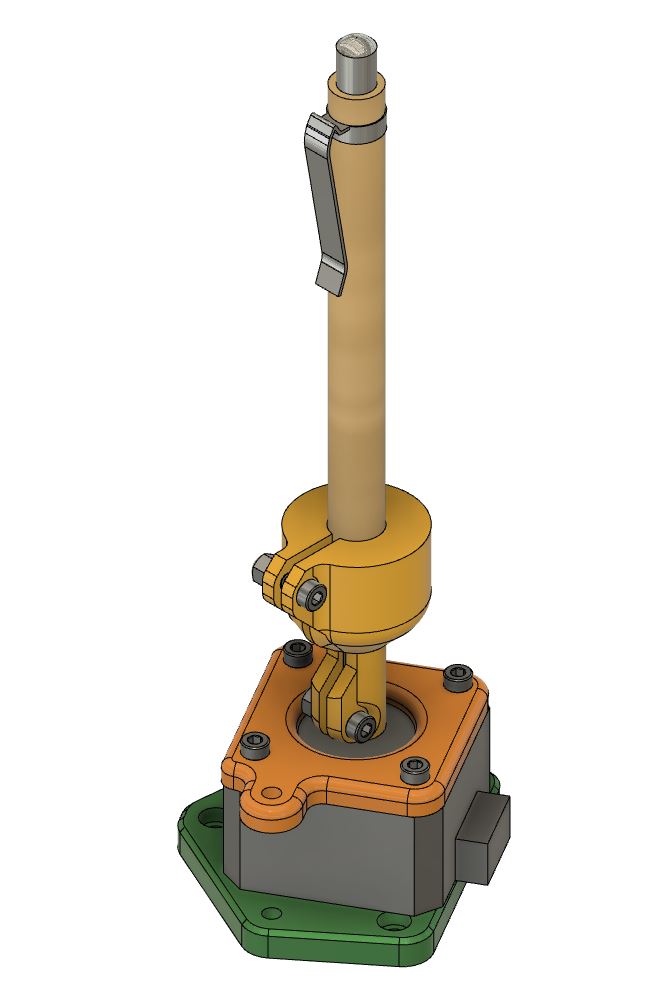
I couldn’t get anything to work right today. First problem which I should have foreseen was the wood is not flat. Second problem was getting that pen vertical. I tried several ideas, but was never happy with any of them, so I designed a special pen spindle holder. The nice thing is it is not a very long print and only have to print 2 parts. I spent a half hour modeling the pen as accurate as I could. Another advantage to this is the laser can get a lot closer to it. The pen should be pretty close to perpendicular to the motor now. If this works well, I will have to make spindle for a toothpick also.
5 Likes
I am finally getting back to this. After having several failed prints halfway thru the print or so, I simplified my idea and made it so not overhangs were happening.
I was playing with ideas for engraving on these bamboo pens & decided to play with sandify. I set the machine dimensions to the dimensions of the area I was engraving. Here are my settings I changed:
machine size 63,27
Web shape
large circle radius of 1
initial width 3
Initial height 2
X offset 0
Y offset 0
Rotate 0
Number of loops 18
Keep in tack
Scale of 100
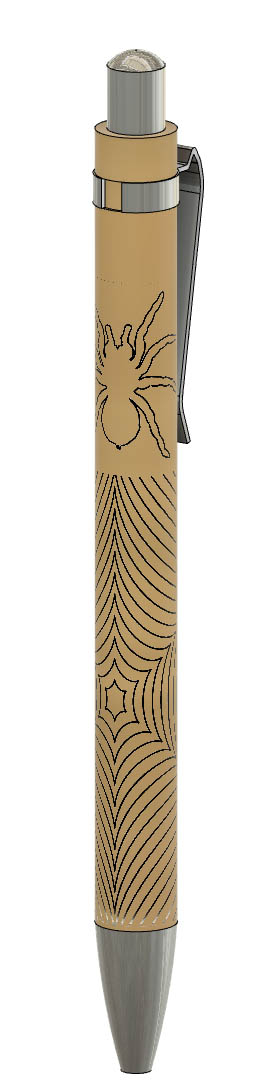
I exported the data to gcode & wrote a lisp program to read the gcode & create a long polyline in intellicad. I took out the lines that connected the web. I found a spider dxf file from Insects | Free DXF Files | Maker Union I wanted to see what it looked like wrapped around a pen, so I inserted a decal of the created graphics into fusion 360. I might put a little more detail in the spider & see if I can calculate the spider web to wrap close to exactly around the pen. So far it looks pretty good to me.
7 Likes
Engraving of a spider & web wrapped around the bamboo pen came out well for the first pen engraving.

5 Likes
I was just realizing last night that a 1/2" drill chuck would work well for these small objects & be easier to put in & take out. This one on Amazon handles 1.5mm-13mm which covers the ranges from toothpicks to a little beyond these bamboo pens. It also has 3 different types of shanks for mounting. It uses a keyed chuck, but probably only need to hand tighten with these wood & bamboo items. https://www.amazon.com/1-5-13mm-Converter-20UNF-Adapter-SDS-Plus/dp/B088NNVG38
There is also a keyless version that goes from 2mm-13mm. 2-13mm Capacity Drill Chuck, 1/2-20UNF Mount Impact Driver Bits Chuck with 3/8"SDS-Plus Shank 1/4" Hex Shank 1/2 inch Socket Square Female Adapter(ZDJT 2-13MM 1 Packing) - - Amazon.com
I would just 3d print a coupling to mount this to the motor. Looks like you can also get 1/4" to 5mm couplers that would make it a more rigid connection to the motor. Actobotics Set Screw Shaft Coupler (1/4" to 5mm) - RobotShop
There are a few of the drill chucks on aliexpress, but the ones Amazon looked better.
4 Likes
Man my wallet cannot afford all the ideas this forum puts in my head. Lots of great work in this post!!!
5 Likes
Thanks. I am trying to keep the cost down, but sometimes you have to spend a little money.

7 Likes
That’s incredible!
1 Like
Here is a video of the engraving of the maze on the pen. I found some free artwork of a running squirrel, added it to the beginning of the maze & couldn’t resist adding a cute title for the video.

4 Likes
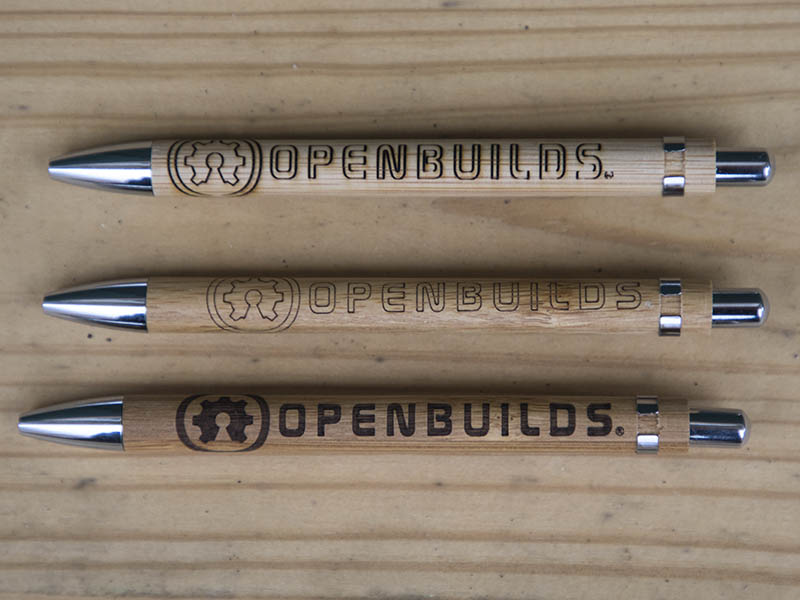
I was having a problem with the openbuilds logo not coming out well. I had the rotary settings wrong. Although they worked, I noticed the engraver was moving faster along the X-axis than the rotary axis.
The settings I had before were:
$102=27.000 ;Z-axis steps per millimeter (Rotary Axis)
243 in the Lightburn rotary mm per rotation
I essentially had these backwards, but the numbers work out to more even ones now and make more sense. Don’t know how I missed that before, but it is correct now.
The correct settings are now:
$102=200 ;Z-axis steps per millimeter (Rotary Axis)
32 in the Lightburn rotary mm per rotation (DRV8825)
The top pen in the image was with the old settings. You can see where it was coming out lighter along the pen (X-axis) which is where it was moving faster. I was quite surprised that the ® on the bottom pen was actually readable.
5 Likes
I found another source for these pens on aliexpress for 1/2 the cost of Amazon & seem like the same pens. It is a pack of 60 pens instead of the 24 on Amazon & comes out to $0.42 each.
2 Likes
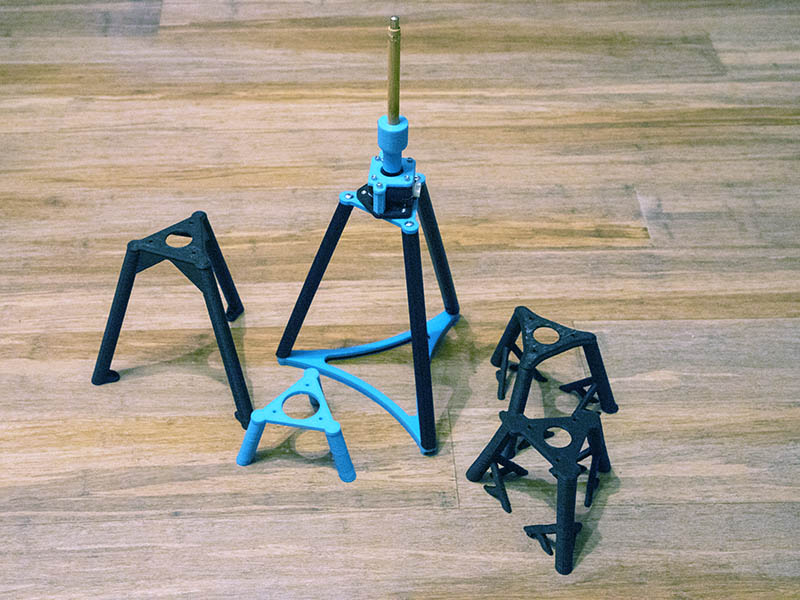
I uploaded the design for this simple Pen turntable to thingiverse along with source files in f3d, step & skp. Simple Pen Spindle Turntable Laser Engraving by GeoDave
Here is the video I took of the openbuilds logo engraving.

2 Likes
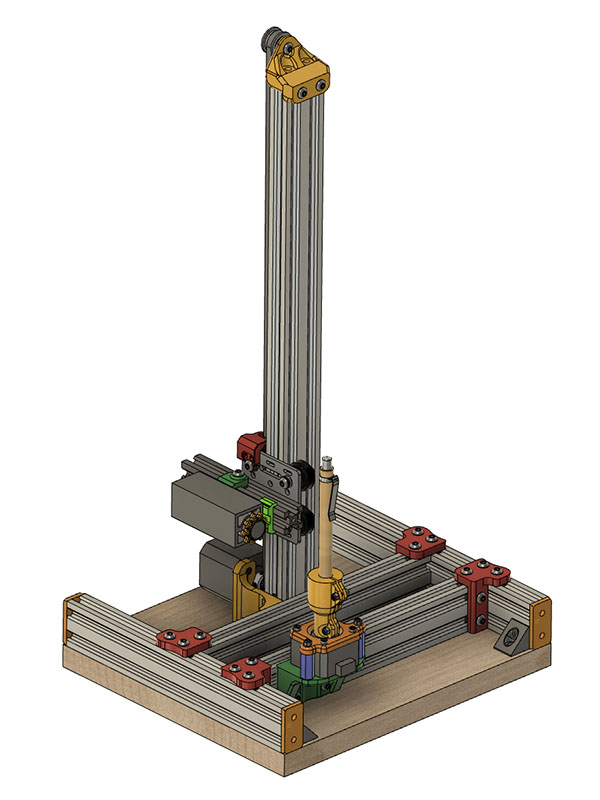
I have been playing around with the idea of a dedicated rotary axis laser engraver incorporating the simple turntable idea. I started a build log of it on openbuilds site here: Dedicated Compact Rotary Axis Laser Engraver | OpenBuilds
Here is what the current design looks like.
3 Likes
I don’t like seeing this thread show up on the updated list as it always makes me want to build one of your previous designs but I like this one even better. 
Please keep up the designing, I love seeing what you’re making!
3 Likes
Anyone have thoughts on this 2-axis grbl controller board? Looks to have soldered on DRV8825 drivers & 2 or 3 pin connections for laser & might be perfect for my dedicated rotary axis engraver.
Thought I would update this thread to the corrected numbers for rotary setup in Lightburn for the turntable.
I set 100.0 mm per rotation in Lightburn Rotary Setup & that is the same with the DRV8825, A4988, 1.8-degree Nema 17 or 0.9-degree Nema 17.
Here are the GRBL numbers that should cover most people’s situation ($101 is Y-axis or use $102 if you are using Z-axis for rotary setup)
$101 = 64 ;DRV8825 & 1.8-degree Nema 17 1/32 step
$101 = 128 ;DRV8825 & 0.9-degree Nema 17 1/32 step
$101 = 32 ;A4988 & 1.8-degree Nema 17 1/16 step
I found a simple way to test the speed difference between the X-axis & rotary axis to verify they are both traveling the same distance in the same amount of time. I created a Lightburn file with a line 100mm in length vertically (rotary axis) on Layer C00 & 100mm in length horizontally (X-axis) on Layer C02. With the laser unplugged, I ran each layer separately and the times came out the same for speeds from 100mm/min to 2000 mm/min
Below is the output from Lightburn showing the times.
$101=64.000
100.00 mm per rotation in Lightburn Rotary Setup
2000 mm/min
Starting stream
Layer C00
Stream completed in 0:05
Starting stream
Layer C02
Stream completed in 0:05
1000mm/min
Starting stream
Layer C02
Stream completed in 0:08
Starting stream
Layer C00
Stream completed in 0:08
500 mm/min
Starting stream
Layer C02
Stream completed in 0:14
Starting stream
Layer C00
Stream completed in 0:14
100 mm/min
Starting stream
Layer C00
Stream completed in 1:02
Starting stream
Layer C02
Stream completed in 1:02
2 Likes
I finally got around to publishing the files on Dedicated Compact Rotary Axis Laser Engraver by GeoDave. I tried to upload a zip file of all the files, but thingiverse doesn’t seem to allow that now. You can find the zip file and more detailed info on my build log I mentioned a couple of posts earlier.
4 Likes
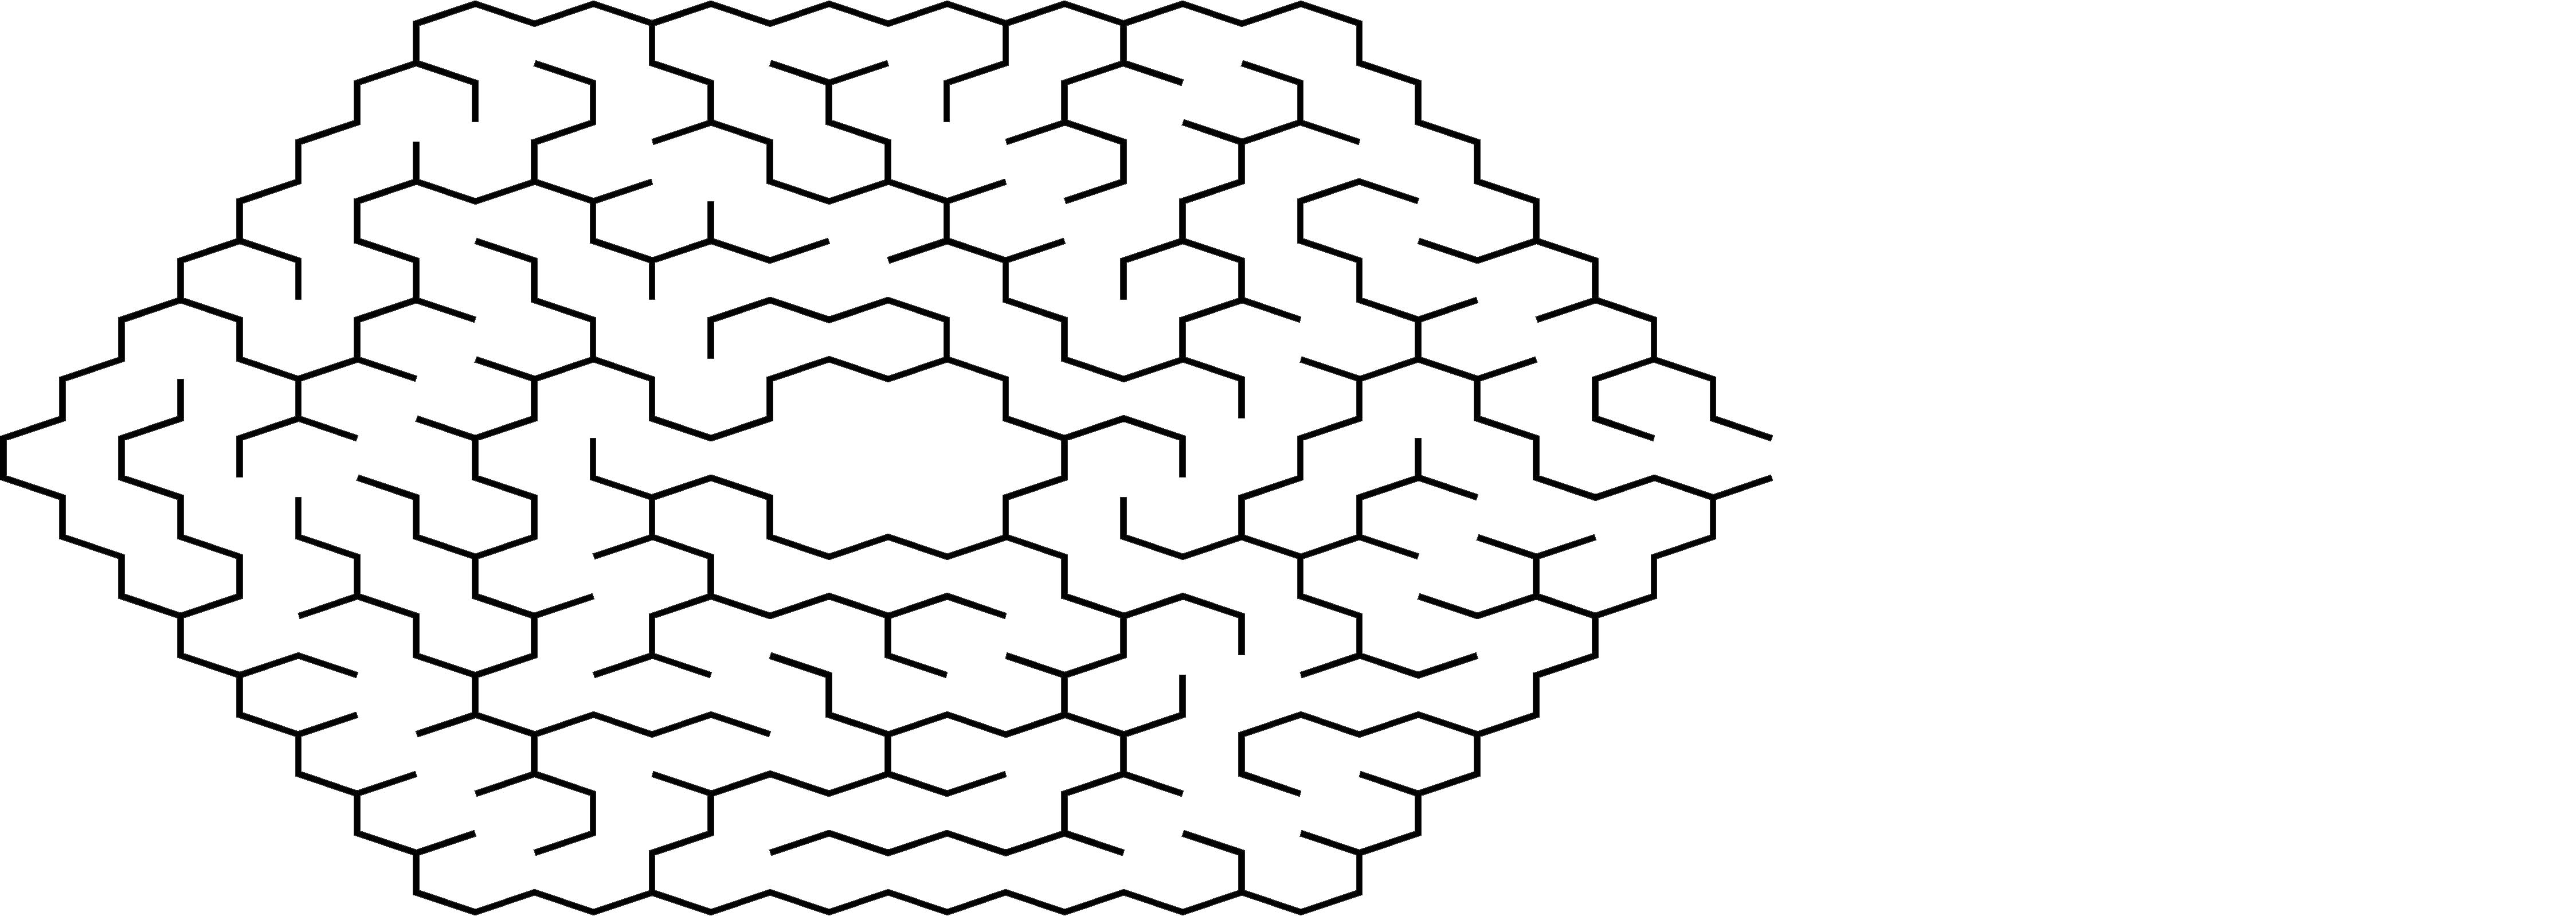
How about Pi to 100 decimal places engraved around a Bamboo pen?

11 Likes
Use this link to download all files as a zip file.
Is that a new way of getting zip files from Thingiverse? You can also find all the files zipped together along with a zip file of the lightburn file for the pi design on my build log : Dedicated Compact Rotary Axis Laser Engraver | OpenBuilds
I will probably post this design to the prusaprinters site next week.