So close. Your first layer is too low (too close to the bed). As for the ripples, could be 4 things. Belts too tight or too loose, machine a little loose, my money is on printing too fast. What are you speed setting like?
I Helped get so many people up and running today!!! So cool.
Starting height, Nozzle just touching the bed, all axis should read 0,0,0. When its starts the print it should lift the right height of the first layer. Do it once or twice and it is simple, you are aiming for slightly squished extrusions and still able to distinctly see each line. Just before the point where they smear together. Wipe the blue tape with 70% alcohol or better (I think the 90% might stick better). If you get tape stuck to your prints just soak that surface in alcohol for 5-10 minutes and it scrapes right off.
I’m not worried about first layer height. this was a test of temperature I was doing. there is noticeable over extrusion on the corners, that’s what I’m trying to figure out. I’ll get the bed level when I get the thing printing right. And the ripples are from the zinc I’m still wearing off. if you notice they are in the exact same place at each layer so it’s a deviation in the movement across that axis and i can hear the pipes grinding when the ripples are being drawn.
Take a business card and move the print head down to where you can just feel the card being held in place by the friction of the nozzle resting on it. then select prepare in the lcd menu then select set home posistions. everything g should read 0.00 across all axis at this point. in your slicer settings make sure you remove any g28 or g29 commands. if you notice any dragging across your bed at this point when starting a print then your bed is not level.
I am not the biggest fan of this extruder yet. 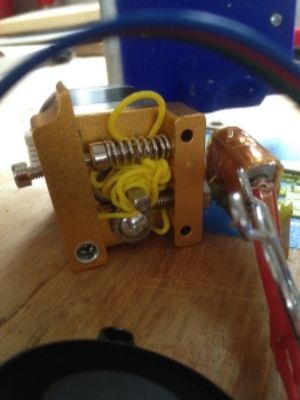
Is that flexible stuff, TPU? Did you find the issue, was it a clog?
I actually love these things, and have been slowly switching out my JHeads.
I am using the last of my HatchBox PLA on this test. It started out fine then bunched up. It happened twice before I realized that the cooling fan was barely running. I will put in a new fan and test it later but I think that is the issue.
Either youre hobbed bolt isn’t lining up with the throat or the throat is clogged. there is a ptfe liner in the throat so you shouldn’t see excessive backups like this just because the fan is breaking down. unless you keep your house 90 degrees. you need to pull the nozzle and throat and make sure they are clear. your fan also needs to be addressed for sure, but your extruder shouldn’t look like the picture unless you didn’t get the filament lined up properly, if it was filament backing up in the hot throat then you’d see some oozing somewhere around the throat. it could be something as simple as a tiny little nic in the ptfe liner.
Actually cooling the extruder does amazing things to not pre-melt the filament! I think I will be adding a second fan on the stepper itself as it seems to get rather warm
If your extruder is too hot turn down the driver. There is no rhyme or reason to these extruders. I have my drivers from .45v to 1v huge difference.
OK…How do you do that??? Congrats on your 1000th post 
Oh man 1000! I hadn’t even noticed how many I had, wow.
To turn it down, you need a voltmeter on it’s lowest DC setting, negative goes to the negative of the power plug positive goes to the little silver pot/screw on the driver. They are very sensitive, tiny movements. I would go down in .1v steps.
It was set at 1.54V. I looked at the three you set and they were .55 to .75 so I set the extruder to .70
Time to test
wow 1.5! you’ll know its too low if the prints get a texture and you can feel it kinda vibrate as it pulls it through. Too high and the stepper gets hot.
Wow, I can’t believe I didn’t look for jumpers. Ill have to try that tomorrow.
Also, my friend has a folgertech 2020 and I can’t get the texture right for the life of me. Maybe I should adjust his stepper drivers a bit.
Installed the jumpers and played with just extruding filament. Seemed better. The real test comes in a few hours when I will have time to do a test print.
I would suggest printing out the test part that’s mentioned here in the forum. then for fun you can try to print This part that I made. its s good test for overhang and tall slender towers.
The first test part is printing now. The first attempt was OK, but still needs some work. The bottom layer was garbage and there were a few quality issues in the print and it failed part way through because it stopped extruding. Luckily, it wasn’t the extruder’s fault this time. I wasn’t paying attention and the filament got wrapped around a bolt head. Printing another now after re positioning the filament. I will make changes based on how this one turns out.
Also, it appears that my machine is no longer secured to the table. Someone borrowed the claps I was using and I totally forgot about it until now. I can’t screw it down to the table it is currently on, but something is in the works for another work space next year. And when I am home I will screw it to its own surface.
I want to thank @Ryan and everyone who chimed in. Adjusting the voltage on my driver from 1.5V to .7 made a HUGE difference in my stepper temp. I have a part that has been printing for over an hour and the stepper is 78F and the top of the extruder is 86F in a 60F environment. THANKS!!
I love it that each time I use this I learn more and more.
Nice!
I finally have it printing pretty good. The test file from the extruder page came out OK. I then printed a file that I prepared directly in Cura with some random settings like a month ago. It is a 20mm hollow cube from thingiverse. It came out awesome except for the bottom, but I think that was my raft settings. Probably even better than my Fabrikator mini which prints great.
Can’t wait to see what this thing can really do.