Hi all. I’m having an issue when trying to carve a 3d reief. My Z1/Z2 and Y1/Y2 steppers are getting out of sync. I have attached the g-code file (Dragon 2_toolpath2.gcode) that I’m having the issue with, and also a video of the issue occuring (https://youtu.be/wxiUrZFHfxA)
Dragon 2_toolpath2.gcode (15.3 KB)
. The discrepency starts not long after the carve starts, with roughly 30deg of rotation difference after 4 mins, which steadily gets worse until the point in the video where you can see the right hand side drive stop altogether when the left is still going. It is very noticeable in the Z axis, but it can also be seen in the Y.
I have tried some troubleshooting, by creating a test file which basically exercises the Z axis up and down 100 times. This showed no issues (video and file attached https://youtu.be/hRnLUUu_Lso).
My machine uses an SKR Pro V1.2 running V1CNC_SkrPro_DualLR_2209-2.1.1. The code is running off the SD card.
Parameters: Max Acceleration (180, 180, 80), Max Feed Rate (66.6 ,66.6 ,8.33), Drive Current 900mA for all drives. The drives are not getting hot.
There is no binding of the lead screws, everything is smooth as butter.
Where else can I look?
Zaxis speed test 600.gcode (3.0 KB)
With the V1 firmware (Or, in fact any Marlin firmware) steps commanded for a dual motor axis will always stay in sync.
Getting out of sync is either skipping steps or loose grub screws.
Skipping steps makes an audible noise, and comes from overloading the motors. Loose grub screws are the motor shafts spinning in the coupler or pulley, often silent and always unpredictable.
Check the grub screws first. It’s easy to miss. One screw should be on a flat part of the motor shaft. Loctite can be a good idea. I’d say the blue rather than the red, but I have the red.
Low motor torque can happen from a low current setting. V1 firmware defaults to 900mA, which should be perfectly fine for Y and Z. On my machine I found it a bit low for X.,but most people don’t have a problem, AFAIK.
Thanks Dan, but I had checked the grub screws. They’re tight and have thread lock on them.
I’m going to check the connections in the plugs on the board, just in case the vibration of the carve is affecting them, but I’m grasping at straws.
As you can see from the video, I fitted longer lead screws (they were the only ones I could get at the time). I didn’t want to cut them down, and a benefit it has given me is the ability to put manual drive knobs on the top end of them. This allows me to feel the torque of the motors when driving. I found I had to try quite hard to slow them down with my hand.
All connections are good, all grub screws are tight.
I have found that the TMC2209 driver heatsinks are very hot (too hot to touch). Although the stepper motors themselves are running cool. I think this is the cause of the missing steps. I’m not sure where to go from here. I’m going to add some fans over the heatsinks, but there must be a reason why they are running so hot.
I sourced the stepper motors from amazon.co.uk Amazon.co.uk.
The spec says : Nema 17 Stepper Motor 83.6 oz.in (0.59 Nm) 47mm Body 1.8 degree. Step Angle 1.8°,Holding Torque 59Ncm(83.6oz.in),Phase Resistance 1.4ohms,step angle (200 steps/rev.)
The control board came from eBay BIGTREETECH BTT SKR Pro V1.2 board TFT35 E3 V3.0.1 TMC2209 Driver For Ender 3/V2 | eBay with TMC2209 drivers.
Edit: NVM, I see you were talking about the heatsinks.
If the TMC2209 drivers don’t have heatsinks, that is the first thing I would do. That eBay link shows heatsinks on the drivers, but you may not have installed them or they may have been missing in your package.
Mike
Hi Mike.
No, the heatsinks are installed and it is the heatsinks that are too hot to touch.
I’m becoming more convinced that this is a heat/current issue, as the error happens at roughly (but not exactly) the same time in the carve. Once I’ve installed the cooling fans I will see if this changes.
I am also having a rethink about the supply voltage to the system, for a totally different reason. As I want to add a laser module that I already have lying around, which is a 12v laser. I have a 24v power supply to the system, so changing this to a 12v power supply will make it easier to connect the laser, and may have an impact on the drive issues that I’m having.
Carrying on the diagnosis. I ran an M122 S1 command while the carve was running and got the results below. The current is set at 900mA however the Max current is at 2259mA and RMS is at 1602mA. Is this normal?
10:42:09.327 : N1164 M122 S182
10:42:09.513 : axis:pwm_scale/curr_scale/mech_load|flags|warncount
10:42:09.514 : X Y Y2 Z Z2
10:42:09.514 : N1166 G1 X123.766 Y34.427 Z-16.692107
10:42:09.514 : Address 0 0 0 0 0
10:42:09.714 : Enabled false false false false false
10:42:09.714 : Set current 900 900 900 900 900
10:42:09.814 : RMS current 1602 1602 1602 1602 1602
10:42:09.914 : MAX current 2259 2259 2259 2259 2259
10:42:09.914 : Run current 28/31 28/31 28/31 28/31 28/31
10:42:09.914 : Hold current 22/31 22/31 22/31 22/31 22/31
10:42:10.014 : CS actual 0/31 0/31 0/31 0/31 0/31
10:42:10.015 : PWM scale
10:42:10.115 : vsense 0=.325 0=.325 0=.325 0=.325 0=.325
10:42:10.215 : stealthChop false false false false false
10:42:10.315 : msteps 256 256 256 256 256
10:42:10.415 : interp false false false false false
10:42:10.514 : tstep 0 0 0 0 0
10:42:10.514 : PWM thresh.
10:42:10.514 : [mm/s]
10:42:10.614 : OT prewarn false false false false false
10:42:10.615 : triggered
10:42:10.615 : OTP false false false false false
10:42:10.714 : pwm scale sum 0 0 0 0 0
10:42:10.815 : pwm scale auto 0 0 0 0 0
10:42:10.914 : pwm offset auto 0 0 0 0 0
10:42:11.015 : pwm grad auto 0 0 0 0 0
10:42:11.115 : off time 0 0 0 0 0
10:42:11.214 : blank time 16 16 16 16 16
10:42:11.214 : hysteresis
10:42:11.314 : -end -3 -3 -3 -3 -3
10:42:11.414 : -start 1 1 1 1 1
10:42:11.415 : Stallguard thrs 0 0 0 0 0
10:42:11.514 : uStep count 0 0 0 0 0
10:42:11.514 : DRVSTATUS X Y Y2 Z Z2
10:42:11.614 : sg_result 0 0 0 0 0
10:42:11.714 : stst * * * * *
10:42:11.814 : olb
10:42:11.914 : ola
10:42:12.014 : s2gb
10:42:12.115 : s2ga
10:42:12.215 : otpw
10:42:12.315 : ot
10:42:12.414 : 157C
10:42:12.515 : 150C
10:42:12.614 : 143C
10:42:12.714 : 120C
10:42:12.814 : s2vsa
10:42:12.914 : s2vsb
10:42:12.915 : Driver registers:
10:42:12.935 : X 0x00:00:00:00 Bad response!
10:42:12.955 : Y 0x00:00:00:00 Bad response!
10:42:12.974 : Y2 0x00:00:00:00 Bad response!
10:42:12.995 : Z 0x00:00:00:00 Bad response!
10:42:13.015 : Z2 0x00:00:00:00 Bad response!
10:42:13.035 : Testing X connection… Error: All LOW
10:42:13.055 : Testing Y connection… Error: All LOW
10:42:13.075 : Testing Y2 connection… Error: All LOW
10:42:13.095 : Testing Z connection… Error: All LOW
10:42:13.115 : Testing Z2 connection… Error: All LOW
The TMC2209s don’t appear to be responding correctly as shown above. I wouldn’t trust that they are actually configured per the firmware defaults. Your drivers may be using the pot setting or stored currents as a default and this may be why they are over-currenting and overheating.
You will need to figure out what is wrong with the driver communications.
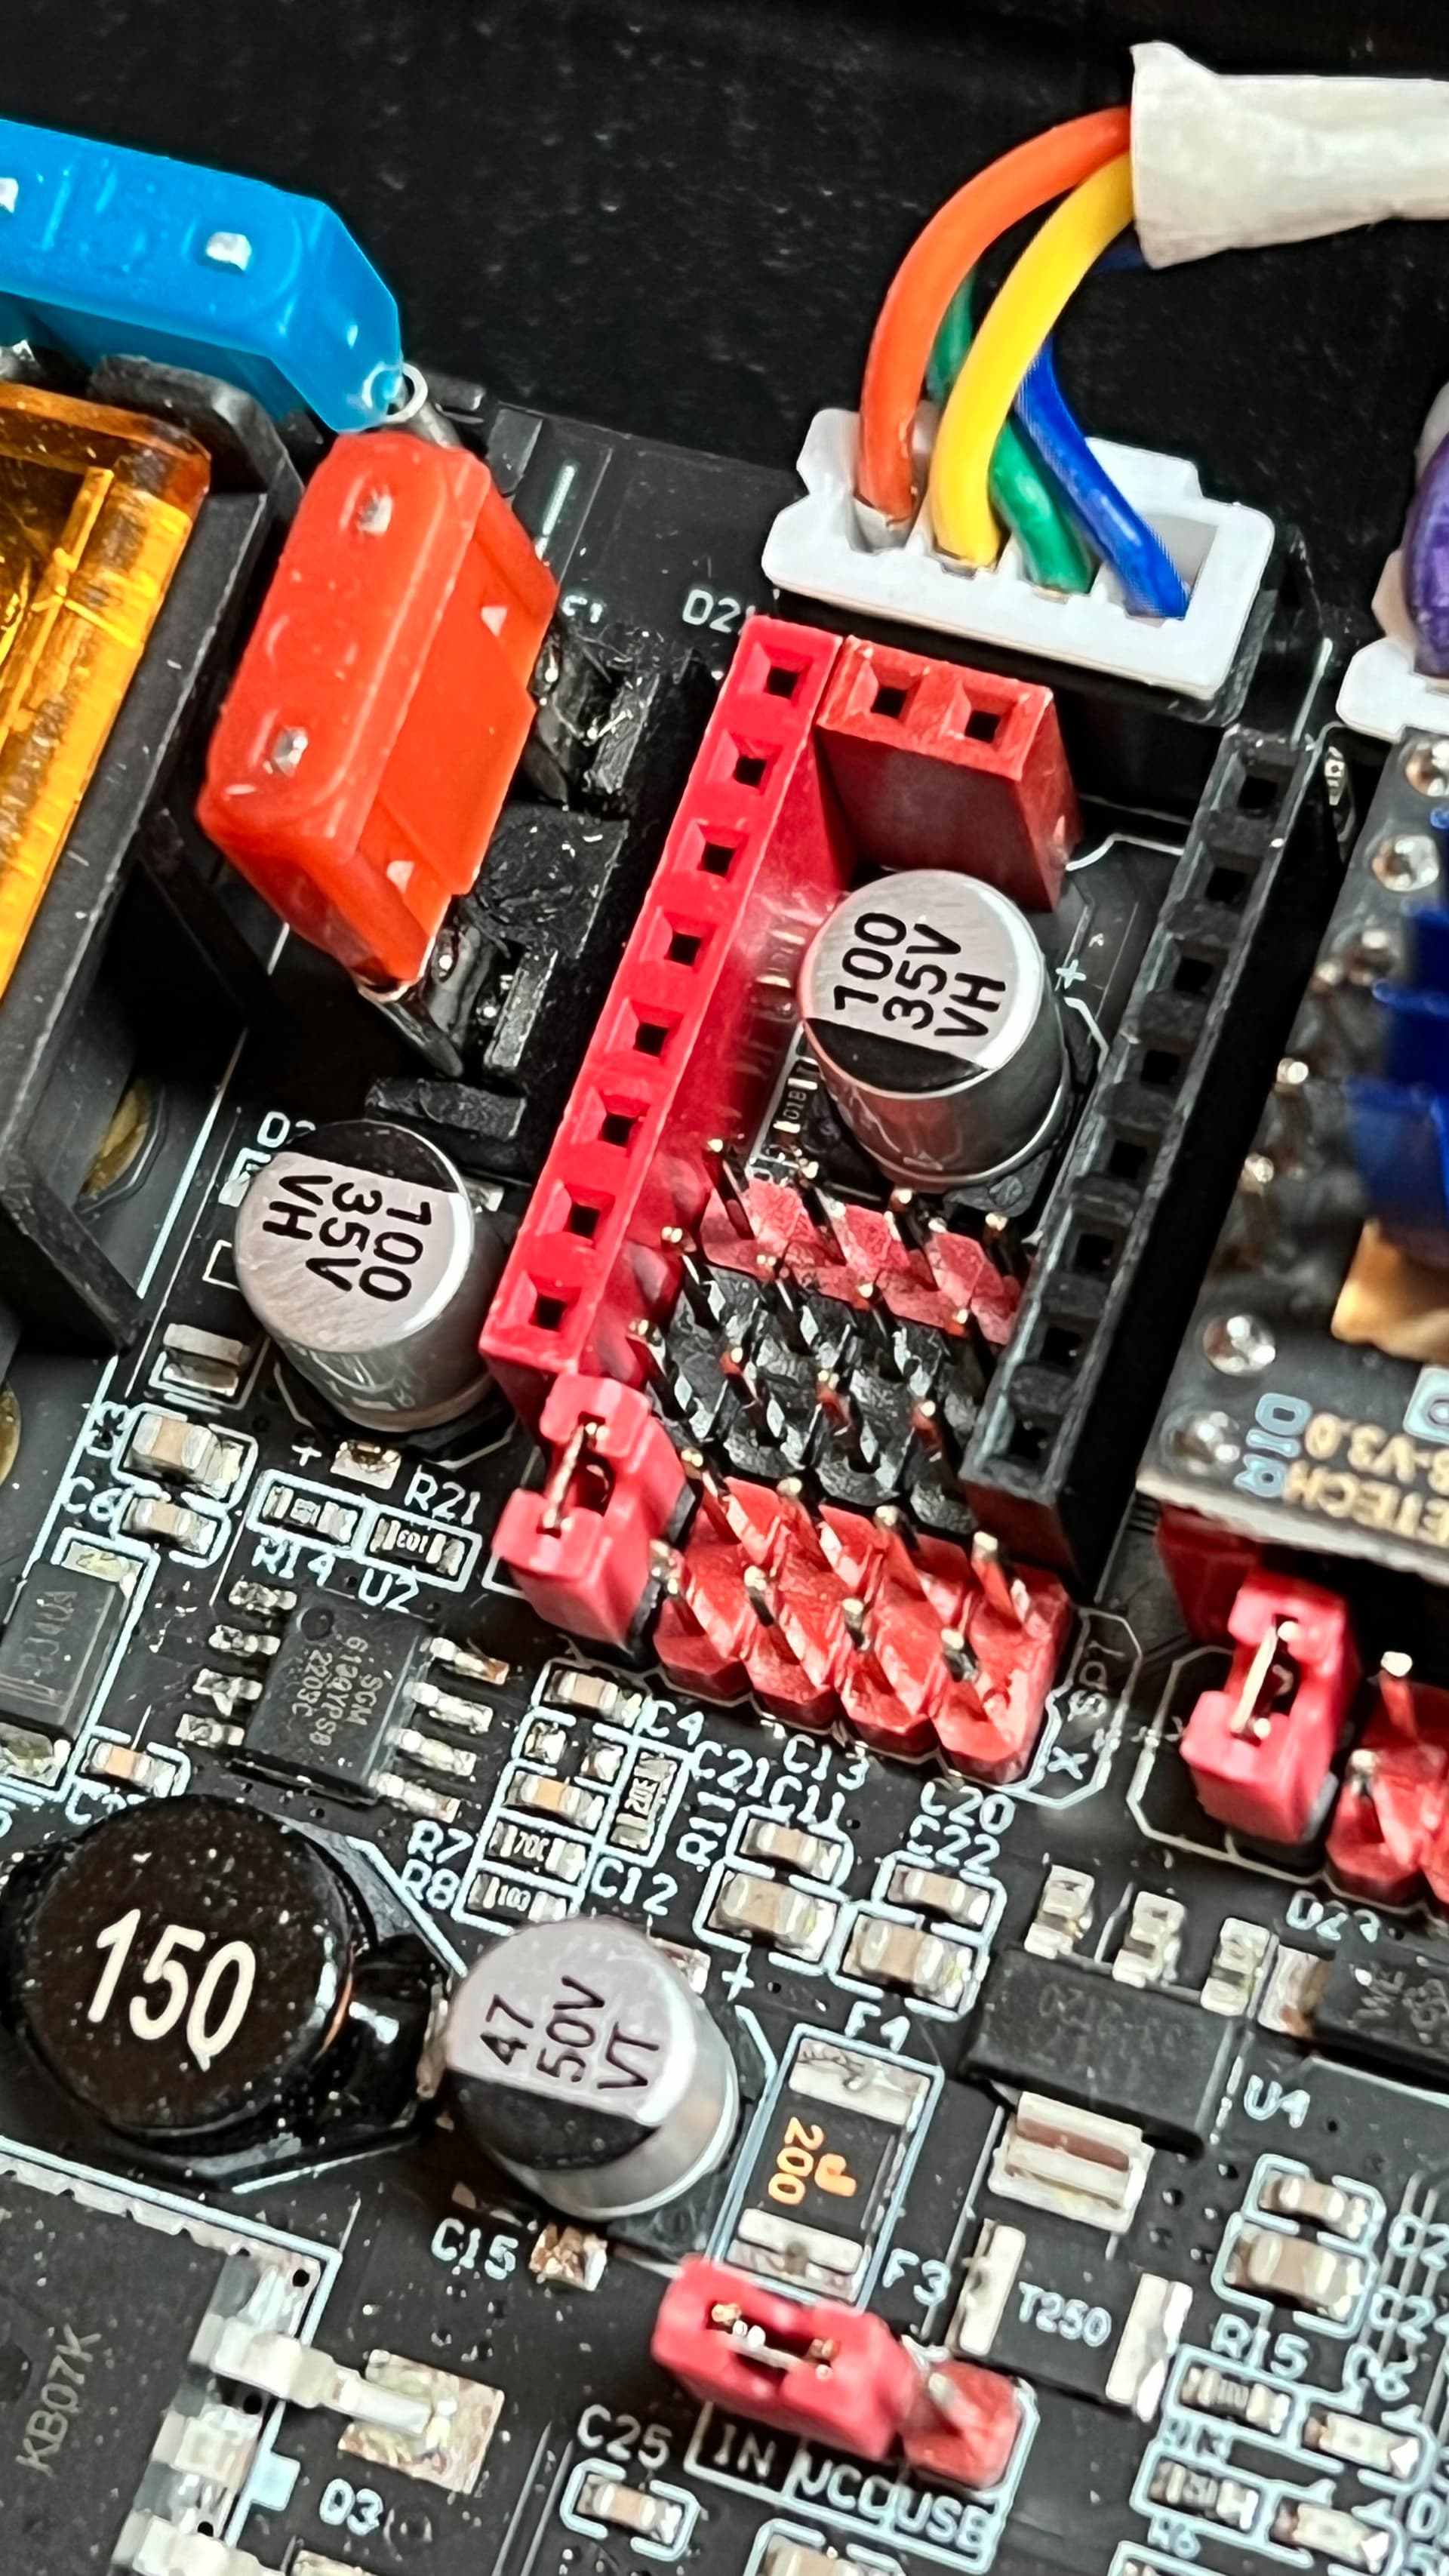
On the SKR 1.2 check your jumpers. The SKR Pro comes with the jumpers set for selecting microsteps and current set on the little pots.
Look at the red jumpers in this pic:
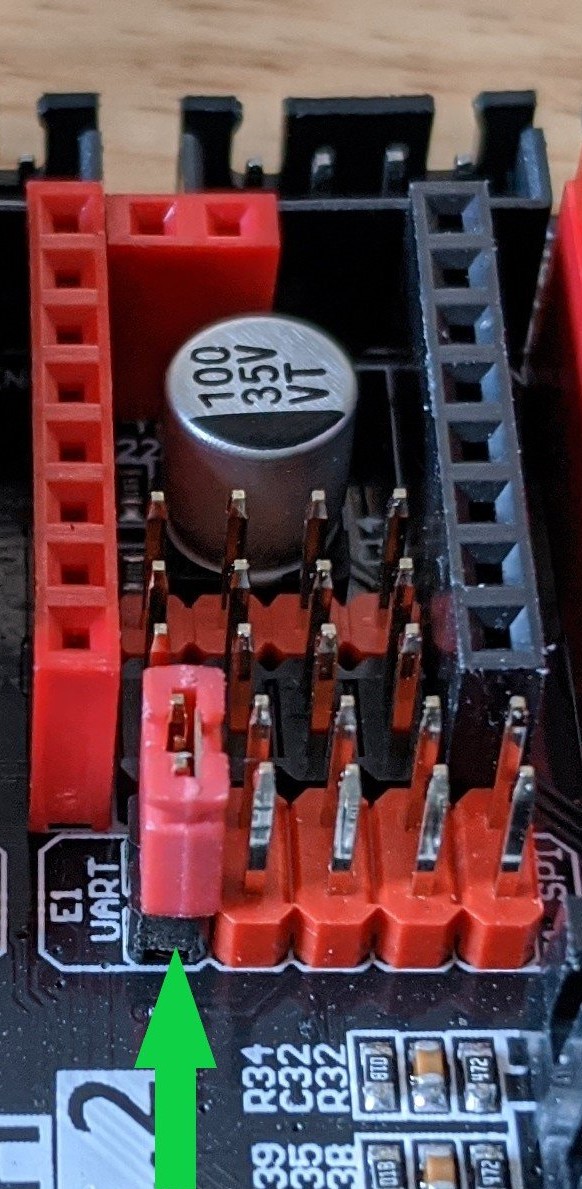
Hopefully you also disabled the sensorless homing pin as well
The links are in the correct positions, and as you can see, the drivers came without the sensorless homing pins.
I did manage to ghost run the carve once I had installed the cooling fans. I measured the temperature of the heatsinks at various times throughout the carve. They were all between 45 and 50 deg C.

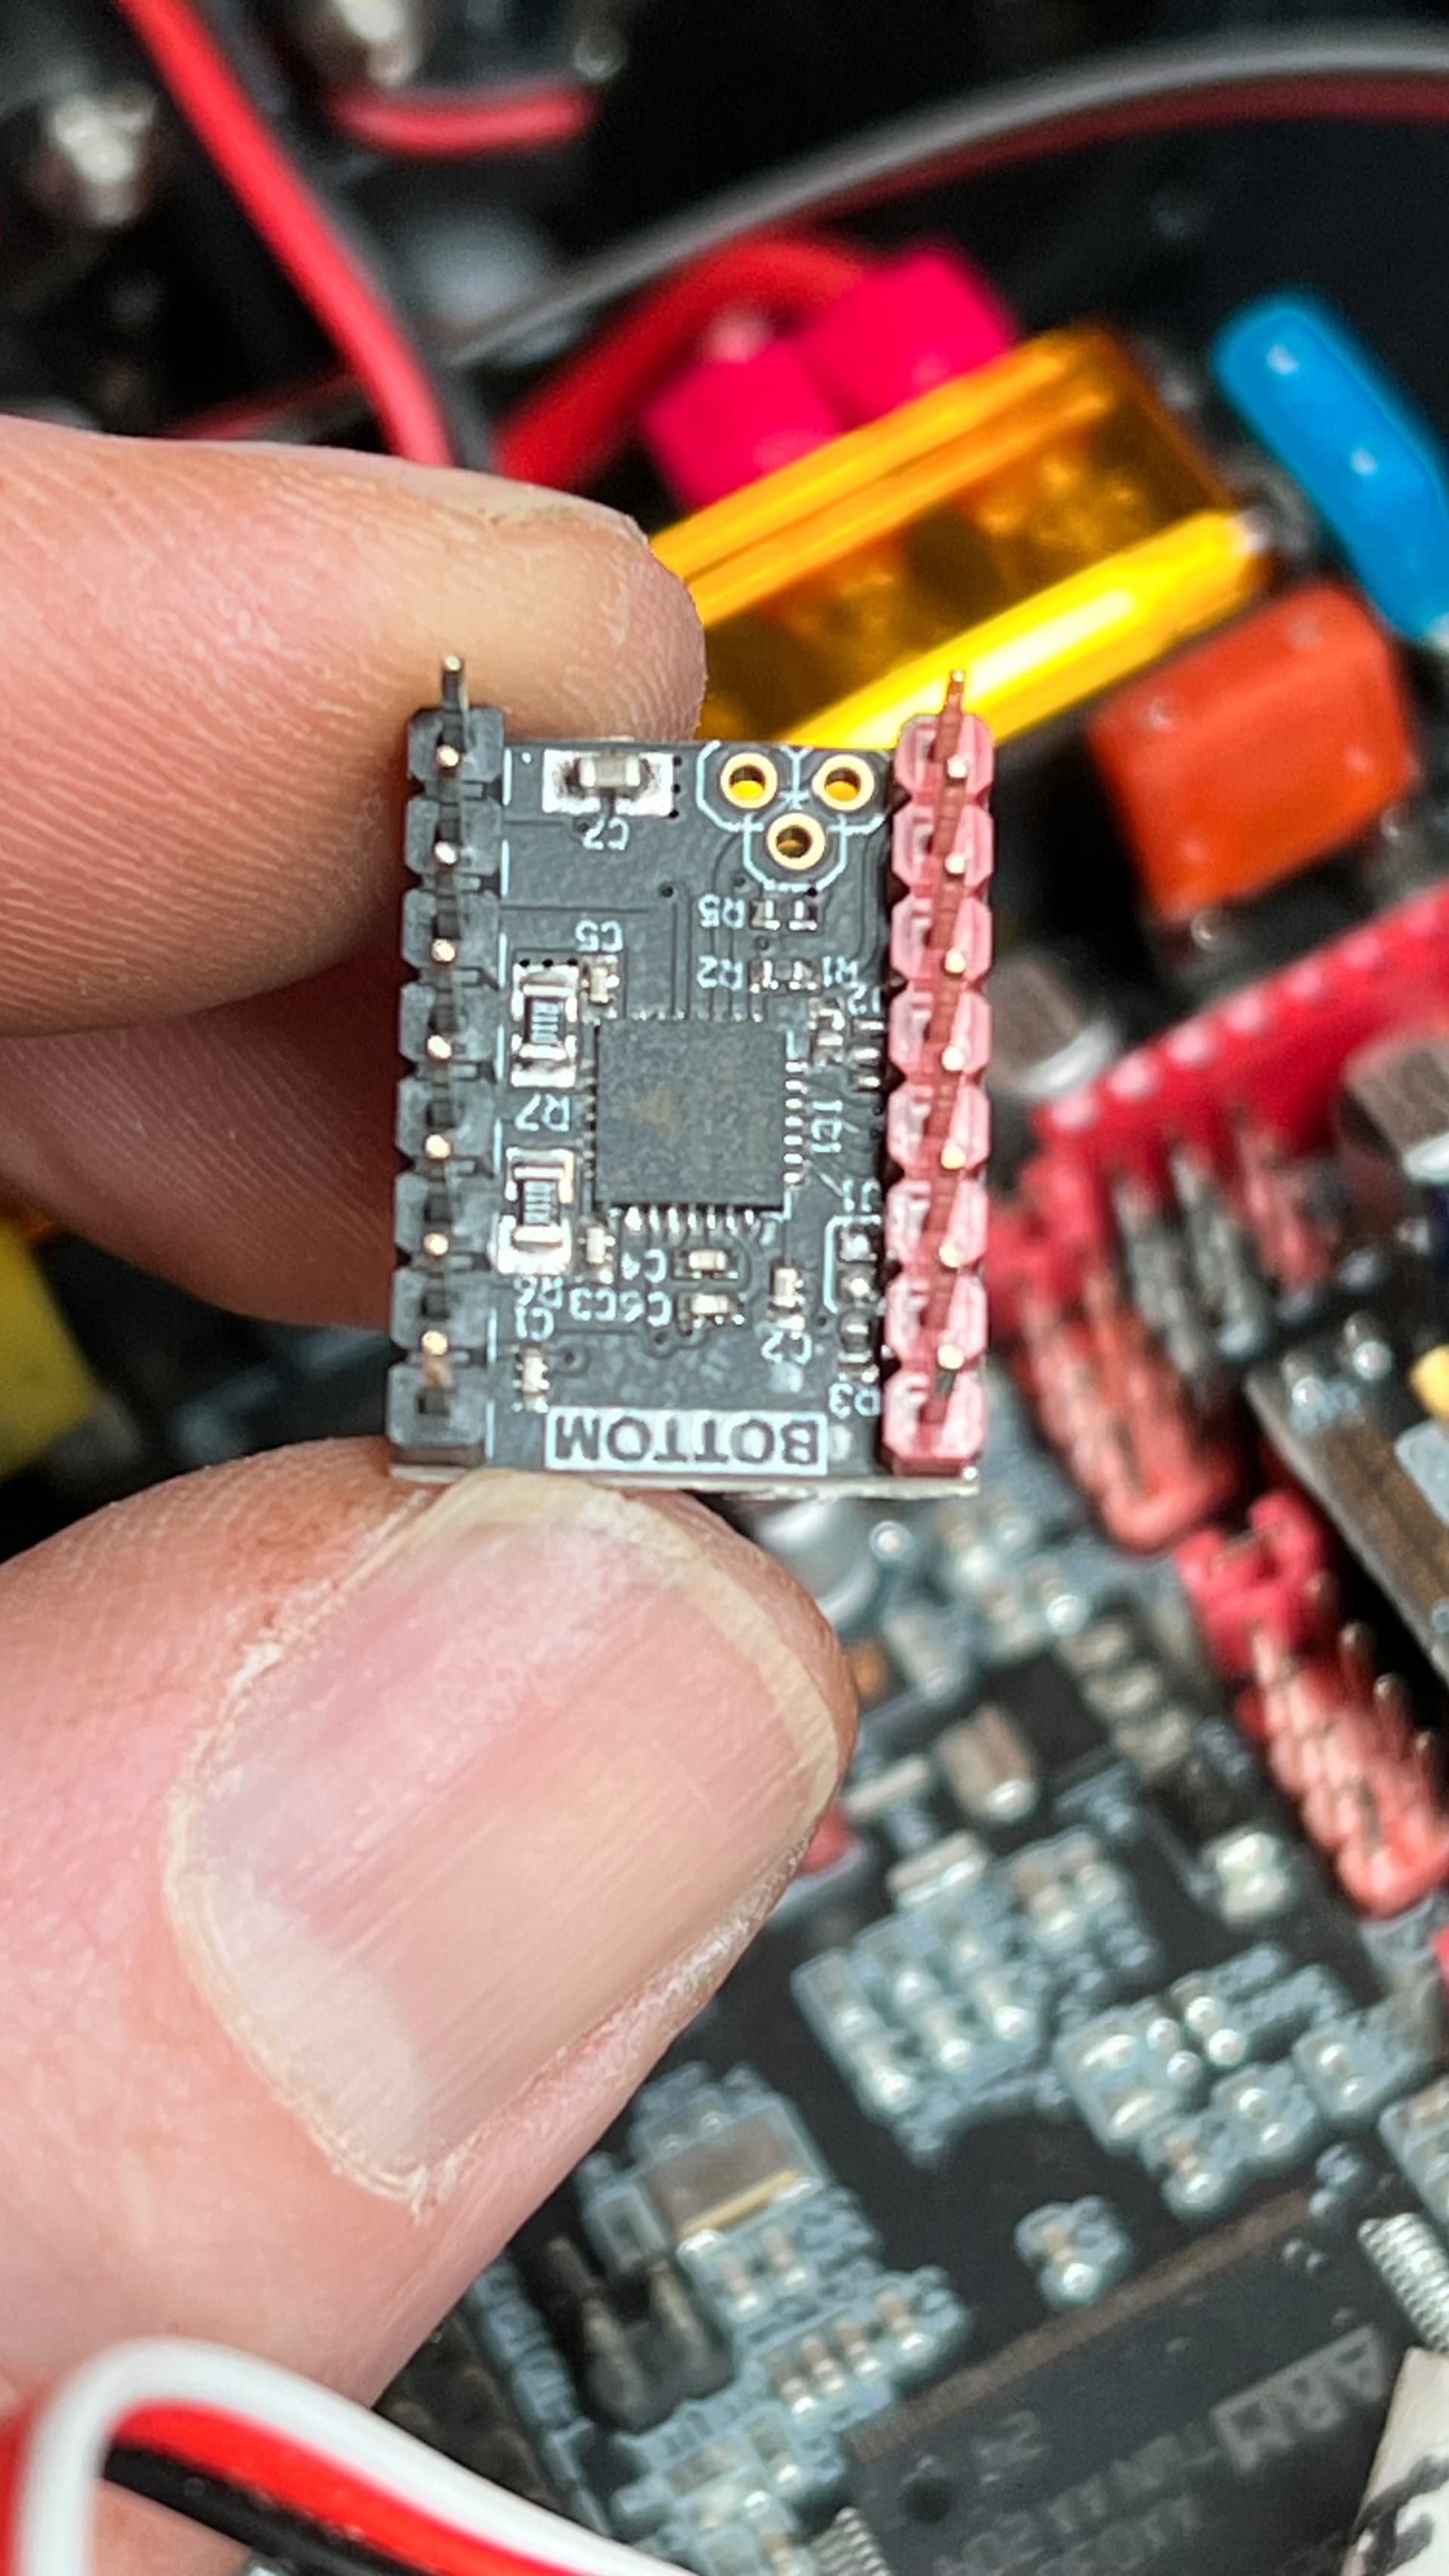

those TMC2209 drivers aren’t just missing the sensorless homing pin, they are also missing the UART pin. I believe that without the pin from that 2 pin header closer to the side, the drivers cannot be set up by software, and you will get those errors. That isn’t the way the drivers come from the V1 store, I don’t know where you got them, but that isn’t going to work properly. The drivers cannot be set for current control via the firmware in that state.
I would solder in a pin header to that one and see if that gets rid of the errors, and you will almost certainly get better performance out of the machine that way.
Those aren’t TMC2209s AT ALL.
They are TMC2208s
Thanks Dan,
Living in the UK, it’s difficult to order from US. $100 shipping, along with the time for delivery. So ordered off eBay and came from China ![]() . Between Amazon and eBay I had everything within 10 days. Obviously paid the price
. Between Amazon and eBay I had everything within 10 days. Obviously paid the price ![]()
I’ll solder in the pin and give it a try.
You’re right Jim. I hadn’t noticed. Fortunately, Amazon should be delivering me some TMC2209 V3’s this evening ![]()
Thank you guys. The issue seems to be solved. As usual it was operator error. They (the Chinese) had sent me the wrong drivers, and I hadn’t checked. I’d only looked at the V3.
New drivers and the M122 report is:
20:51:16.589 : N14 M122 S1*85
20:51:16.590 : axis:pwm_scale/curr_scale/mech_load|flags|warncount
20:51:16.590 : X Y Y2 Z Z2
20:51:16.590 : Address 0 0 0 0 0
20:51:16.630 : Enabled false false false false false
20:51:16.630 : Set current 900 900 900 900 900
20:51:16.669 : RMS current 887 887 887 887 887
20:51:16.710 : MAX current 1251 1251 1251 1251 1251
20:51:16.710 : Run current 28/31 28/31 28/31 28/31 28/31
20:51:16.710 : Hold current 22/31 22/31 22/31 22/31 22/31
20:51:16.751 : CS actual 22/31 22/31 22/31 22/31 22/31
20:51:16.751 : PWM scale
20:51:16.791 : vsense 1=.18 1=.18 1=.18 1=.18 1=.18
20:51:16.831 : stealthChop false false false false false
20:51:16.871 : msteps 16 16 16 16 16
20:51:16.911 : interp true true true true true
20:51:16.951 : tstep max max max max max
20:51:16.951 : PWM thresh.
20:51:16.951 : [mm/s]
20:51:16.991 : OT prewarn false false false false false
20:51:16.991 : triggered
20:51:16.991 : OTP false false false false false
20:51:17.031 : pwm scale sum 25 25 25 25 25
20:51:17.071 : pwm scale auto 0 0 0 0 0
20:51:17.111 : pwm offset auto 36 36 36 36 36
20:51:17.151 : pwm grad auto 14 14 14 14 14
20:51:17.191 : off time 3 3 3 3 3
20:51:17.231 : blank time 24 24 24 24 24
20:51:17.231 : hysteresis
20:51:17.271 : -end -1 -1 -1 -1 -1
20:51:17.310 : -start 1 1 1 1 1
20:51:17.311 : Stallguard thrs 0 0 0 0 0
20:51:17.351 : uStep count 40 40 56 40 8
20:51:17.351 : DRVSTATUS X Y Y2 Z Z2
20:51:17.391 : sg_result 0 0 0 0 0
20:51:17.430 : stst
20:51:17.471 : olb * * * * *
20:51:17.511 : ola * * * * *
20:51:17.551 : s2gb
20:51:17.591 : s2ga
20:51:17.631 : otpw
20:51:17.671 : ot
20:51:17.710 : 157C
20:51:17.751 : 150C
20:51:17.791 : 143C
20:51:17.831 : 120C
20:51:17.870 : s2vsa
20:51:17.911 : s2vsb
20:51:17.911 : Driver registers:
20:51:17.919 : X 0x80:16:00:C0
20:51:17.927 : Y 0x80:16:00:C0
20:51:17.935 : Y2 0x80:16:00:C0
20:51:17.943 : Z 0x80:16:00:C0
20:51:17.951 : Z2 0x80:16:00:C0
20:51:17.959 : Testing X connection… OK
20:51:17.967 : Testing Y connection… OK
20:51:17.975 : Testing Y2 connection… OK
20:51:17.983 : Testing Z connection… OK
20:51:17.991 : Testing Z2 connection… OK
Thanks again.
