Z - axis unstoppable, out of control

There is a different command for homing the lr3
Are you using a z touch plate ?
Mpcnc is g28
Lr3 is g38 I will try and get the proper code in a bit.

1 Like

I am still trying to get a basic setup started. Nothing in the initial posts from may of last year had anything about touch plates or end stops. So I have already added those to my cart and consigned myself to adding all the axis stops. Much appreciated. Been up since 4 am for work, so will be running to lowes shortly to get material to cut my strut plates.

Some things we need to know is
What version of firmware do you have
Dual end stops
Or none
I assume you bought the board from Ryan and it came programmed ?

Correct.
No end stops. (at all, it was not in the list when i purchased).
Flashed by Ryan firmware (whatever the original was since i got it may 2022).

I hate to steal someone elses thread but i think OP and i have the same issue.

I am still pretty new but until someone else pops in I will try my best to help you.
Did you follow the v1 estlcam basics ?
You should be able to just use
The g92 code
I also downloaded the crown file and it’s different than yours.

1 Like


Just curious if you loaded the file into estlcam and did the engrave procedure.
And if you adjusted the setting like it says.
Like for units and firmware (marlin)
I think you should move your z up with repetier or your screen up to 15 mm from touching the pen tip.
Then enter at the top only
G90
G92 X0 Y0 Z0

Then the rest of the code.
This should zero your machine at the height you jogged up to and then it should print at that exact height.

2 Likes


I would try the move z up 15 manually with controller.
Then have your file like that.
Also maybe enter the code into the cmd spot on your repetier or screen
M115
That should show us what firmware you have.

Travis,
i downloaded the file and followed the instructions given on ESTLCam basics.

That’s my frustration. It seems like half of the instructions are super detailed (which is awesome) and then randomly its assumed you know what you are doing and zoink off to the races.

The crown file will change based on where the zero point (in estlcam) was relative to the rest. The commands should be the same, just the relative numbers change. Straight out it tells the machine to go to origin. X=0, Y=0, and Z=2mm. If the machine has whatever current position it booted in as 200mm. It’ll try go down 198 to get to zero.

I went through the marlin commands and tried the V1 section and “Reset Z axis” command. THis showed all positions as zero (x,y and Z) on the main screen. but the moment i went to adjust elevation, z said it was at 200mm again.

I only downloaded files last night as well. SO everything is latest on the software side, firmware is old as can be. (latest update shows as sept 2023 on the list).

I’m going to try updating the firmware and see if that fixes the issues i’m having.

edit: just saw your post as i was writing this. Where did you see the GCODE segment? I follwed the build instructions which hotlinks all over the place. None of the links about controlling software talk about the gcode? It looks like this may be what i am missing. Though it talks about a touchplate, something i dont have as it was not part of any of the build lists when i purchased. (And still is not discussed in the assembly of the LR3.)

edit2: I’m trying to not vent my frustration on anyone. It’s taken 11 months to build this because it feels like everytime i start I either do not have something, or find some random note that ends up a rabbit hole and I walk away in shear frustration. I’ve finally gotten to where i’m at due to a lot of cajoling by the wife and friends on when will i ever finish it.

1 Like

In the docs section of this site
Use the search and just type g92
And there is a bunch of links to places that explain the code and give links to marlin etc.
I know I struggled with things and later found the information was on the site I just had to dig it up a bit.
Also when you look it up sometimes there is. Switch button to go from mpcnc to lr3 bc. They are slightly different. One has a z max one uses z min.
I think I hope I helped but I have been in this fluidnc world lately.

1 Like

Travis I agree,


the above image is part of the ESTLCAM guide on the crown, and says to just place the pen right above and hit go. That’s what i did the first time and the machine immediately went z down until it crashed, then ran the steppers juddering for a while before zeroing out, lifting up and moving around.

I figured it was something in the Gcode the more i dug into it.

1 Like

Oh it’s ok man ppl are very helpful in here but the main guys are really busy getting ready for a convention that from what I believe is the first time it’s back from the Covid days.
And they are scrambling trying to get ready to go to that. I am more than willing to help you through this tho don’t get too frustrated. Just ask no one is going to make you feel bad for asking.
I didn’t even know anything coming into this like a year ago. Your very close to having this nailed down then all the fun starts.


For me one of the biggest things was the wording once I figured out the lingo it was way better.
Like marlin
G code
Firmware.

2 Likes

Travis, Your note is correct. Changing the beginning of the Gcode was the key. screenshot below are the changes i made.

image

2 Likes

Did it run good now ?

yeap.
tried to do my squaring and ran into the next snag. ( i clicked on the SKR pro link somewhere and had a friend print the MINI/rambo case, instead of the main one.)
so first power disconnected at the molex b/c there’s no strain relief on the wires and the pins are super lose.
then power disconnected on the battery brick when it moved too far.
i got closer and closer though.
initial squareness shows me over an inch out. (i’m home alone so hard to make it hit the spot right, on a 1030mm Y x 1200mm square. )
I may just do the strut plate first then care about that setup part.

also, Z is out by a full mm on thefurthest from my initial set point. which tells me my table is not flat at all.

then i set home accidentally the far side of the square. since home in the marlin is not go home but set home. (whoops) and my marlin will not let me control to negative values.
I also cannot get it to get negative with the repetier host. So i g uess i need to shut it off and slowly pull it back over this way.

2 Likes

Well sounds like you have made some progress.
How was the crown print that’s actually a pretty great draw bc it shows if your accurate etc.
I would do a couple of those before I started the struts. You don’t want to have trapezoid struts.

2 Likes

I am not using touch plates.
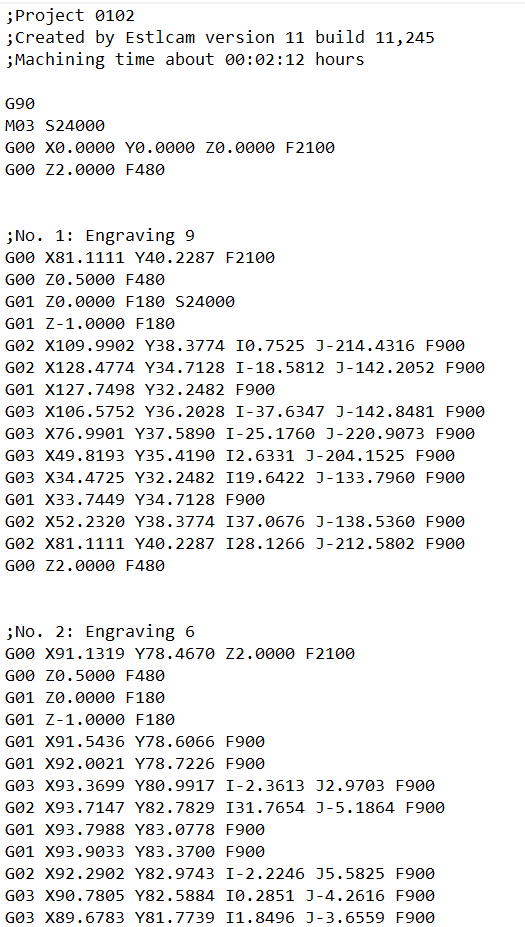
Start of gcode looks like this:

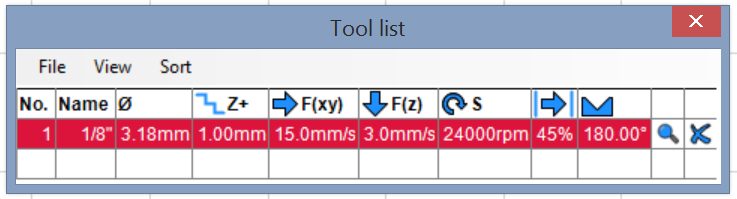
these are the settings I am using in Estlcam
image

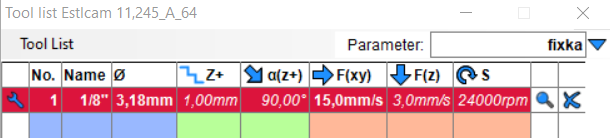
I tried my best to follow tutorial in docs, these settings in Estlcam looks different from what is in tutorial, which is this:

I am not reseting and don’t know how to do that. How should I reset?

Martin,
add this line of code (highlighted yellow)

with this the cnc sets where it is as zero, then moves up to z2 from there to move before coming back down. In this case if you start with the pen touching the paper it will work.

@Waspjr i’ll start a different thread. Crown looks great, i have some z elevation issues with the table apparently so one side is a bit “slurred” because the pen dragged (one cable tie and blue tape).

I intend to “pen” the strut to see how it looks before i cut.

4 Likes

IT WORKED!!!

Thank You and everybody else for suggestions. Now I have beautiful crown.

1 Like