Z-axis pulloff, precision, and squareness

Hello, everyone! I’m building a LR4, and so far, things are going really well. But I’m at the point where I need to make my first cuts for my strut plates, so I’m getting nervous and second-guessing myself. :slight_smile: This is my first CNC, but I’ve done a lot of 3d printing and other DIY.

I’m trying to figure out what’s ‘normal’ when leveling my Z-axis using the V1E touch probe. On a recent calibration run, the probe triggered at Z-81.075 at X=0, and Z–81.835 at X=890mm (the right side of my travel). If I’m doing the math right, that means that the right side Z homes 0.76mm higher. So I added 0.76mm to the left side Z pulloff.

On my next run, I got Z-80.985 on the left, and Z-81.890 on the right. Am I just chasing too much precision and probably not holding the probe flat enough? If I go do 10 more runs, am I going to see a bunch of variance that makes me feel silly for trying to adjust pulloff to fix 0.76mm of error?

What’s normal for you? How repeatable is the probe measurement, and how much difference do you have across the travel of your X-axis?
1 Like

When you add to the pull off you are lowering that side. Your X Max side it homing higher, so that side is what needs the pull off distance increased. You put it on the X Min side. Z should be X Min, Z1 should be X Max. Move your pull off addition to the other Z motor and run it again to see what you get.

2 Likes

Sorry, I am actually actively working on finishing the instructions.

Getting under 0.1 should be pretty easy. That said, it comes down to how well you use your touch probe. If you need to, tape it to the table. (when I tape it I can get several of the exact same readings).

If you are having issues getting similar readings, make sure to do a lot of them and just average. Tape the probe down to keep your movements out of the way. Probe slower Speed of 100 seems to work well for me. If you are getting readings that vary more than ±0.1mm we need to figure out what is going wrong. Most readings are pretty easy to get ±0.03.

1 Like

So, I did a lot of probing last night. :upside_down_face:

Ultimately I was able to get my Z-axis readings within 0.02mm of each other, which is pretty good across 900mm to me. And once I started taping down the probe, it became very repeatable, to within 0.005mm between readings. (I suspect that’s the minimum resolution of the stepper motor or something.)

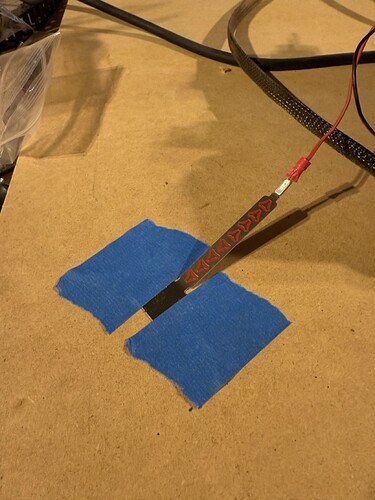
Some tips for other n00bs like me: Definitely tape down your probe for Z leveling. If you see your probe move at all while you’re taking a measurement, it won’t be repeatable. I also bent mine a bit, so the square section can sit dead flat while the ‘tail’ angles up a bit. I’ve attached a picture to show both.

I also noticed that the order of operations matters, at least with my build. Maybe it’s the temporary strut plates that will be replaced soon. :slight_smile: At this level of precision, things like the position of the wire attached to the probe chan change how it sits, and therefore change the measurement.

My workflow was:

  1. Move X all the way to the left or the right
  2. Home Z
  3. Move Z down close to the bed
  4. Probe 3 times
  5. Home Z, then jog Z down close to the bed again
  6. Probe 3 more times
  7. Repeat 5-6 a few more times until the measurement was really steady

I noticed that the first set of probes after moving to a new X location would always center around a slightly different value than the following probe sets. Here’s one example:

X to the right:
[PRB:880.000,0.000,-81.210:1]
[PRB:880.000,0.000,-81.215:1]
[PRB:880.000,0.000,-81.230:1]

home and redo:
[PRB:880.000,0.000,-81.300:1]
[PRB:880.000,0.000,-81.305:1]
[PRB:880.000,0.000,-81.300:1]

home and redo:
[PRB:880.000,0.000,-81.300:1]
[PRB:880.000,0.000,-81.305:1]
[PRB:880.000,0.000,-81.305:1]

So my advice to anybody trying to really dial in their Z: Do what Ryan said, and just probe a lot. :slight_smile:

1 Like

That number is amazing.
Ready for this, to get it perfect…all you have to do is surface your spoil board. Those tiny numbers are great but I can not imagine many of our users have every really had it matter much. Now that you can measure those numbers you will see how far everything really is. Try again anywhere else on your work area it will be different. But surfacing the entire spoil board will help.

You are in the territory we call, chasing zero’s. At this point you have already noticed using the touchplate by hand alters your readings a lot. Same thing would happen if you re-taped it down every time. 0.02mm is tiny, a human hair is about 0.1mm thick.

All that to say anything under 0.2mm is plenty in my book. So you hit a home run but, no need for everyone to try to get that.

We are pretty sure that is actually a firmware limitation, beyond the scope of most consumer CNC’s.

You need to actually home between every probe. The way you did it you confirmed the machine repeatability is 0.005mm or better, but not really your Z level. The probe sequence is the combination of machine error, microswitch error, and probe error. That is what you are trying to average. A microswitch should be about ±0.01mm, the machine is at least that, but you can see what hand probing is…all over the place.

Home in between every probe, get it fairly close, if you need anything better (very very doubtfull) if you surface your spoilboard it gets as perfect as possible no matter what your readings are.

Okay now to summarize, getting it under 1mm is all most people really need, the longer your beam the larger that number can be. Almost no projects depend on this number though it just need to be close.

1 Like

Oh, for sure. I was having fun with it by this point. :slight_smile: It was election night, and this was how I avoided watching TV for a while!

Yes, and I should clarify something: Most times I was doing multiple sets of (Home Z, then probe 3x), and my data matches what you suggested. Within each of those sets the probe-to-probe error was ~0.005mm; between sets, it was around 0.01mm of “home-to-home error”, I guess.

And to be clear to others: Ryan is right—you don’t need this level of precision. Now that I’ve actually started cutting things, I usually just do one quick hand probe (ew) to set my work zero and I’m off to the races. I didn’t even realize until midway through cutting my strut plates that the sheet of 1/4" MDF I was using was bowing upward about 1mm in the middle, so some pocketing ended up a bit deeper than I planned… but all told, the level of precision I’m already getting from this machine I slapped together myself in my garage is blowing my mind. Thanks for this great project!

3 Likes

(Oh, and right now, my spoil board is a slab of 3/4" MDF sitting on top of another 3/4 piece of MDF. It seems dead flat when I sweep a big level across it, and I don’t want to breathe in all the dust I’d make by trying to flatten it any further!)

1 Like

For sure I am just prepping to rewrite the leveling section of the instructions so I have been thinking a lot about this.

This is EXACTLY what I love to hear. I worry people over do it, or chase the zero’s because they can. So I always try to step in.
People are fine with a ruler or tape measure until they get calipers, then all the sudden everything is shit…

Summer, winter, humidity. It is pretty crazy how much things move when you can measure sub 0.1mm.

I never surface a table on any of my cncs for years and years. Once I had like a 3mm bubble in one of my tables, I knocked that down with an endmill and a rough pass a little and just kept going. When I did a couple PCB’s I slapped on a new scrap on top of my table , surfaced it and made my V cuts.

Glad you like, it, sounds like we are on the same page. Seeing how far you can push it is fun, thinking you have to push it sucks, you are clearly having fun. Glad to see it!!

1 Like

Looks great, you are off to a great start! :tada: