I think I’m suffering some paralysis by analysis on getting my LR4 setup to do 4 ft. x 4 ft. cuts (max) and I’m looking for some advice for those who’ve gotten up and running. What’s everyone’s opinion on the shortest path between A and B, if I have the main assembly of the LR4 done?
I plan to try and keep the table as light as possible so I can pick up the machine and prop it up against a wall and I’ve seen Ryan say torsion boxes aren’t totally necessary. Can I just make a cross out of some 48 in. by 62 in. sheets, given what the calculator says for a 4 x 4 ft. working area? I don’t want to overthink it, I want to cut things .
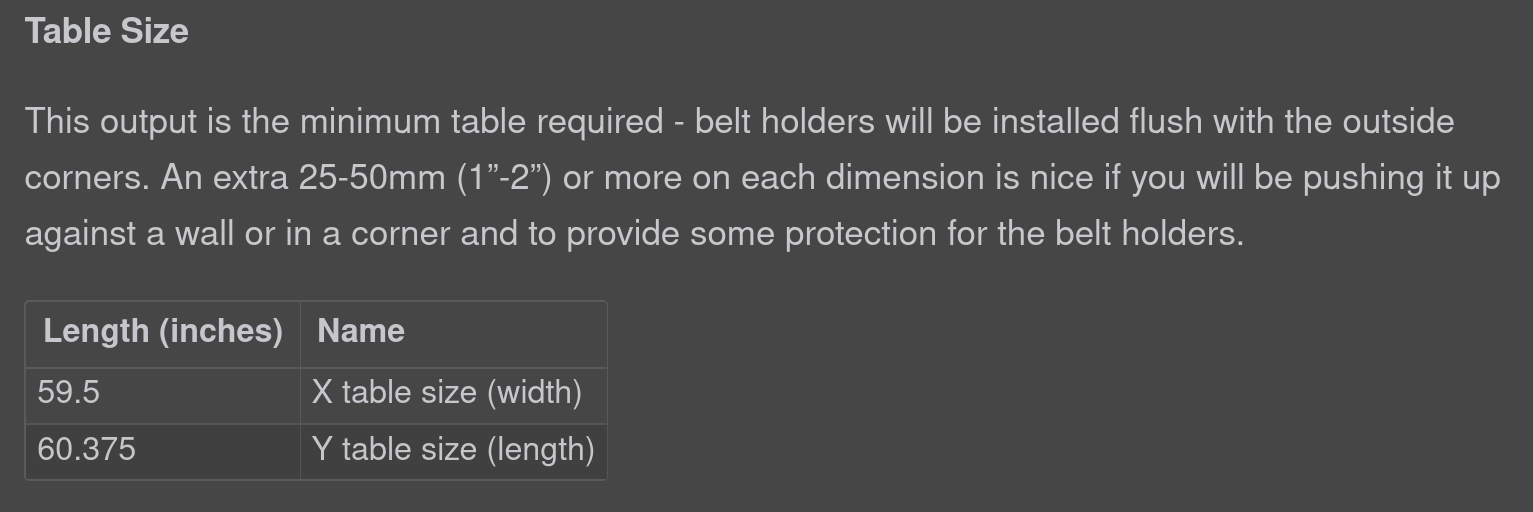
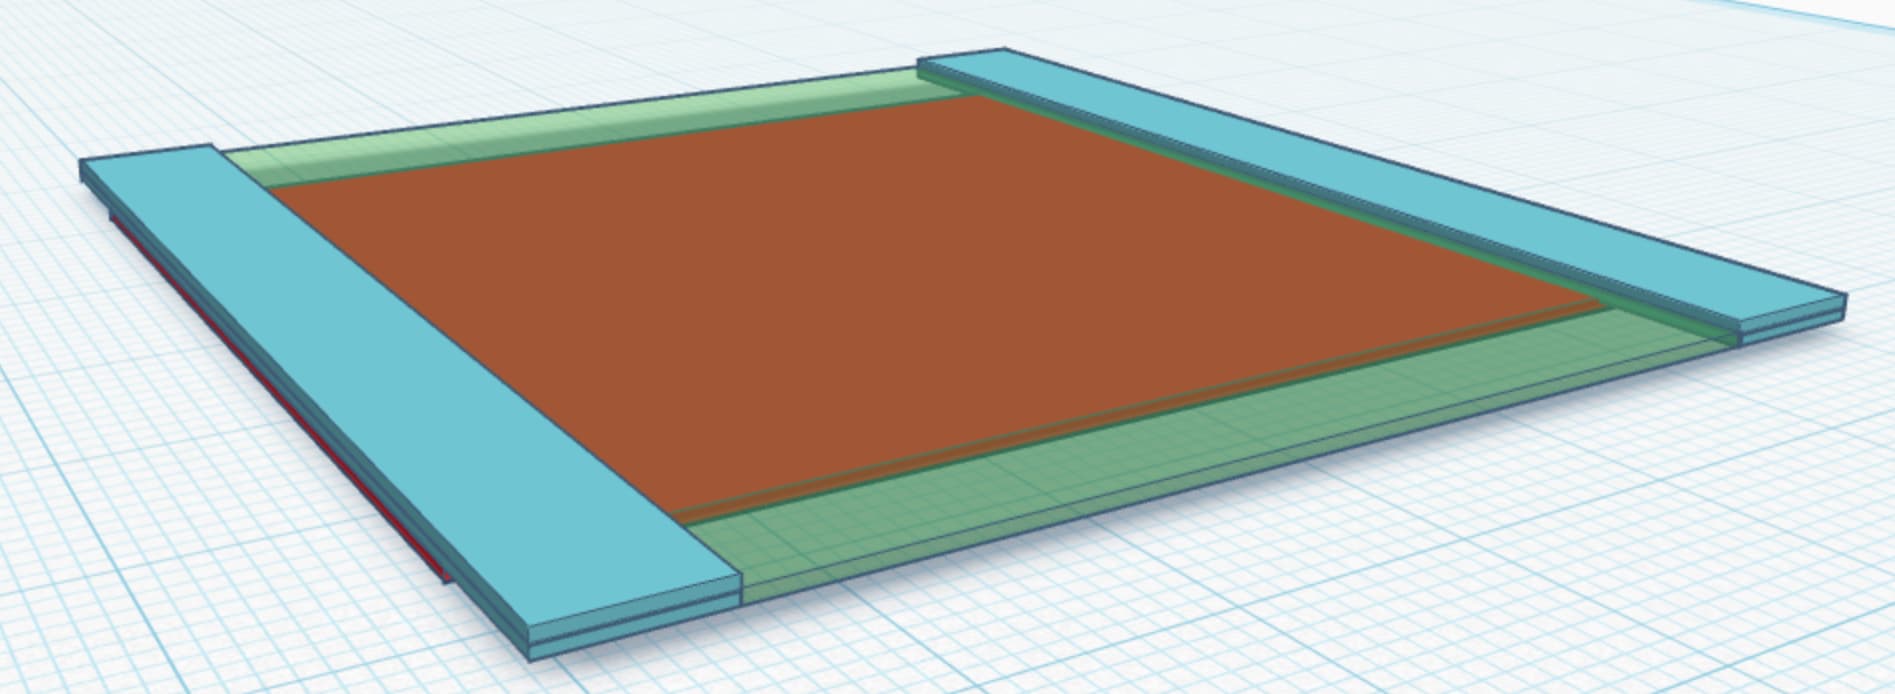
I was thinking something like this? Does anyone see any obvious shortcomings? Everything is 0.5 in. tall. The red base/X axis is 62W x 48D as is the green (made transparent so you can see X) crossing Y axis, the blue strips would constitute the rails for the Y travel. Spoilboard would go between the blue rails. Overall this thing is ~5.1 ft x 5.1 ft. and I have a large outside table I’d put it on when cutting with it.
Just enough to keep the rail and belt holders (vaguely) in the right relative places. It’s workable if you put it on a flatish floor.
Certainly wouldn’t recommend using pine, I was being extremely lazy and used what I had on hand and didn’t need to cut. Your plan looks better. But I might have the worst LR4 so take my advice with a barrel of salt.
I don’t know about that. You’ve come for advice during your build, rather than half arsing a bad solution and only then asking for help. So you’re already leagues ahead of me
That sounds like a good combo. I did, and still do, have a strong dislike of MDF. Mainly the mess, but also that it melts in the rain. Lots of rain to go around on this damp little island. But I’d never considered until now - or needed, tbh - the fact that it’s the king of dimensional stability compared to my beloved plywood.
I would say the big question is what kind of work do you plan to do with it and what kind of tolerances are you hoping to maintain.
If you’re ok with cutting into your spoil board more and just looking to cut 2D shapes. Should be no problem.
If you want to have really accurate and repeatable Z then it’s probably worth the effort to build a torsion box under the table.
My old MPCNC table was particle board with minimal bracing underneath. And it worked. But…I was constantly chasing Z and tearing a few mm into my spoil board to get parts cut because there was 2-3 mm of difference across the tabletop. A surfaced spoil board probably would have helped…but I often use stock that’s larger than my cutting area so I never really bothered with surfacing since my stock would usually stick past the surfaced parts.
That said - I get the analysis paralysis. And something is better than nothing. You can always build another table.
My current table I wanted to do a lot more support under it…but my design kept changing and I put it off…and now I’m finding I’m ok with it how it is. It’s leaps and bounds better than my old table and if I take the time to measure my stock and setup my CAM right I can cut parts and not really leave a mark on the spoil board. Though - often I just eyeball things and leave a fudge factor so my spoil board is gaining quite a bit of character quickly. And I’m ok with that. If I do something I really want accuracy on I’d put a fresh board on and maybe even take time to surface it. But for what I’m doing right now it’s plenty good enough and I’m fine with that.
Hrrm, this is good feedback. I think I mostly want to cut plywood with it (which is I think what you mean by 2D shapes?) but one thing you mentioned that I don’t want is to have to fiddle with it repeatedly while setting up a cut. I want a repeatable process/configuration where I can generally lock the machine in. So maybe I’ll split the difference and go for a simpler torsion box, just a 5ish ft. x 5ish ft. x 0.5ish ft. box with OSB on the bottom, MDF strips as the…torsion…bars …, and MDF sheets on the top.
Your design should be totally workable if you don’t mind tearing up your spoilboard a bit, just set the CAM to overcut by enough to account for the variance in your table. It should be repeatable enough, though the resultant DOC variation does cause problems if you’re trying to go real fast.
I say get it cutting, see how it goes - you can always build a better table later. Possibly using the machine, though Ryan’s non CNC design is pretty slick: ~ $200 Full sized Lowrider table, Non-CNC Build
Yeah, by 2D shapes I’m talking about milling sheet goods and doing mostly outlines.
It’s when you want to start doing pockets or engraving and such at a specific depth but not all the way through that things can get tricky if your table isn’t totally flat.
Cutting my LR4 plates on my old MPCNC was fairly easy…though at some points I didn’t even get a full depth cut and at others I was 2-3mm deep into the spoil board. But if I just wanted plates that was fine and I don’t mind some cuts in the spoil board.
But I wanted to add engraving to it…and that’s where the uneven bed became an issue.
My first attempt I just went for a 1mm deep engrave - and the warp in my table was enough that that resulted in some parts not getting carved while others got carved deeper than I wanted.
The final cut in the photo I did a 3mm cut - which was deep enough to cut everywhere…but some parts are still cut significantly deeper than others.
Note - I didn’t bother with a spoil board there. The stock material was bigger than the cutting area on my machine so a surfaced spoil board wouldn’t have helped without cutting the stock down (and I wasn’t interested in taking the time to surface a spoil board or cut stock down first) And I was decomissioning the machine and table after this so I didn’t mind cutting into the table itself.
Also note - the issue with my old MPCNC wasn’t just the table…I built the machine considerably larger than recommended. Which was fine for my primary use of a needle cutter to cut foam board. But it meant the rails sometimes sagged ( I added mid-span supports that helped - but the gantry rails themselvs still had some sag) so I was dealing with inconsistencies both from my table and from my machine. The LR4 pretty much eliminates the machine issues.
For most of what I wanted to do this wasn’t a big issue. I could just use a deeper cut. Of course - it worked out that it wasn’t quite THAT simple. Adding a deeper cut solved the issue…but opened the door for other failures since it usually required an extra pass or two since I also used very shallow cuts with that machine due to it’s lack of rigidity. And each extra pass opened the door for more possible failure since again the machine was lacking in rigidity and had issues like the cord strain relief coming off the router tended to get caught in the gantry causing lost steps…so that extra depth led to a slower cut which led to more chances for other things to go wrong.
All that said - overthinking it doesn’t help as much as having a machine and learning from it does. You can always build another table if you find the table is a limiting factor. And having the machine working will mean one more tool to possibly make building that improved table easier.
I am about to start my own LR4 upgrade process here and am setting up a table first this time. When I did my LR3 the table was an after thought and it is currently really in the way as it took over the main table / out feed for table saw space. I have a stack of wood in my shop now and am going to be building the non-cnc table that AJ linked.
That table that Ryan designed is now a bit more than $200 but still not that big of a deal in regards to cost.
On a side note, I got all this yesterday and when I went into the shop to get the wood, about 1/2 way through the store it started to rain, really heavily, from the sound on the metal roof. It slowed to only a light sprinkle when I was loading and I was able to drive out of it. Until about 20 minutes from home and then the skies opened up again. I just unloaded into the shop and left it to all dry out. Hope the MDF isn’t shot, been afraid to go back out and check it.