I got it because it has TMC2209 drivers, is pretty well-adopted by the broader Marlin/3D printer community and is cheap (~$45 for just the board on Amazon or $85 for the board + TFT35-E3 display). And because I have an Ender 3 so worst-comes-to-worst I can just swap it in there as an upgrade for the printer.
Yup, I know it’s only 4 drivers instead of 5 — Z driver multiplexes 2 Z ports which as near as I can tell are parallel. I wired all my axes in parallel for simplicity (ie stepper wires are 1:1 w/ axis ports).
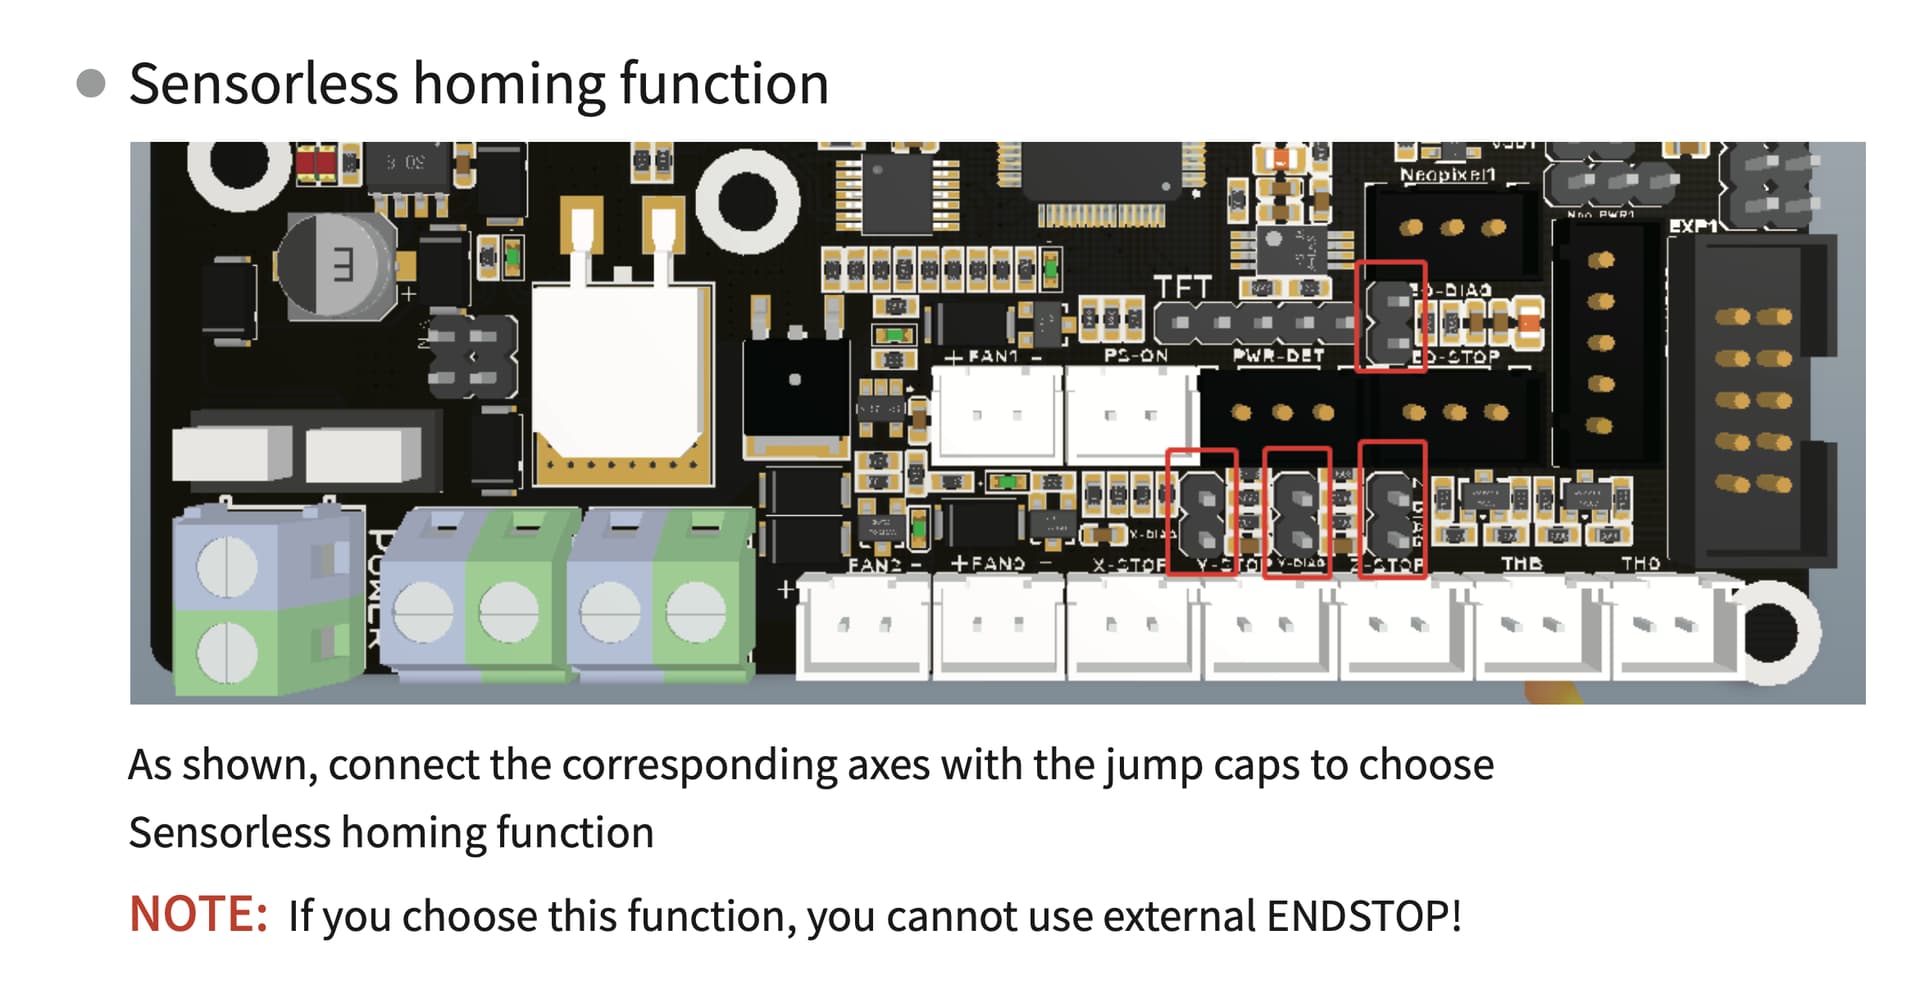
I’m using sensorless homing which is super simple to set up - just have to put jumpers on 3 pins and make a few Marlin tweaks.
I read all the info I could find on these forums re: why >=5 drivers + series wiring is better; some salient threads:
And I think I’m comfortable with the tradeoffs as I understand them. Namely:
Less power from parallel wiring, particularly Z axis because of the driver multiplexing (I haven’t noticed problems yet…maybe I will later?)
No dual endstops (I’m fine w/ physical endstops + sensorless homing)
No auto squaring (because no dual endstops - I’m comfortable w/ getting things as close as I can by hand + calibrating, offsetting, and storing offsets in eeprom)
No auto leveling (I’m not 3d printing so I don’t care)
I’d be interested to know if there are more tradeoffs I’m not thinking of and/or if my understanding of ^ is incorrect.
I just build in the root dir using platformio run -e STM32G0B1RE_btt from the CLI. Then I copy the built binary in ./.pio/build/STM32G0B1RE_btt/firmware.bin to the SD card of the SKR Mini E3 V3. Probably have to do something different if you’re using PlatformIO from VS Code, not sure.
Hopefully this is useful to someone / saves a few hours for ppl like me who choose the SKR Mini E3 V3
I wouldn’t bother with the sensorless homing for Y and Z. It will be more accurate to have some physical stops to push against just before engaging the steppers. Since you cannot run the steppers independently, you cannot remove any skew with homing (the primary use), but physical stops will get you very close to what you would get with dual endstop homing.
Parallel wiring will halve the current going to each stepper. You can compensate a bit by increasing the current to the driver, but personally I’d wire up a small connector that converts the wiring for Z to a serial connection. It can be installed inside the control box using the wiring you’ve already done.
1:1 driver per motor, or what we call dual endstops. You are doing this on your Y.
The tradeoffs you describe sound like you are comparing parallel to dual. But you should really do series (sometimes we call it serial).
Parallel splits the current between the motors, which greatly reduces the power. When we started wiring motors in series, our builds worked a lot better. Dual is marginally better, and really only significantly improves the builds by auto squaring.
You can’t do dual on both axis on your turbo. But you can do series.
I would at oeast wire your 2 Z motors in series. It is a trivial fix.
I might also consider using dual endstops on Y so you can auto square XY. But this would be more work, and a bonus feature. The way you square a build without dual endstops is to just have hard physical stops you push the build against and start the motors square.
When I mentioned “tradeoffs” I guess I should have been explicit what I was trading off - I meant “a 5+ stepper board vs the SKR Mini E3 V3’s 4-stepper-5-port-multiplexed-z setup”
Thanks also for clarifying the differences between the wiring configurations! I guess I was a little imprecise when I said “parallel” - the only part that is probably parallel are the Z ports and the board comes this way as-designed from factory. I think you rightly understood that my setup is 1:1 steppers <-> motors for the 2 Y axes (ie the “actual” Y port and the commandeered Extruder port) and the 1 X axis.
Definitely read you on no dual X axis w/ this setup (at least not without klipper and a separate board w/ more steppers). I’m fine living without auto squaring using dual endstops like I mentioned. But good to know there’s a way to square manually with physical stops!
I mostly wired 1:1 out of convenience. Good to know that series wiring is still an option for Z axis if I “need the juice” so to speak. I’m sure I’ll make that switch sooner rather than later.
Oh, and I’m not working with a turbo - looks like that has 2 multiplexed extruder ports on 1 stepper vs the SKR Mini E3 V3 having 2 Z’s - but clearly it’s the same principal