Yeah, I think so… What Is Borax & Is It Safe For Cleaning With? - Moral Fibres
1 Like
I’ve seen some post that they use rubbing alcohol to clean off the wood after engraving. You might give that a try.
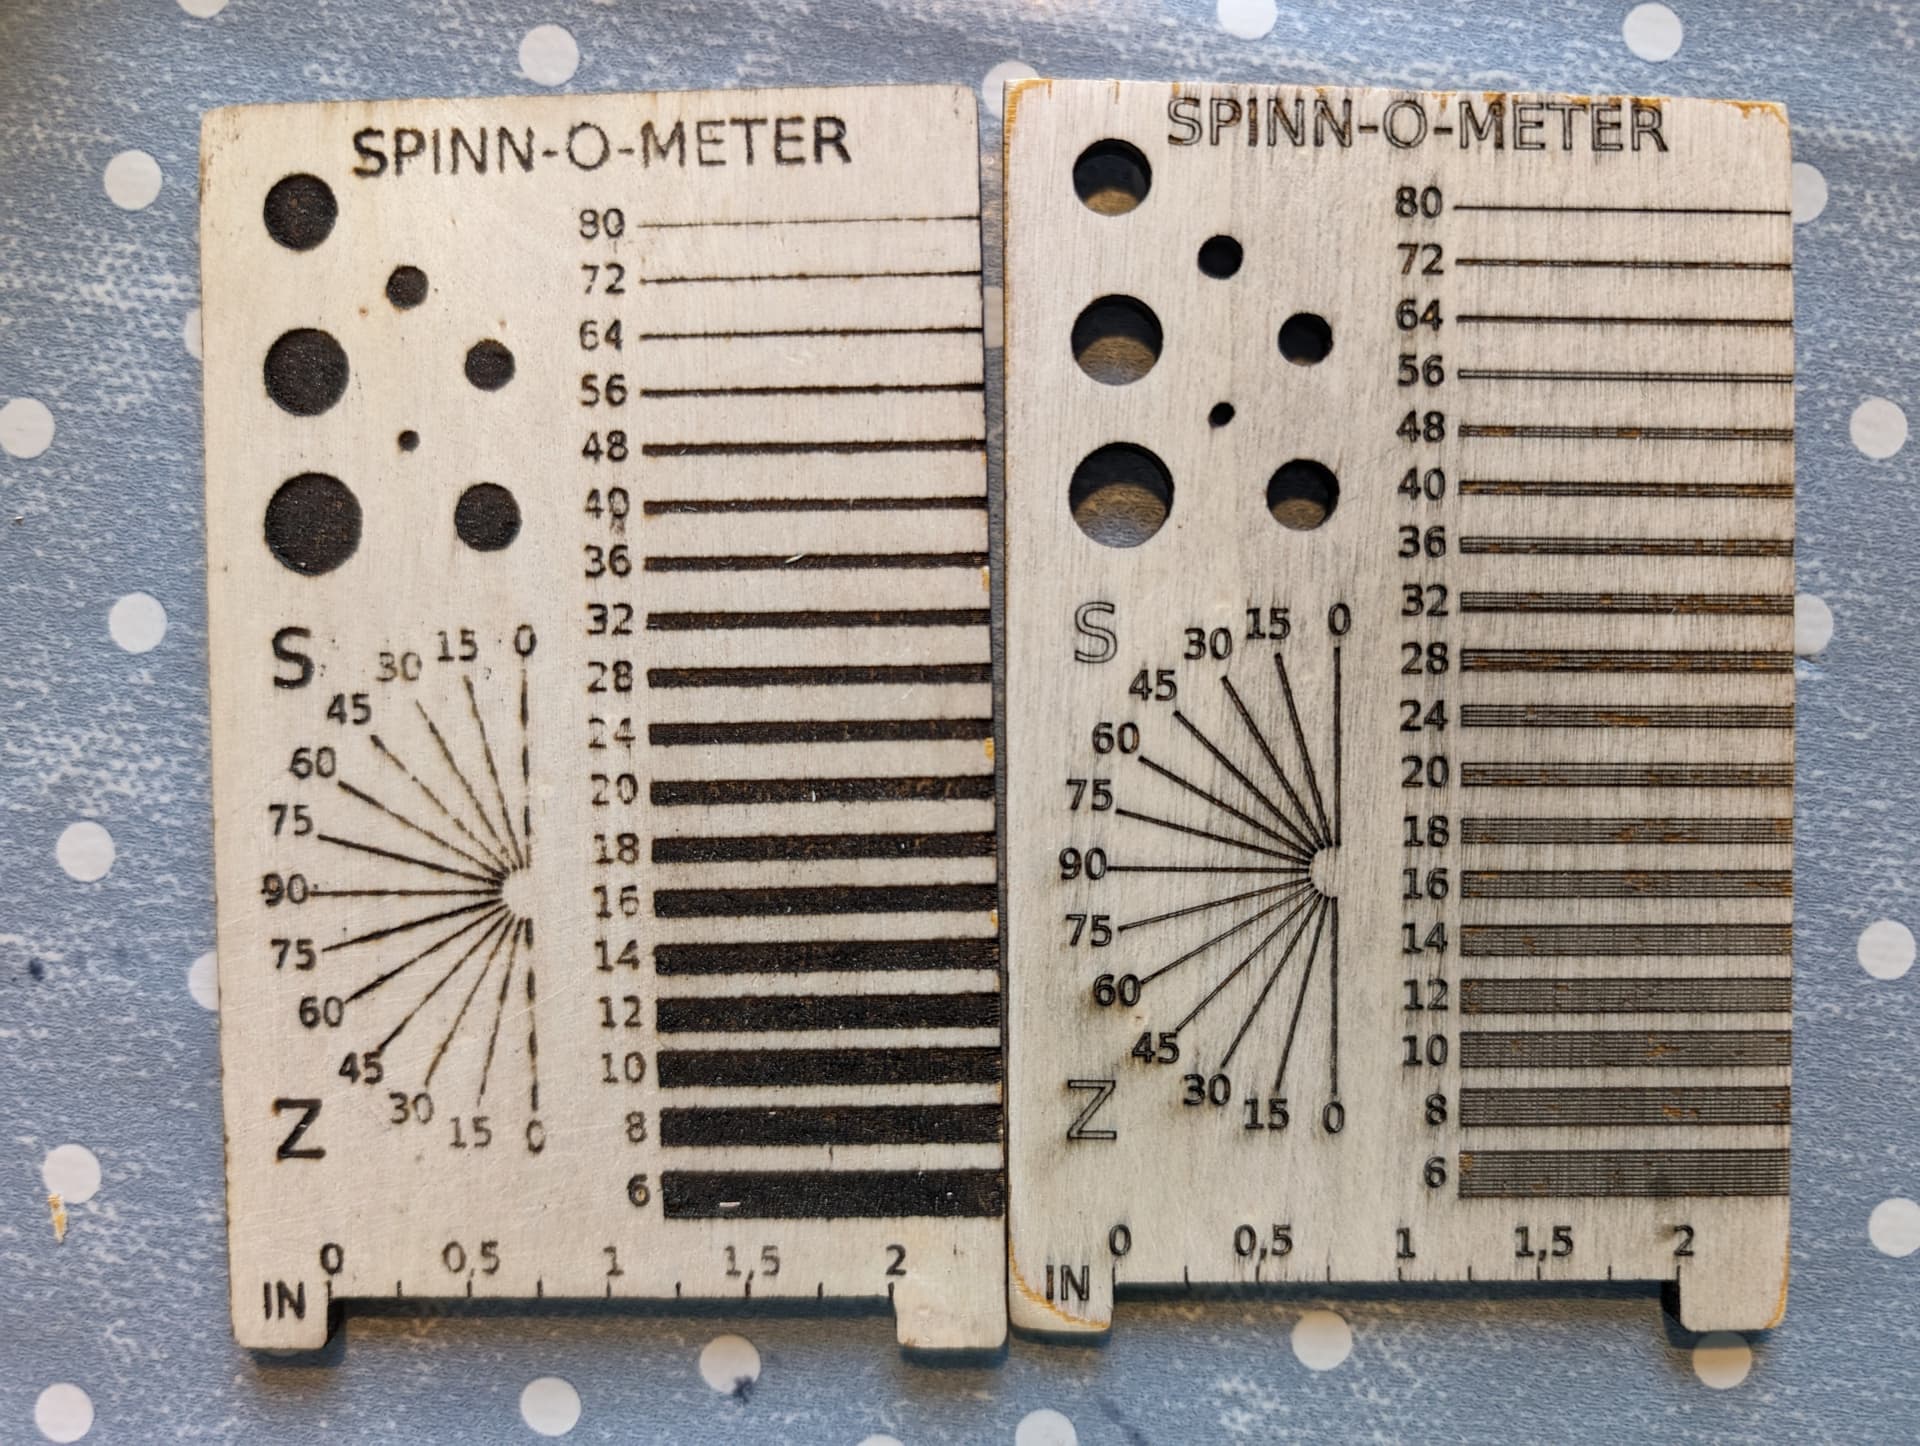
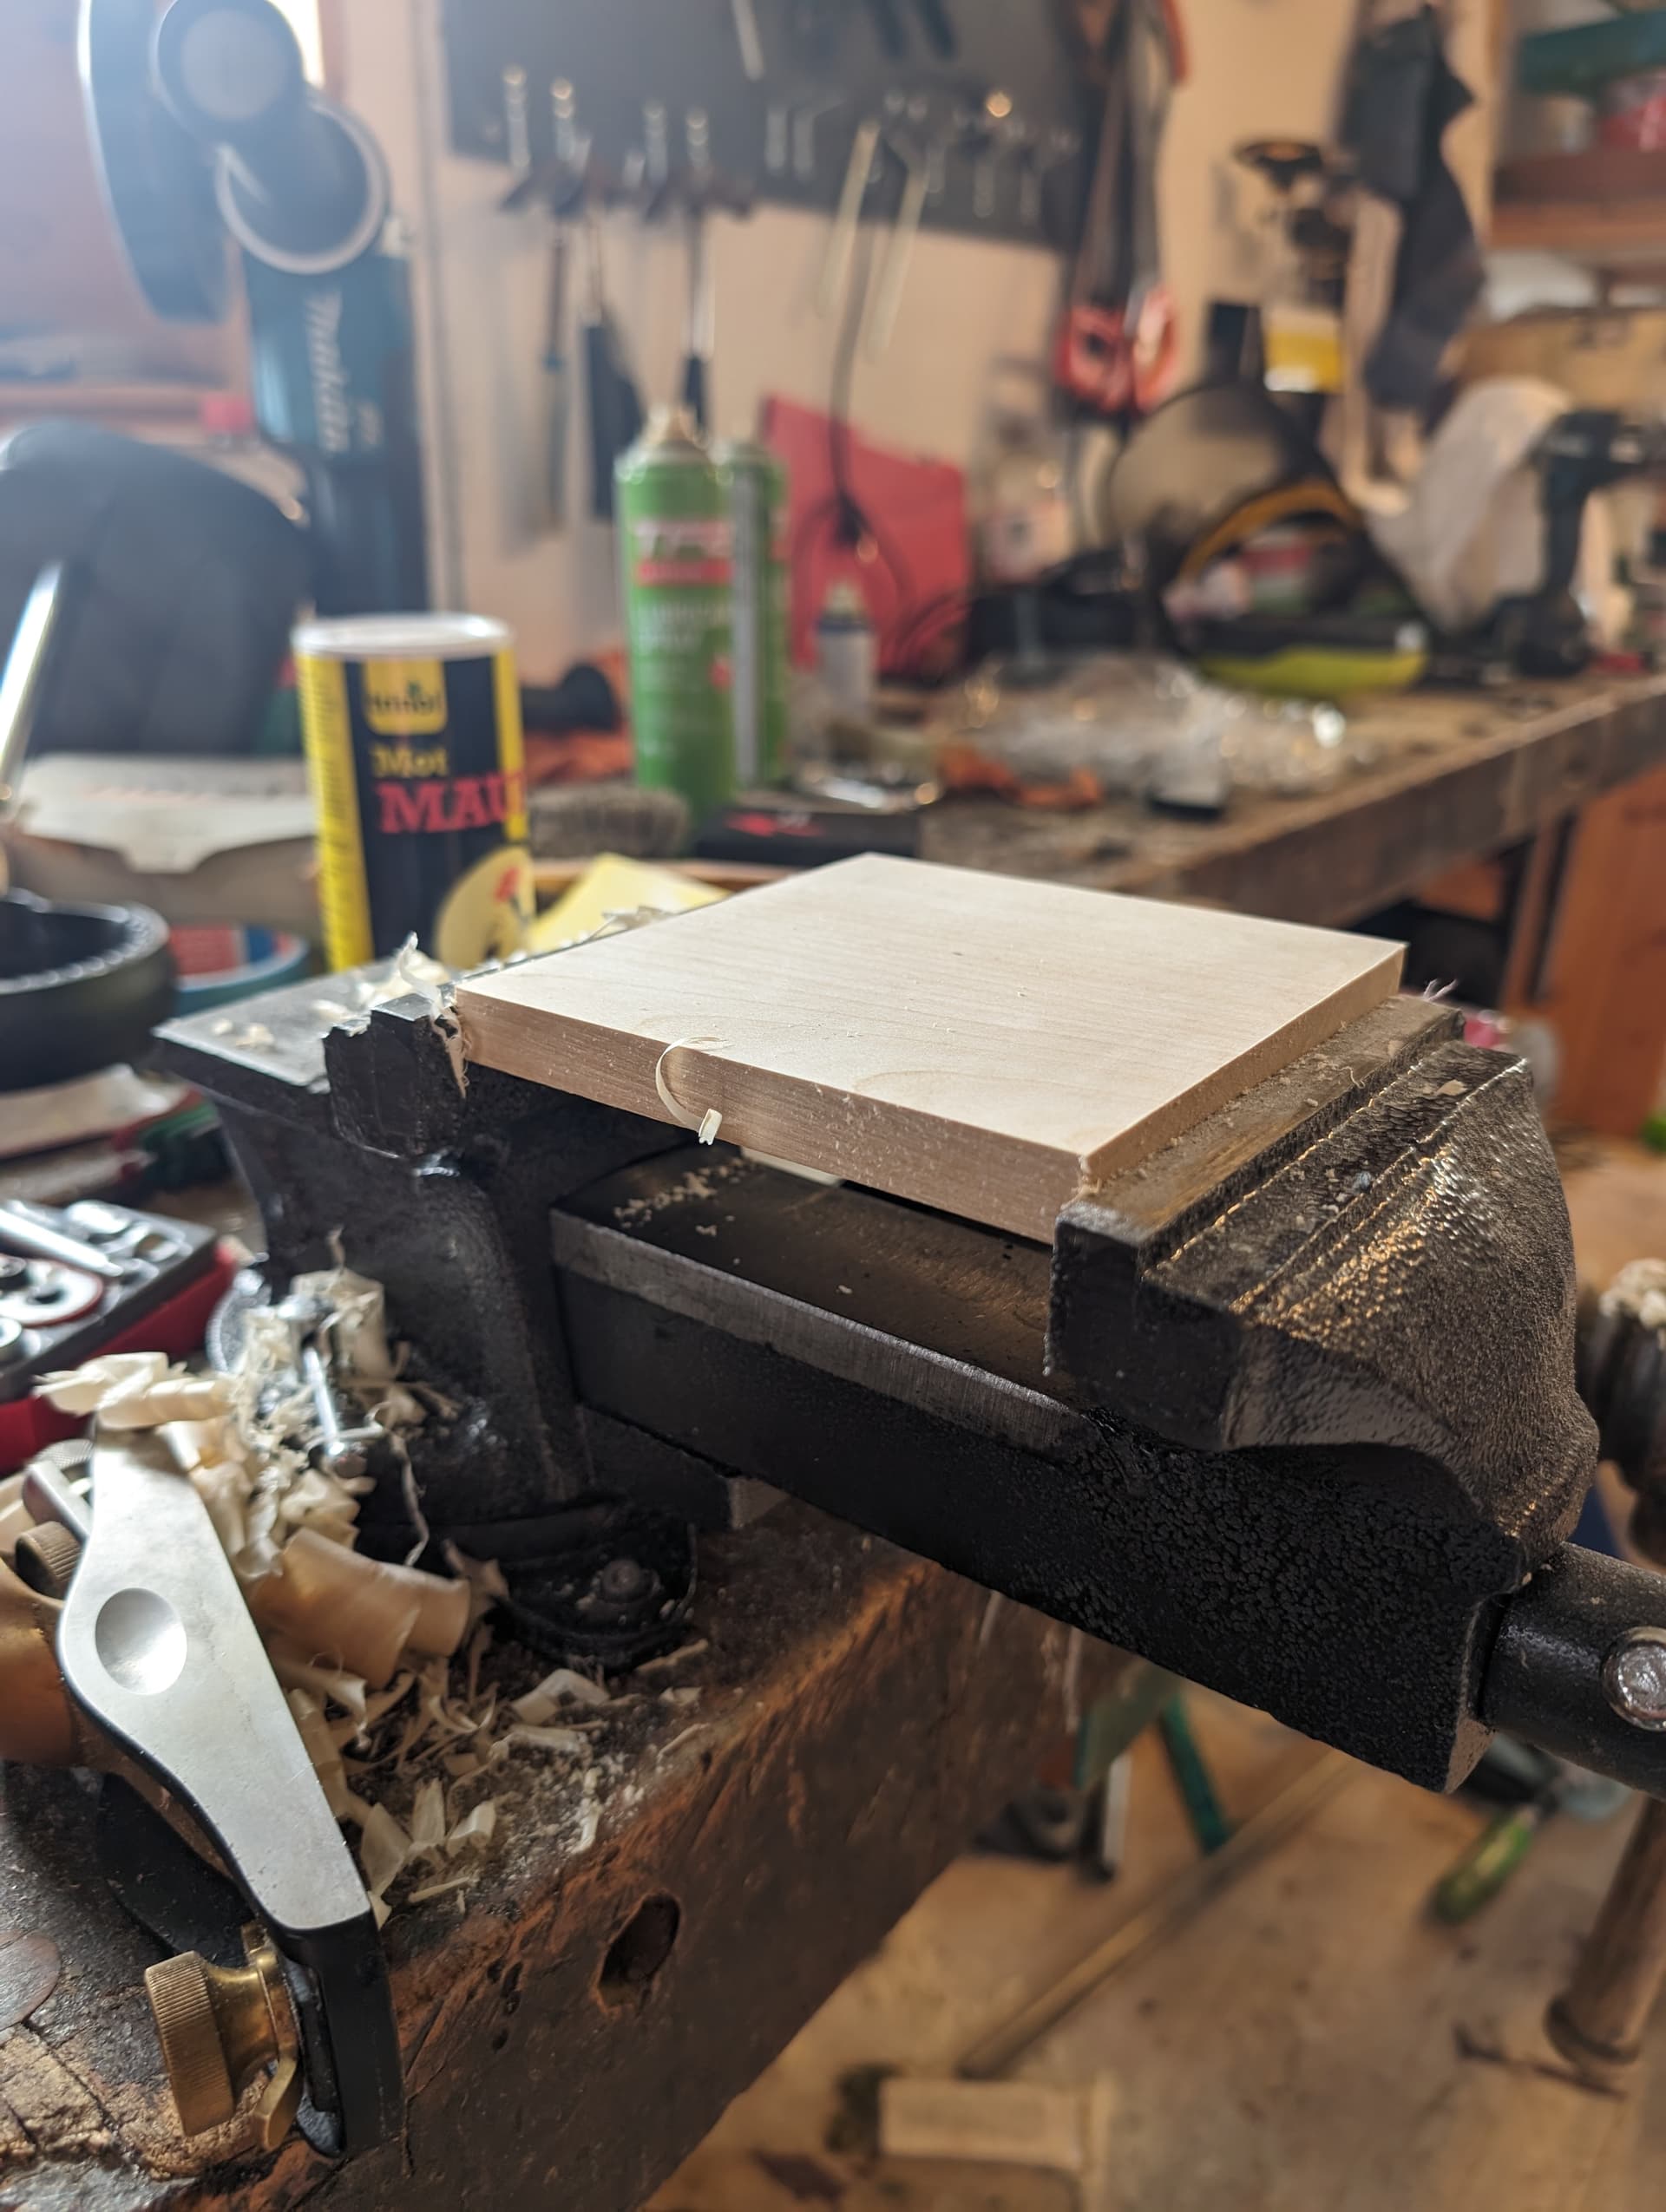
I finally found a way! Pffeewww! What a relief ![]() it sure is annoying when you’re almost there, but not quite…
it sure is annoying when you’re almost there, but not quite…
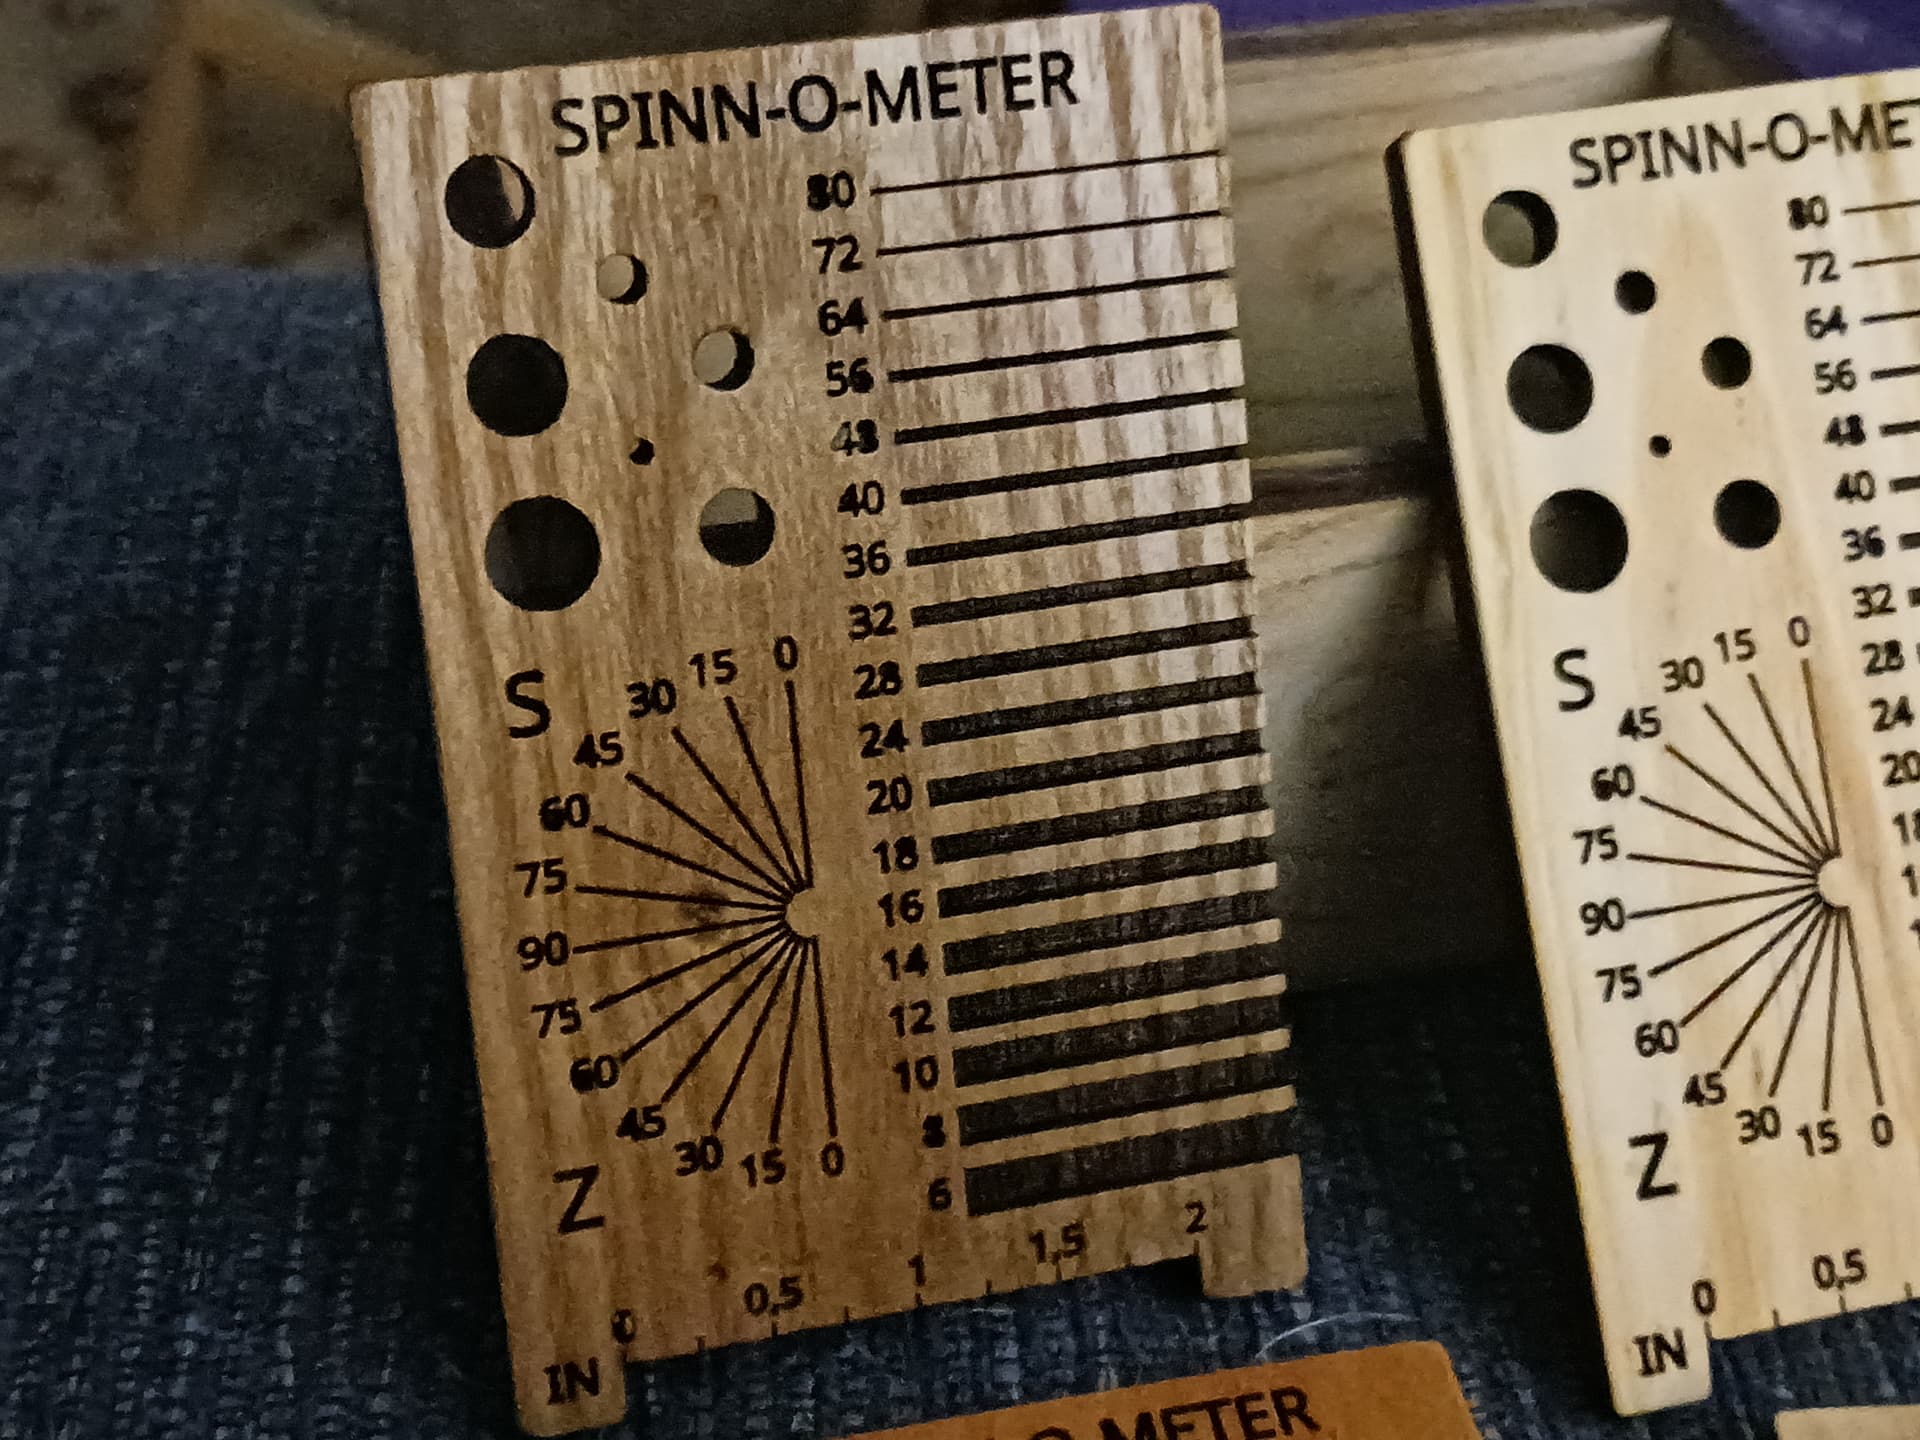
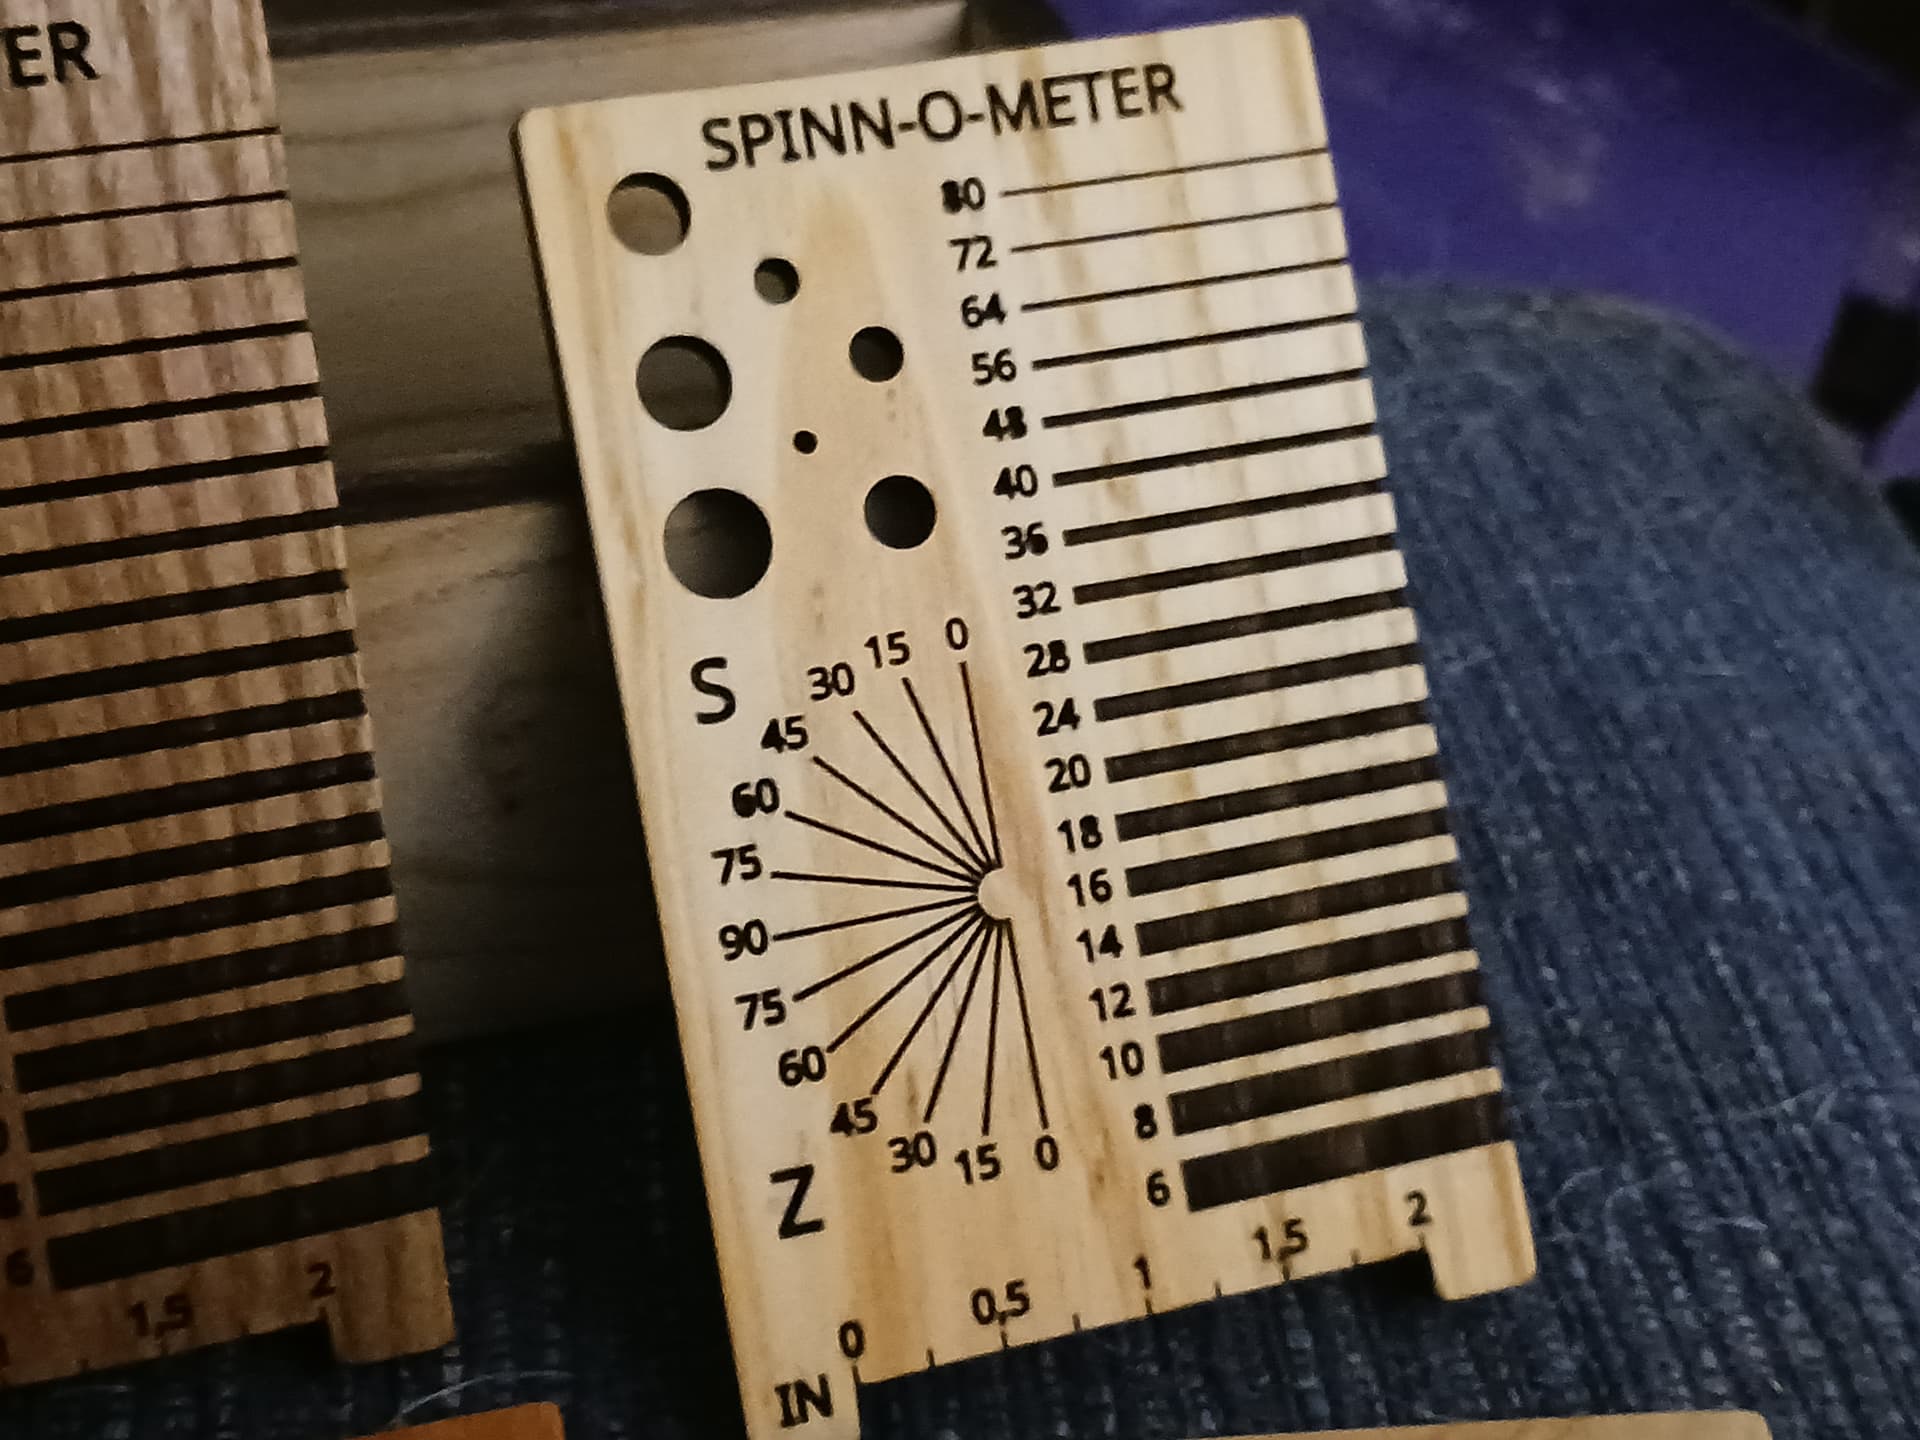
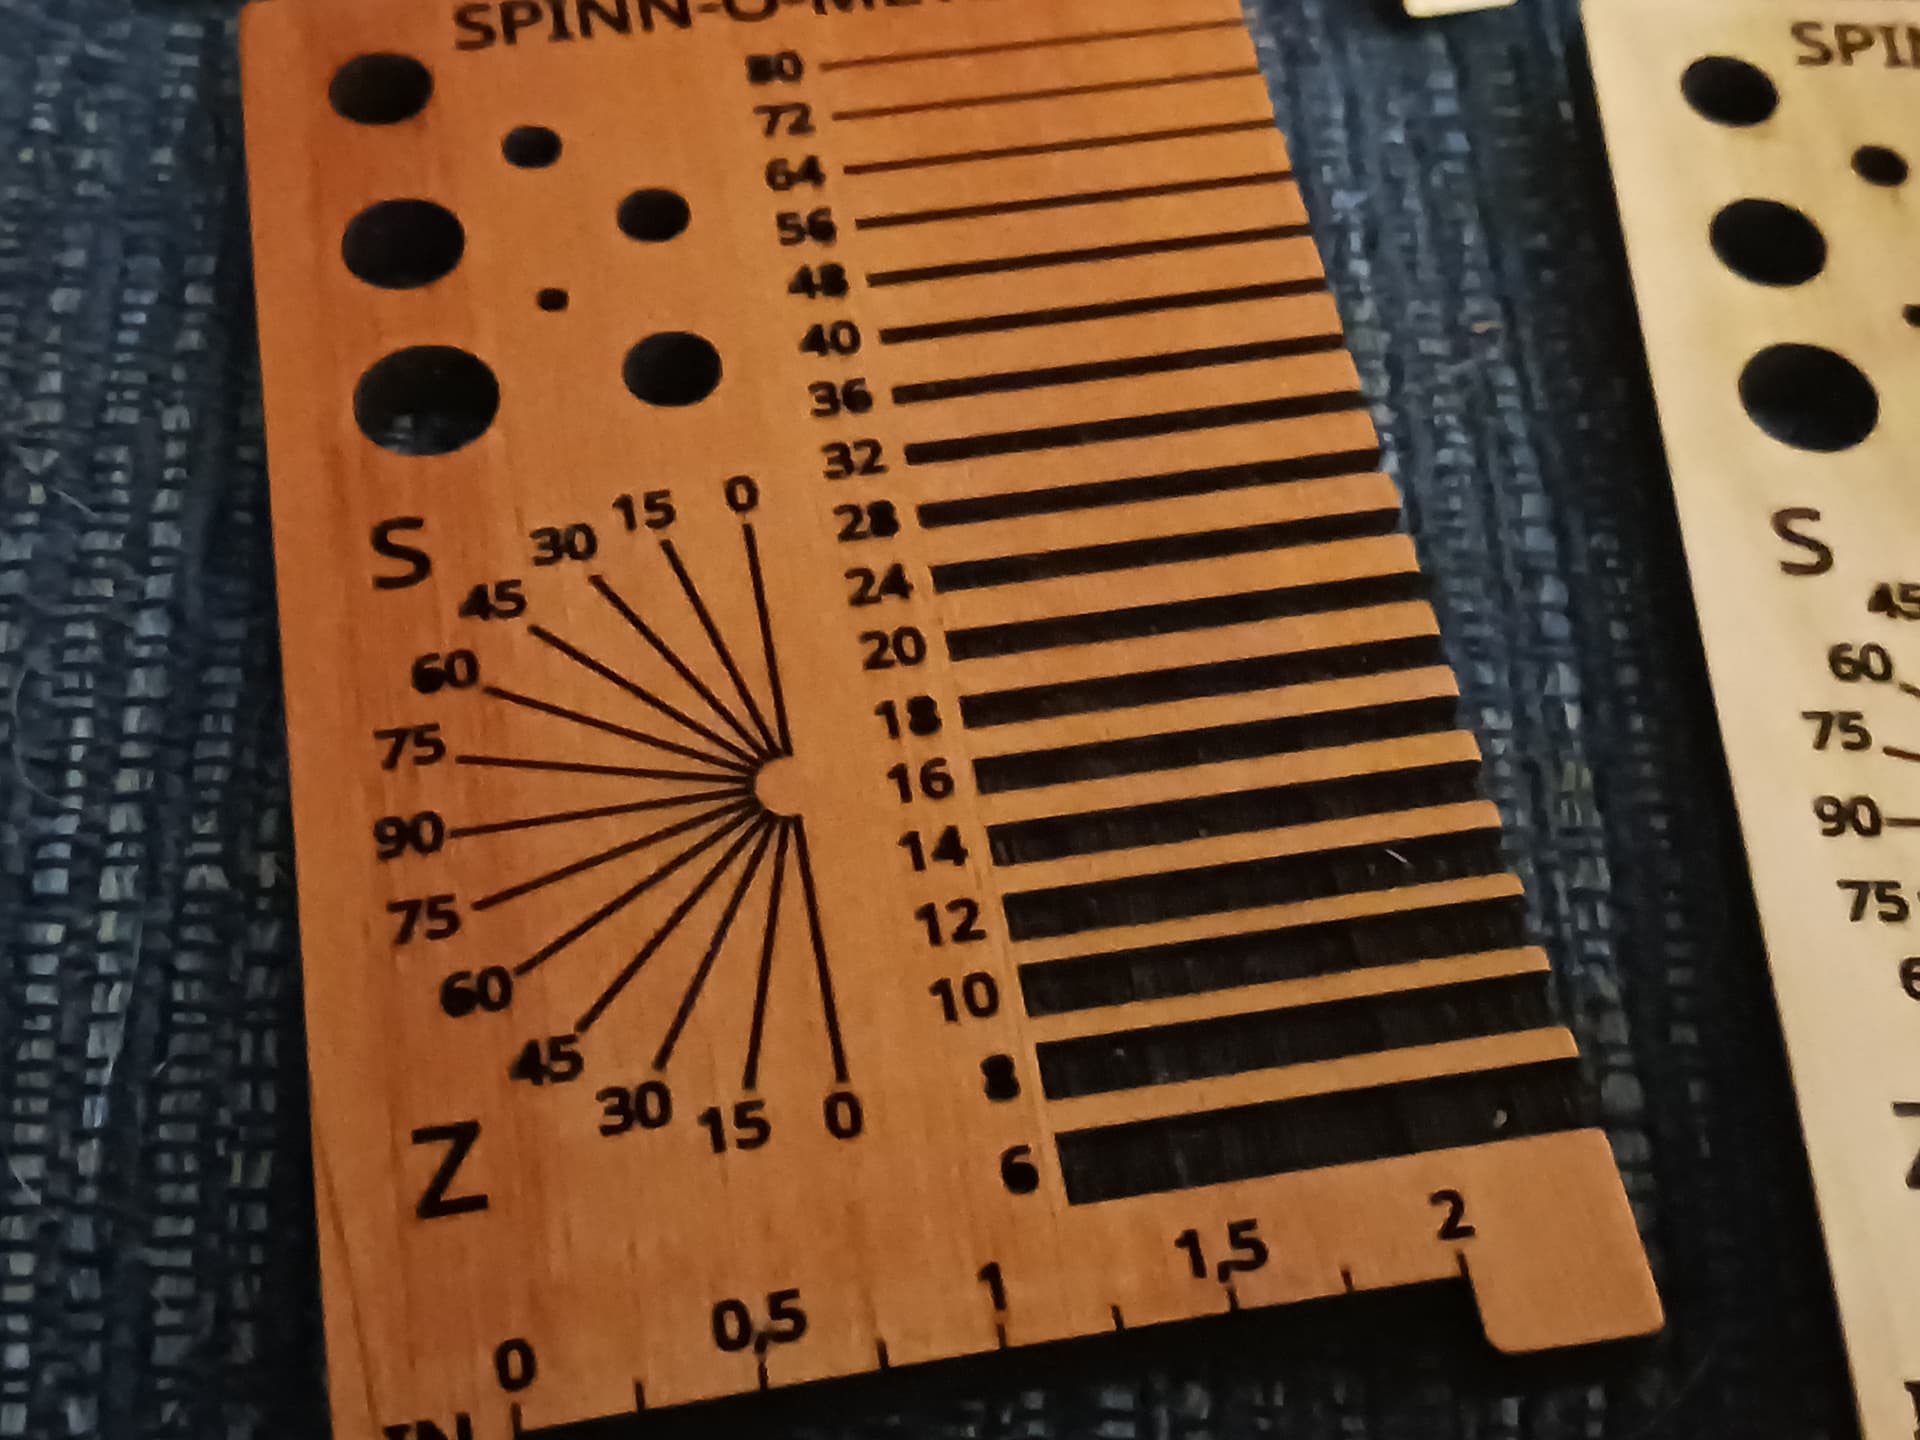
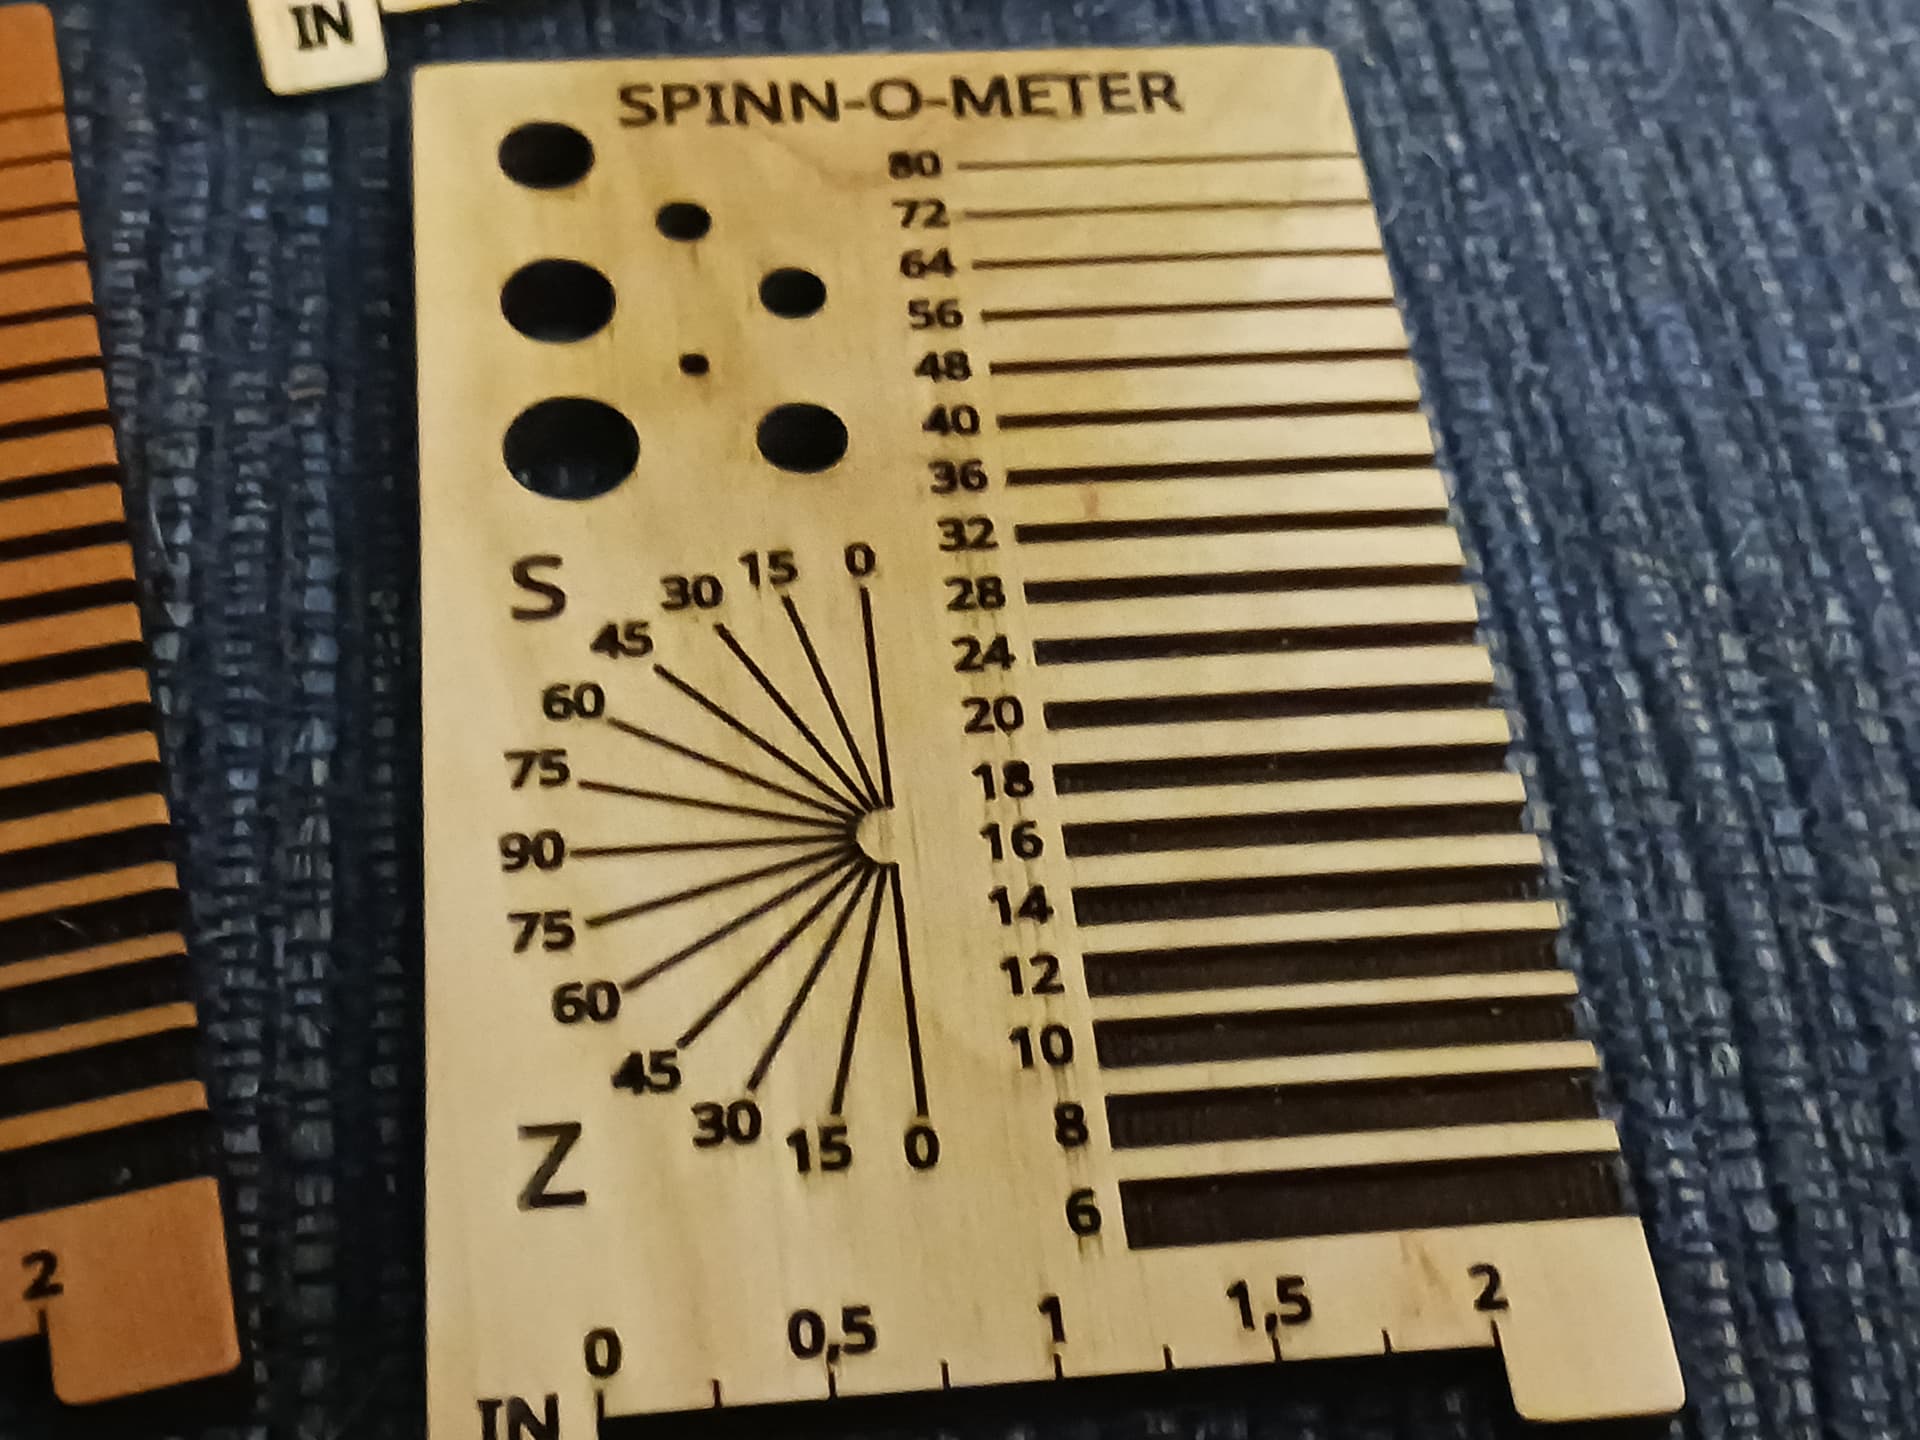
The solution: use line instead of fill! Visiting the in-laws my eyes fell on a funny measurement tool. They used only line when engraving it, and it’s soo much smoother.
I DID try with baking soda (natriumhydrogenkarbonat), but the whole “fill” option seemed obsolete for this project. Using line is so obviously a better choice for this.
A few remarks: The plate to the right doesn’t look good at all. I forgot setting zero, and when I was going to use air to remove sanding dust, there was so much condensation in the compressor that the plate got soaking wet. Thus the soot all over the place… but I’m 100% confident that this method is the right one for this project.
I also think that the veneer being used means A LOT. Mine seems soft and of a bad quality. The veneer used for my m-i-l tool seems almost like hard wood, a totally different feel.
4 Likes
No that you mention it - I think @dkj4linux has suggested using fill with a slight offset and going around the lot to tidy up with a line.
If it wasn’t him, he’ll have a better suggestion anyway!!
I was pretty much buying into the idea that @turbinbjorn’s veneer indeed wasn’t the best quality… and the soot and smudge advice he was getting was as good as anything I’ve heard or done. I also use solid wood mostly (vs ply or veneer) and can “afford” to sand away any soot and smudges that occur. So I’ve remained quiet.
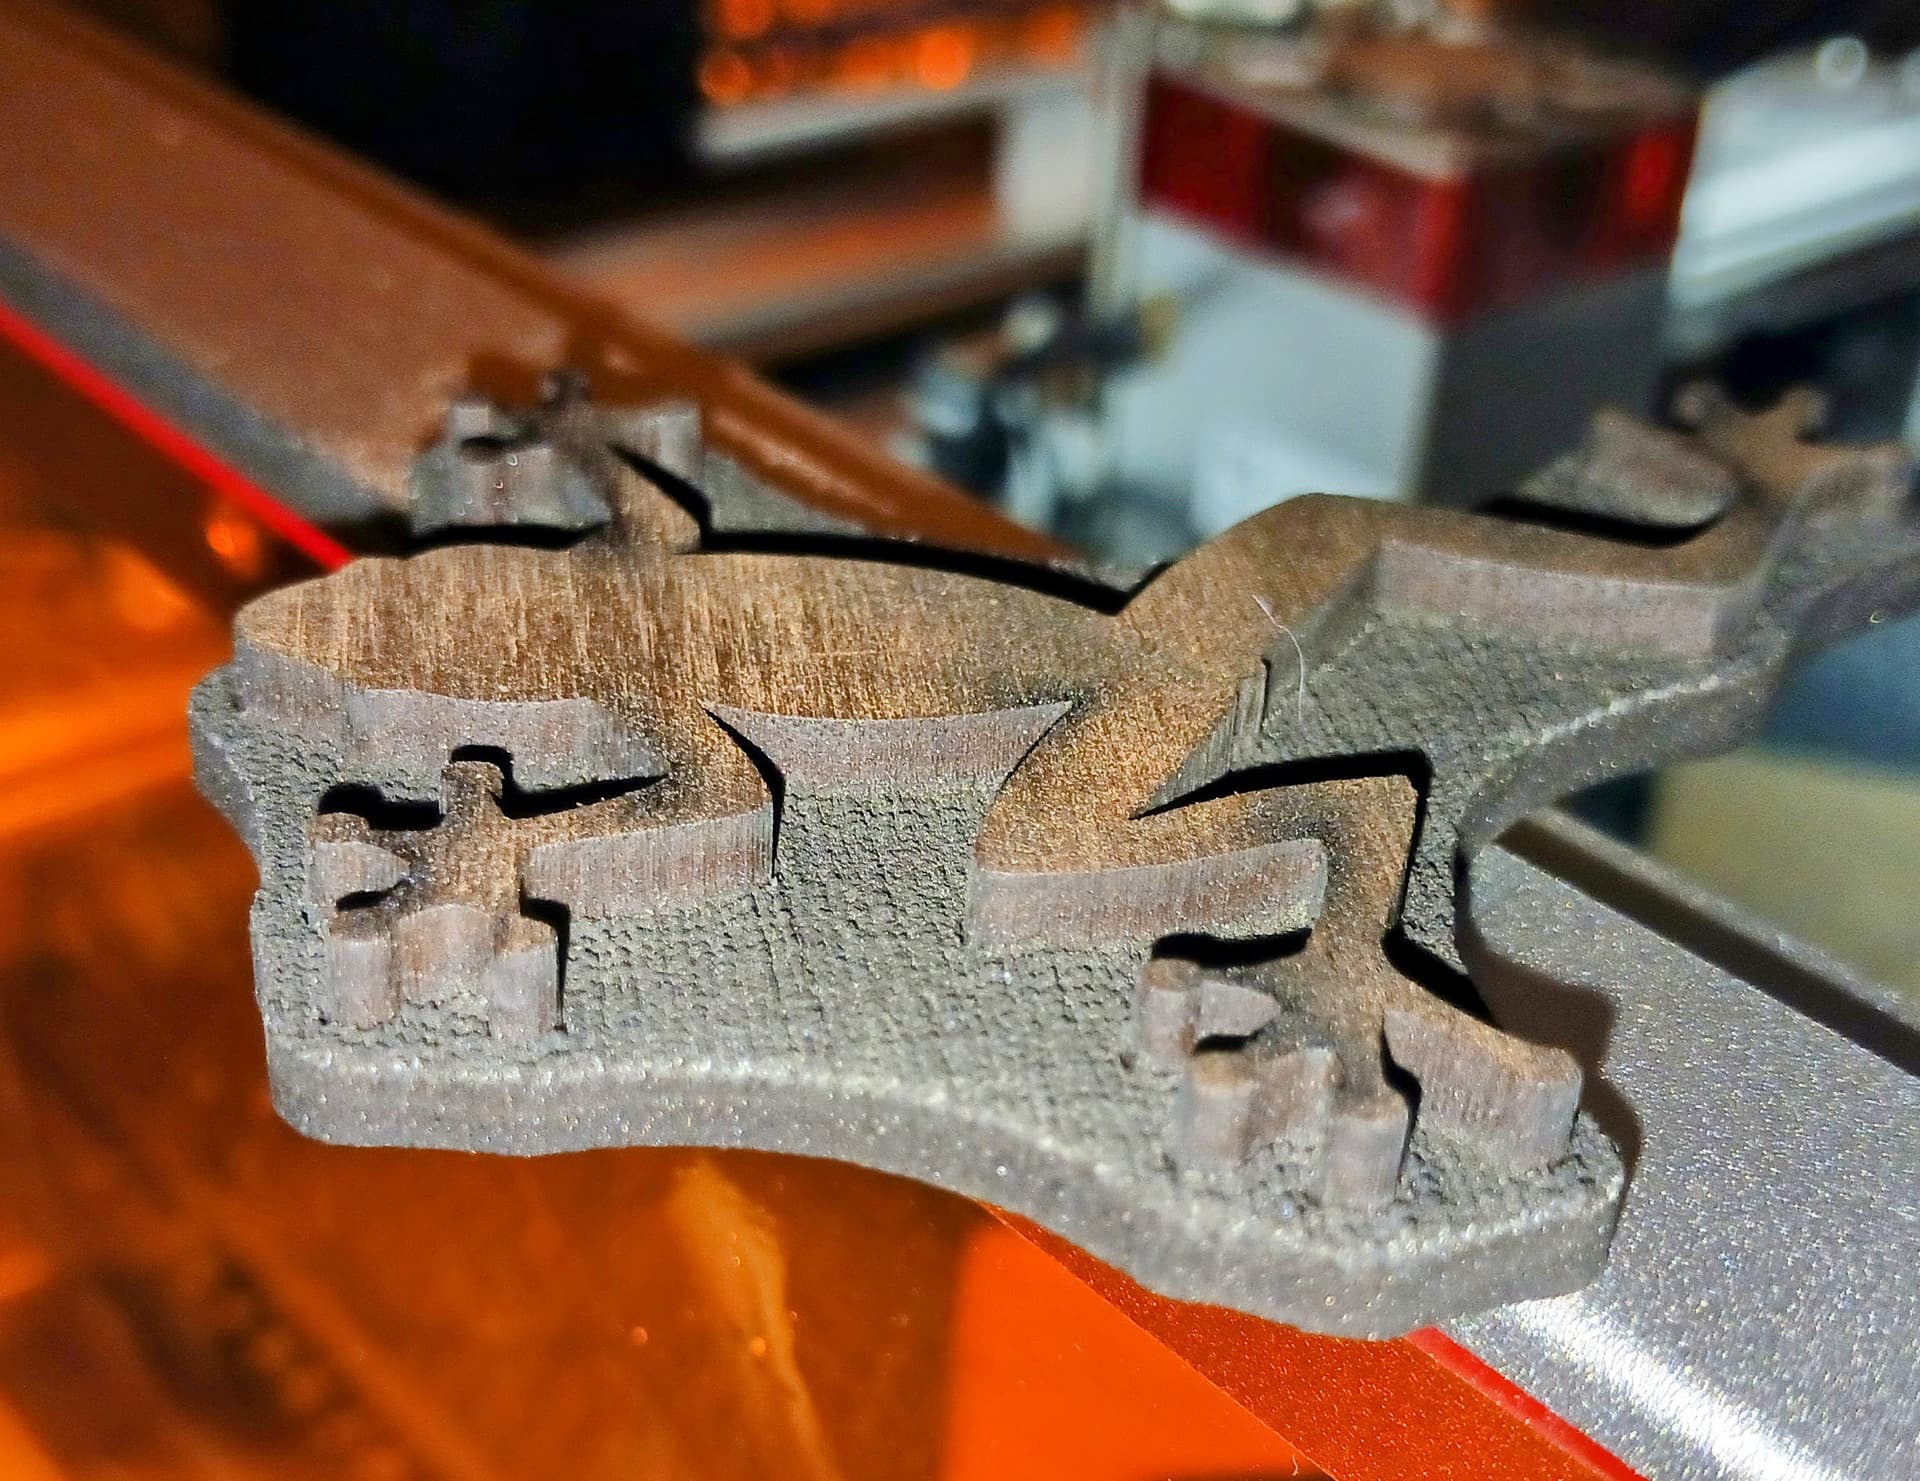
Using “line” instead of “fill” will always give sharper, though less heavy/dark, results. But there are times when you need a heavier mark and a “fill” operation is called for. In these cases, I always follow up the “fill” operation with a “line” (vector) operation to sharpen the edges… and easily done in Lightburn. I also do this with my “easy inlays” method to create both the pocket and inlay pieces… and get the most accurate edges. Though far deeper than a simple surface engrave, the idea is the same… and here’s an inlay piece using the “line after fill” sequence that shows the nice clean edges produced.

– David
7 Likes
I appreciate the thought of the man himself paying attention while the acolytes are trying to figure stuff out. Thanks for chiming in! I think you are onto something, using regular wood, rather than veneer and other laminated materials. Amazing inlays as always!
I wonder if it’s possible to split pieces of hardwood and flatten/thin them with a thickness planer. I’d love to reach 3-4 mm. But I’m quite sure the wood would warp easily? Using proper wood would give a nice impression!
For engraving with lines, something you might experiment with is defocusing the laser. This will produce bolder lines, but does require additional power (or slower federate).
1 Like
I’ve been confused by the lack of fill+outline in the newer light burn version s. Because of that, I’ve been trying either or. Just recently found out that sublayers solves it!
1 Like
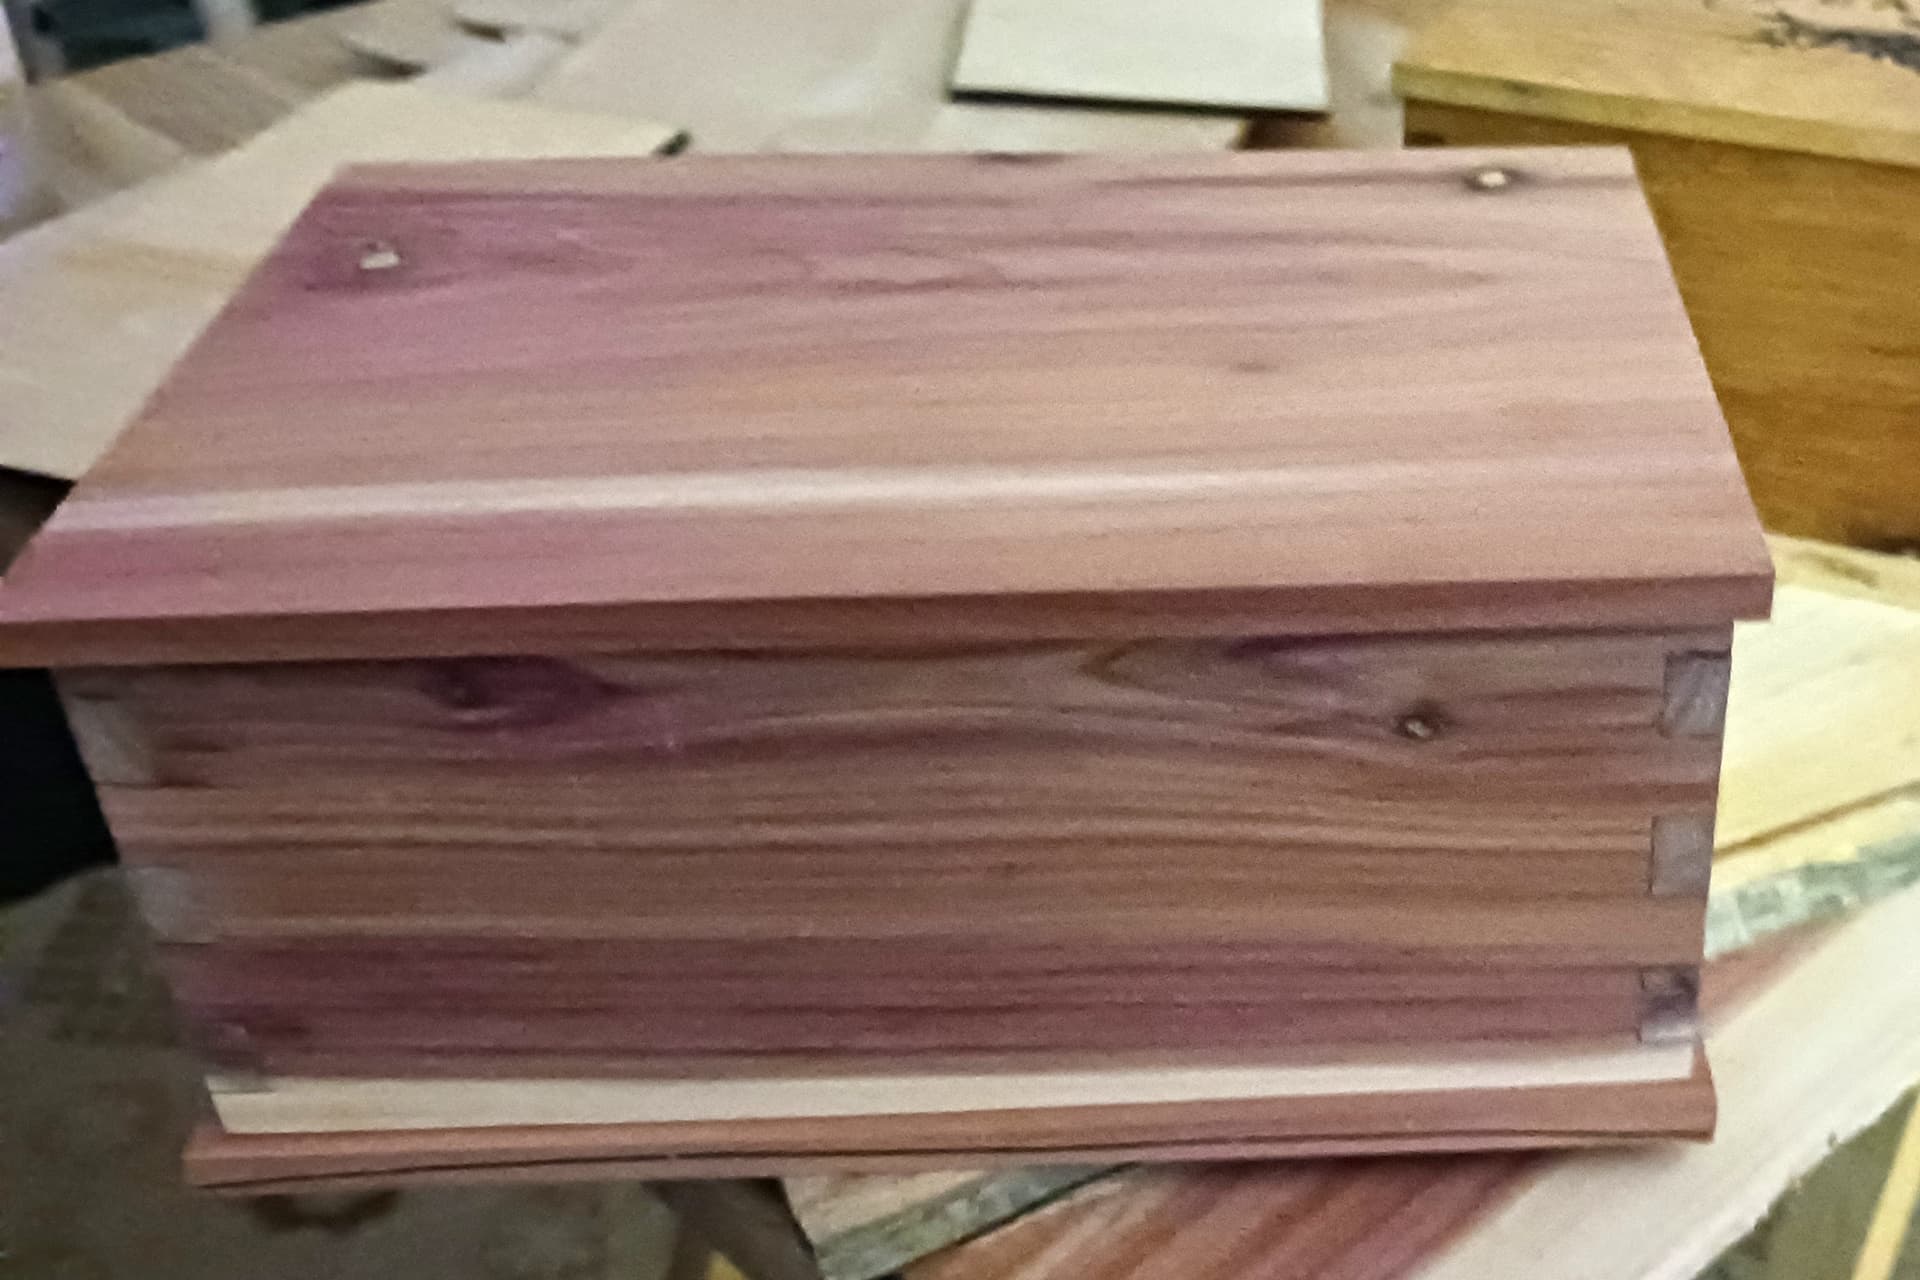
I’m sure you’re aware that I plank out smallish (< 6" thick) limbs and chunks of wood with my bandsaw for the keepsake boxes I’ve built and shown.
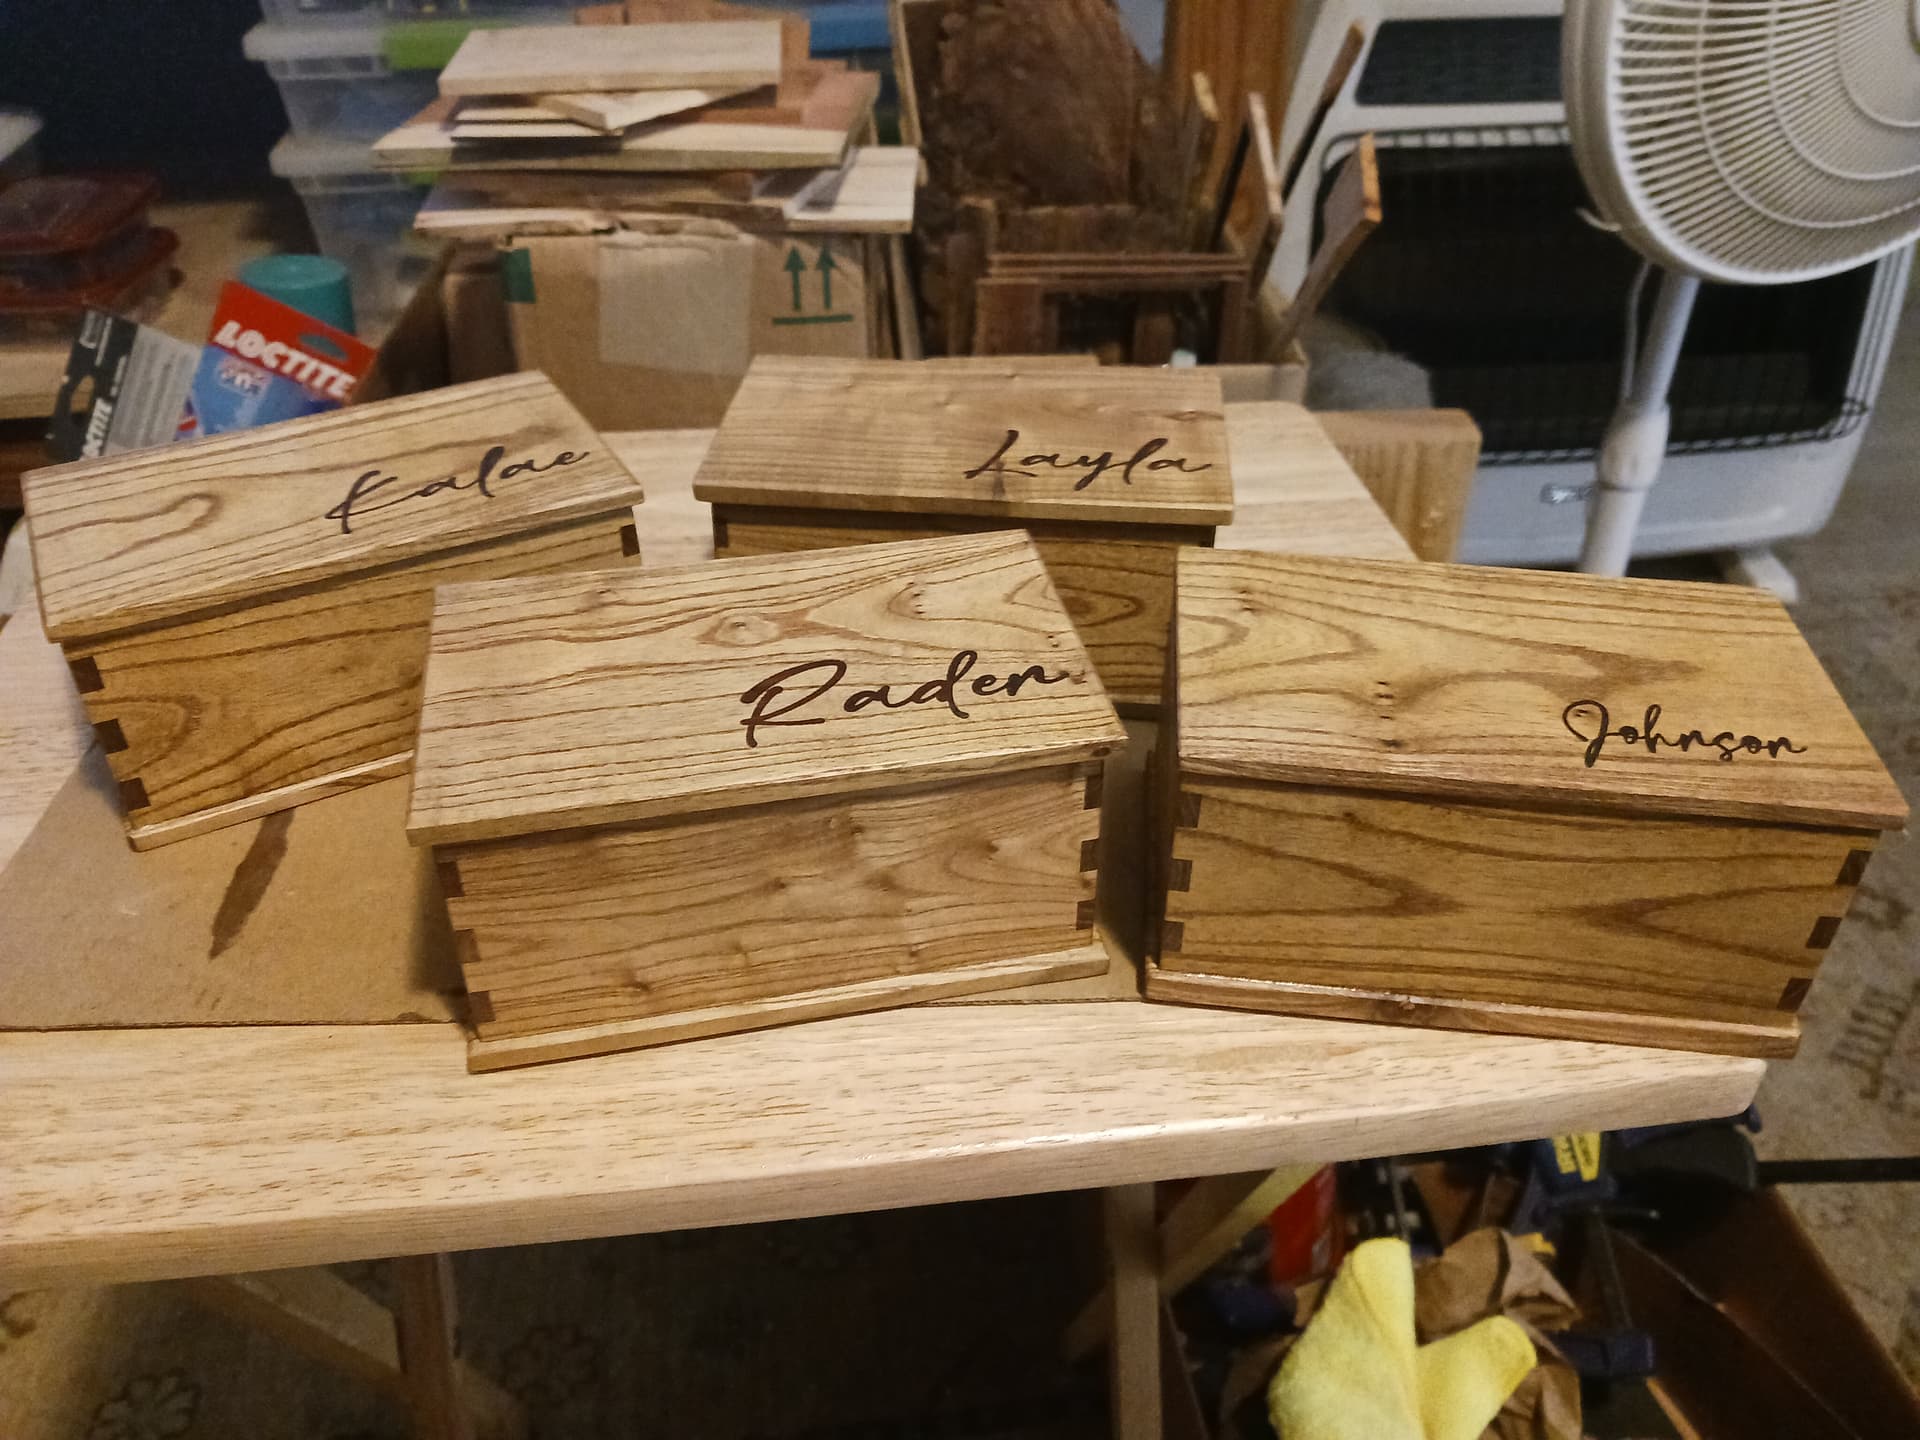
I don’t have a thickness planer or sander. I try to keep a reasonably sharp blade on the bandsaw and avoid “crowding” the cut… and usually the thickness doesn’t vary by more than a millimeter or so (usually less) over the length of the 3mm to 8mm thick planks I cut. I then belt sand the saw marks away… trying to keep the sanding time/strokes in each area approximately the same.

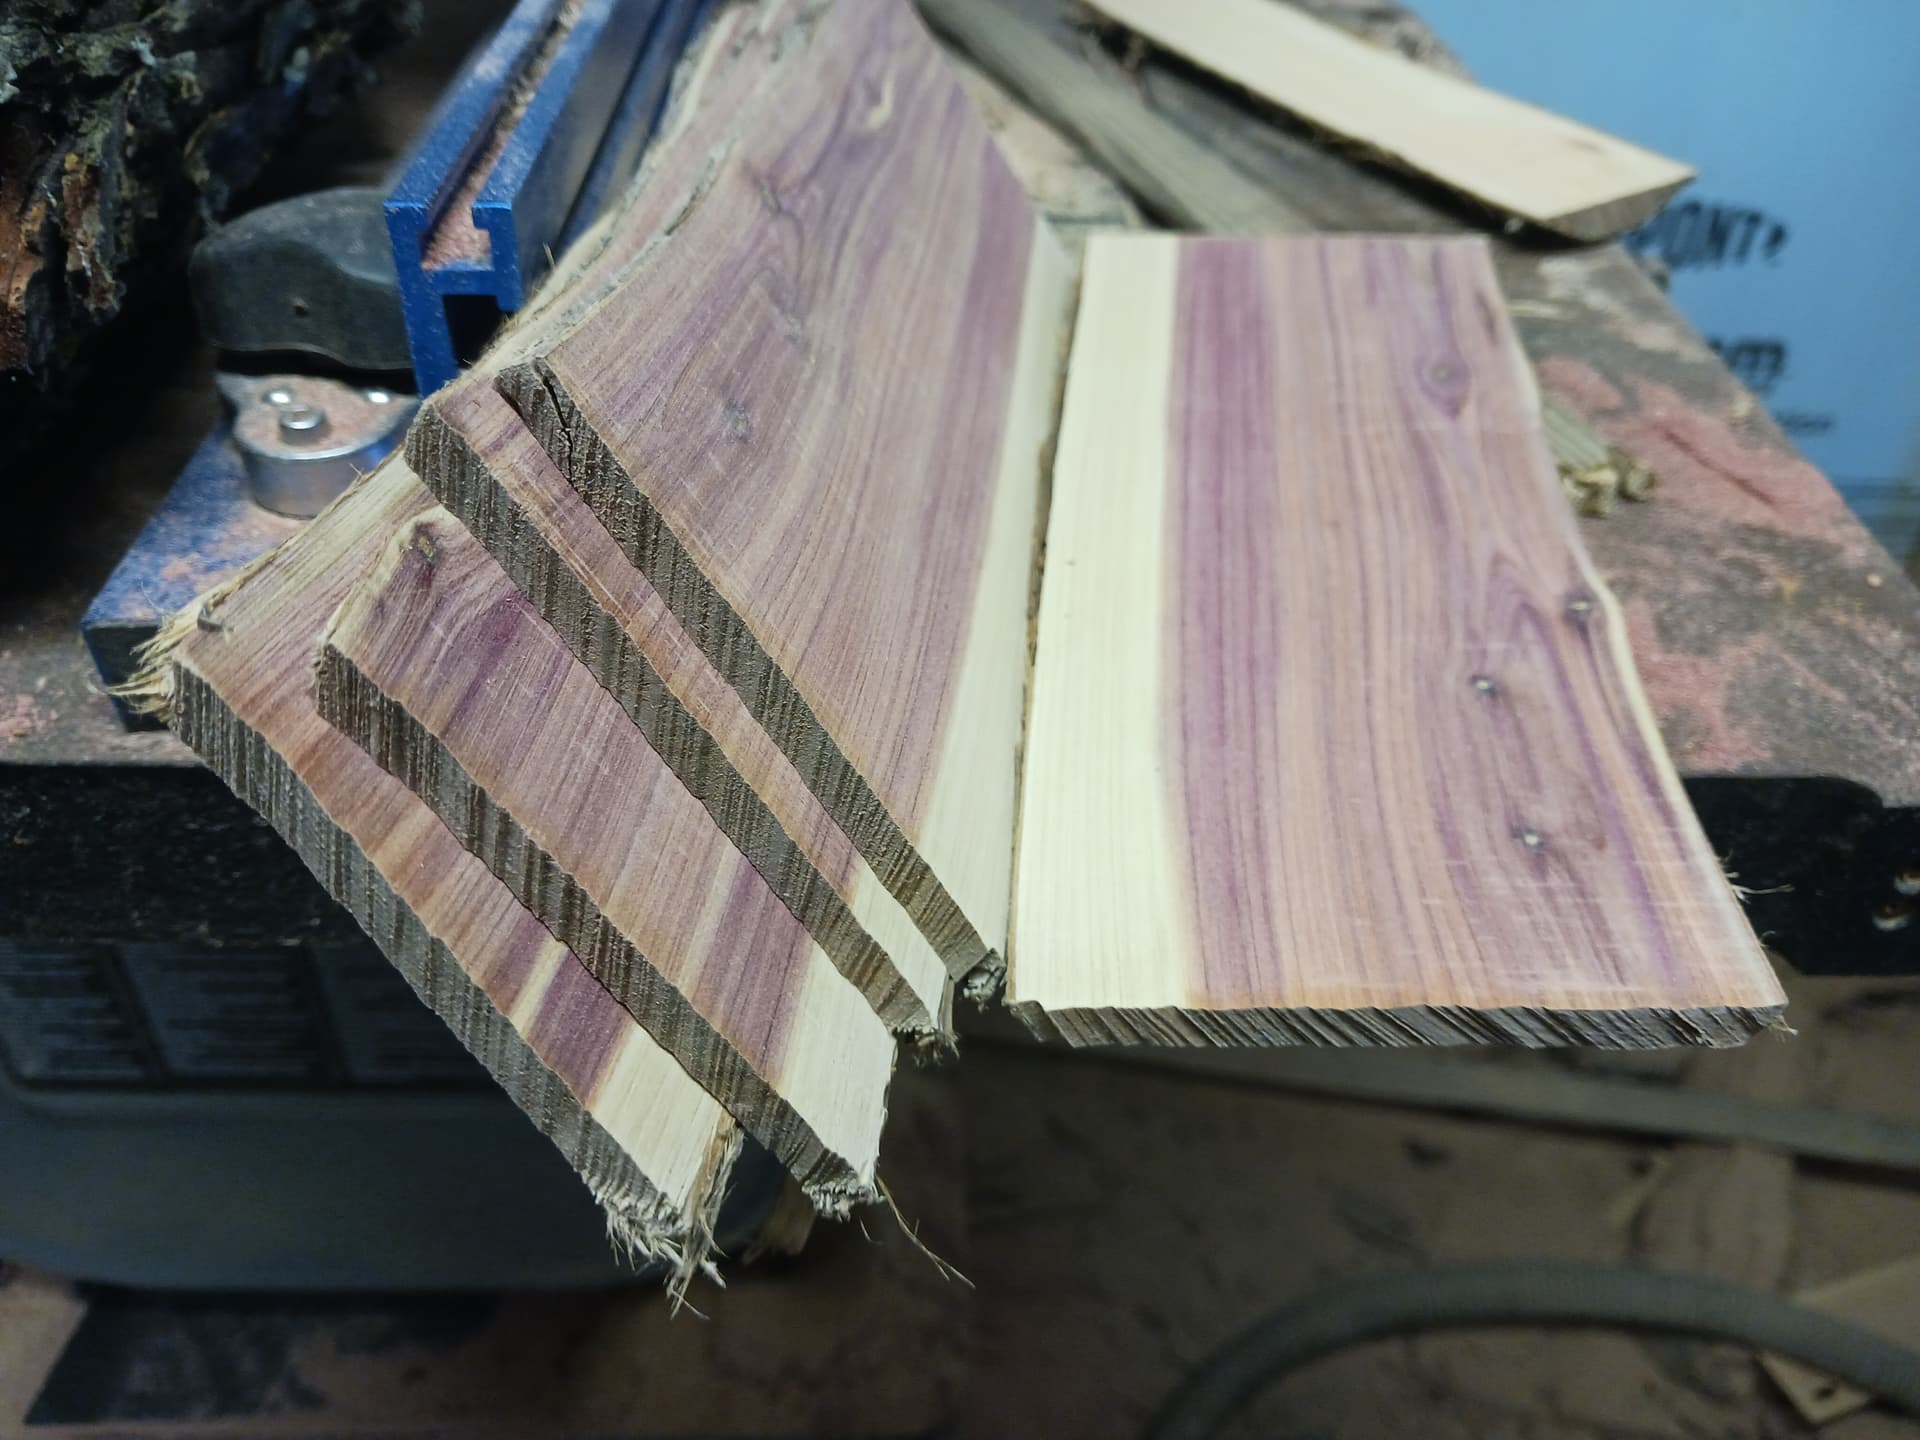
After considerable and prolonged consternation, I finally came to the conclusion that absolute precise plank thickness just wasn’t necessary. In reality, it lends to the handmade, more rustic, look I was going for. And since it’s not obvious to the naked eye in the finished product, I just go with it. TLAR ("that looks about right…) works amazingly well on many projects that don’t need precise dimensions… as it has for centuries for our ancestors, who handcrafted virtually everything they made.
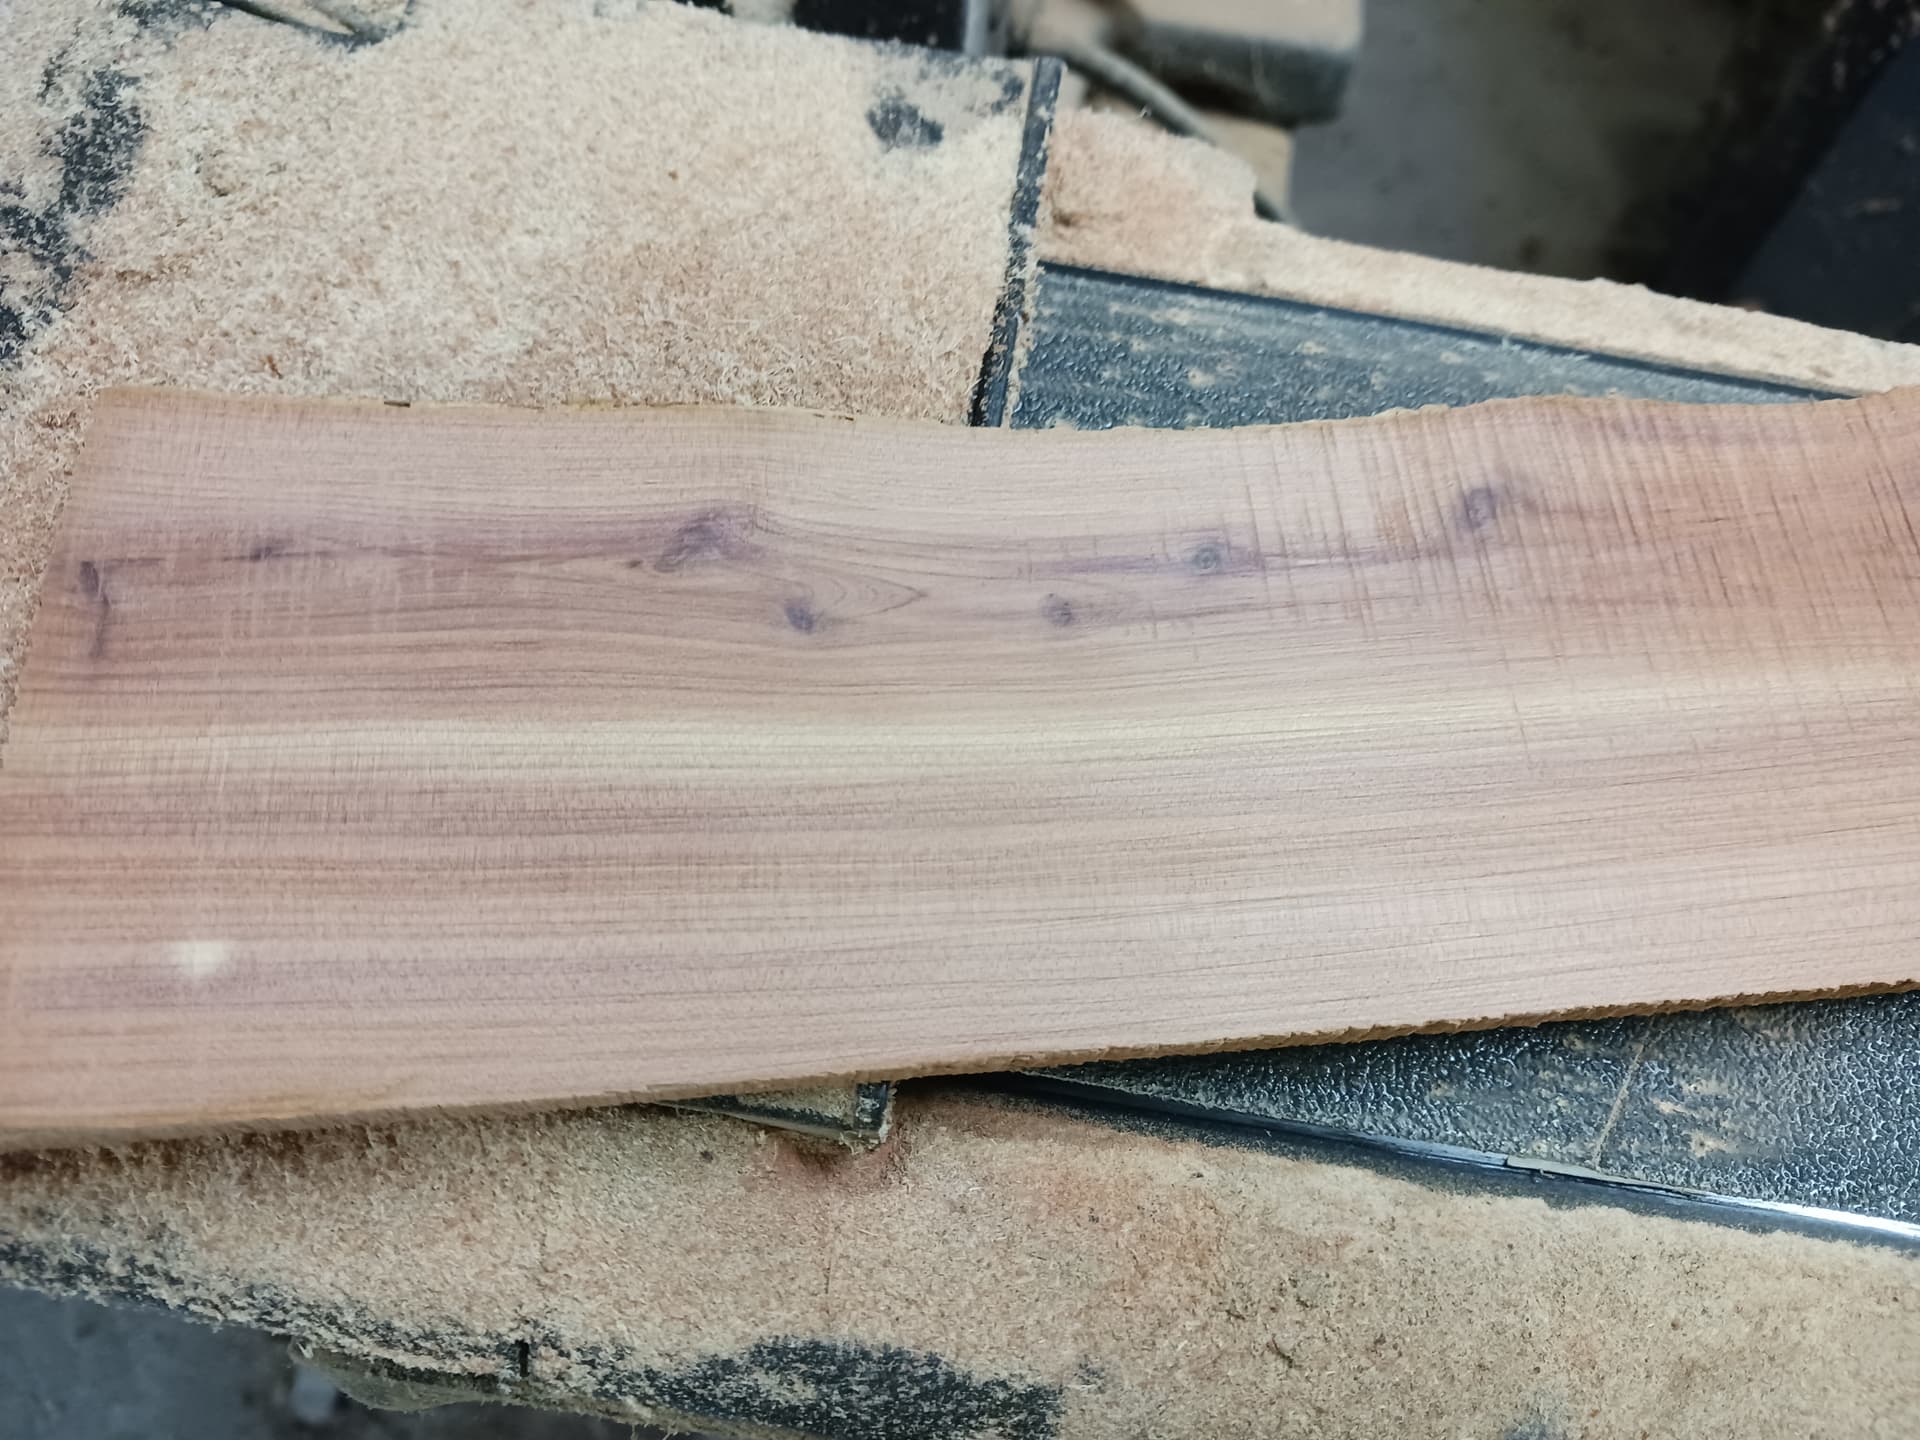
As far as warping, cracking, and instability goes, the drier (less wet) the wood is, the better. Some of the wood I use are from long dead limbs on or off the tree and can be used right away. Some has been cut green from the tree and when planked out is obviously very wet… and needs to dry out a bit before it can be used. I’ve played a bit with microwaving small planks to dry them for use… but it’s usually faster and easier to just go find something drier to work with. And some species of wood simply warp, crack, and move more than others while drying out. And the way it’s sawn can also be a factor… quarter-sawn wood (sawn perpendicular to the grain) tends to cup and warp less than plain-sawn (parallel with the grain) wood. One of my favorite woods is aromatic red cedar (a juniper in abundance on my place) which moves very little as it dries and can often be worked while still a little “wet”.
Hope this helps?
– David
7 Likes
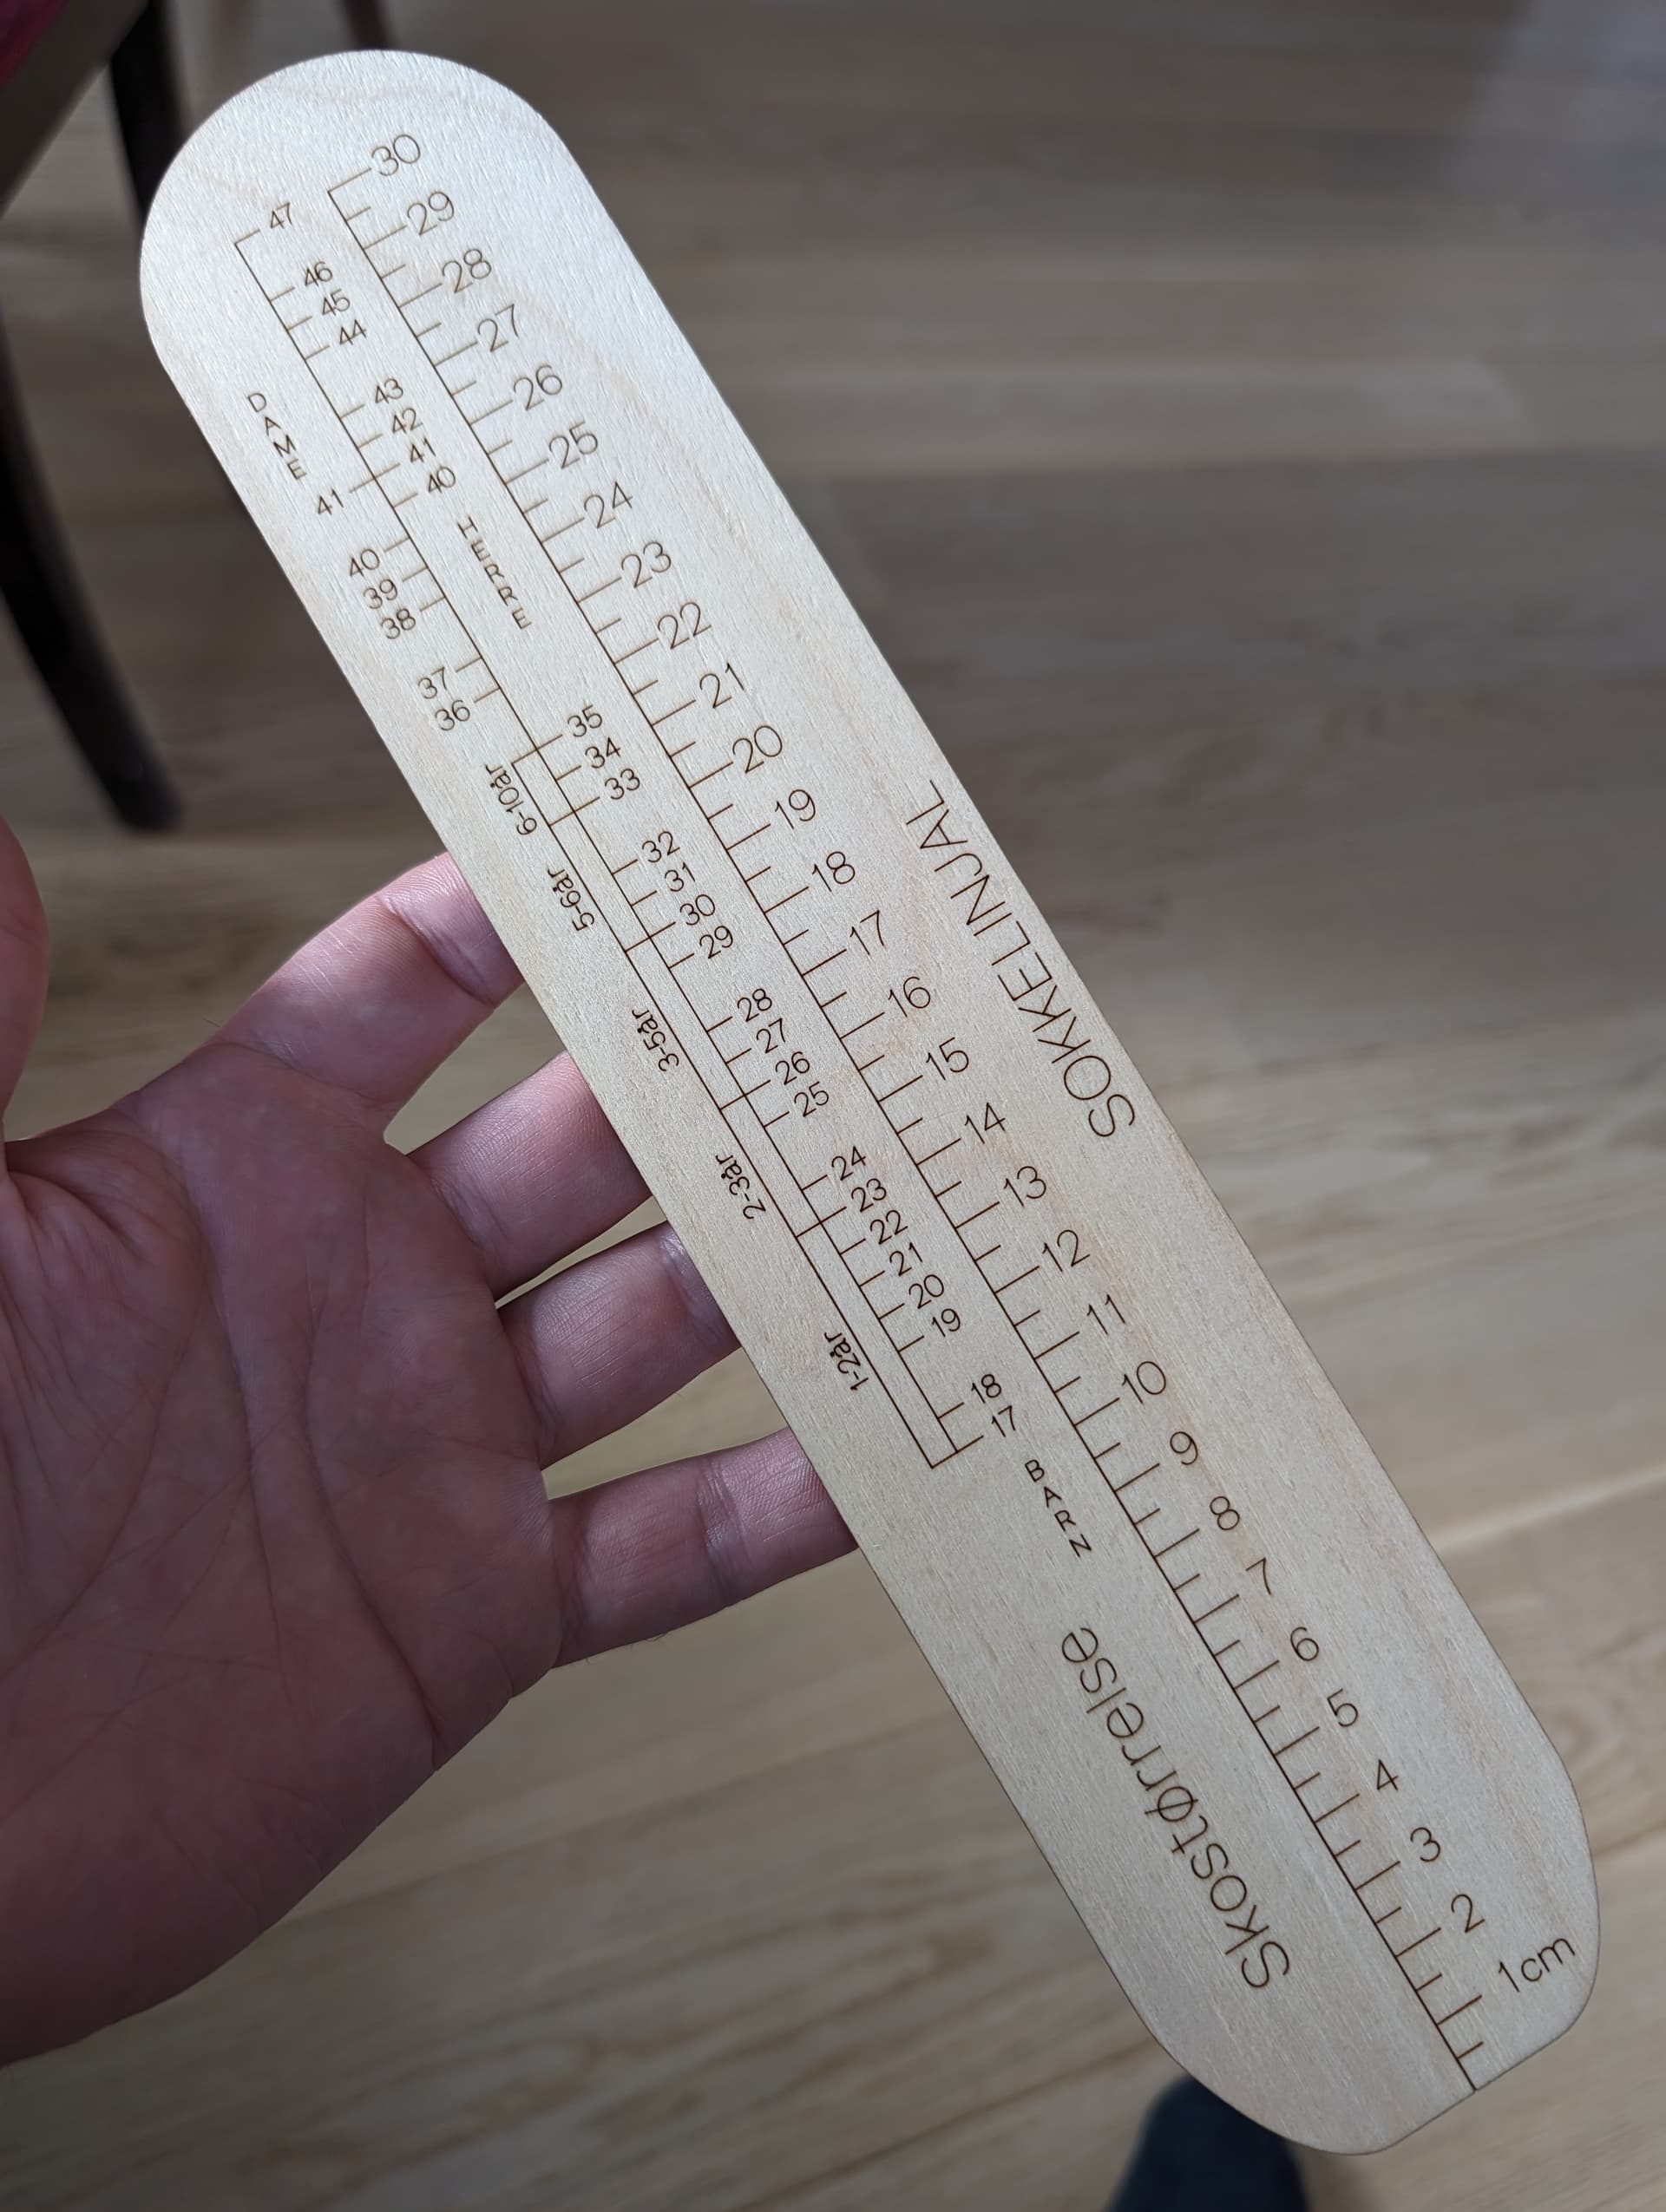
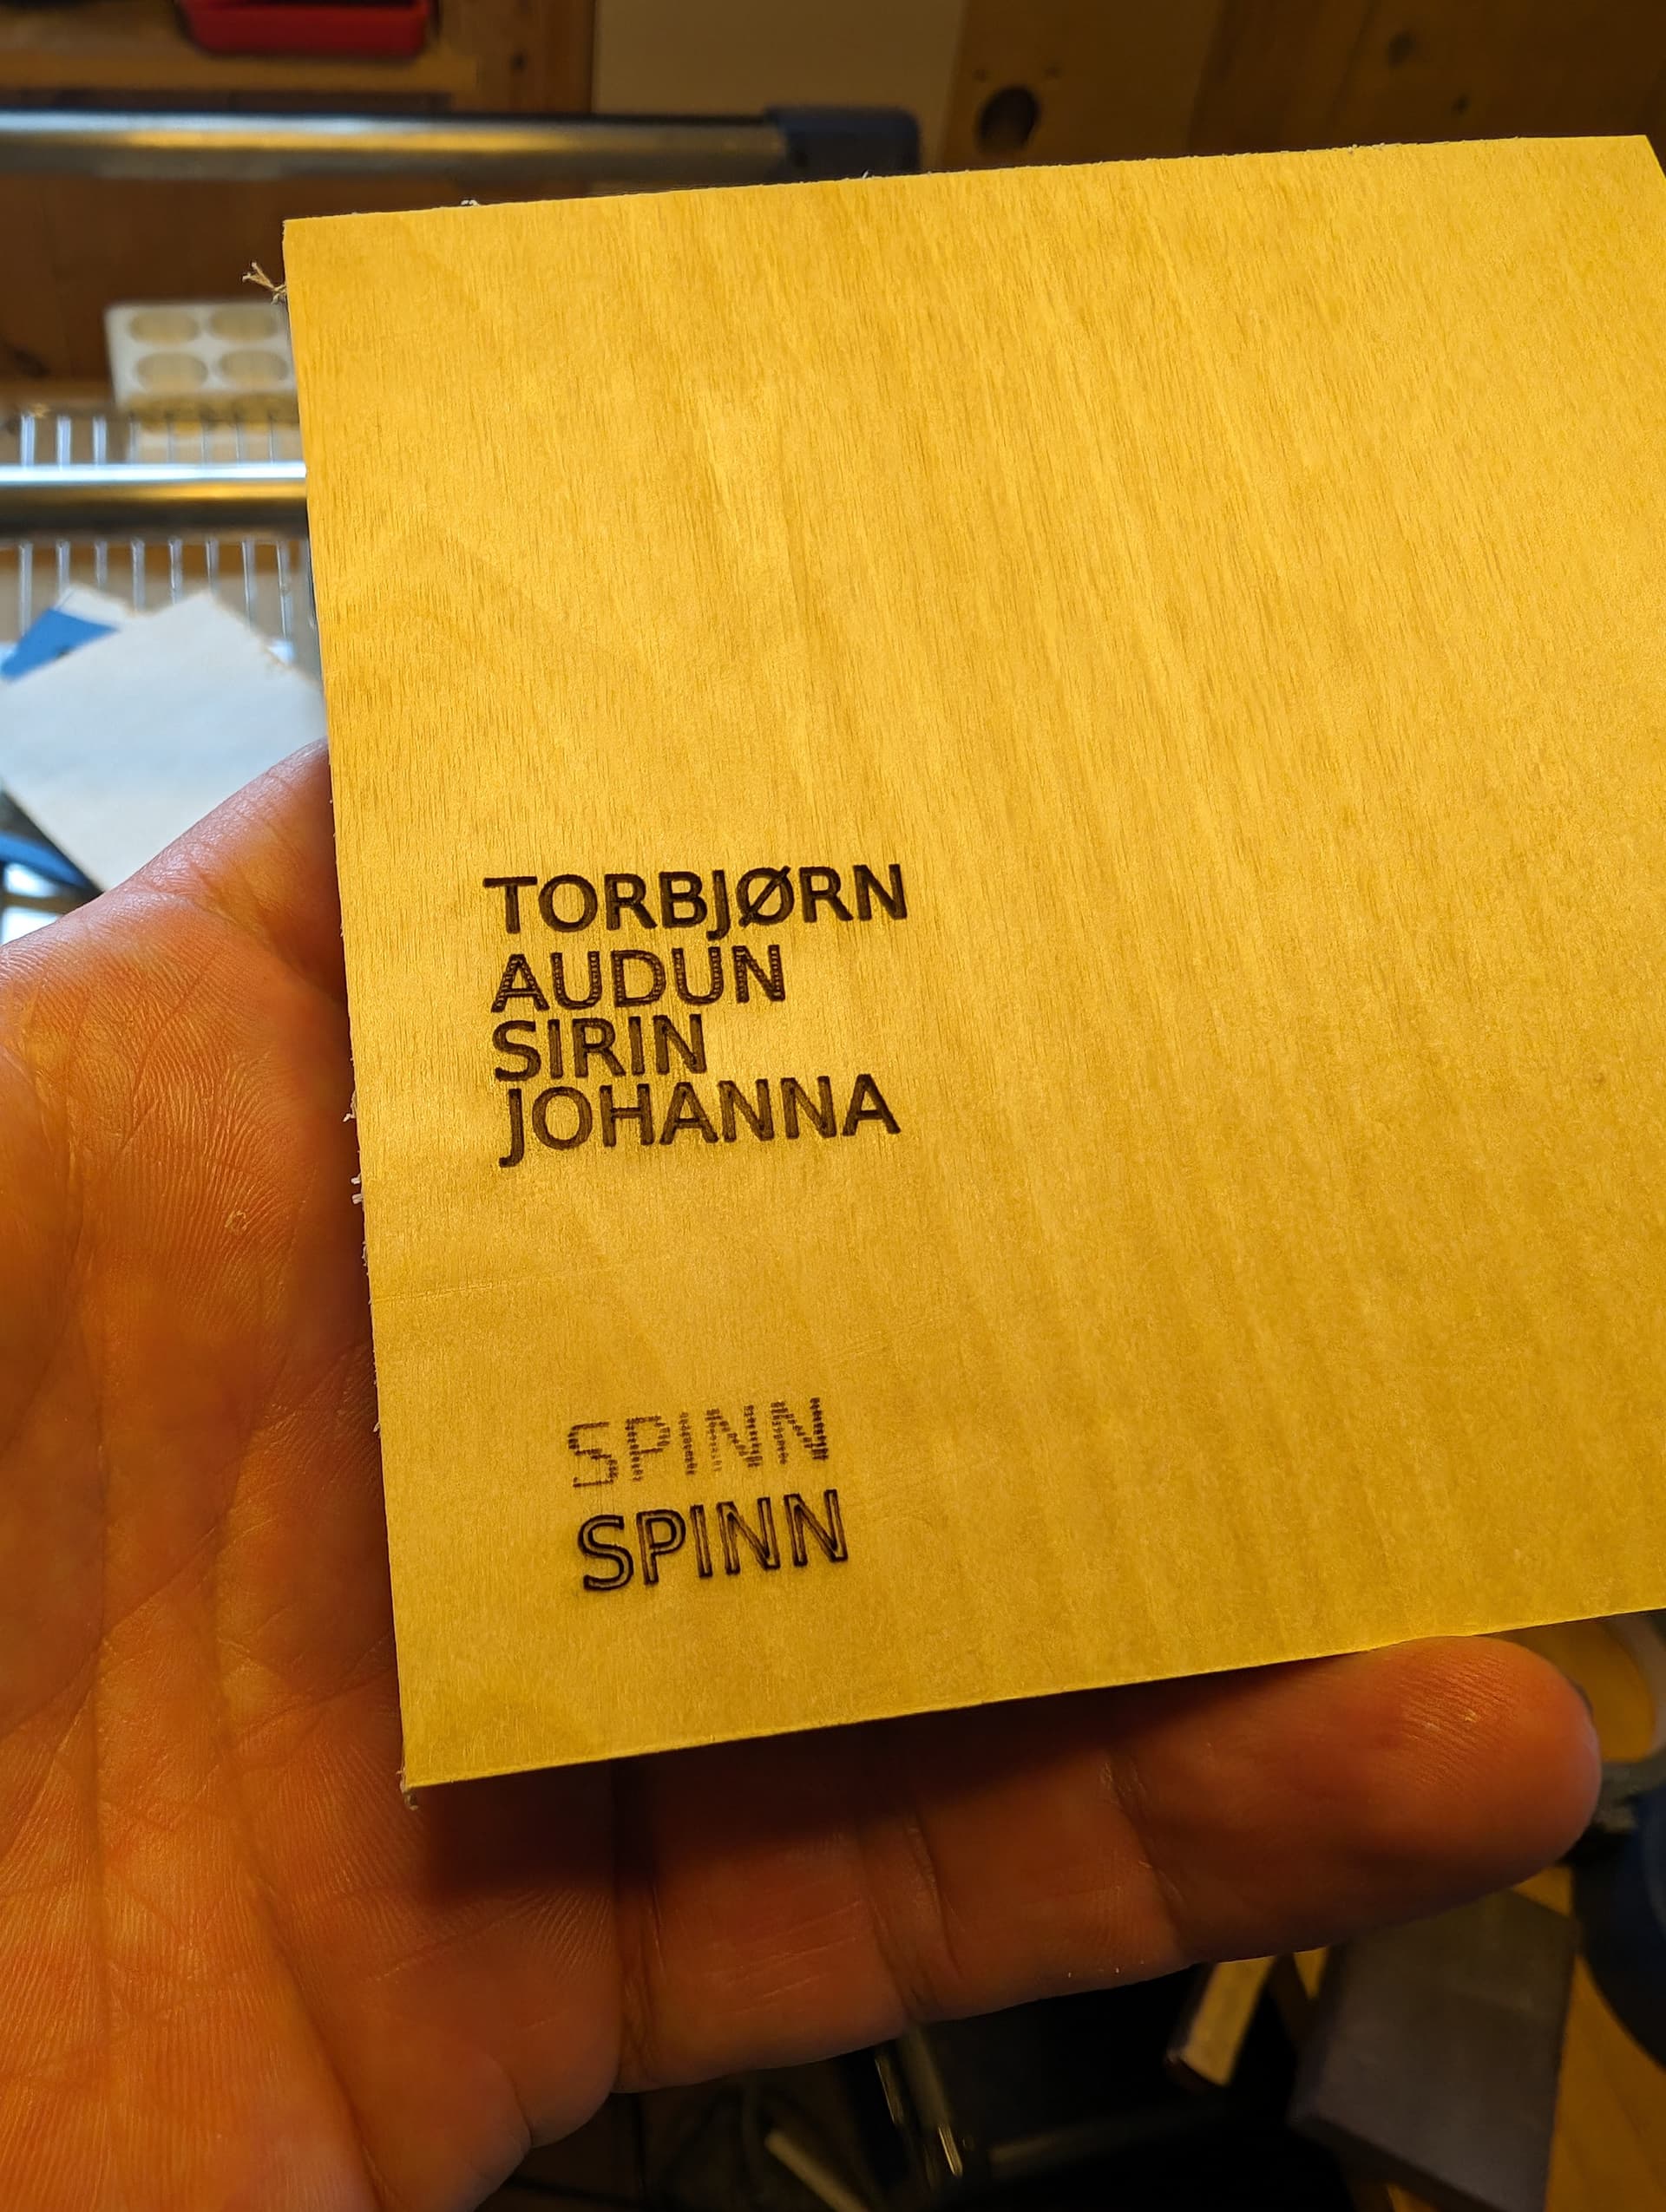
Thanks a lot David! Your posts are always very thorough and good to read. I’m aware of your boxes and your inlays, wonderful works. Interesting what you are saying about the dry wood. I have quite a lot of different kinds laying. How dry is dry enough? Under 10%? Perhaps I’ll saw them to thin pieces and see what happens? ![]() Making these “Spinn-o-meters” from single pieces of wood will be soo much nicer. Perhaps I even can sell them to local handcraft shops.
Making these “Spinn-o-meters” from single pieces of wood will be soo much nicer. Perhaps I even can sell them to local handcraft shops.
3 Likes
Thanks for the kind words. IIRC wood that’s around 10% is considered ideal but it’ll vary depending on how wet or dry your area of the world is. I’m not sure the use of a Spinn-o-meter but if you don’t mind sharing the SVG/DXF or Lightburn file, I would be happy to show what it might look like on one of my local woods.
– David
1 Like
You have given me a great idea David. I can’t wait to cut up the dry birch I’ve been saving. I was supposed to meet up with the woodworkers club tonight, but they skipped because of bad health… ahem… But I’m definately going to try this out. You are welcome to give it a try, but you shouldn’t make a hassle!
Here is the usage of the fiber-measure-tool: Using the Fiber Sprite Spinner's Multitool Control Card

1 Like
I wish I had seen this post a few days ago.
I use lightburn to do my laser engraving. I always use fill+line for engravings. The Fill gets all the big spots, then the line comes back and cleans up the edges. Lightburn will let you use different settings for the fill vs the line part so you can fine tune each. I find that running the line at a lower power and slightly faster leaves a really crisp edge on stuff that was already engraved with fill.
I also turn off the air assist during the engraving process. Otherwise, it just blows the soot all over the piece. The fan on the back of the laser will keep the diode cool and I haven’t had an issue with smoke getting back up into the nozzle.
1 Like
Thanks for providing the information about this neat little tool. My daughter, who actually has a spinning wheel, thought it was really neat.
I used Lightburn’s sublayers to do the fill + line operations on a few scraps of ~6mm thick catalpa, yellow pine, fir, and maple. I do the “line” sublayer at reduced speed and power, however… reasoning that the often very curvy edges of inlays and engravings (like a curvy road) calls for reduced speed, whereas the straight line raster fill operation can be sped up, when direction changes are minimal. It seems to work for me… YMMV. ![]()
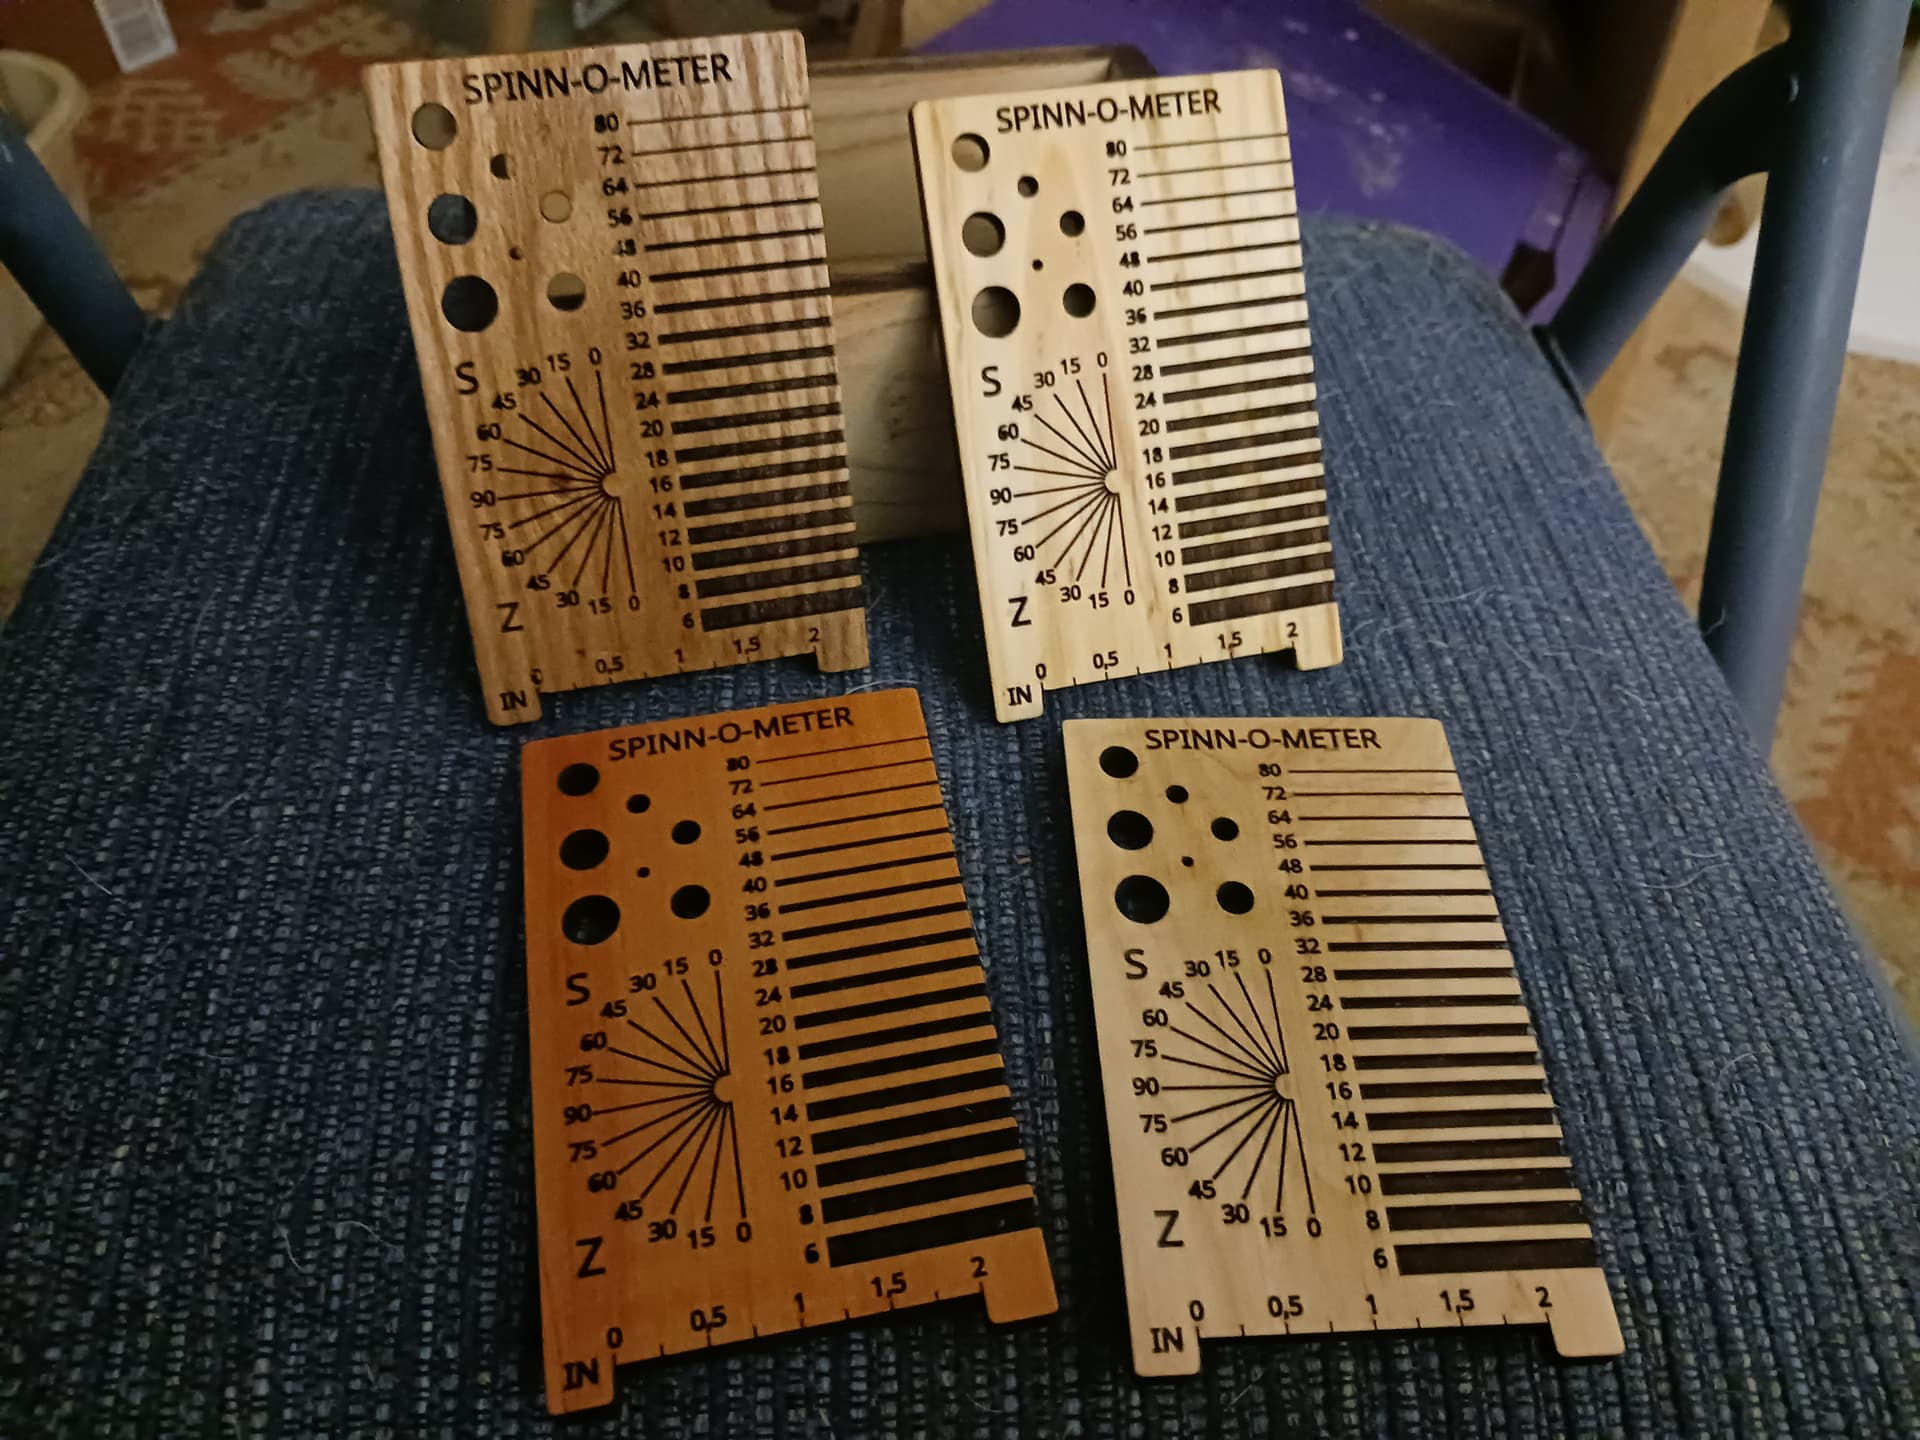
Catalpa…
Yellow pine (common construction lumber in North America)…
Fir (Douglas Fir?) from stud scrap in great-grandmother’s house that we’re currently remodeling…
Maple, not really native here but purchased online for inlay work…
The engraving is deeper than required but I see no reason for it to not be bold enough to stand out against any grain/figure in the wood. I sanded and oiled each of these pieces… though they probably could be sanded/softened further to avoid snagging the fine wool strands it may come in contact with. I initially thought it best the wood not be too figured but in hindsight, I like the catalpa and yellow pine best.
WRT air-assist… I use it all the time. Normally, highest pressure when cutting, less when engraving but still enough to keep positive pressure in the nozzle to keep the lens clean. However, when using solid wood… I make no adjustment, using high-pressure all the time, where I can afford to sand as much as necessary to remove soot and stains.
That was fun! Holler if I can help further. ![]()
– David
4 Likes
Wow… what can I say? This is amazing! I’m touched and grateful. They look really good. It’s funny how your daughter is into spinning. I think there are some common global traits among us garage gnomes and handcraft people!
I hope your daughter and her people may make use of them!
How thick are the boards? Again, they look really good ![]()
![]()
![]()
![]()
The light woods works best I think. Great to see that pine works so well! Common construction timber here as well.
2 Likes
Thanks for the kind words. I don’t think my daughter is actively spinning now but she did show considerable interest early on in her marriage… enough so that I bought her a spinning wheel as a gift. But she’s always been “crafty” and had so many interests (like I once did…) that I suspect she’s already had to begin culling them to fit the time and energy she can afford to devote to them. Not to mention running a family of five… and having a curmudgeonly old neighbor to look in on every now and then. ![]()
These are roughly 1/4" (5mm - 7mm) thick and depending on the wood the engraving is 1mm - 2mm deep. I don’t know how deep is too deep but felt the bolder the engraving the better… to be seen against any figure/grain in the wood.
I’ve used a Roly Lasermatic 30W laser engraver (also for my daughter) to create these tools and I’ll be happy to provide the Lightburn file if you’re interested.
Again, thanks for the fun project.
– David
2 Likes
Finally weekend! I haven’t had time to try out your approach until now. And boy, it’s fun! I don’t have a big enough sander to get a reasonably flat surface, so I ended up using a small hand plane. I really like the surface from planing. I don’t have a band saw either, so I haven’t cut the planks thin enough yet. Today was just trying out engraving on birch, rather than veneer.
Proper wood sure is easier to work with than cheap veneer/plywood. I really like the appearance. I guess I should get myself a band saw, so that I can make myself blanks for these kinds of projects. I have band saws accessible at the local woodworking clubs, but I don’t always have time for that… ![]()
4 Likes
That all looks very promising! And, I’m glad you’re having fun with it. I love working with raw/“found” wood… it’s always fun cutting open a small log and seeing what kind of figure and coloration is inside!
And I love hand planes a lot… but I’m just not very good with them. When you do get a surface properly planed, however, with a sharp blade that’s properly set, nothing compares with the beauty and feel of the surface that results… i.e. no sanding necessary.
I do have a handheld power plane that I rough set and use on the rough log/limb sections to quickly get a full-length flat on two sides, and at right angles to one another. These ride against the fence and table of the band saw during the planking operations.
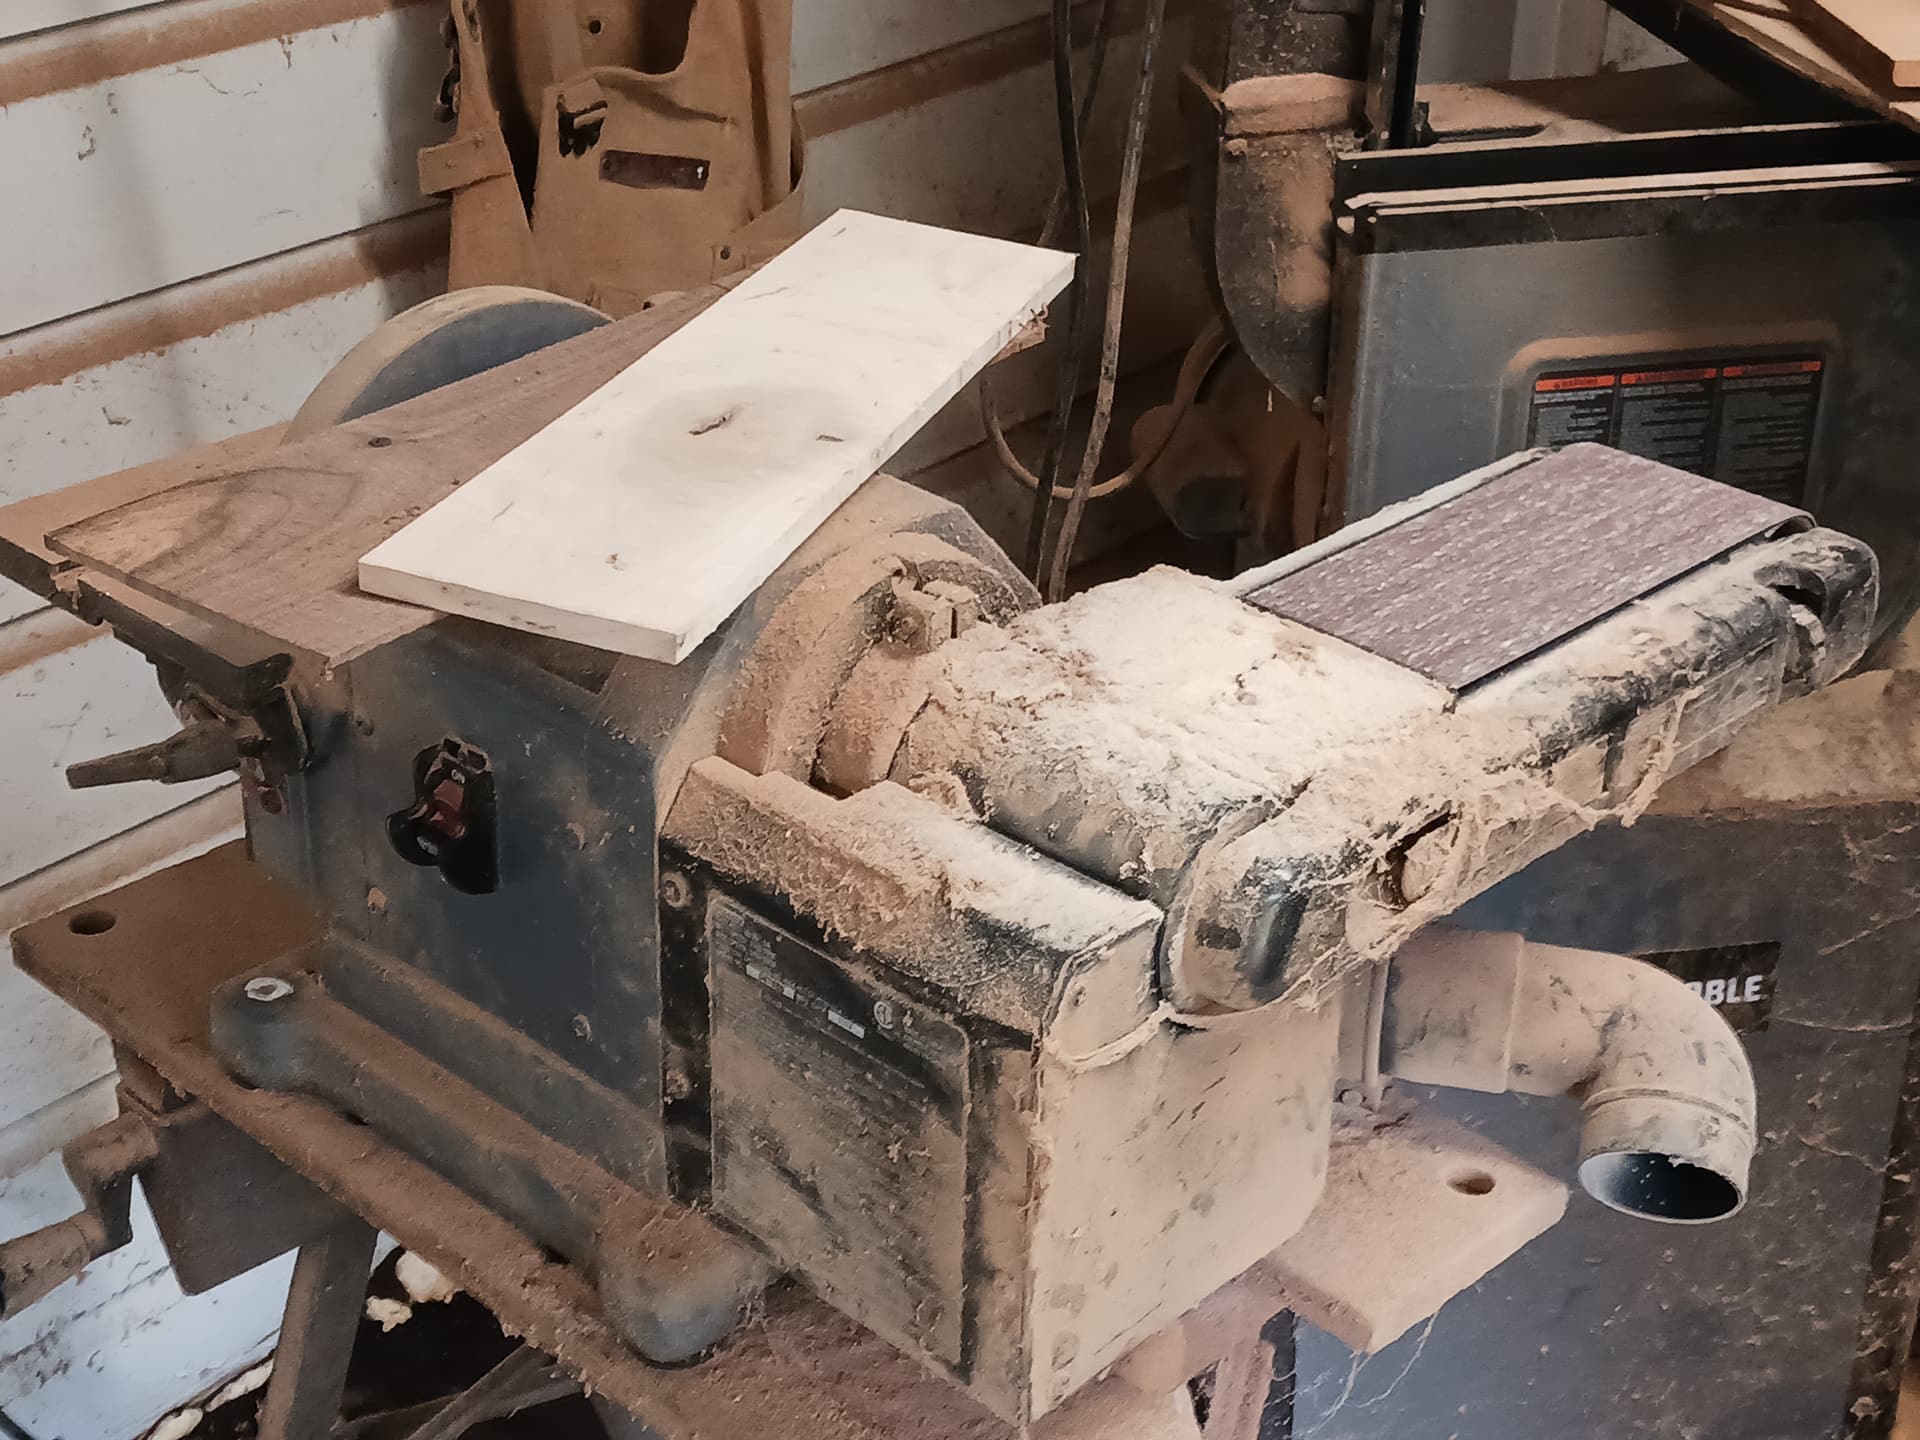
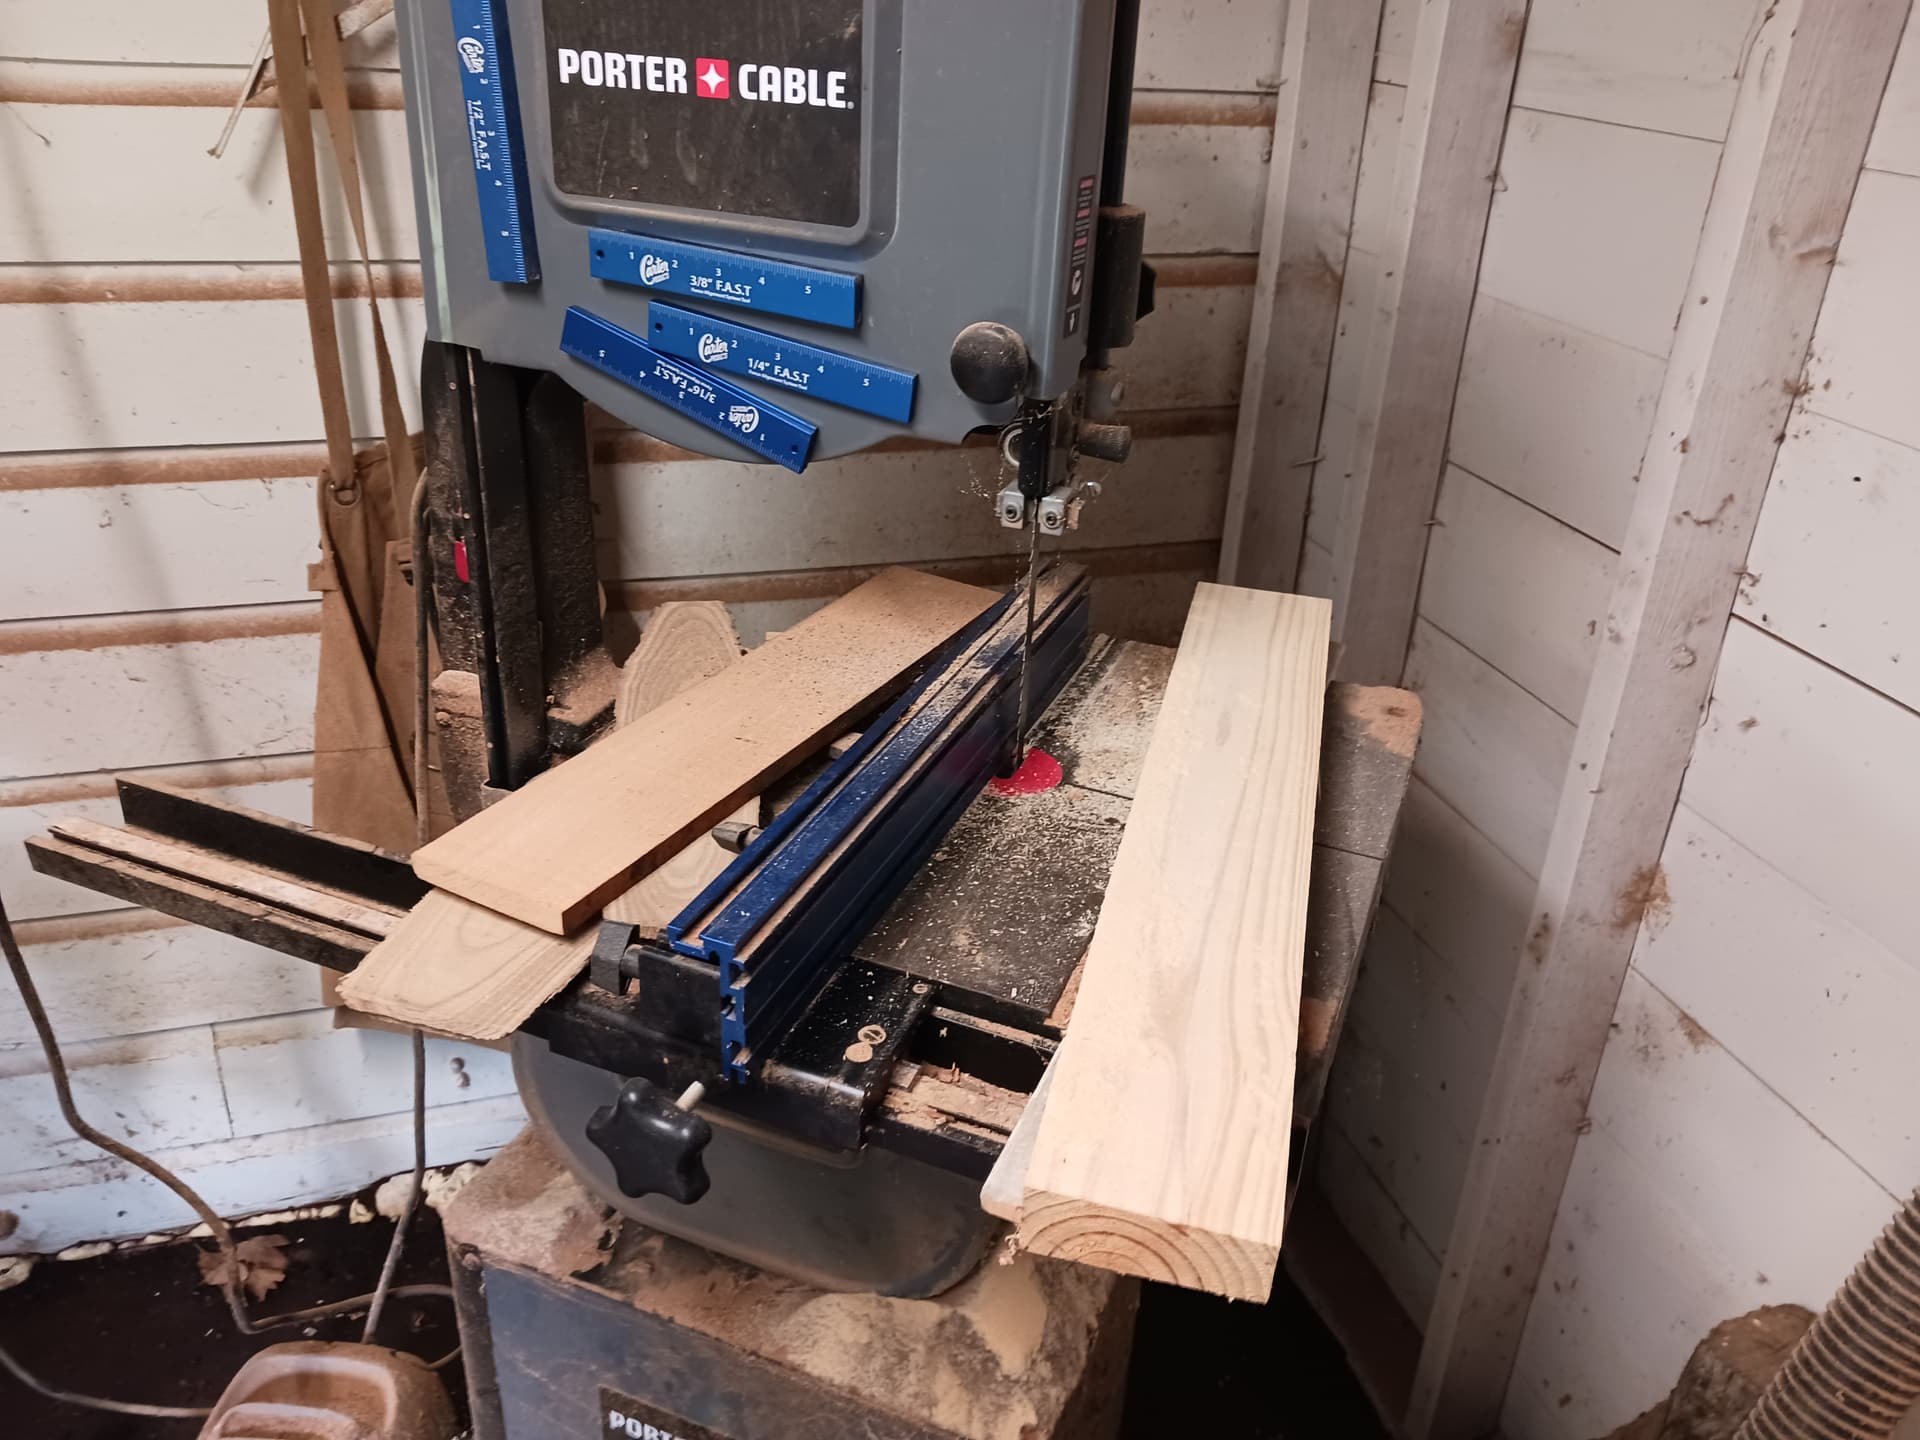
Here’s my modest bandsaw-milling station… a 14" Porter Cable bandsaw and a Porter Cable 4" x 36" belt sander.
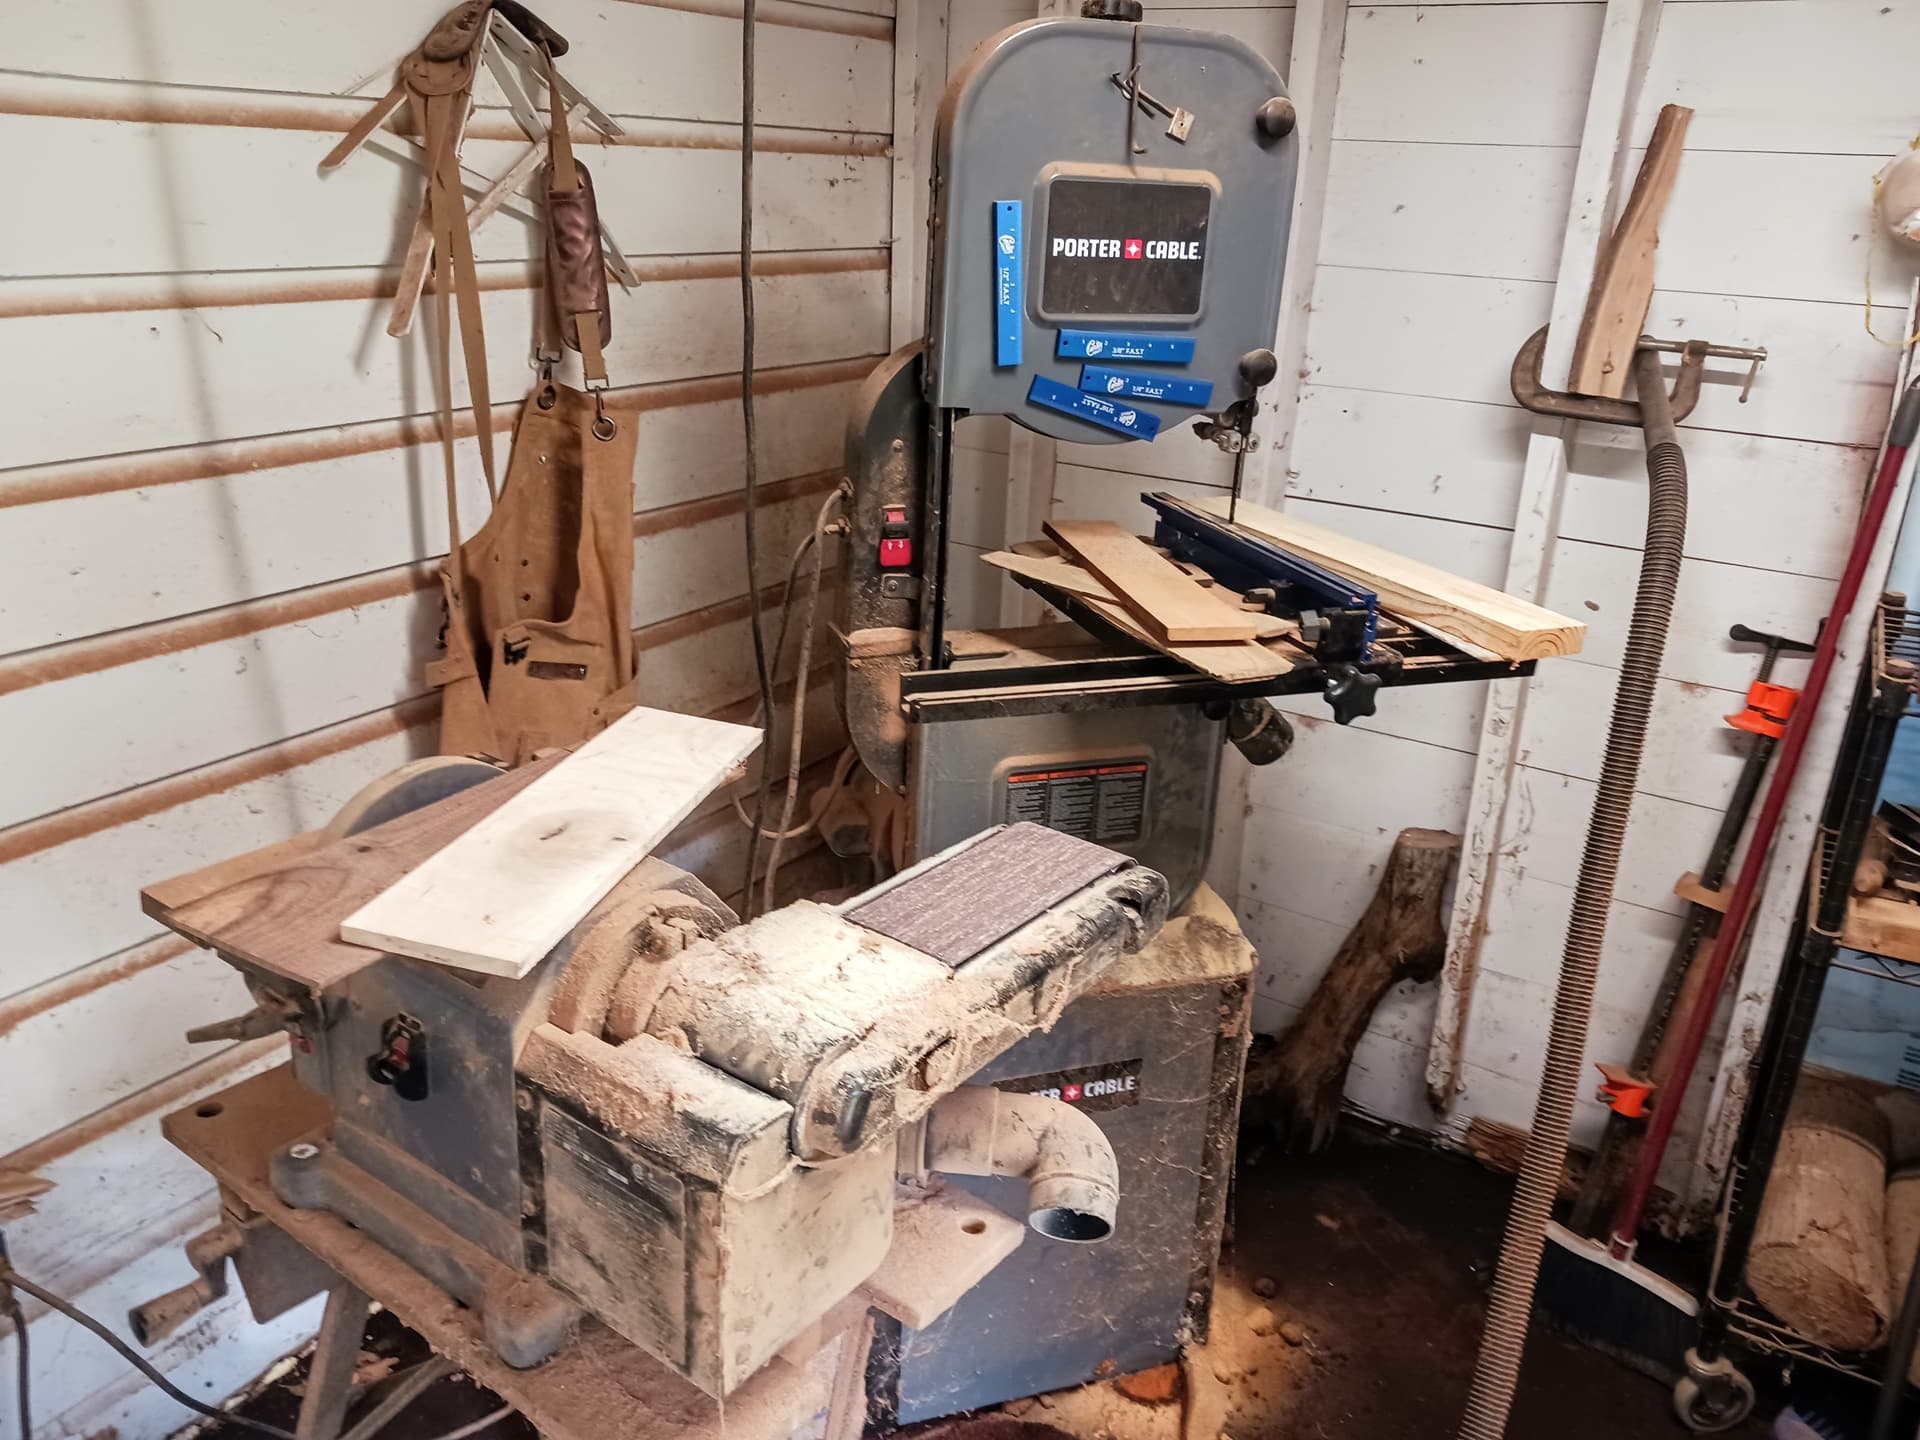
The sander is a PC benchtop belt and disc combo. I rarely use the disc…
I use 1/2" bandsaw blades exclusively for milling limbs and small logs. They have 3 - 4 teeth per inch and the saw has a ~6" depth of cut max…
The sander has about 8-1/2" of flat platen area… so I limit the plank length to 16" - 17". I can then work 1/2 a side at a time… smoothly stroking 4 - 6 times against the roller and then flat on the platen to remove saw marks. Flip end for end and side for side and repeat… taking care to keep the time/strokes for each area approximately the same.

I can’t do large stuff obviously… but then again I don’t have the strength and energy anymore to do large stuff. So it works for me… and I find it very satisfying to do ![]()
– David
3 Likes
I like your setup, thanks for sharing! I’ve been thinking about getting a band saw for ages, I guess I should get around to it! I had a well paid teaching assignment, outside of work, last week. I’m thinking of sending an invoice from my hobby firm, and buying stuff for it - rather than paying taxes ![]() I was going to get a MMU, but perhaps I should go for band saw instead
I was going to get a MMU, but perhaps I should go for band saw instead ![]() a better sander would also be nice, but I think that planing actually would work well enough for now.
a better sander would also be nice, but I think that planing actually would work well enough for now.
1 Like
Thank you. A bandsaw (and a wood lathe…) has always been one of my favorite tools in the shop simply because it can take a rough blank from start to finish (even to the point of final finish for the lathe). I don’t have my lathe anymore… I gave it to one of my sons when we moved to San Antonio back in 2019, thinking then I’d never have room or need of it again.
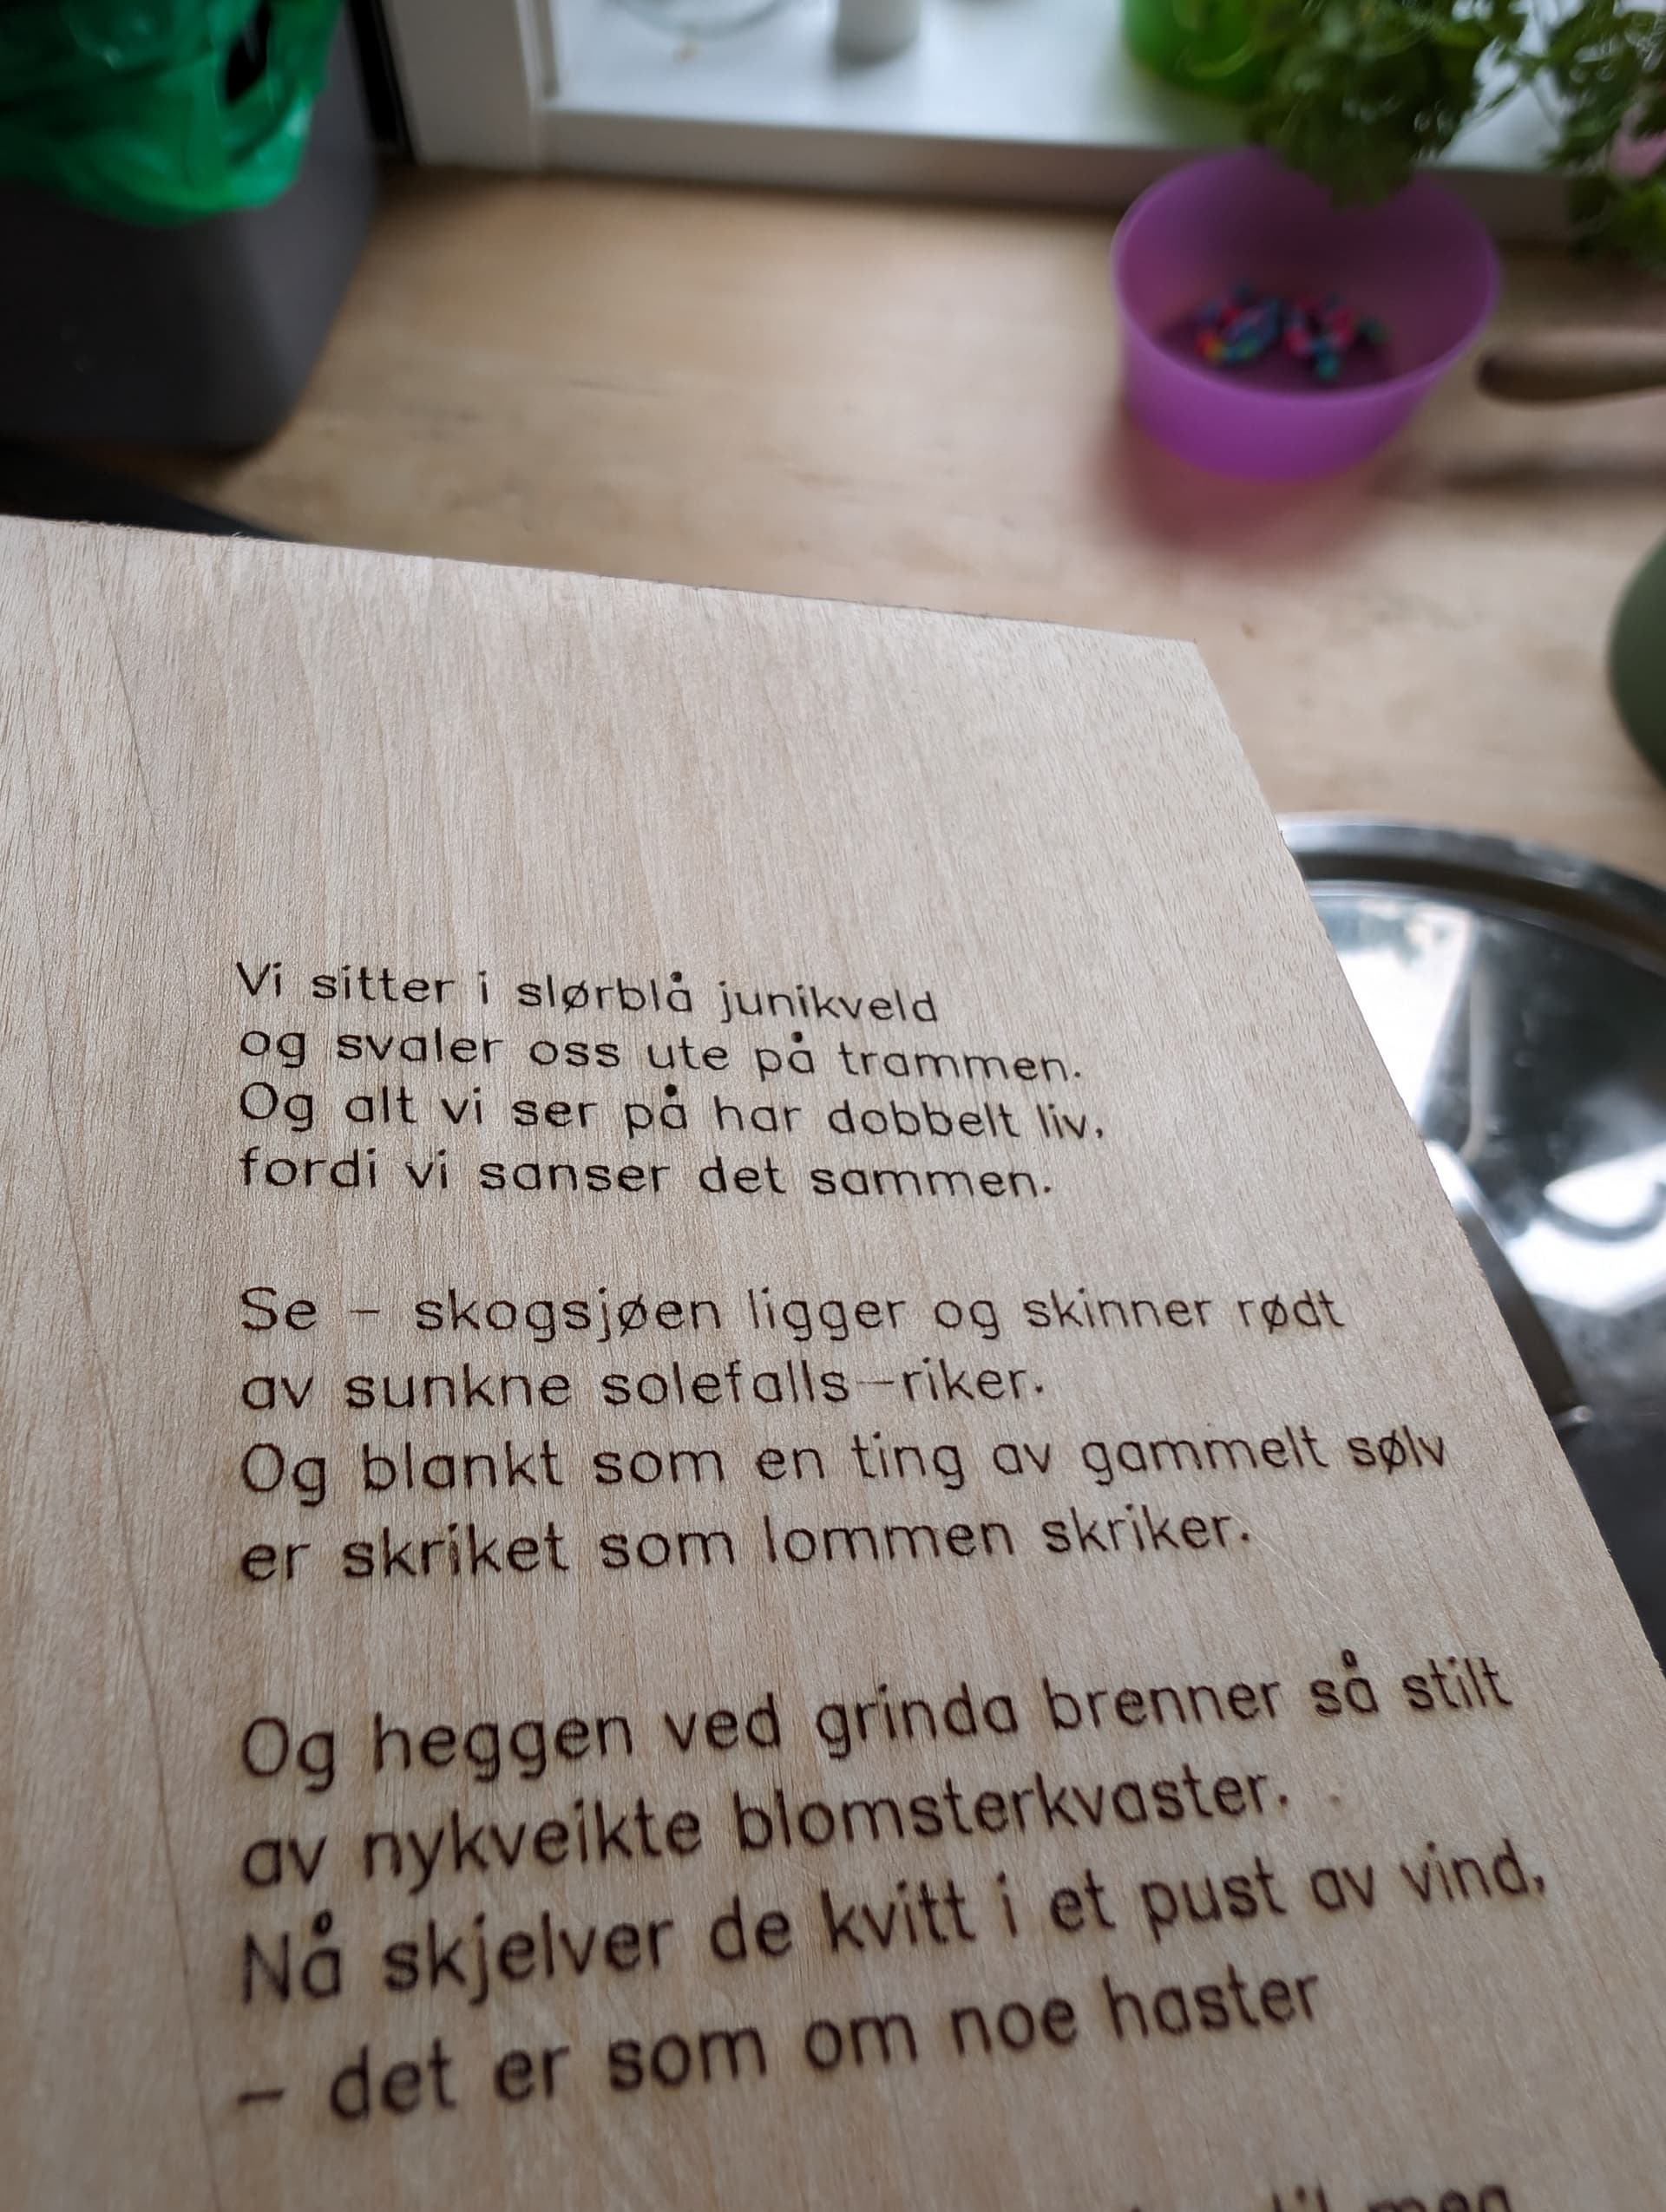
I transcribed and did a Google translate of the first line of the last stanza (“And the hedge by the gate is burning so quietly with soft flower vases…”)** and suspect that it is a poem you’ve engraved in that last photo? Do you mind translating… or pointing to an online copy that Google can translate for us? It looks interesting… possibly interesting enough to engrave on a nice piece of birch?
– David
** Og heggen ved grinda brenner so stilt av mykeveikte blomstervaster…