Not as long as the table can be a couple of inches from the wall. Look at the calculator. The table size for a 2’x2’ machine is 34.75" x 35" The difference between footprint and table size is because the trucks and the steppers hang off the sides of the machine. They don’t need to be supported by the table.
Ok thanks for the clarification.
Are you absolutely sure that the your EMT is 1" outside diameter? I’ve never heard of that size EMT. All EMT that I’m am aware of is measured from the inside. For example 3/4" EMT is 23.5mm on the outside, not 19.05mm.
2 Likes
I want to reiterate this point. There is 1" EMT, but it is too big and it is 1" on the inside, the 25.4mm parts are for 1" tubing, which is measured from the outside.
3 Likes
I read that as 1" EMT by mistake. I now see that 3/4 EMT would have been the better option as it fits with the 23.5mm parts. Glad I waited to buy the kit! Also, sry about the terminology, this stuff isn’t really in my wheelhouse so kinda learning on the fly.
1 Like
I’ve seen posts on the forum where someone spent a week 3D printing parts only to find out they made a mistake in the tubing/conduit sizing…and spending a second week reprinting everything. I didn’t want you to make that mistake.
2 Likes
Ok 3/4 EMT acquired. Parts ordered. G-code generated. Now I wait.
Next steps will be to cut the pipe down to size.
@robertbu Thanks for the steps and the files. They definitely helped me understand the process better.
ID vs OD measurements are such a PITA. EMT is a conduit, so it’s measured by ID, since folks are usually concerned about how much junk they can stuff inside. Because it’s standardized, we know it’s OD. SS tubing is measured by OD, because it’s usually structural, and the OD is what folks need to know where it can fit. And it would be great if all “pipes” and “conduits” were measured by ID, and all “tubes” were measured by OD/WT, but even then, they aren’t. You have to do your homework. Just about every. Damned. Time.
And if you hadn’t seen it yet, the “models” are Common (23.5mm OD/ 3/4" EMT), Foreign/Freakish/FarSuperior (25mm OD), and Jumbo (25.4mm/1" OD). There was a brief foray into trying to develop a Mammoth (1" EMT) set, but it proved difficult and the cost-benefit vs SS (or even 3/4" EMT for that matter) was deemed negligible.
1 Like
Thanks @kvcummins This was a great explanation.
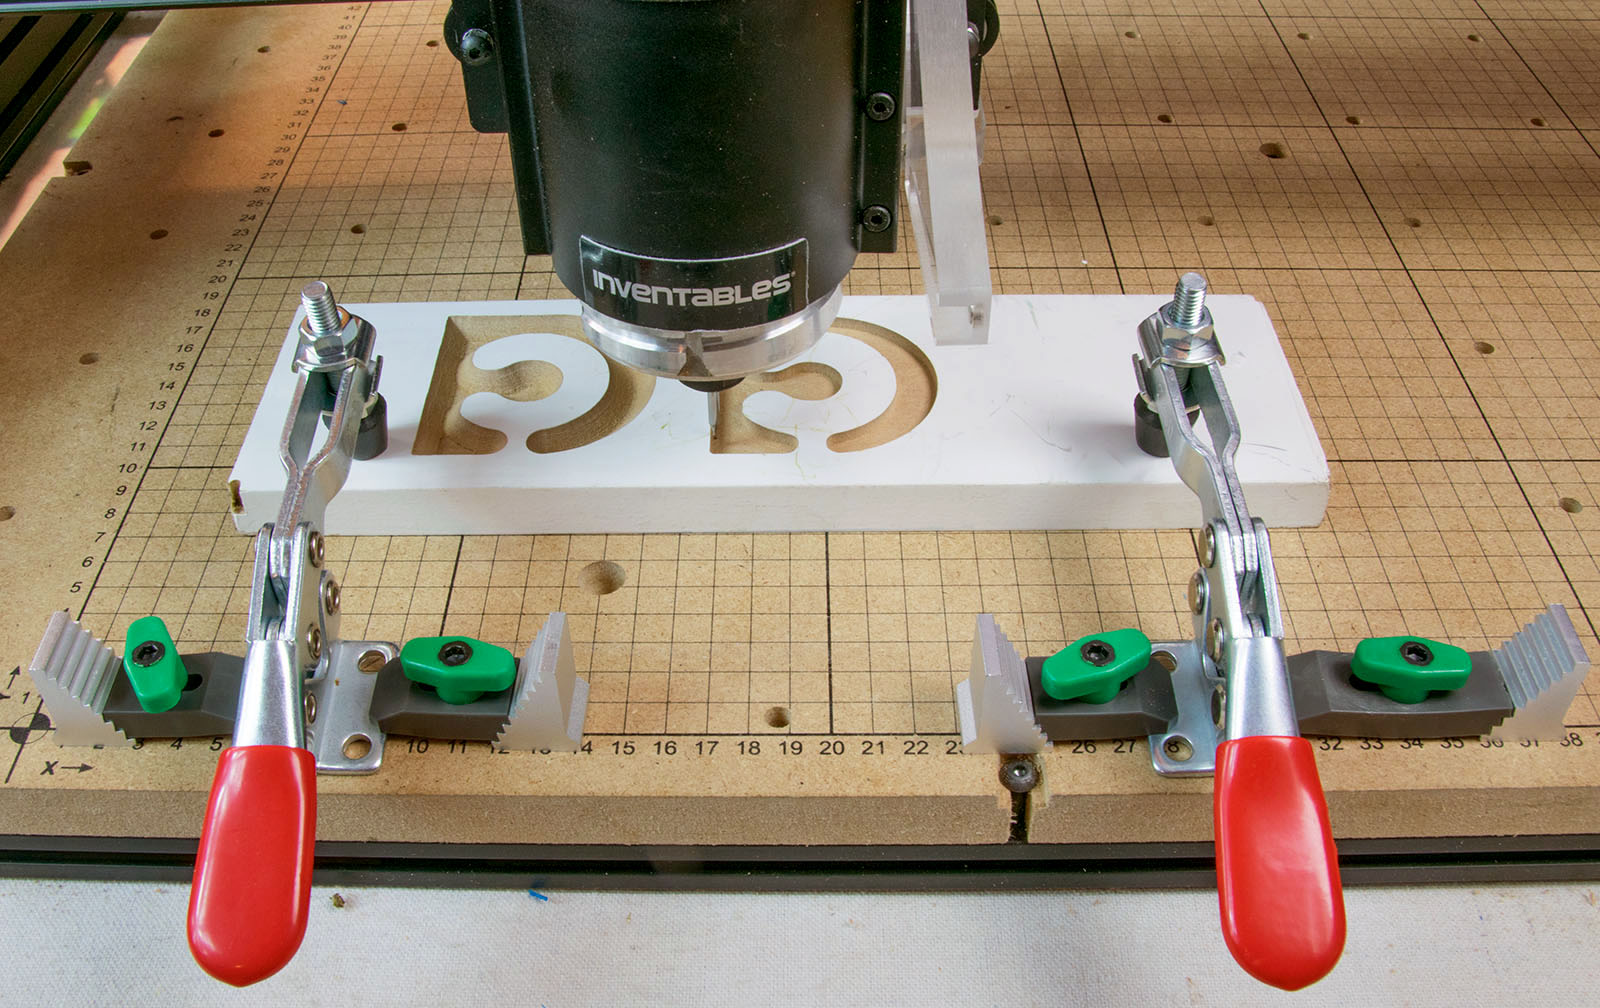
Here’s another question. How do I get the stock board to stay in place? It appears like I should have a 2x2’ piece of wood that sits on top my table that the CNC can attach to. 2 strips of wood that the legs sit on. One on the left and right and then a center piece that the stock sits on (attaches to). I saw a pic floating around the site somewhere. Any recommendations?
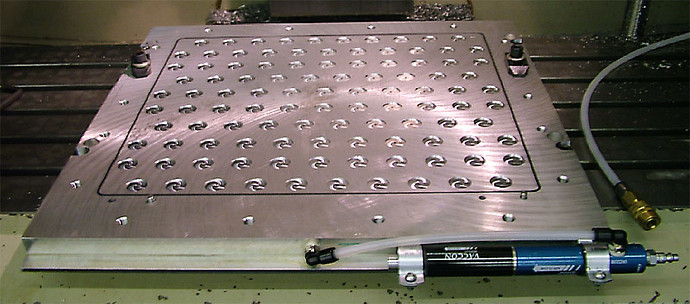
Here’s the pic i was referring to but I’m curious what is clamping the stock down.
The stock sits on top of a “consumable” replaceable spoil board. On through cuts the spoil board gets cut into, which is why it should be replaceable. In that picture there are F-style clamps through holes in the spoil board. There are lots of options. Googling CNC work holding will provide lots of examples.
- tape around edges of workpiece
- Spray adhesive (often used for thin foams or fabrics)
- double sided tape under workpiece
- blue tape and superglue trick
- screw through stock into spoil board
- resin nails tacking stock to spoil board
- embed a a grid of threaded inserts or T-nuts into the spoil board and use these to bolt in clamps
- pegs and wedges
- DIY cam clamping
- Grid of dovetails and clamping hardware
- DIY t-track (rabbets in underside of spoil board sections, sized to hold toilet bolts or other hardware
- Aluminum t-tracks with spoil board sections in between.
- Vacuum table
- Vice secured to table
Often the spoil board is made of thick enough material that it can be resurfaced a couple of times before it needs to be replaced. If using aluminum t-track, the spoil board material should be thicker than the track to prevent the tool damaging the track during cutting jobs.
If using metal fasteners to secure things, you’ll want to be sure the tool isn’t going to hit them.
You’ll also want to be sure any pieces that are cut free are either secured in place or managed in such a way that they don’t interfere with the continuation of the job. For this reason, tabs are often used to keep pieces minimally attached, then the piece is freed using another method following the CNC operation, e.g. oscillating multi-tool to cut the tab, then flush-trim bit in router to remove the “nub.”
2 Likes
Wow ok so a lot of options! Thanks for the spread, I’ll do some research on what might work the best for my setup.
Blue tape and superglue trick. Learn something new every day.
1 Like
It’s basically “roll your own” double-sided tape. Seen some head-to-head comparisons and good double stick seems to work better and be less expensive, but it’s still a useful technique to know if you already have the tape and superglue on hand.
1 Like
Blue tape trick is nice because double sided tape can pull plywood veneers off sometimes.
1 Like
That was my impression, that the “blue tape” might not be the most effective adhesive, but it being painter’s tape is able to be removed more easily.
I have double sided tape that will likely work better for holding… But then it’s going to hold pieces in place.
I’ve also had some success with the tape that comes in “window film” kits. It’s double-sided tape intended to hold a clear poly film in place over windows to provide extra insulation in the winter. I suppose that it would help in summer too, if you don’t need to open the window. Anyway, the tape is intended to be able to be removed from the window casing when you take the film down, so it will come off of the work. The downside is that it’s narrow, about 3/8" so you need to be a little careful about where you place it. But it holds reasonably well, and comes off clean.
It’s less expensive than the “good” blue tape, and superglue, and comes off nicer than the cheap painter’s tape.
1 Like
holdingdown.pdf
746.70 KB
![]() Make: DIY Projects and Ideas for Makers – 19 Jul 17
Make: DIY Projects and Ideas for Makers – 19 Jul 17
Keep Your Project Secure with These CNC Workholding Techniques | Make:
If you’re going to be machining, you’ll need to hold down your material. These techniques and tricks will keep your project secure.

Vacuum Chucks, Fixtures, and Clamping: Definitive Guide for 2020
Vacuum Chucks, Fixtures, and Clamping Systems can be awesome productivity enhancers in any shop, but they’re especially helpful for rapid prototyping and sheet work (e.g. signs and electical panels). This guide shows you how to use them to best…
Est. reading time: 15 minutes
I guess I should accomplish something related to my job for the next few hours. CNC is more fun
1 Like
I have a roll of carpet tape that I tried. It worked really well, but took forever to clean off the bottom of the part.
I still need to try the blue tape/super glue combo.
I did put threaded inserts into my spoilboard and use side clamps for most parts.
2 Likes
Quick update: Everything is going together smoothly, however, I did snap a piece. Is there any way to purchase 1 single printed part?
Also thanks for the holding ideas!