Created separate topic with details about my LR3ās front grill
āTrue Levelā will have to remain a fantasy, for now.
Have procrastinated, overly deliberated and navel gazed on the ideal āmedium sized workā workbench. Am just going to quickly throw something together, will look something like below, with casters. I can always add levels and lasers laterā¦
Sizing surface for cutting 2āx4ā stock. Clear front makes this a usable regular bench. Will overhang top surface enough to enable clamping various things. Finished surface will be 36" high, with adjustments to account for floor level and earthās curvature. Standardizing on 36" height for misc tool stands.
Me: Progress! Today, Iāve decided how wide to make my mostly LR3 workbench.
A few minutes laterā¦
ColinFurze: Progress! Today, Iāve finished initial build out of the ultimate DREAM workshop, and dropped a kick-arse YouTube videoā¦
Me: Wow! Time for me to listen to Amazon.com againā¦
Yeah. Colin Furze has no fear and so much talent.
Anyone recommend sealing/painting the inside of their torsion box?
My mostly LR3 workbench, topped with a partial torsion box, is in an unconditioned garage, so dry, but enduring the Pacific Northwest climate.
The ātorsion boxā isnāt fully boxed, will be eventually leaving off front rail/apron so some plastic containers can slide in. Front rail is just temporarily fastened while I get rest of blocking and top/bottom skins fastened.
Sending an update to 1) get feedback on my mistakes, 2) share ideas that might help others, 3) help motivate me to get this done,
This is relatively simple build. No fancy collapsing/rotating mechanisms. Assembling using easy to modify in the future screws, except for the box which also has glue. My goal is to build enough so LR3 is always setup to use. But build in a way that enables some probable upgrades to be easily added.
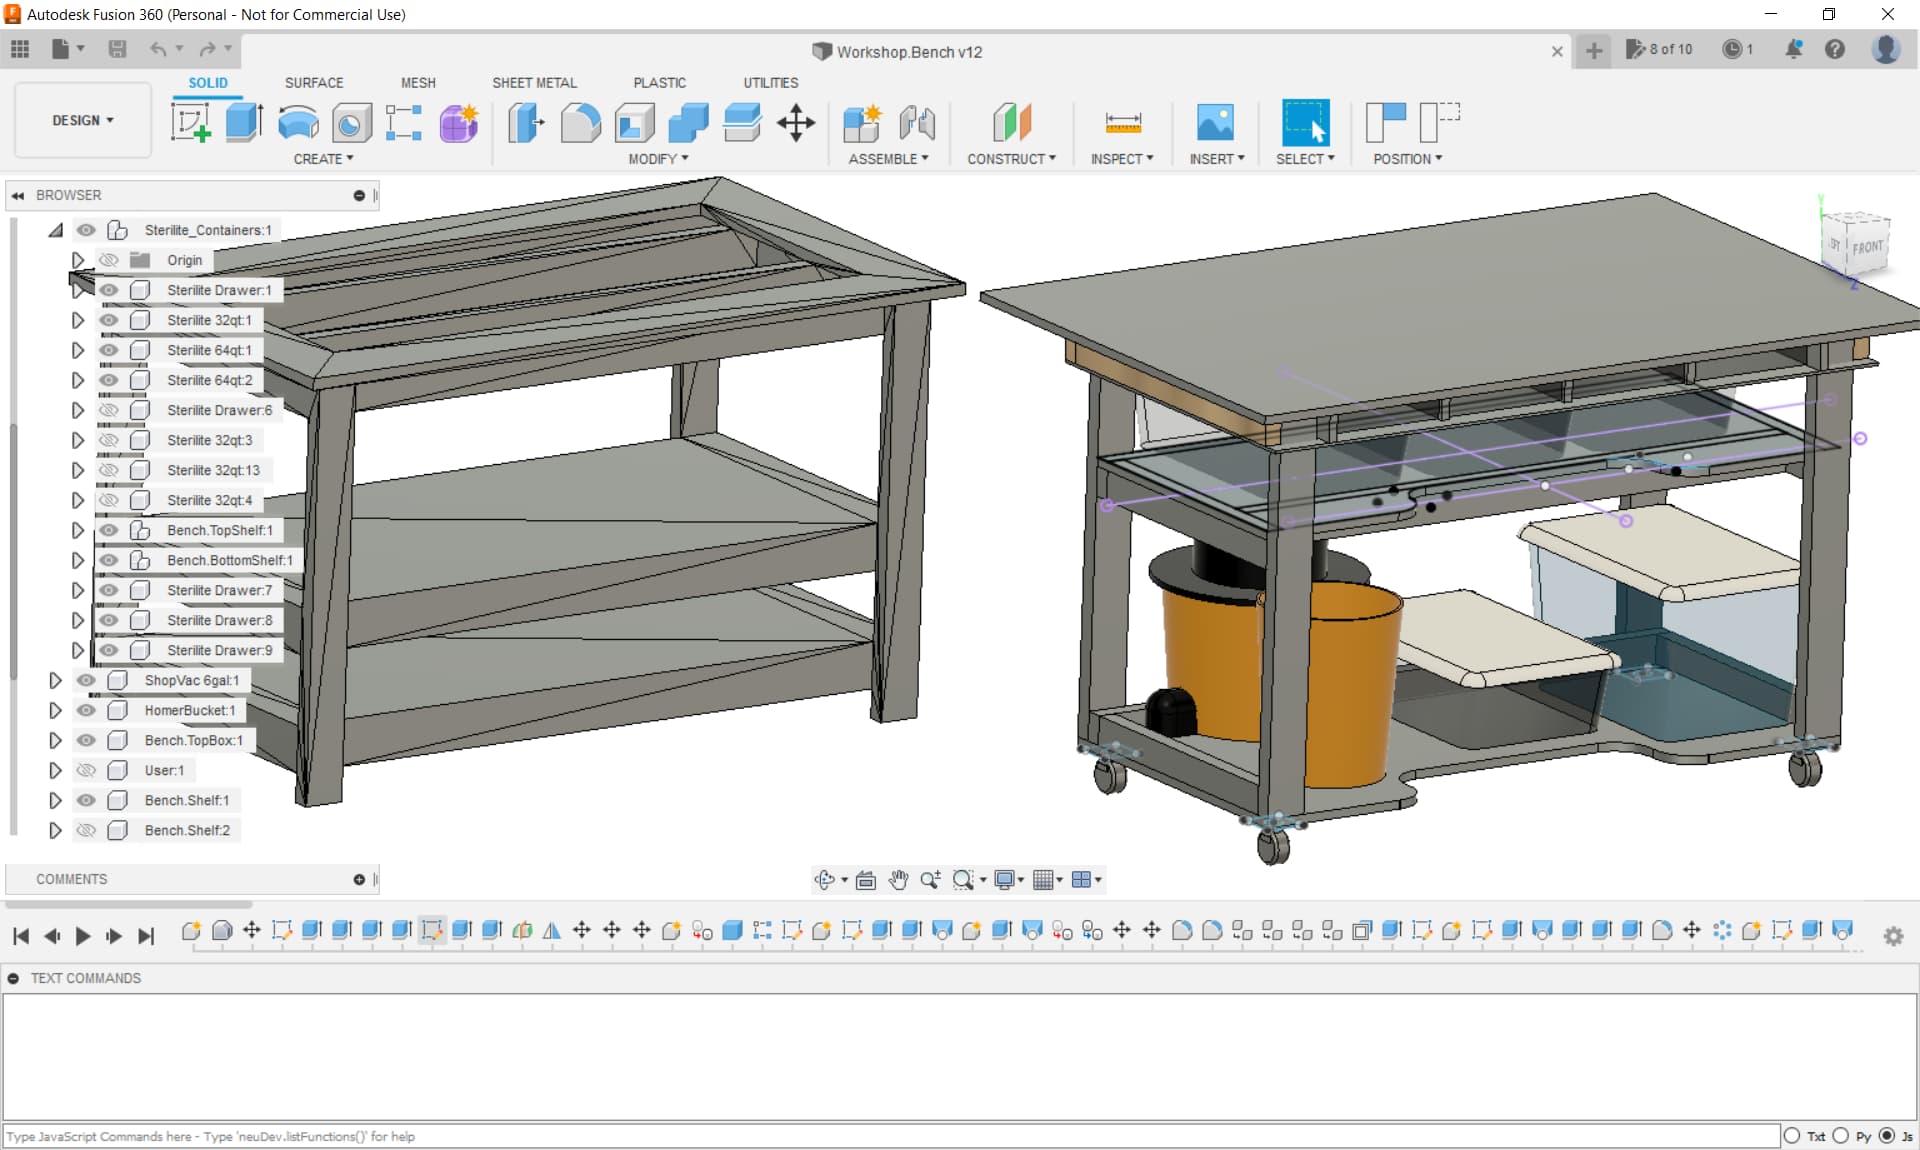
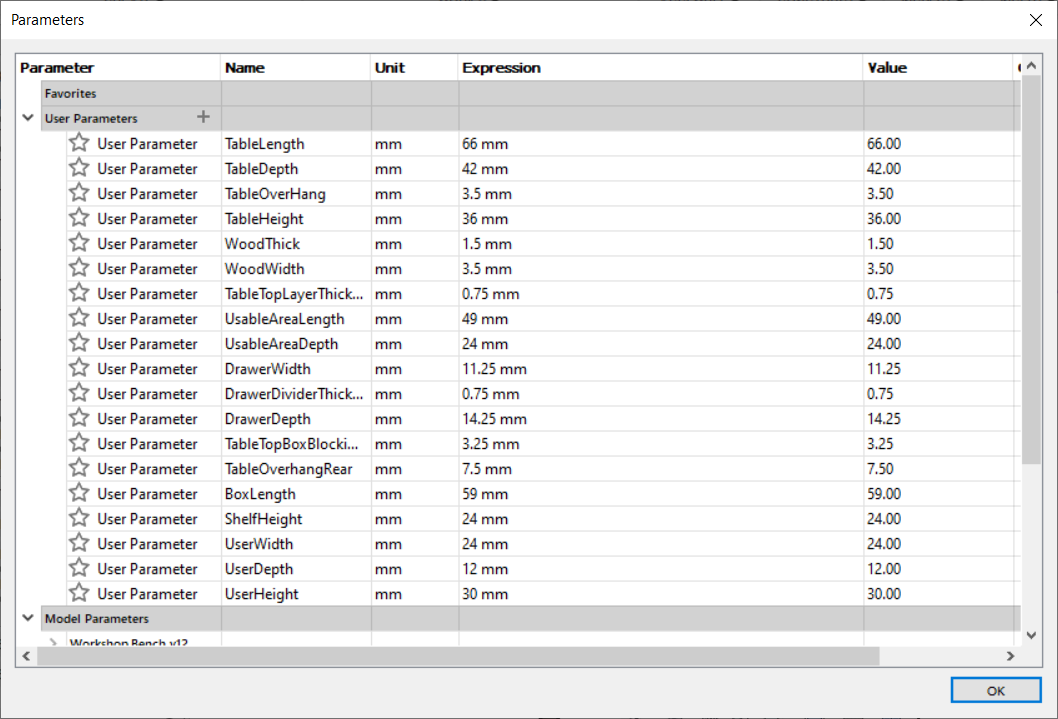
Tried modeling in OpenSCAD, but ended up abandoning/pausing that design. Instead, have created a somewhat parametric design using Fusion 360. My LR3 will sit perpendicular to most folksā builds (see earlier post), front will be clear, and shelves will be recessed/contoured to allow usage as a regular assembly workbench. Still figuring out vice type and location.
.
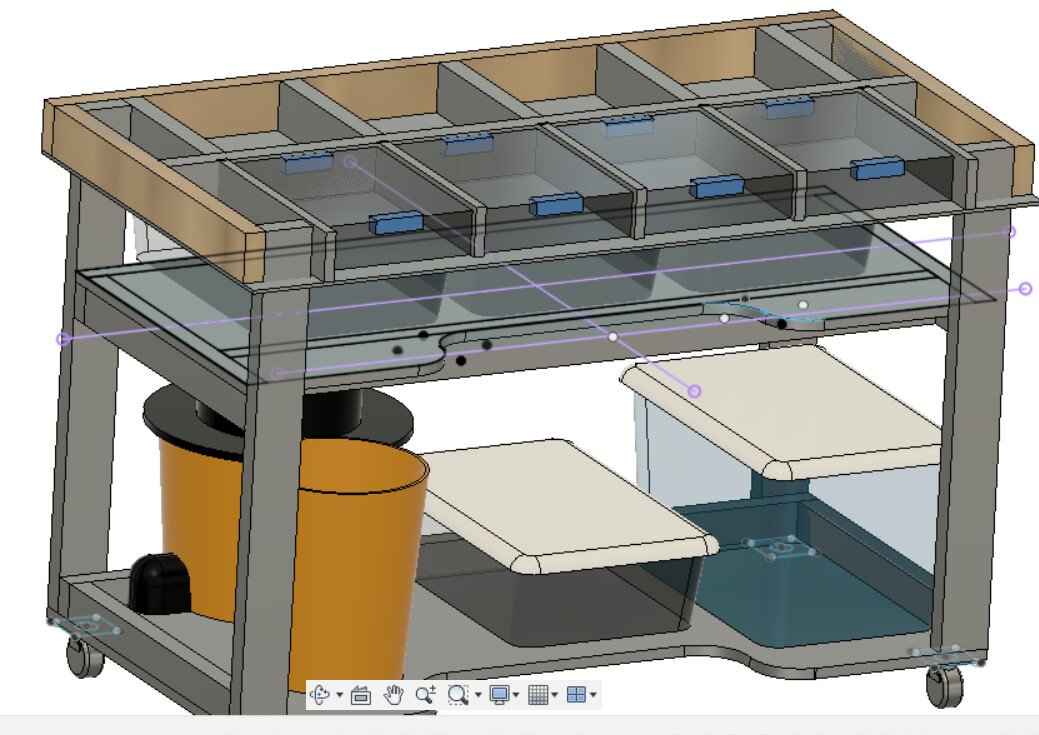
Managed to squeeze some Sterilite containers into the almost a torsion box top, can alternatively insert 12x1 plank and use as a desk extension. Did this by ripping the 2x4 blocking to double up as drawer/shelf runnersā¦
.
Baby got back! Decided to extend rear to ensure LR3 doesnāt overhang, controller box and vac hose stick out a bit. Thisāll reduce risk of damage, and make future enclosing of the LR3 easier (dust/noise control):
Beyond this sketch, will be adding additional ply sheets on the sides, maybe the back too, to hang/mount stock/stuff, and add shear strength/rigidity. Adding diagonal bracing as needed (steel cables maybe like Stuff Made Hereās sweet puzzle solving CNC).
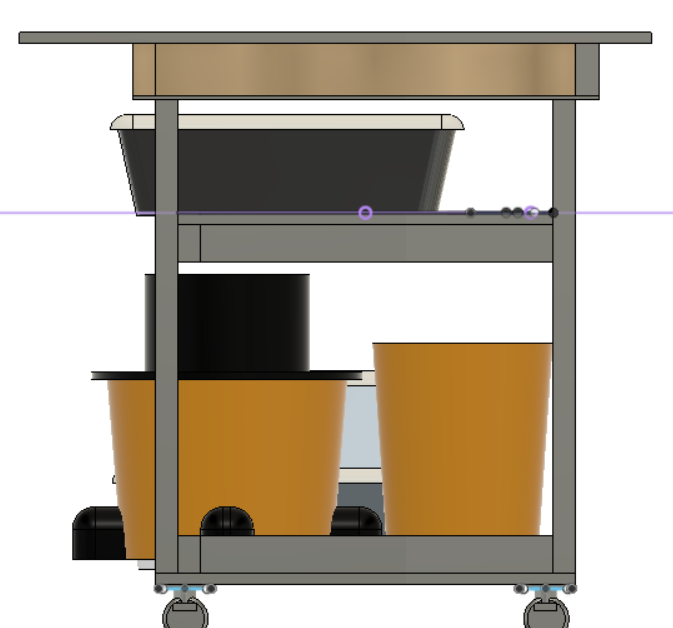
Legs will insert into openings within underside of the torsion box, will add brackets and bolts to allow tuning corners to be on the same plane. Simple 3"-4" braking-casters for now, can get fancy if/when needed later on.
Dimensioned lower section to fit in 28" opening, so can move/transport in/out house through 30"+ door entry. Outdoor weatherās crap right now. Top will be removable for transport and/or āportableā to jobsite/friends.
Will be running vac, with dust stop collector, similar to bench in LR3 docs. I didnāt bother to sketch, power/controller cords and E-Stop, theyāll be strapped on at the end. Am copying JeffeB (and others) by having a 1-1/2" thick table top (with spoilboard) with plenty of overhang, and plenty strong to enable mounting power/controller enclosures.
For me, real life is nothing like those many, many, workbench YouTube videos with their slick build montages.
Making progress to somewhereā¦
Drop table and overhang cuts would be nice. Best I can think of currently is to have the Y rails, on bench dog fastened rails. Or, build yet another LR3 table, a drop table version. The LR3 is portable after all. Want to start another build project before Iāve finished the current projectā¦
hhhmmmmā¦ Iām no table expert but I think itās upside-down ā¦
Itās a drop table. Aaron probably dropped it.
Ummā¦ Wasnāt intending to make a dropped drop table. Original plan wasā¦
That, plus some bracing, with an adjustable/removable top torsion.
Was wanting to figure out a way to enable LR to occasionally overhang the front to cut vertical/thicker stock.
Howeverā¦ these dropped drop table mentions are sparking ideas about adding adjustable height shelf (using pins, peg holes, or something like Joshās shoe rack, or something else?). LR3 would ride ply boxes that slot and lock onto what looks like upside down table legs at first glance.
Any additional adjustable height shelf ideas? Must involve ply/lumber/emt or something else cheap and easy to find at homedepot/lowes. e.g. doubled peg board? Trying to avoid expensive materials.
Resisting scope creep, and getting on with initial plan. Additionally implementing drop table feature will be good to add later.
Making progress, but still not ready to cut.
Also, am struggling to let go of the drop table idea. Many folks have made fold away CNC tables. Am curious how many convertible tables are out there? Table where either the middle section lowers (not just a removable sectionable), or, the main top torsion box flips out of the way to expose a drop table setup. Examples/ideas appreciatedā¦
It doesnāt even need to be that complicated. You can just get two rails that are thicker for each side of the LR. Something nice and flat, like a stack of mdf strips.
Cheers for idea to raise LR rails instead of dropping stock. Want to engrave top ~1" of wood surface thatās ~12-20" high.
Stacks of MDF is less crazy than some of my other ideas. Am digging through Duiās and othersā drop tablesā¦
Itās pretty easy for a quick brainstorming session to add some fixturing capability to turn into a big mission with a very generalized goal of handling any project that may come in the future. Looking good so far! I appreciate the photos of a realistic workshop. Thatās what it looks like when you tend to stay focused on making/finishing projects, vs how the shop looks while youāre at it.
You have your X double your Y? This is uncommon as well for a lowrider, isnāt it?
Yeah, this isnāt a common orientation. Probably for good reason(s)?
Ended up here after originally making a Sled for cutting/surfacing full sheets and slabs
Since LR3 is so fast to remove and store, and because Iām long term lazy, or aspire to be. My plan was/is to also have LR3 mostly live, ready to work, on a smaller bench dimensioned for 2āx4ā sheets. A bench that can be used for assembling other projects. Unintended bonus is that itās stand up desk height, same as bar height, so has some other uses tooā¦
This setup is not common, but I liked the idea of trying out a setup that keeps the front clear and clean (no belts, wires, vac hose).
Based on the forum posts, looks like the CNC accuracy for this 2āx4ā area will not be as good as a narrower gantry you often see. No idea how much accuracy/speed Iām missing, I should participate in the accuracy/speed tests when up and running.
Need to address sag in front middle, and still want to make Y rail risers, or a drop table so I can engrave ~12"-20" tall stock. Some how?
Is there any notable sagging in the middle? My thinking is that if I build a 120cm cutting width on X that I theoretically could build a longer table later and start with one that is 180cm or sth like that.
/edit: I am pretty stupid because that is basically your last sentenceā¦ uff. -_-
How much of a cantilever over the end of the table do you need?
If itās for making joinery in the ends of boards, only a few inches, right?
I have an idea that I donāt want to voice for fear of looking stupid, until Iāve tested it. Should work if you only need <6ā
Whatever- here goes
My rail and belt are attached to 3/4ā thick mdf rails that run beside the spoilboard. Right now, they are attached to the 1/2ā top of my table with 1.25ā deck screws.
What Iām thinking is that I replace the screws with threaded inserts in the 1/2ā too, and use 1/4ā 20 bolts to attach the rails instead. When I want to use drop, I unfasten the bolts, slide the two rails
Forward 6-8ā, and then re-bolt. Iād then support the front of the rails (tbd) to ensure it doesnāt sag when the gantry is on it.
Itās an idea. I didnāt say it was a good idea
I have a 36ā X span and I donāt notice any sag. How much do you get?
The only problem with that is recalibrating your Y axis for square each time you move a rail. I think it would be easier just to cut a slot somewhere in your table.