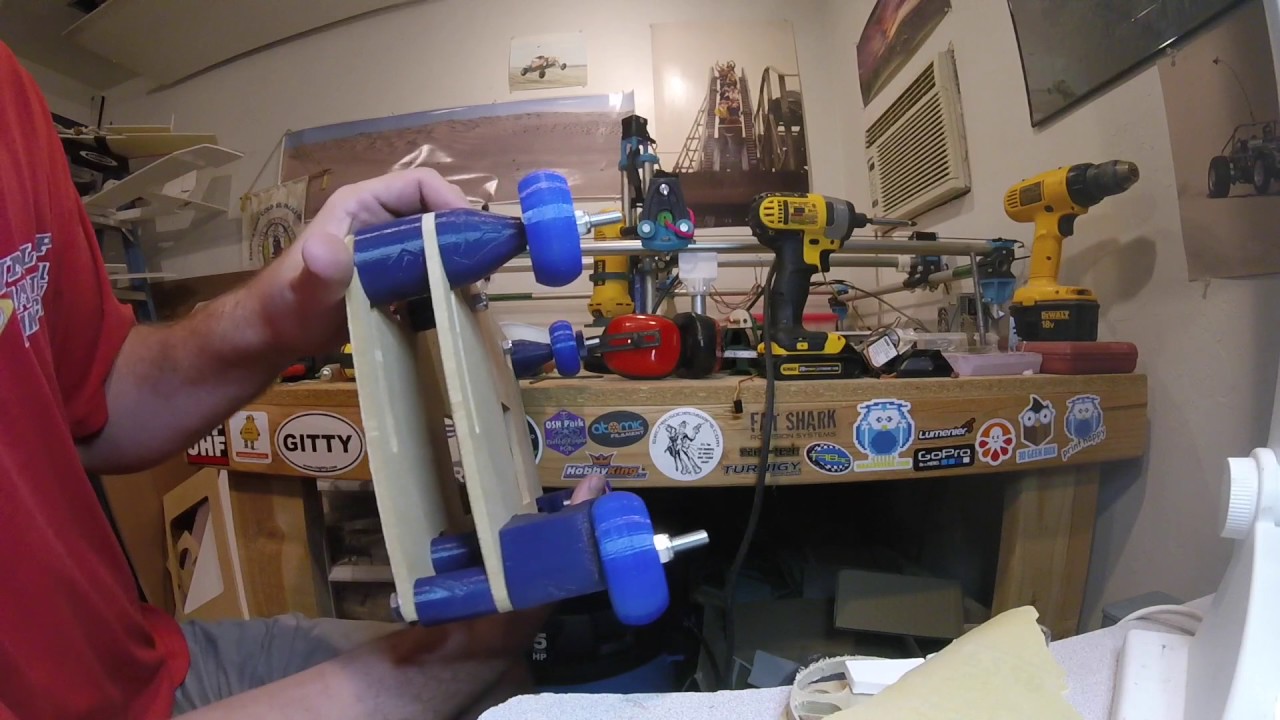
Printed wheels?

Ok, Back in January i had mentioned this idea in jeffeb3’s build thread. I guess I may have got him thinking as I see that back in May he was thinking about cutting wheels from MDF.

But I’ve still been thinking about printing wheels. The problem is I figured they’d have to be printed in TPU and that meant not being able to use supports but to fit bearing pockets you’d pretty much need supports. So I stopped thinking about it and moved on.

Well…Someone on the FliteTest forums is building a low rider to use with a needle cutter…so I modified my needle cutter design to fit the 611 plate:

[attachment file=“Screen Shot 2017-07-26 at 10.18.00 PM.png”]

And…well, the red piece on the bottom is a wooden insulator (because the needle guide gets warm in use and can soften PLA if attached directly to it.) I have a 611 router…and was curious how cuttable the design actually is…and I haven’t used my MPCNC for milling in awhile…so…

[attachment file=“20170727_223332.jpg”]

Cool, that worked out pretty well! I guess that’s the first part of my low rider now.

Shhh, don’t tell my wife!

Seriously…I’ve been debating converting my MPCNC to the 525 parts or a low rider…and I’m still undecided which way I want to go. I’ll probably go 525 but I’m really not in a rush to tie up my printer doing the big 12 hour prints. And for a machine big enough to do 20"x30" sheets of foam board the low rider makes a lot of sense…plus it would let me use more of my table as a table.

So maybe what I’ll end up doing is building a low rider AND upgrading my current machine…but shrinking the current machine back down to 2’x2’ and using it more for milling and 3D printing…hmmm. Well, like I said don’t tell my wife I’m thinking this way :smiley:

Long story even longer…I figure a nice way to put off the decision a bit longer is to play with the printable wheel idea a bit more. And yesterday morning in the shower I had an idea on how to pull off printable wheels:

[attachment file=“Screen Shot 2017-07-28 at 10.34.13 PM.png”]

[attachment file=“Screen Shot 2017-07-28 at 10.33.45 PM.png”]

[attachment file=“Screen Shot 2017-07-28 at 10.33.53 PM.png”]

It may be hard to tell from the photos. Onshape project here if anyone wants to look closer or play around:
https://cad.onshape.com/documents/4d0d43396addd455b6369dba/w/d4c068b1fa39baf3ca03925d/e/656b0a3ffdc97d0020666c24

But basically it’s a 3 part wheel. 2 PLA (or PETG) bearing holders and an outer TPU tire. All of which can print without support.

I also did a version with pins in the hubs to keep them together but I don’t think it’s necessary and that version would need printing with support:

[attachment file=“Screen Shot 2017-07-28 at 10.37.03 PM.png”]

The big issue I can already see is making the tires soft enough they can flex over the hubs…but stiff enough they can support the machine. Though I have a few ideas on that too if it’s an issue…my experience with TPU so far has me thinking it may be possible.

I’m going to try printing one tomorrow just for fun and see how it does.

What do you guys think? Am I totally wasting my time (wouldn’t be the first time) or is this possibly viable?

Screen-Shot-2017-07-28-at-10.33.45-PM.png

Screen-Shot-2017-07-28-at-10.33.53-PM.png

It’s after midnight…so…technically it’s tomorrow now right?

Hey, it’s Friday and I can sleep in tomorrow…I couldn’t let this design just sit and not get printed:

[attachment file=39655]

I think this might be viable…It does squish a bit much…but I only printed the tire at 15% infill and 3 perimeters. At 6 perimeters it would be basically solid through the center where most of the load is.

Getting the tire on was a bit tricky but not overly so…getting it off…I don’t think is going to happen. With more perimeters getting it on will be trickier but I think still doable.

Though I think the center needs to be modified a bit…there’s no room for a spacer between the bearings…but would I even need one…I need to find a “real” wheel to compare with…

That’s pretty cool!

I can’t wait to see these in action. That needle cutter mount looks pretty awesome. The wheels should work, depending on the TPU you might be able to make them out of just the one material. You can do a little design cheat.If you want to do a relatively low infill density but are worried about bearing rigidity, you can place a series of small holes all the way around the bearing. if you do this it will trigger perimeter walls around the holes and make it much more rigid, almost like 100% infill just around the bearing.

But the two material wheels are always going to look better!

The problem with one material is printing the bearing pockets. TPU bonds to itself so well that support is pretty much impossible to use with it (unless you have a multi material printer and can use a dedicated support material - which I don’t have and therefore can’t.)

As I was falling asleep I actually had the same idea Ryan suggests though :slight_smile: But even printed solid I don’t think the inner parts would do well out of TPU.
I’m going to open up the inner hole so the inner race of the bearings won’t rub and it will be possible to install a spacer like a normal wheel. (If anyone with real wheels could give me a measurement of the ID and the full width face to face that would be great.) but I’m also going to try printing the Tire with 6 perimeters to see if that stiffens it up enough since the current 3 perimeter tire really is a bit soft. I may bump the infill a bit too…but with 6 perimeters it will be pretty close to a solid tire.

Tire printed with 6 perimeters is as suspected MUCH stiffer, and seems more than capable of supporting the weight required. The center weight supporting section is basically solid now while the outside still has some open areas. Honestly, I suspect no infill is required at all with 6 perimeters.

However, as I also feared it is MUCH more difficult to get it on. And as I suspected getting the tires off is all but impossible, even the much flexier version with only 3 perimeters. I ended up having to cut it off.

Testing one more tire idea where I added a bit of a fillet to the outer edges - more for looks than anything since nothing really rides on that surface…but it will give them a more rounded profile if it prints ok…just may push the angle a bit far past what can be done without support…but we’ll see.

Whichever comes out better I’ll print 3 more of then dig in on printing up some hubs. Also going to make a quick trip to HD to pickup some 1/4" MDF so I can cut at least one Y plate and a few bolts/nuts so I can test-assemble one and see how it rolls on my table :smiley:

Kinda like tweels. The guy that cuts our grass has them on his mower.

Well, between other projects and tasks today I managed to get four wheels printed, 1.5 Y plates cut (I’ll explain the .5 in a moment) and enough hardware picked up that I can hopefully test them out once I print a few spacers.

I tried printing a set of hubs with holes - in retrospect I should have made the holes a bit bigger. They did result in a more solid hub - but honestly I think the plain hubs with 3 perimeters and 15% infill are plenty strong for this already.

[attachment file=39689]

The plain hubs print in about 25 minutes…the version with the holes takes almost an hour. So I only did one wheel with the holes

The tires I added a bit of an outside fillet to the edge of the curve which made for a rounder profile. Original profile:

[attachment file=39690]

Rounder profile:

[attachment file=39691]

The rounder profile is a bit nicer looking…but doesn’t print quite as symmetrically, and droop on the downward facing side can cause some print issues (you’ll notice them in a few of the photos). I think they’re still usable for the low rider because the low rider should really only be using the very top/bottom of the tread. And honestly the squarish profile is probably fine for our use already I just wanted to see if I could make them look more like real wheels.

Either way the OD is the same, and printed with 6 perims the center of the tread is basically solid so they should all ride the same.

However spinning the tires they do appear to be slightly less round than I had anticipated…so I’m not sure how well they’d actually work. Maybe the TPU has enough “give” to it that they’d self-correct…I’ll just have to experiment. But overall I suspect these will work but may not be as ideal as real wheels.

[attachment file=39692]

I do like the grey/blue though…

I haven’t had a chance to actually try them yet since as I said I need a few spacers…but I did cut my first Y plate:

[attachment file=39693]

Really happy with how it came out! I’ve done a ton of foam board on my MPCNC and a good bit with my laser as well as some decals with a drag knife. But I haven’t done a lot of milling. My shop is small so running the shop vac and dewalt requires hearing protection and even then it’s annoyingly loud. Plus dealing with hold downs and the mess I get even with the vac going and wood being more expensive than foam…I keep putting off doing more milling.

So I was quite happy when this came out great first try!

Well, almost. The cut didn’t quite go all the way through on one side…so I redid the gcode so it would take just one deep pass instead of 7 1mm passes and re-ran it. Remarkably I managed to keep my home position consistent (Something I’ve never done successfully before) and it came out pretty much perfect!

Not so happy when I sliced my finger open and got blood on it while cleaning up the holding tabs…but most of my projects aren’t successful without a blood sacrifice anyway so I can accept it.

Then I decided to get brave on the second one and did 3mm deep passes instead of 1mm and increased the feed rate a little bit more. The top edge was a little less clean…but overall it seemed to be doing great. Then it got to the last cut (the one around the perimeter of the piece) and I realized one of my holddown screws was in the way.

The bit hit the head of the screw - and amazingly kept going on it’s proper path. But I didn’t want to risk it hitting again so grabbed my drill and ran another screw into the workpiece to the right of the part and removed the original screw. Should be all set now.

Nope. Just past where it would have hit the screw I removed the new screw suddenly failed and the work shifted. Doh…I knew I should have used more than 2 screws to hold it down…but got lazy because “it’s just MDF”.

[attachment file=39694]

On the upside…I learned that I can take a pretty much full depth cut at speed through this MDF…

But also figured that’s a good point to call it a night. I’ll re-cut that plate tomorrow along with the Y plate covers and 611 plate.

Oh…also figured out that my current table is too thick…it might just barely fit…but overall too thick. I kind of wanted to redo it anyway. It’s 3/4" particle board on 2x4’s - I’d like to redo it so one face can use thinner stock and I can mount some outlets and switches in it…and add sheeting to both the top and bottom to turn it into a proper torsion box. But that will have to wait until it cools down some more. If I have to I’ll trim down my current table for further testing since I can at least do that inside :smiley:

Those wheels look awesome! The finished y-plate looks great, too! Frequently in my house, the best projects always have some blood, sweat, and tears. Sounds like you’ve got all three going for you!

Yea, it won’t be a successful project until you’ve made an offering to the project gods.

I should probably start a build thread now that it seems I’m going to tackle this…but I feel like if I do then I’m committed so for now I’ll just post a little update here as the current project is still focused on testing the feasibility of using these wheels.

But I’m building a Y plate to do that. Spacers are printing now. So while I wait for them I’m keeping myself busy by cutting the other Y plate.

Apparently this is not meant to happen. I gave it another go with my second gcode setup using faster feeds and deeper cuts. Seemed to be doing well, was cutting a little deeper than I expected but I attributed that to me starting the z lower - probably a bit lower than I meant to. The top edge wasn’t quite as clean…but was still acceptable and with the cut time almost 50% faster I’m willing to take a minute to clean that up with some sandpaper.

Then it got to the last pocket - and my router cord snagged somehow. I was watching the cut not the cord so I’m not sure exactly where/how it snagged. But it did. So that turned into an ugly failure.

Repositioned my work to find a clean spot and gave it another try - went back to the older slower gcode this time. Again it was cutting a bit deeper than I expected - but again i had used a slightly lower starting z since I still had about a paper thick uncut portion on the first y-plate. Did well until it got about 1/4 of the way around on the final parting cut…and then my router cord got caught between an X roller and one of my center supports :frowning:

I caught it before it did any real damage though so I figured I’d just recut that. Generated the cutting path just for that cut and ran it. Well…something must have shifted somewhere. X was in line but Y was about 2mm off. Damn. And then…cord got caught in the exact same place - yeah I forgot to watch for it since I was trying to figure out why my Y was suddenly off.

Grrrr.

Maybe I’ll hold off on that second Y side for a little bit, I think someone is trying to tell me to step away for a few hours. Need to pick up a bit more 1/4" MDF now anyway. At least the small spacers for the first side are almost done printing…

While you’re out getting new mdf, pick up a short extension cord to hand off your ceiling! Both my Z assemblies are hanging everything from the ceiling so they don’t tangle on anything. One less thing to worry about, and as an added bonus, they don’t pull on the gantry any so they won’t cause missed steps.

That’s some cool whells, very nice project!

Just one suggestion: the inside part angle is pretty pointy. given the fact that the inside part is made of some stiff material, versus the outside part made of soft material, it is likely that, at some point, this pointy edge will cut through the tire, especially if you have some load.

Maybe you could change it to a bit more rounded edge profile., something like that (sorry for the horrible paint drawing):

[attachment file=39794]

Just a suggestion, maybe I’m wrong and maybe it won’t affect anything, only time and experience will tell you. Could worth a try though.

Again, very interesting stuff, I’ll follow your thread to see your progress.

Could you post pictures of the printed parts unassembled, and, if possible, during assembly?
Thanks!

sdfdsf.png

Dui - good point - I’m not sure if the forces on the low rider are enough to cause any issues there…but it’s definitely something to keep an eye on. My only concern with softening that edge is how it would affect bed adhesion when printing the wheel hubs.

Here’s a view of the parts un-assembled:

[attachment file=39830]

First step is to stack the two hubs - you could glue them but I don’t think it’s necessary:

[attachment file=39831]

(Actually, you can install the bearings first - I did that on most of them but they can also be installed last.)

Next the hub is pressed into the tire - this takes some force but is possible due to the flexibility of the TPU:

[attachment file=39832]

Then the hub is rotated into position - this takes a LOT of force and is pretty tricky. The point in this photo is the hardest. Getting the tire over the ridge takes a lot of finesse and force, I found a blunt spatula type of tool helpful to get the lip over:

[attachment file=39833]

In fact, on most I needed some mechanical assistance - a long bolt or piece of allthread through the hub made it much easier to get the leverage needed to pull the tire on:

[attachment file=39834]

Like I said - once they’re on they don’t come off!

This was my first attempt with 3 perimeters - I had to cut it to get it off - the 6 perimeter versions are even harder to get off and are solid TPU from the crown to the PLA hub:

[attachment file=39836]

And…they work! I can’t upload the video until tonight but I was able to print enough parts to assemble a Y plate and test it on my table (which it turns out isn’t too thick after all)

[attachment file=39835]

It seems to track fairly well too. I even tried snugging the lower rollers to where it really pinches and the tires deform a little and it seemed fine. Actual cast urethane wheels are almost certainly a better option - but it does seem these are probably usable.

Oh - one thing I did learn. The inner spacer between the wheel bearings is not optional. I accidentally overtightened one of the bolts assembling my test setup. The PLA hubs stood up fine even with only 15% infill. However it created enough force to damage the bearings. Admittedly these were super cheap bearings (listed as “Free” on wish.com just pay $2 shipping for 10) that I only bought because I was curious how bad they’d be. They’re better than I expected for the price but still really lousy bearings. The two in the wheel I overtightened the inner race is now offset and super loose from being squished together. Oops. So…I’m going to modify the hub design one more time to make room for the proper spacers and will actually get some spacers to go in there (or maybe I’ll try printing some spacers just for giggles.)

1 Like

Very interesting. Thanks a lot for your post

Given how perfect the gap was between the center PLA part and the rubberish tire, I was assuming you were printing the two materials at once. Impressive.

I’m pretty sure rounding a bit the edge would not cause you any issue with warping or adhesion, but you know your printer more than I do :slight_smile:

Anyway, good work.

I wonder how well those wheels could do on a skateboard/roller/scooter and how long they would resist to actual use abrasion. Would love to see, if you have any time or willingness to try it at some point!

I do know you can’t print a power steering belt with the stuff.

A small chamfer or fillet on the edge like Ryan has on the MPCNC parts would probably be ok. I still need four more wheels so I can test :wink:

Still just a single material printer here, would love to go multi-material but use my printer too much to experiment on it right now. Once the low rider is done I can rebuild my MPCNC smaller and put an extruder on it so I can use it as a printer and not be as scared to make mods to my existing printer :slight_smile: I actually have an all new X axis I designed for it that’s been sitting waiting to be installed for 2 months because I don’t want to risk tearing it down that far and finding I need to print “one more piece” :smiley:

Thanks! When I designed them I was thinking there was no way I’d want to try them under a human…but with the 6 perimeter tire and the hub with holes…I’d probably actually try it. But I no longer have any inline skates :frowning: I have wanted a new pair so we’ll see…maybe I’ll squish them into the budget at some point.

I still wouldn’t recommend them for regular use like that though - I doubt the TPU would hold up for more than a few miles of use on pavement! But it would be kind of fun to try just to try.

I’m really impressed with TPU overall. I wouldn’t want it in my engine compartment…but it’s strength really impresses me. I did some single wall box shells out of it and they took more force to pull apart than the ones I did in 910 nylon. But…it also stretches a lot more before it breaks as well and it squishes in compression. So it’s really only good for high strength things that don’t need to be rigid and most of the stuff I need to be strong I also need to be stiff.

I tried printing some prop guards for my little 90mm quad out of it:

But they’re just way too floppy even if I print them solid:

[attachment file=39931]

That frame on the right is one I found on thingiverse that’s designed be printed all in TPU with a PLA center to give it stiffness…but even with the plate installed it seemed too floppy and I never installed any guts into it.

Best prop guard’s so far have been PLA in a D profile with no infill to keep them light:

[attachment file=39932]

But I haven’t been impressed enough with any to actually devise a mounting method.

Nylon seems most promising but I have a very hard time doing larger prints in Nylon:

[attachment file=39933]

Small prints come out great - but anything that takes more than 15-20 minutes to print I start having issues with it underextruding terribly and I can’t figure out why. Increasing tension on my extruder idler seemed to help…but then the problem came back next print. Was worried it may be moisture but followed Taulman’s advice on a dehumidifier and no difference (plus I’ve kept the Nylon vac sealed with desiccant when it’s not in the dehumidifier.) Besides…I live in the desert and 15% ambient humidity is high for us :stuck_out_tongue:

Really want to like Nylon though…so strong, love how it can be dyed, and I bought an all metal hot end specifically so I could print it. Just wish I could figure out why I have so many issues with it.

20170423_104624.jpg

20170418_220434.jpg

20170430_213450.jpg

Finally uploaded the little video I recorded a week ago testing the first set of wheels:

They seem to work…finished printing the last of the parts for the low rider last night and got my bearings in Monday. Printing another set of wheels for the other side right now (and making some minor adjustments to them so the bearings seat better) but once I find the cash for some 1" tubes I should be able to test this out for real :slight_smile:


Nice video. You keep up the trend and I will have to rename it to Mostly Printed LowRider.