I’m trying to get familiar with the CNC workflow and decided to try doing this with EstlCAM. I figured I’d do drawings to get familiar with creating gcode, sending it to the CNC and how it all relates to one another before I go out and buy a router and bits.
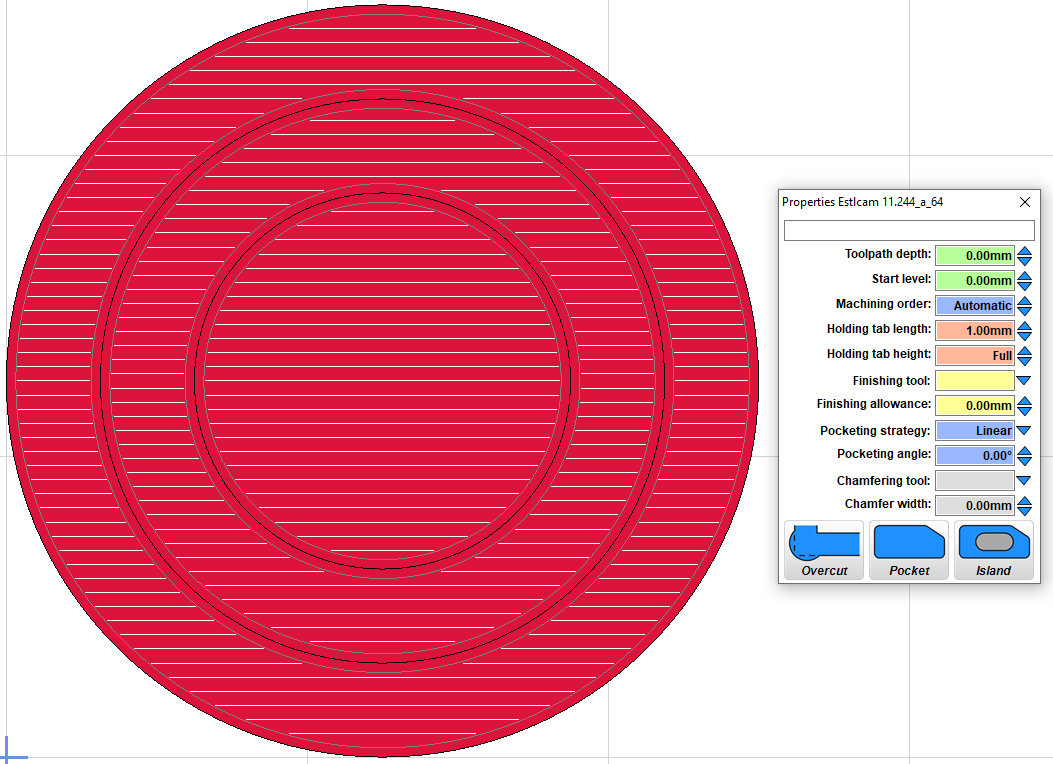
I followed the basic instructions and have completed the crown drawing. I have now moved on to other svg drawings. Now I want to become familiar with tool changes and decided to create a simple bulls-eye (with three rings) and I want to have the circles drawn with a pen (I can do that), now I want it to ‘change tools’ (by switching from a pen to a sharpie) to color in the rings. I can’t seem to keep the rings separate from one another. I get the inner circle and outer ring to ‘fill in’ but I can’t get the middle ring ‘filled’ in so I can go through 3 tool changes (pen, green for inside circle, blue for middle ring, red for outer ring).
I’m wondering if I have to set the DOC for each ring different to trick estlcam to thinking these are at different depths and therefore are distinct ‘cuts’ vs. just cutting the whole surface at the same DOC.
Or maybe I’m just not clicking the rings in the proper order/sequence to do this (I was thinking the ‘island’ feature is what I need to do).
Lunch time for me. Maybe I’ll be able to think better after I fuel up
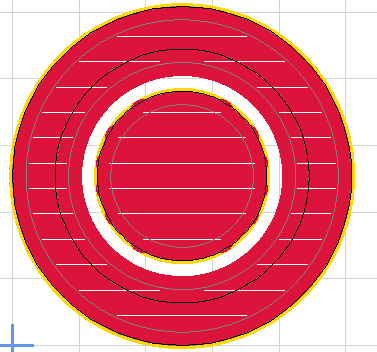
From what I can gather you are trying to make a flat drawing. Because this is a subtractive software meant for cutting into a medium, it will create paths to most efficiently remove material. So what you will need to do is start from the middle, and work your way outward, while “cutting deeper” with each concentric ring. This way, the software can’t make paths that cut accross the middle when drawing the outer rings.
Start with a “hole” and pocket in the middle ring. Set this depth for .1mm Then you will use “part” on the inside of the second ring, and a hole on the outside of the second ring. Re-select the outer toolpath and click island. Make sure this operation has a depth lower than the middle pocket, say .2mm. Do the same for the outer ring as you did for the second ring, but again, make your depth deeper than the last operation .3mm.
I saw a bunch of circles in you pictures, so I am making assumptions about how many rings are required, but the logic would work independent of the number of rings.
I’m not in front of my computer at the moment so i can’t give you any visual help, but this should work the way you want it, if I’m understanding what you need.
Thanks. That’s what I was looking for! You nailed it!
Yes, I did understand that I was trying to make a flat drawing. I was kind of thinking that each ring had to be a different depth, but I was doing 100ths of a mm. I guess I needed to be 10th of a mm different. I also now see the steps (ie: inside, then outside, then island). Thanks. This was helpful in my learning the software also. It might not be that bad after all I can see its potential, now just need to live and breath it.
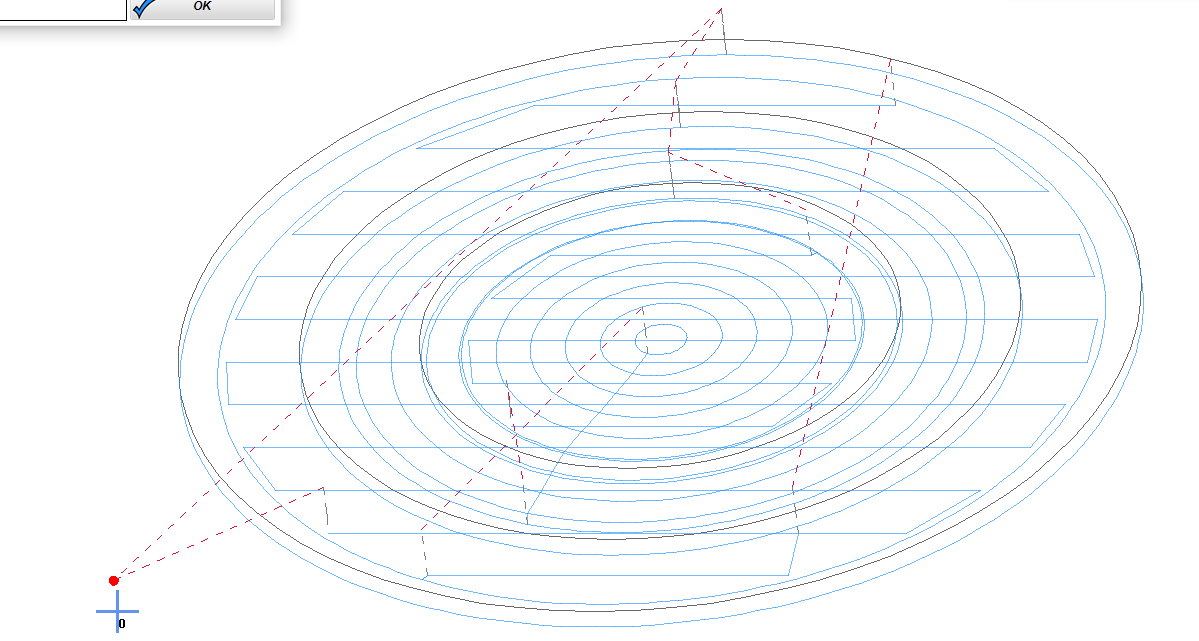
Yes, part/island perimeter > hole w/ island selected. The depth doesn’t matter, all cuts are .001mm in my example. While the default G-code settings allow up to 4 decimal places, all screen numbers are rounded to two decimal places. Rotating the preview and zooming in will show that the paths are below the material top.
Cool, good to know. I would have assumed that if they were the same depth Estlcam would try to optimize the paths and cut straight through. I’m guessing the island function prevents that then?
Every path (line, hole, pocket - w/wo islands, part) that you define will be cut separately (in the order that you or Estlcam decide). Every path is listed on the Preview screen, clicking one will highlight it in the drawing. Any path optimization, e.g. using Start Level to avoid redundant paths, is up to you. There is an example of that and islands in Christian’s Estlcam 8 the "Toolpath Properties" Window (English) - YouTube video. Optimization is not always possible, e.g. stacked text using carve pocketing.

 I can see its potential, now just need to live and breath it.