Paulk Smart Bench + LR3 Configuration

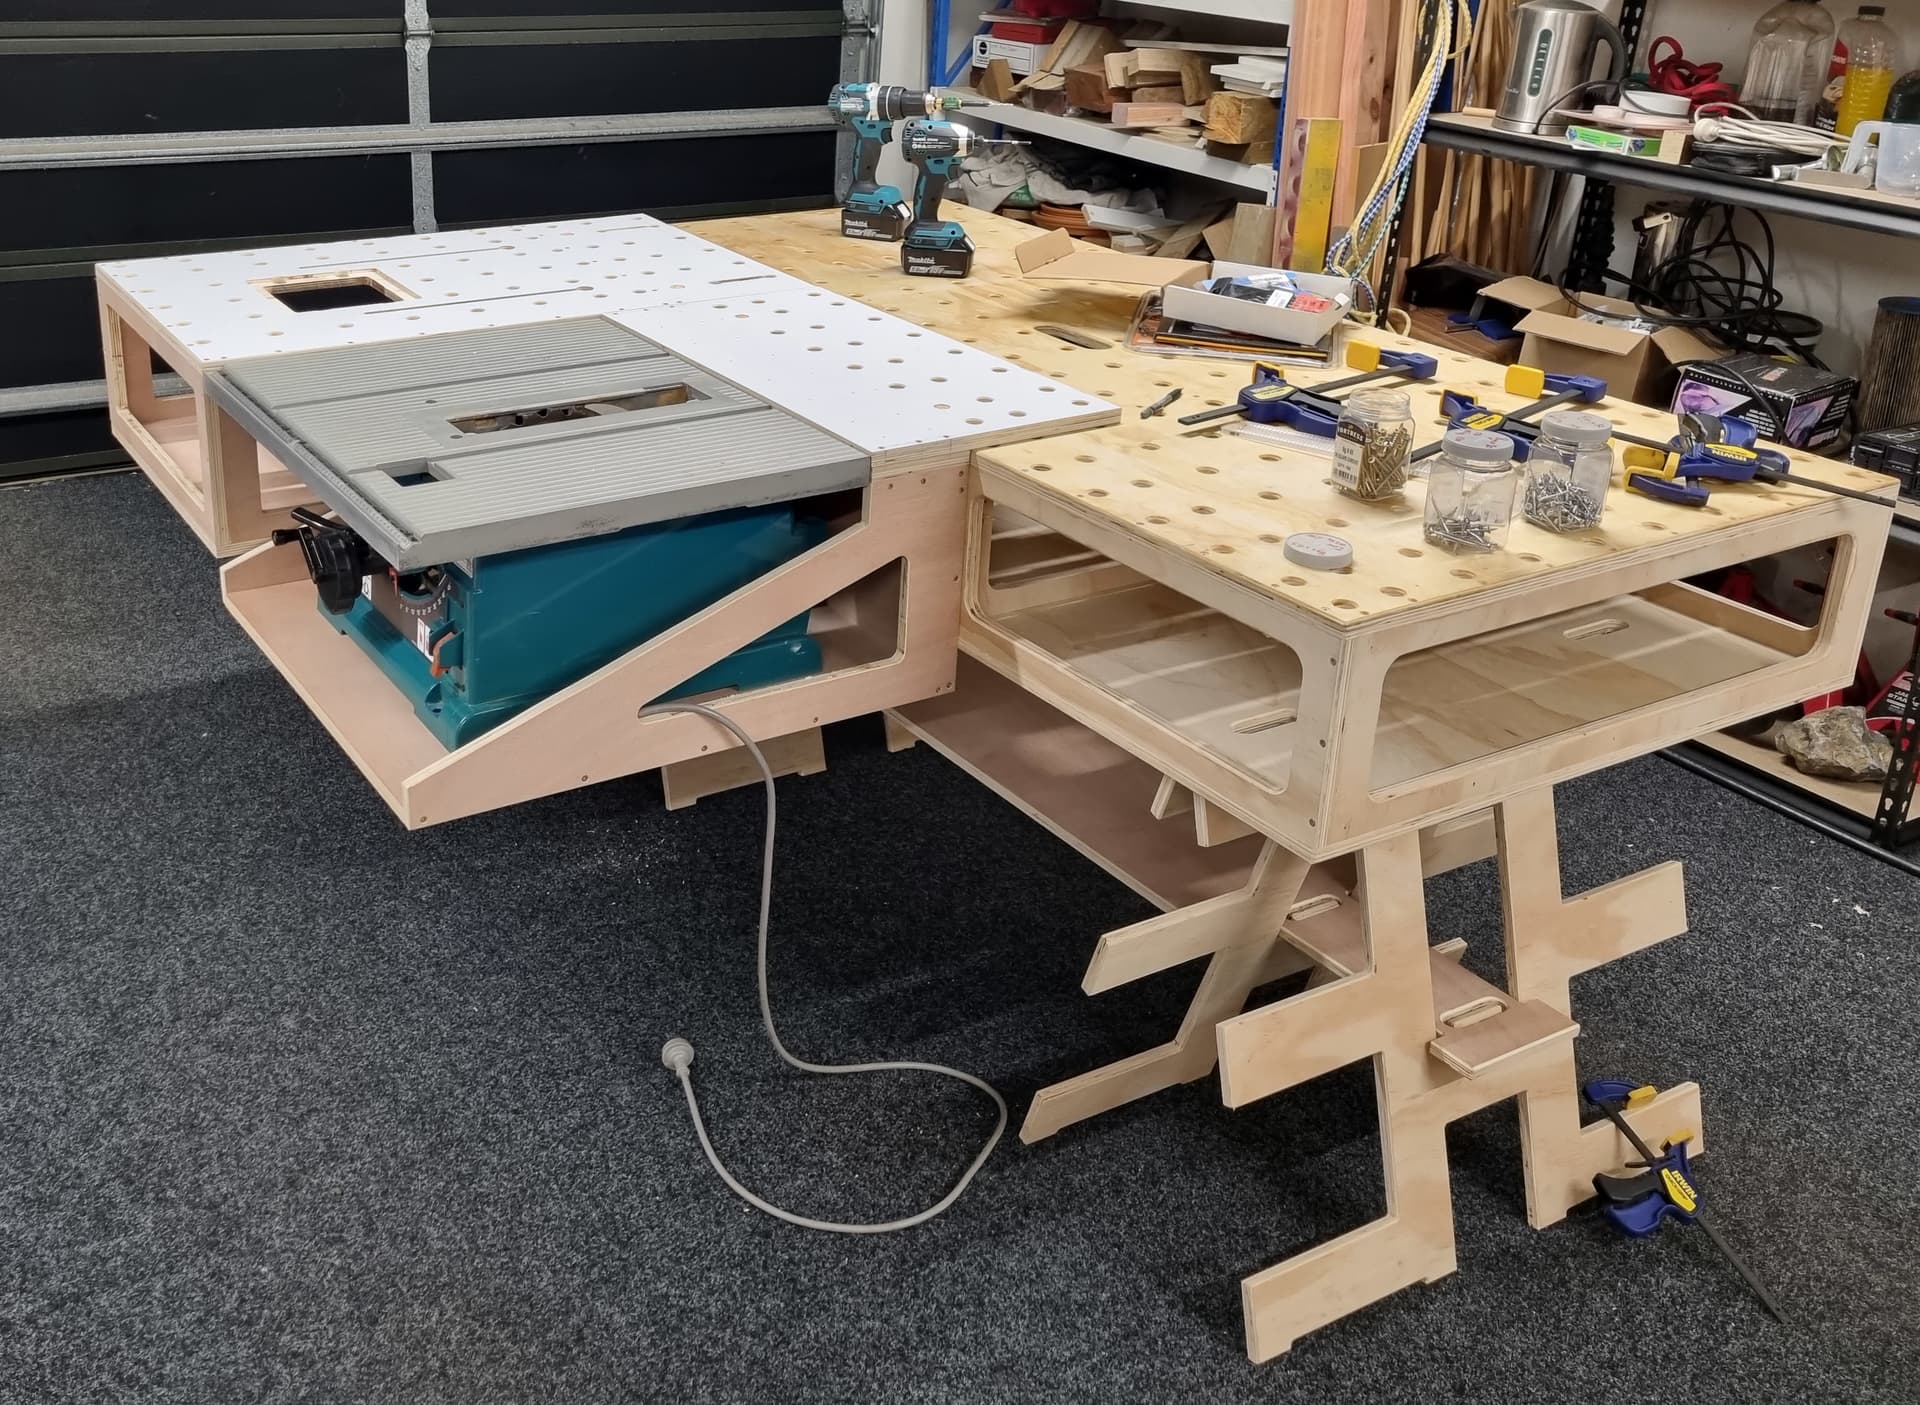
Hi all, I’m considering building an LR3 and I’m looking for some opinions on table options. I already have a Paulk Smart Bench that I’ve been using for a couple of years and have made all sorts of attachments for it (table saw, router table, slab flattening sled, cutting jigs etc.), so the idea would be to re-use this bench in some fashion as I already have space to use it and a way to store it when it’s not needed.

The main idea that I’d like some feedback on is to build a set of add-on rails for the bench that an LR3 could run on. The assembly process would be to set up the bench, attach the rails and a spoil board, check for squareness, drop the LR3 on the rails, string and tension the belts and then be good to go. When not in use, the LR3 and rails can hang on a wall or stored in a cupboard somewhere, potentially.

Assuming that there isn’t anything preventing that idea from working, the next consideration is which orientation to build the system in. The bench itself is 864mm x 1824mm which is roughly 34" x 72". I have the array of holes drilled in the top quite accurately so I’m confident that these could be used to mount the rails with decent repeatability.

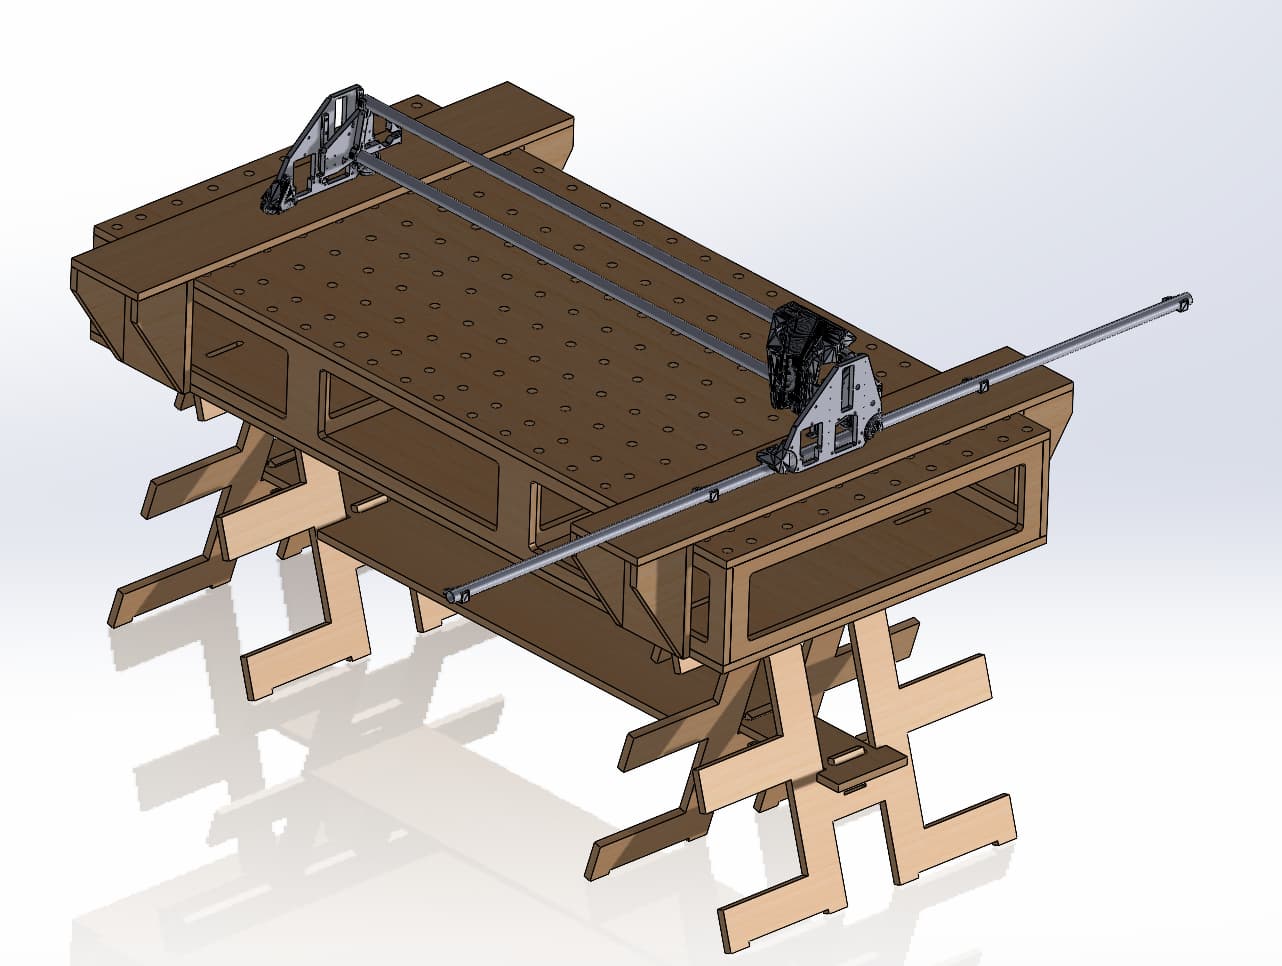
I could add rails that hang off the long sides of the table like this:


This would give me a working area of ~750mm x ~1500mm and seems like the most obvious approach, at the expense of a potentially slightly odd sized work area.

Alternatively, I could add rails that ‘straddle’ the bench across the short dimension like this:


This would give me a working area that’s ~1240mm wide by 864mm or longer if I want to extend the rails further and add extra support for the work. This seems like a slightly more oddball approach that doesn’t fit the shape of the workbench well but would leave me with a gantry that could be used for full-sheet cuts. It could also be used to cut parts into a segment of a full sheet with the excess being supported by some saw horses, potentially.

A 3rd option would be to add the LR3 directly to the top (or bottom side) of the bench but that seems like it’d end up with an even narrower gantry and workspace, which seems like a waste of potential capability.

I don’t have any clear projects in mind for the moment so I don’t really have any ‘must hit’ dimensions or capabilities. The option to make a full-width gantry is appealing from the perspective of coming down with ‘full size sheet fever’.

So I guess the main questions are whether anyone sees any issues or constraints with the ideas above and, if not, is there a preferred orientation? Are there any obvious pitfalls to intending the CNC to be easily disassembled? Are there any key tweaks or remixed parts that make living with a frequently disassembled LR3 easier?

2 Likes

The bench in question, along with the router table and table saw addons

In case people aren’t familiar with the design, it’s a torsion box workbench design from Ron Paulk at https://thesmartwoodshop.com/. The plans are intended to be used to make router templates and then the whole thing can be cut to size with a table saw/track saw and then machined by hand with a router. The design calls for a tool called the Parf Guide to drill an array of 20mm holes in a 96mm grid to match the Festool workstations.

I’ve found it to be super robust and surprisingly accurate. I believe Ron creates his with lightweight plywood, so mine is likely a bit heavier, but it’s still well within my ability to take it from standing up in the corner to set up on the saw horses in just a minute or two.

Out of frame to the left is an MPCNC that is currently being upgraded from an older version to a Primo.

3 Likes

That’s pretty close to my lr2 table. I made 2 plates that bolted to the sides with unistrut as rails.

4 Likes

That looks really good. I think I’ve seen that from trolling through the forums for table ideas before.

In my case, I’m wondering more about avoiding permanently mounting stuff to the bench itself and whether there’s any pitfalls to that idea. Also whether people would go with the ‘portrait’ or ‘landscape’ setup above?

1 Like

Portrait is much stronger, stronger = faster and more accurate.

Do you have a gut feel for how much faster? The gantry would be pretty close to half the length. This thing wouldn’t need to be a speed demon as I’ve got the MPCNC, access to a reasonably large laser cutter and the full-sheet fever is definitely a thing.

Faster isn’t the big draw. More accurate is.

The more accurate the LR is the better projects it will make. 0.5mm is enough to make a dado joint not fit, or be sloppy. A sheet of plywood is expensive enough to not want to waste, at least to me.

1 Like

That’s a useful perspective, thanks. So at a full-sheet size, you would expect enough inaccuracy to limit the overall utility of the machine, then?

If you build the machine wider than it is long you will not be able to cut your own strut plates without using pins and moving the workpiece.

The machine works better with the X axis the shorter axis and was designed that way as well.

You can achieve whatever accuracy you need with the sacrifice of speed. If you choose to build it wider you will always be cutting slower than you would if you built it the way it was designed.

1 Like

But it IS intended to handle a full sheet width along the gantry, and there are plenty of them built that way. So if that’s your motivation I think you should feel comfortable that you can do it with the same limitations as someone with an actual full sheet lr3, and the extra restrictions that you can only cut part of that full sheet at a time. I saw one built that way just for convenience here (4ftx2ft I think it was), and he seemed happy with it.

Really, everything about diy cncs (and probably commercial cncs) is a question of what you’re willing to trade off for what you actually need (do you really NEED full sheet?). Figuring out the second part is usually the hardest. The facts remain that building it shorter gantry solves the strut-cutting challenge and will be higher performance, no questions or doubts.

But HOW important is that to YOU compared to sliding a full sheet of plywood back and forth on your table? Do you need cnc precision on a full sheet? For example, I’ve designed things much larger than my cnc and cut it out in sections of underlay ($5/sheet at the time) and used those as a template to trace and jigsaw on the larger stock.

1 Like

I’d suggest the portrait orientation since the designer recommends it and you don’t currently need the full-sheet width. If the day comes when you do need the width, could you add modular pieces to the side(s) of the existing primary bench to enable the full-sheet capacity? The major mechanical change to the LowRider at that point, as I understand it, would be longer X tubes.

@vicious1
Thanks for clarifying, that all makes sense. The speed vs accuracy trade off is expected.

I have access to a 1600x1000 laser cutter and a bunch of acrylic off-cuts, so was just going to do the strut plates that way. That’s my plan for the XZ and YZ plates, as well.

I definitely understand that there are trade-offs in going for a wider gantry. I’m mostly trying to get a sense of the magnitude of those. If it’s simply a factor of 2 in cutting speed then I’d probably go for it, I can always shrink the thing if it proves untenably slow.

The issue is that I don’t have any clear purpose for the machine, which is obviously not an ideal starting point for trying to make something optimized and is a clear cause of feature creep. On the other hand, it also means that speed is less of a concern because it just becomes another tool in the toolbox. If I need fast, I have the laser cutter, jigsaw, tracksaw, table saw, mitre saw, trim router, plunge router, drill and forstner bits, chainsaw, thickness planer etc. That’s a concerningly long list, actually. :expressionless:

@turbomacncheese
Agreed about the capabilities, that’s why I was confused about one of the responses above when I thought I was considering what would likely be the most common configuration of machine. I know the thread you mean, I think that’s what entirely kicked off this whole thing. Previously I’d been looking at the parametric tables and decided that it was all just too much for the space I’d need to permanently dedicate, even for storing the table upright.

100% understand the point about trade-offs and the nature of it being DIY. That’s kinda why I’m asking the question. I don’t have enough of a base understanding of the real-world trade-offs, so seeing what other people are suggesting is helpful.

I don’t have a need to be able to handle full sheets, but I also don’t really have a clear need for the machine at all. As you say, there’s a long way you can go with alternate methods. Everything in the first image was tracksaw + laser cut template + router with pattern guide bushing, so I’m definitely with you on how much can be accomplished in that way. It’s less about cutting things out of a full-sheet and more about not being limited by a specific dimension in the ‘convenient’ configuration and then being able to rig something temporary on the floor if something larger is needed without needing to re-make the gantry.

I can definitely make the portrait version, use that to cut templates that interlock and then pattern route or jigsaw those out. That starts to look a lot like what I already do with the laser cut templates, which then makes me 2nd guess the whole idea. That’s a significant part of what I’m struggling with, which is obviously a ‘me’ issue, not an LR3 issue!

@ttraband
Expanding it later is definitely an option. I was thinking about a similar possibility with starting larger and then shrinking it (just cutting the gantry rails down, trimming or re-making the strut plate, it looks like), but scaling up would still be relatively cheap at ~$100 for another length of tube. Expanding the portrait version that I’ve described above any further could start to get awkward in terms of placing a spoil surface. Currently the cutting surface is entirely inboard of the table accessory mounts. I guess as long as I consider those mounts as part of the spoil surface then I can go out further without issue. That would make each ‘wing’ 350mm instead of 120mm, but that doesn’t seem impossible. I have some material supports that attach directly to the sides, so I could always do that as well, even if they need to be screwed on. The bench is very much intended to get beaten on. I’d rather not cut into the top deliberately, but

I’m pretty comfortable with the idea of this being a ‘good enough’ attempt which can then be re-made if I end up using it primarily in a specific way. Perhaps I should just be thinking about the gantry itself in that fashion, as well.

It will not be a factor of two, less.

Kinda the reason I stress having the best possible build per the footprint. This is just opposite of what we deal with on a day to day. Everyone typically wants to push it way harder than it was designed. Rarely if ever do we get people willing to make it lesser.

1 Like

Looks like you understand about as much as anyone now. I don’t think there are any head-to-head comparisons. With all that response, I’m inclined to suggest a shorter gantry will be more forgiving, but then, you already have an MPCNC so that probably doesn’t apply much to you.

Sounds like you have a good handle on the variables. Whatever you pick you’re gonna be fine.

1 Like

Understood, I can definitely see the logic behind that sentiment.

Perhaps it would be a better approach for me to look for other posts showing what performance other people are getting from their full-sheet sized machines and then see what that would translate into form some of the projects I’ve done recently.

One of the other motivating factors is that I have a full set of parts printed/laser cut sitting here for a build that my Dad is planning. I think the parts appeared a lot quicker than he was expecting so I’d potentially be able to go from getting a set of the mechanical parts sent over to having a running machine in a weekend while the printer runs a 2nd set. Probably a bit silly to do that when I can just bide my time and wait to hear how the performance of his build turns out.

@turbomacncheese Thanks for that, I appreciate the vote of confidence. I think it’s clear to me now that my ‘ideal’ plan is solidly going to end up with a compromised design. Also I very much appreciate the perspective of templates and cutting things out by hand. It made me take a step back and consider the goals of this vs my current ‘workflow’, such that it is.

I appreciate all the input :slight_smile:

1 Like

12mm Acrylic plates:


No idea if this is a good idea or not, but it’s out of a convenient chunk of scrap so even if it only survives long enough to cut ‘proper’ versions, it should be pretty amusing.

7 Likes

That looks pretty good to me.
I’ve had problems with laser cut acrylic that I did at the local makerspace ending up over time cracking from the laser edges. (Those weren’t LR3 parts, but were similar size)

But, as you say, you can always use the initial assembly to cut replacements.
You’re off to a good start, I’d say.

1 Like

Yeah, 100%. This was purely an ‘I wonder’ type thing. I’m now imagining an LR3 with cold-white printed parts and clear acrylic flat parts.

I agree about the cracking issues. The designs provided look really good from the perspective of having well-rounded internal corners etc. There is a little bit of a sharp ‘tick’ along the edges from where the honeycomb table was touching the material, so we’ll see if that poses an issue.

As much as I’ve tried to tweak the mirrors etc. the beam still seems to be a few degrees off vertical, so we’ll see if that poses any challenges.

4 Likes