I am rather impulsive, and two things have happened recently that convinced me to build one:
I saw someone write “Happy Easter” on their table and I thought my kids would get a kick out of waking up to holiday/occasion messages, cool patterns etc.
I remembered that, buried in the garage behind the Christmas boxes, was a 3/8" thick plate of glass left here by the previous owner.
I then figured that I probably had enough laying around to complete MOST of everything else.
-I have a box full of NEMA 17 steppers and pulleys (at least 8) from abandoned projects and junked 3d printers.
-I measured my leftover gt2 belt from the Burly and I had a whopping 22FT
-I bought 100 bearings for the Burly
-I have a ton of filament, and it is cheap anyway.
-I have a control board and screen from my old Anet A8 clone
My only significant investment will be time. However I am choosing to go ahead with the V2 on account of its lower part count. Unfortunately that rules out the leftover bearings and possibly the board (need to find out here), so I will just need the POM wheels and idlers, and maybe a board.
I also discovered that my leftover EMT stash didnt have long enough parts, but that will be a grand total of $10.
I will use my Burly to make the table itself, though I am considering modifying an IKEA table, not sure yet.
I dont have anything to show yet, but I’m excited so I figured I would get a build thread started!
My first Zen table was all parts bin, too. Left over steel from the Primo, nema 17s from wherever, I think the only thing I bought specifically for it was the 16T idlers, because it wouldn’t fit the 20T idlers that I have.
I’ve got about 15m of 6mm belt around, oh, and the old belt from the first iteration of the Zen beta, which I used 6mm belt for. I still plan on building a CoreXY printer at some point using it.
I found the Ikea table to be a very convenient way to build, and it looks nice enough. Inexpensive, too. The hollow core construction is very easy to hack. I’ve been trying to figure out a way to clean up the bottom without cutting it out though. The cardboard that makes it stiff leaves glue ridges in the bottom that would be difficult to roll the marble over. I was hoping to be able to use a surfacing bit, but it’s not long enough to reach.
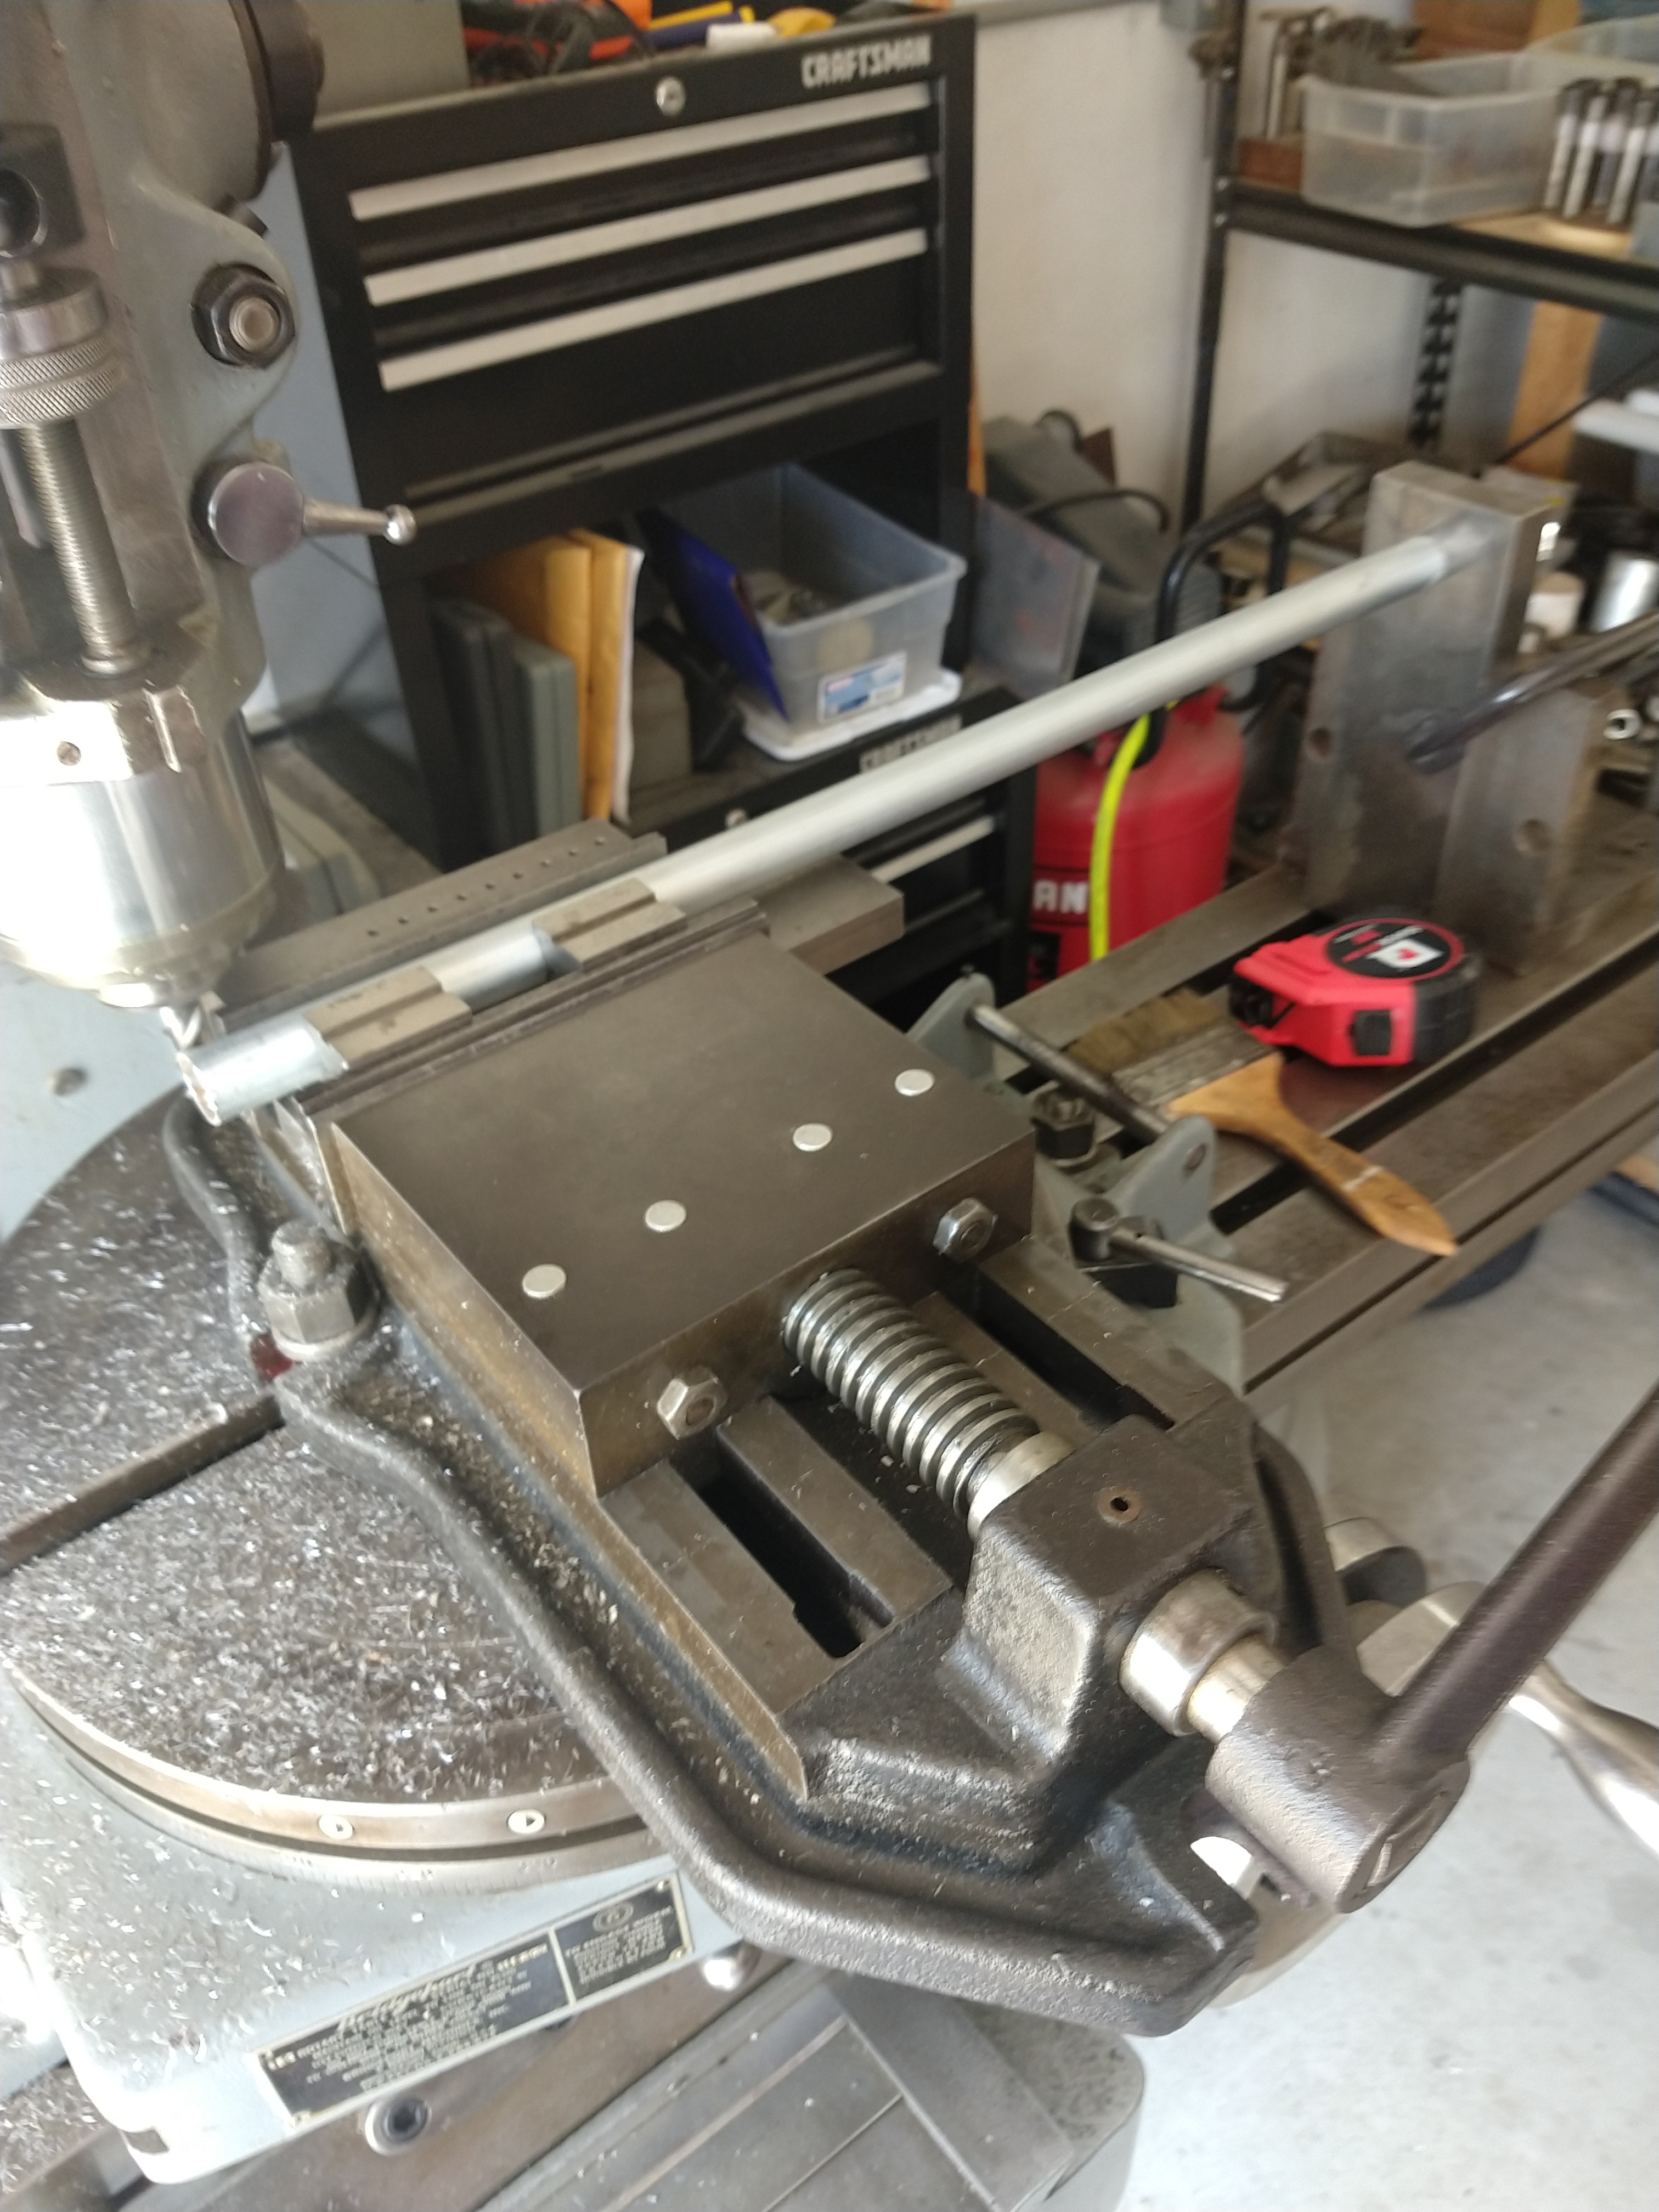
So, how critical is it to have the rails be exactly the same length? I wasn’t sure, and even though it’s now OPPRESSIVELY hot in SoFla, I threw em on the mill. Overkill? Absolutely! But my band saw isn’t tracking right these days and my chop saw isn’t quite up for steel, I think.
I know this hasn’t been much of a build log, honestly still trying to weigh make vs buy on the table itself. Machine is almost ready to go. Got magnets, balls, and endstops from the shop this weekend, as well as a controller from tindie. The parts haven been printed for weeks just waiting for the rest of the plans to come together.
With the new build, you definitely want the corners to be square, but there’s a little bit of play because of how the ends are held. So long as the conduit is long enough to be held at both ends by the pieces, you’ll be fine. There’s about 5mm of allowable range in the rail lengths for both X and Y.
I assume it is necessary to bolt the corners down before tensioning the belts?
Also, is the bet supposed to pass freely through the back side of the center? (The side opposite the side with the belt clamps). Or is it supposed to clamp on the back side too?
There is a bolt hole on the back side. Use a 5mm screw there to clamp the belt firmly against the core. It shouldn’t be able to move there. At least not easily. If it does move, it will pull the X rails out of square.
Yes, you need to bolt the corners down firmly before you tension the belt. If you’re having trouble getting the belt into the tension block, what I did was this:
Bolt up the corners into place.
Pull the belt tight through the location. Mark where it comes through the core hole.
Remove one corner. I did the “cross corner” on the X Max side, which seemed easiest. Remove the Y tube from that corner piece.
Pull extra slack through the core, and fit the tension block to the belt with one tooth or less extra from where you marked it.
Put the Y rail back in the printed part, and bolt the corner up. This will pull the tension block pretty close to the edge int he process.
Put in the tension adjusting screw and get final tension.
square the X axis, and put in the clamp bolt in the opposite side of the core. This only goes into plastic, so you can’t put a lot of tension on it, but it shouldn’t need much. Just enough to bend the clamp arm to the belt.
Thanks for the advice! I’m kinda stuck now. It’s table time, and until that is done I have nothing to bolt her to. Boss and I have been debating the table. She just wants a nice table, could care less if it has sand in it. I would be just fine with keeping our current table, but I want a cnc machine in my living room, lol. My challenge is to seamlessly marry the zen to a “nice” table, be it built or bought.
It’s tough. And analysis paralysis got me for a long time. It makes it even harder when you can’t agree with your partner. Hopefully you will settle on something, even if it isn’t perfect.
I actually quite like my Ikea table, but in the end, it’s a cheap Ikea table, and isn’t going to be nicer than that.
I’m doing one for a friend that will be nicer, but is turning into a bit of a money pit. Anything even remotely nice for wood is pretty expensive, and even MDF gets expensive when there’s more than a little of it. Next time I’m just going to used furniture places and finding a starting point that I can work with. Something that I don’t mind cutting a sand box out of the middle.
Regarding the table, here is where I am at. As I think I mentioned, I have a 20"x"24x3/8" piece of glass that was left in the house when I moved it. I am building around that because it is a) free and b) thick enough my kids PROBABLY cant break it.
IKEA Lack is still on the table (HA! puns…). Its cheap, easy to work with, and attractive.
However we are still considering a custom build. This would not be my 1st piece of furniture, but I am definitely trying to make it my best (past results vary). This would be the first built with the help of the Burly, wherever possible. that in mind, I am also trying to work within the constraints of my slightly-less-than 24"x48" working area on the Burly, and with stock 48"x48" or less. (I have a small table saw, router table, chop saw, etc. I am fairly well equipped for the job)
Since my machine needs to be about 30.25"x26.5" according to the calculator, I am planning on a 30"x48" table to suit both the machine and the space. since the panels are 2’ square, and I dont want to buy 4, I figure if I split each into 12"x24" chunks I could a) fit them on the Burly easily and b) play with some epoxy.
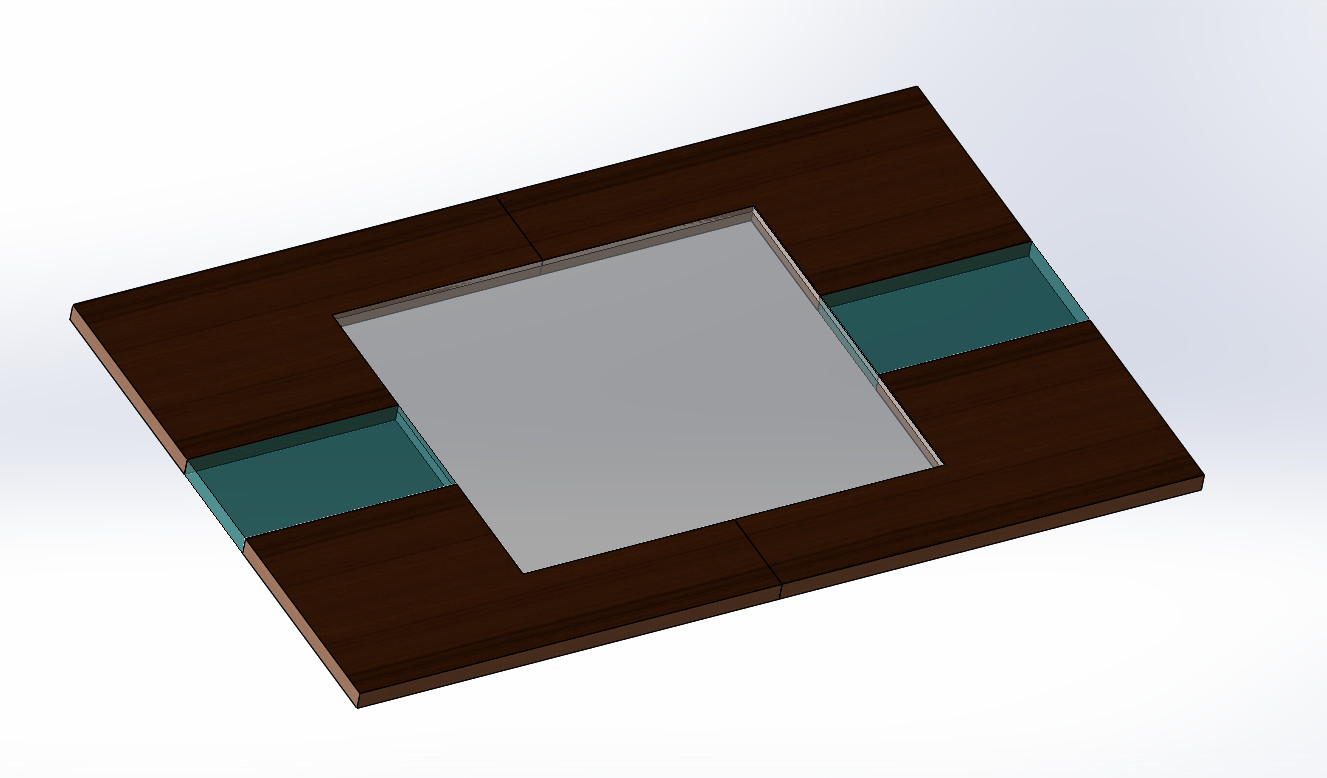
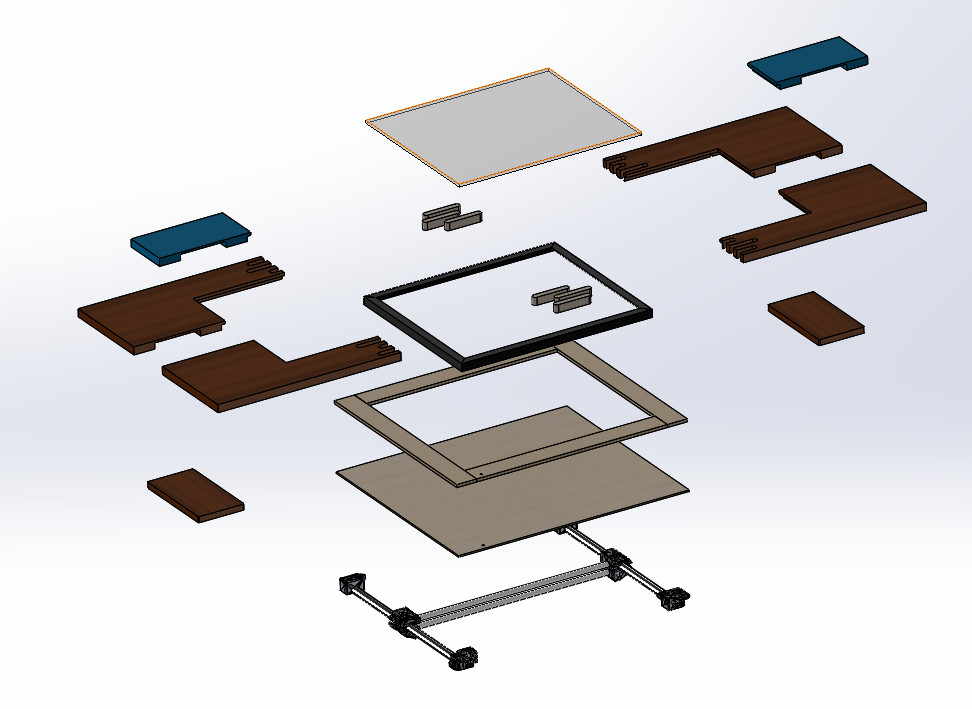
I have done epoxy “bar-top” finishes, but never a deep pour. might have to pilot this one first. Also, the wife LOVES teal/aqua, so the color choice is obvious. Not sure about legs yet. Possibly welded square tube with a satin black paint; or hairpin legs. I am also going to want to fully close out the machine, but of course in a way that it can still be accessed for maintenance. I have little fingers I need to keep out of the works. Starting to CAD it up below:
I just want to throw it out there. If you are going to have kids leaning over it I would aim for something a little more solid than the lack table. Especially if you want it to be around for a while. That’s if you choose to purchase a table.
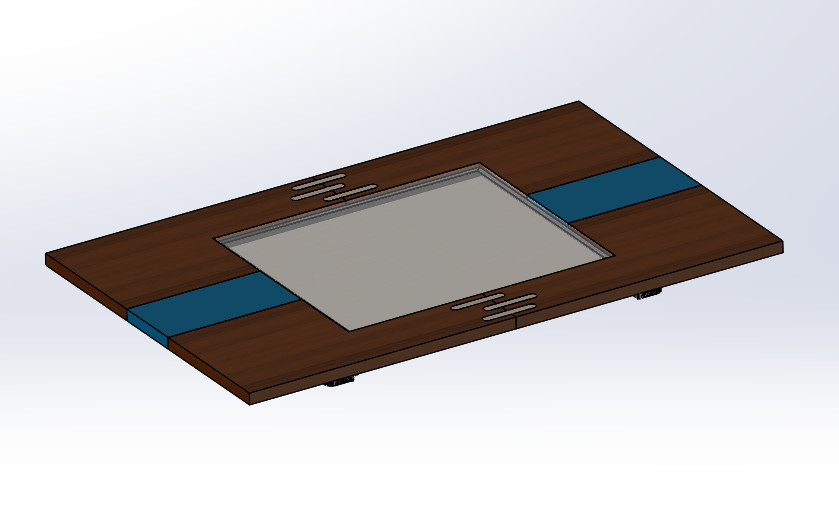
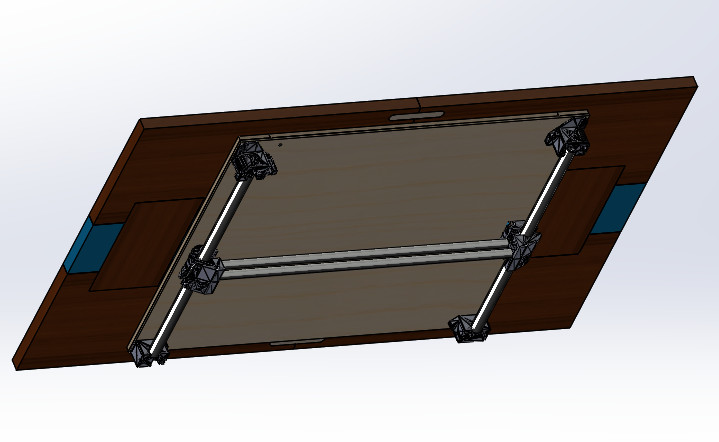
Making some progress on the “make” option. My current plan is to cut each 2’x2’ teak panel in half, and putting each quadrant of the table on the Burly for pocketing, dowel holes, the window cutout and the finger joint. The wife didnt want a plain butt joint running down the Y-axis of the table, so I am going to choose a contrasting hardwood for the fingers so it will look like an inlay. This will be a challenge to the accuracy of my Burly build, hopefully all the parts fit together as envisioned. The blue “part” in the explode represents the epoxy pour, which I would do separately to each half. Still need to add some alignment holes, a cover for the machine itself, legs, and some other details as they pop into my brain.
How thick are two frames that make up the “basin”? I played with that a lot and I decided that about an inch deep, at least, is good for LEDs, and even a few inches of border really adds a lot (more than the extra size of the work area).
  ============== glass
  |      B
  |
A |
  |
  |          0
  ---------------------------------------------------- bottom
If 0 is the marble, then I think an inch or more on A is good, and a few inches (at least 1.5, but up to 3) on B is also really helpful.
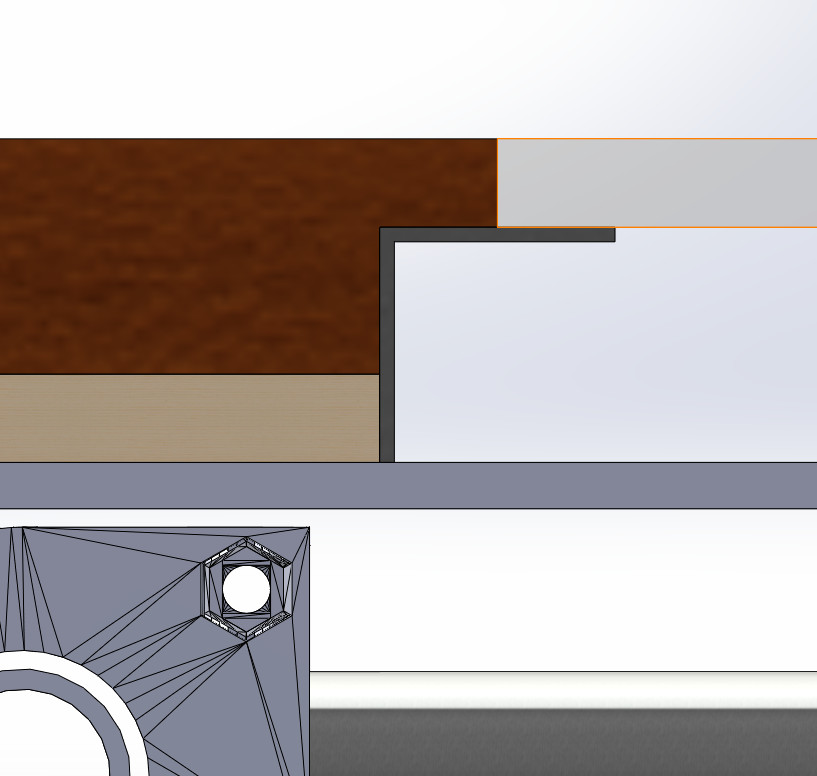
Presently, the design calls for aluminum angle (the black frame). Its 1" angle, so A=B=.9375 (1" minus the material thickness). I know that doesnt give me alot of setback for the LEDs, but im weary of making B too long because it also makes the lip that supports my VERY heavy glass.
I COULD consider getting some 2" angle, cutting 1 leg back to 1", and attempt to epoxy the angle to the underside of the lip in the teak, for strength. Currently I was only planning on driving some screws into the teak sideways. That detail is not in the model yet.
This is the section as it sits now:
You now what, I cant consider that. Making the setback B bigger means that my power corners have a mounting hole in the setback area. I would have to make my machine larger, as well as the table, in the Y direction. I have already cut the pipes, which isnt a huge deal, but I dont really want to increase the table footprint.
Fair enough. If I remake the frame on my table, I would sacrifice work area. It really doesn’t need to be enormous to get a really good effect. But I don’t think you will regret it either way.
Also, you were supposed to respond with ascii Cad.
 it is all 6mm. I don’t know what I was thinking when I bought it. Some error in my shopping cart, IIRC.