I built my MPCNC 2 years ago and now I want to add a laser to it. I bought the 4LDS ver. 2 laser. Where can I find good tutorials on setting up software, electric connections etc. I have spent hours on the net with no luck. Thanks for any help
1 Like
Robert,
Welcome to the forums!
The current firmware versions all support adding a Laser to the machines. Can you be more specific with regard to the machine version and controller board?
We should be able to get more precise setup details for you.
Mike B.
2 Likes
I second Mike’s question. We need to know what control board you are using. It is likely that all you need to do is upgrade to the latest V1 maintained firmware, and plug the laser into the right pins.
1 Like
Thank you for getting back to me. I have a mini-Rambo 1.3a board. I don’t have a clue where to hook up the laser. Is it possible on here to send a picture ? Will I need certain software ? Thanks. Bob
1 Like
Hello. Are there any good books tutorials online or elsewhere on everything you need to know about laser etching and cutting ? From software electronics setups all the way to first cut ? thanks for any help. Bob
1 Like
A good place to start is the docs: Main - V1 Engineering Documentation very informative and thorough.
2 Likes
Thanks a lot
As mentioned in my previous post, getting your laser installed requires two things, 1) upgrading the firmware and 2) hooking up the PWM.
Upgrading the firmware.
The fly in the ointment is that you have a Rambo 1.3a and most MPCNC users over the last couple of years are running a Rambo 1.4. Doing a bit of digging, it appears that the layouts of the boards are different. In the Marlin source code, the Rambo 1.3 board is not broken out separately from the Rambo 1.4 board. I am going to assume you can use the exact same firmware. @jeffeb3 can confirm.
If there is nothing special about your setup that requires changes to the firmware, the simplest solution is to use XLoader to upload the binary to your board. If you require changes to the firmware, you will need to setup the PlatformIO environment and compile the softwre. You will find links to all the V1 maintained versions of the firmware on this page. If you have serial wiring (only use 3 drivers), then you will want V1CNC_Rambo. If you are running dual endstops (using 5 drivers) you will want V1CNC_Rambo_Dual. After upgrading, I suggest you run a router job to verify that everything is working correctly.
Hooking up the Laser
The Rambo firmware defines pin 45 as the laser PWM pin. Assuming the blocks of pins are the same between Rambo 1.3 and 1.4, pin 45 is found on the Motex-1 block:

On the laser side, I’m going to assume this manual refers to your laser. I’m also going to assume you will be using the Driver Adapter board. Based on my own experience and the experiences of others on the forum, it is likely you can wire your laser without this board. I can provide alternate instructions if that is the path you want to take. From that manual I’ve highlighted the connections in red:
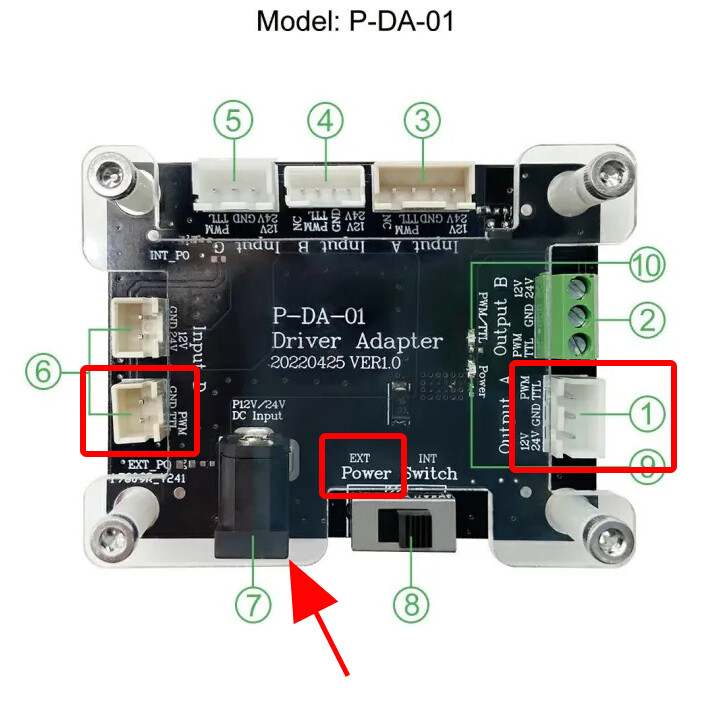
The #6 connection in the red box connects to the Rambo board. The pin labeled PWM/TTL connects to pin 45 on the Rambo board. In the manual, I did not see a provided cable to make this connection.
I don’t know the exact connector for this socket, but Dupont wires will fit both the Rambo board and the Adapter board. The ground pin connects to any ground pin on the Rambo board including the ones framed in yellow in the picture I provided. You should have a 24V power supply that connects to #7. I believe the power switch should be in the Ext position. The laser module connects to the Driver Adapter board at #1. The referenced manual gives more information about that connection.
In considering how to hook things up, the Driver Adapter board can be positioned in different places. Personally, I installed my directly above the middle of my Primo on the ceiling of my enclosure. I’ve seen them mounted with the laser on the core. I’ve also seen them mounted next to the control board (Rambo board). You will have to think through what wire runs work best for your setup.
Testing your laser
The laser menu did not work for my laser and my Rambo 1.4 board. I believe this is due to the new safety timeout introduced in the lastest V1 firmware release. An alternate method is to use an M42 g-code. Values for the pin will go from 0 to 255, so the following line will turn your laser on at half power.
M42 P45 S128
For testing, I would use S1, not S128.
Using your laser.
I highly recommend buying a copy of Lightburn. They give you a 30 day trial, and it costs $60. Lightburn was far superior to all other laser solutions I looked at. There are many YouTube videos on laser cutting/etching using this tool…far more than any other tool.
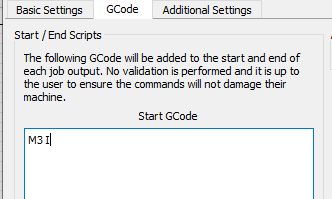
Regardless of the tool you use, you will get far superior results using inline laser commands. In Lightburn that means setting up for Marlin, and selecting Inline:
![]()
In addition, the following command must appear at the top of your g-code files:
M3 I
In Lightburn, you can automatically add this line by putting in the Start GCode section:
Post back if anything is not clear or you run into issues.
5 Likes
Also, look for, and pay attention to, darn near anything @dkj4linux has to say about lasering…
2 Likes
While I’m appreciative of the kind words, @robertbu is the man to listen to. He is far more up-to-date than I am and still works with the Marlin side of the house. He’s most generous with his time and knowledge and IMO the one to pay attention to with things “laser”…
Happy New Year, y’all!
– David
5 Likes
After reading what you sent me it sounds like I would be better off just getting another board. I’m just not good with this stuff yet and the price of a new board wouldn’t bother me. If u agree could u suggest a board that would be plug and play and where I could get it Thanks again for any advice. Nob
1 Like
The only thing simpler than my description above is if you purchased a new Rambo 1.4 board from V1/Ryan. V1 is the only company selling boards pre-flashed with firmware for the MPCNC, so if you are careful to spell out what machine you have, and the configuration of that machine (serial vs dual endstop) at the time of purchase, then you would receive a board with working firmware. Note that would only get you past the “Upgrading the Firmware” section of my description above. All the wiring, testing, and setting up Lightburn would still be required.
My suggestion is to try and flash updated firmware to your board. If you understand the steps, the whole process only takes 5 minutes. The worst thing is that you fail somehow and then have to purchase a new board…something you are already considering. If you decide to attempt the update the firmware, I, or someone else on this forum, can give you a more detailed list of the steps involved.
2 Likes
Hi David. Robert Ness asked for the above in one of his posts. I think your posts are well worth reading for help in this area. You have far more experience using a laser engraver than I do…and you’ve attempted a lot of cool things that are only a possibility in my future.
Beyond your instructions, one of the things I received from your posts is the quality that can be achieved. Before I started laser engraving, I read and watched online tutorials. Looking back, I realize the results presented in the tutorials were poor. It was looking at your work that pushed me to figure things out and solve some critical issues. So, thank you.
4 Likes
Never underestimate the power of a quality Garfield, or Chuck Bronson…
2 Likes
I tried to buy a Rambo board but they said it was unavailable so I guess I will have to upgrade my firmware. I haven’t a clue how to do that
1 Like
Rambo boards seem to go in and out of stock frequently, so you can just wait if you want. As for flashing your board using 'XLoader:
Hardware setup:
- Windows computer version 7 or above
- USB cable
- Power supply
Skills needed:
- Create a folder/subdirectory on a windows machine
- Unzip files to a particular folder/subdirectory. How you unzip files will depend on what you have installed on your machine, and what version of Windows you are running. Here are instructions using Windows 10’s built-in service.
Steps:
- Create a folder/subdirectory on your machine
- Download the firmware for your particular MPCNC machine setup from this page. If your steppers are wired serially (use only 3 drivers), then you want V1CNC_Rambo. If you wired for dual endstops (5 drivers), then you want V1CNC_Rambo_Dual
- From the downloaded file, unzip and extract the file “firmware.hex” to the folder/subdirectory you created in the first step. It doesn’t hurt if you extract both files in the ZIP file.
- Go to this page. Click on the highlighted “XLoader V1.0” to download 'XLoader.
- Unzip the entire contents of the 'XLoader download to the folder/subdirectory you created in the first step.
- Hookup the USB cable between your Rambo board and computer
- Connect the power supply to your Rambo board. The board must be powered to update the firmware.
- In the folder/subdirectory double click on 'XLoader to launch the app
- Click on the “…” and select the firmware.hex.
- Select Mega(ATMEGA2560) for device
- Select the COM port. It should be listed if you click on the drop down. If there is more than one, it doesn’t hurt to try one and see what happens, or you can temporarily disconnect the USB cable and see what COM port disappears.
- Select 115200 for the baud rate.
'XLoader should look something like this when you’ve made all your selections:
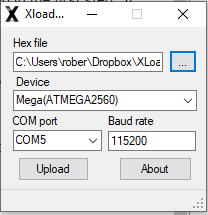
- Click Upload. The process takes around 30 seconds. You are done.
2 Likes