So I know several people here have the NEJE A40640 laser. Anyone care to share some of their know settings for cutting different things? I’m still extremely new to the laser stuff and I’m struggling LOL. Any kind of tips and tricks would be awesome!!!
I’m sorry you are struggling. It would easiest to help if you presented specific projects that are causing you difficulties. A few comments:
-
Air assist makes a big difference in cutting wood.
-
Focusing inside the wood rather than on top of the wood makes some difference in cutting speed/time.
-
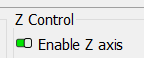
It can be helpful to drop your Z a bit on each pass.
![]()
(for this to work, you need to enable your Z axis in the device settings):
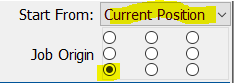
- I’m not sure how you are setting up your jobs, but I set up my jobs to mimic how I do routing jobs. That is the starting point is relative to the stock and typically in the bottom left corner.
-
Master setting up cut tests. There are several YouTube tutorials. The biggest trick to creating cut tests is the use of “Shape Properties.” This allows you to set up a row of squares on the same layer with each shape having a different laser power. Then you can duplicate the row to create layers for different feedrates.
-
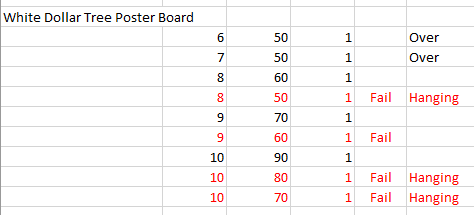
I wish I took good notes from the start. I was pretty ransom with my testing at first. Later I started taking detailed notes. Here is one sample:
-
I really wish I’d taken photographs of very cut and engraving test I’ve done as reference.
-
For wood and some other materials, you want to do your real cutting slower and/or with more power and/or with more passes than your tests indicate. Pockets of glue or pitch are harder to cut, plus I find the Marlin compensation for laser cutting is not perfect. It can be a real pain to try and salvage a project where there are uncut places.
-
Materials are not consistent and even humidity can make a difference. It pays to do a sample cut before starting a long job.
Here are some starting numbers. I cannot claim they are “best” numbers since I’ve not really revisited them since my early testing…and for some reason, I did mm/sec rather than mm/min.
- Amazon cardboard: 11mm/s, 100% power, 2 passes
- Dollar Tree black poster board: 15mm/s, 80% power, 1 pass
- Dollar Tree white poster board: 9mm/s, 85% power, 1 pass
- Underlayment plywood (5.4mm): 3.9mm/s, 100% power, 3 passes
- “Baltic Birch” plywood purchased from Amazon (3mm): 4mm/s, 90% power, 2 passes.
- Thin Home Depot plywood (2.4mm): 6mm/s, 100% power, 1 pass.
- Hardboard (MDF 1/8"): 3mm/s, 90% power, 2 passes.
- Craft foam (black EVA 1.9mm): 20mm/s, 60% power, 1 pass
- Craft foam (gray EVA 4.9mm): 14mm/s, 80% power, 1 pass
- Foam floor mat (black, EVA, 10mm): 7mm/s, 90% power, 1 pass
3 Likes
THANK YOU!!! This is a HUGE help getting started! I keep looking and searching and just get overwhelmed lol. And there is very little about how it works with the Primo so that’s more with it too. I am about to try and cut this out and I’m sitting here looking at it and not having a clue of where to even start with feed and how many passes lol. I think I need to back up and try cutting some cardboard first. Get my feet wet per say. Lord knows I have PLENTY of amazon boxes around LOL. again thank you SOOOOO much for giving me a starting point! As I progress I know I will have more questions and I will post them here.
In addition to feeds and speeds, there are some other potential issues with the project you link. Whenever I do a project created by someone else, I have to analyze the project and usually make significant changes.
The first issue is stock thickness. Anytime you have tabs and slots like this project,
it is assuming a specific stock thickness to work in the slots. Often your stock will not match the stock of the project. Even if the project specifies a specific thickness of plywood (like 1/4"), the 1/4" plywood I come home with may not be 1/4"…and it does not take much difference from the ideal kerf size to either make the tabs too large to fit, or to make the fit sloppy. Plus, you will need to use Kerf Offset in order to cut inside/outside the lines:
![]()
The second issue is kerf compensation. Often these projects have built-in kerf compensation specific to the laser the project was designed for. When I take a look at this project, the slots are around 0.6mm to 0.7mm bigger than the tabs. I think you will find the tabs sloppy with this much compensation…but maybe given its size, the glue-up will work okay.
I recommend you take a piece of scrap and cut one slot and one tab (just the tab), and see how they fit. In addition, I recommend cutting one circle to see how the bearing friction fits in the circle.
Edit to add: You can figure out your burn/kerf offset using this tool. The “Burn” and “Kerf Offset” are 1/2 of the kerf. I find a value of 0.1 works well in 5.4mm plywood, and settings a bit tighter (0.095mm) for thinner plywood. These values make a kerf of about 0.2mm for my laser.
2 Likes
Awesome! Thank you for all the info! I did buy 1/4" MDF for this that is true 1/4". But I will defiantly take a look at everything you suggested and see how it will pan out. Thanks again!!!
Did a lot of playing around with amazon carboard and some files off etsy. Ran the test first and it was neat to see how that comes out. Really gives you an idea of what it can handle. And its crazy how clean it can cut that crappy cardboard lol.
I did come up with another question though. For thicker wood, say 1/4" MDF. Is it better to go really slow and make less passes or is it better to go a little faster and make more passes? I tried to cut some of that today. At 95% power, 6 passes at 180mm/min it still didn’t quite cut all the way though cleanly. And it seemed to fill the kerf with char making it extremely hard to clean up the rest of the cut with an xacto knife. Some of the spots it cut all the way though then others it was spotty.
Slow and deep works better with good air assist. The smoke from the cut makes the laser work harder, and creates more unuseful heat, which increases the charring that the laser can cause on the cut edge.
Experiment and find what works, different lasers will respond differently. I have 2 “40W” lasers (10W optical power) and a nominal 5W laser that I think is probably closer to 3W. The lower power laser has more charring on cuts, and has no air assist at all. The NEJE A40640 cuts more cleanly, even without air assist, but I still use several passes. The NEJE just needs fewer of them. I have never succeeded in using air assist on the A40640. I have @dkj4linux 's air assist nozzle for it, but it keeps melting on me if I run a long job. (Not enough air to keep it cool, I guess.) I did buy a new bigger air pump, but don’t have the tubing to connect it, then I got the NEJE E40, which I haven’t mounted, yet… (The A40640 is going to be mounted on a dedicated engraver/cutter frame. Eventually.)
2 Likes
Thanks @SupraGuy I have the A40640 and it came with air assist. I have compressed air plumbed into my garage and its own pressure regulator on it. I haven’t been able to find much on what PSI I should be running. Everything is in a measurement of flow and I have no idea how to know that. But I have 60 gallons of 175psi on tap lol. I’ve been running somewhere between 40 and 60 psi and cant really tell much difference between the 2 in the cuts. Tomorrow I’m going to set up a test cut and up from 6 to 8 passes and see what speed/power does the cleanest cut. Probably what I should have done from the get go.
Ok I know a diode laser cant cut clear acrylic. But what about opaque white acrylic? specifically 1/8" thick. I made a DXF to cut out what I need to go behind my front strut and set it up in estlcam but then thought I wonder if the laser could cut it. Google just wants to talk about clear acrylic
edit. Ran a materials test and it didn’t go well. Ended up just running it on the LR3. Will have to do some more testing at a later date
White would probably not go well. I have cut 3mm black acrylic though. I think I could cut red or green, but probably not blue.
I’m very dissapointed in my E40
3mm laser plywood, white glue, stuff made specifically for the glow forge:
2mm/s, 100% power, focal distance is a touch above 1.5mm, 40psi shop air assist… 6 passes, charred margins. Incomplete.
I’ve run a whole gamut of tests and can’t get it to cut any better than that.
I now use it exclusively for engraving now, and am about to try copper discs with ‘laser paint’ to make ‘makers mark’ coins for the bigger furniture I make.
Ongoing emails to neje customer support with jo real forward movement
Dang I’m cutting crappy 3mm plywood in 2 passes 375mm/m @80% power clean as can be. This 1/4" MDF is kicking my ass though. I cant get it to cut clean no matter what I try
Yeah, I think my laser is only firing one diode. I’ve done power usage calcs and I keep getting 7 watts at 100%, when it definitely should be higher than that
All neje does is tell me to clean the lens and do air assist at ever higher pressures
The glow forge is a CO2 laser and it is a different frequency. It may not be absorbing the diode frequency.
It’s regular maple 4 ply 3mm plywood- that neje and other e40 users recommend.
I’ve been running the laser quite a bit here lately. Just learning all I can, running test and what not. Got it engraving and cutting pretty good. But I do have 2 questions…
-
For those of you that use compressed air as your air assist, what PSI do you run? All I can find online talks about how much flow and I have no way to measure that, not currently anyways.
-
My NEJE A40640 came with air assist but there isn’t any kind of nozzle, Its just a hole in the bottom. Is this normal or should I be 3d printing some kind of nozzle to go on there??
Is this normal or should I be 3d printing some kind of nozzle to go on there??
Air assist blows smoke away from the lens, suppresses fire, and blows smoke and particulates out of the cut. Without a nozzle, I’d be concerned about the last task. Maybe run your laser at cutting distance with the laser off across something soft like putty or frosting, if you don’t get a line, consider a nozzle.
The older A40640 models did not have built-In air assist, so an add-on nozzle was required. David posted an STL to the forum for his nozzle. I did my own similar version that i can share, though I’m away from my computer for a few days. It needs to be printed out of plastic that can stand some heat. I use ASA, and, due to some melting, have printed new nozzles twice.
I dont have any idea of pressure. An article that did a head to head comparison of pump methods and declared an air compressor the winner, implying that more air is better, though at some point, you will blow small pieces out of your stock.
I will give this a try and see what happens. It seems to do just fine but thats coming from me that knows nothing LOL. Seeming to be fine doesnt mean its actually fine. I will see what i have to do this test with and see what happens.
I do have some ASA that i can print one out of. I will have to figure out how to attach it, the bottom of the laser is smooth. Does yours have the included air assist or did yours come before that addition?
Yeah I will keep digging on that one. I’ve been running 60psi but was hoping I could get away with less. Last night I dropped it to 50psi and it seemed to cut just as well. The other day I went down to 40psi and I seemed to have a lot more not all the way cut areas. Its crazy how this 3mm plywood can be. Looks perfectly cut from the top, flip it over and there are spots it looks like the laser just turned off. Seems like I have to run a lot more power to get though 5% of it than the other 95% needs. But it is cutting well and I cant complain. Biggest thing I need to figure out now is how to hold the plywood flat. Some of these pieces end up with a decent bow in them and that seems to really change things. I guess it moves the laser out of focus and that really changes how it cuts/engraves
All in all it has defiantly been a fun addition and I have enjoyed learning it for sure. Thank you for all of the help!!!
My A40640 didnt have assist. I have printed one of @dkj4linux nozzles. Printed in PLA it turned into a gooey mess. In PETg somewhat better. Somewhat, it’s a a wear item… Black is maybe a poor colour choice. Blue or white would be better, maybe…
That nozzle replaces the red window on the side and uses the screws which used to attach the window to hold the nozzle. You will lose access to the adjustment of the lens when it is in place, but it works well.
1 Like
Mine came with one that already covers that spot. I haven’t touched the lens since I installed it. I just did a focus test and found out it was 14mm from the very bottom of the laser and that’s where I set it to each time.

So should I look at trying to put some kind of nozzle on the bottom of this piece? Sorry tried to find a better pic of it but this is all I could come up with on a quick search