New Primo build Houston, TX 12" x 16" workspace

That just shows your level of excitement while building this!

3 Likes

We have movement!!! FluidNC up and going. Motors all going right direction. Still need to do spoil board and needs serious wire management before i do anything for real but an exciting step. I went ahead and put on dual endstops (wont use them at first) and put 24v fans on the steppers and printed some covers for them. I still have to wire those. I have the Makita on my “wishlist” for Christmas so I am going to try to get spoil board and cable mgmt done in next 2 weeks, then use a week to draw crowns, learn software, etc.

6 Likes

Progress. Mounted the aluminum bracket for the main cable chain. Started putting wiring through the x and y cable chains. Wired 2 endstops (have to get some wire for the other 2). Mounted the router. Secured spoiled board and t track.

Next steps finish wire management and make an electronics box.


2 Likes

Awesome work man looks great now the fun really begins :slight_smile:

Nothing super exciting yet. Lots of wiring and cable managment :slight_smile: I cut the router power cord and cut short then ran a heavy duty extention cord through the cable chain so I could easily take the router off and do a pen/laser/whatever. Also extended stepper cables, wired up endstops, etc etc. Unless something is wrong the cable chains shouldn’t need to be opened again.

Next I am going to design a case for the power supply and box. Hope to draw a crown next week.


4 Likes

@kwledbetter Just a word of caution about running your power through the cable chain next to your stepper cables. IIRC, There has been talk in the past of that power cable causing electrical interference with the stepper motor because of the proximity of the 2 cables. Not saying to completely disassemble, but something to watch out for if you are finding you are having issues.

Otherwise it looks good!

Thanks for heads up. Ill watch out for it!

1 Like

I’ve never had a problem with that. :slightly_smiling_face:

no worries, then. I was trying to remember, and I may be confusing this with another CNC Router set up. Either way, hope for the best!!

I think that happens with a few of the import 800W “spindles” A few of them seem to make a ton of EMI. I think we have been fairly safe with routers.

1 Like

Man, the speed of your build is putting me to shame. LOL. I started mine January… close to being done but you smokin’ it. Good luck on first run.

Also interested in a 3D printer to add to my collection of cool stuff.

Laser Cutter (18x32)
Vacuum Forming Machine (12x24)
Vacuum Forming Machine (24x36)
Soon to be MPCNC Router (24x36)
Future 3D printer

@HyeBuilder Let me know when you want to build a Voron. You’ll love it!

Anyway more progress!

I designed and built boxes for all the electronics. 3 seperate boxes.

Box 1 closest to rear for all AC so fused C14 inlet connects to eStop, connect in parallel to an AC dual plug and out to the DC PS.

Box 2 Meanwell LRS 350, a 24V 4040 fan to keep everything cool

Box 3 Is the Fysetc E4 and a 24V 4040 fan as well

It keeps things tidy and cool and should keep most debris out.

All is working now. Drew a crown, Z motor current was originally to low and so was skipping like crazy. Once I upped that to .75 from 0.5 everything went fine with crown drawing. Still lots more tweaking to do this week but hope to cut some foam later this week.

Video linked shows the z skipping just in case people don’t know how it manifests. I knew immediatly being very familiar with 3D printers but if this is yoour first stepper motor adventure I certainly could see how you wouldn’t know what it looked like.


3 Likes

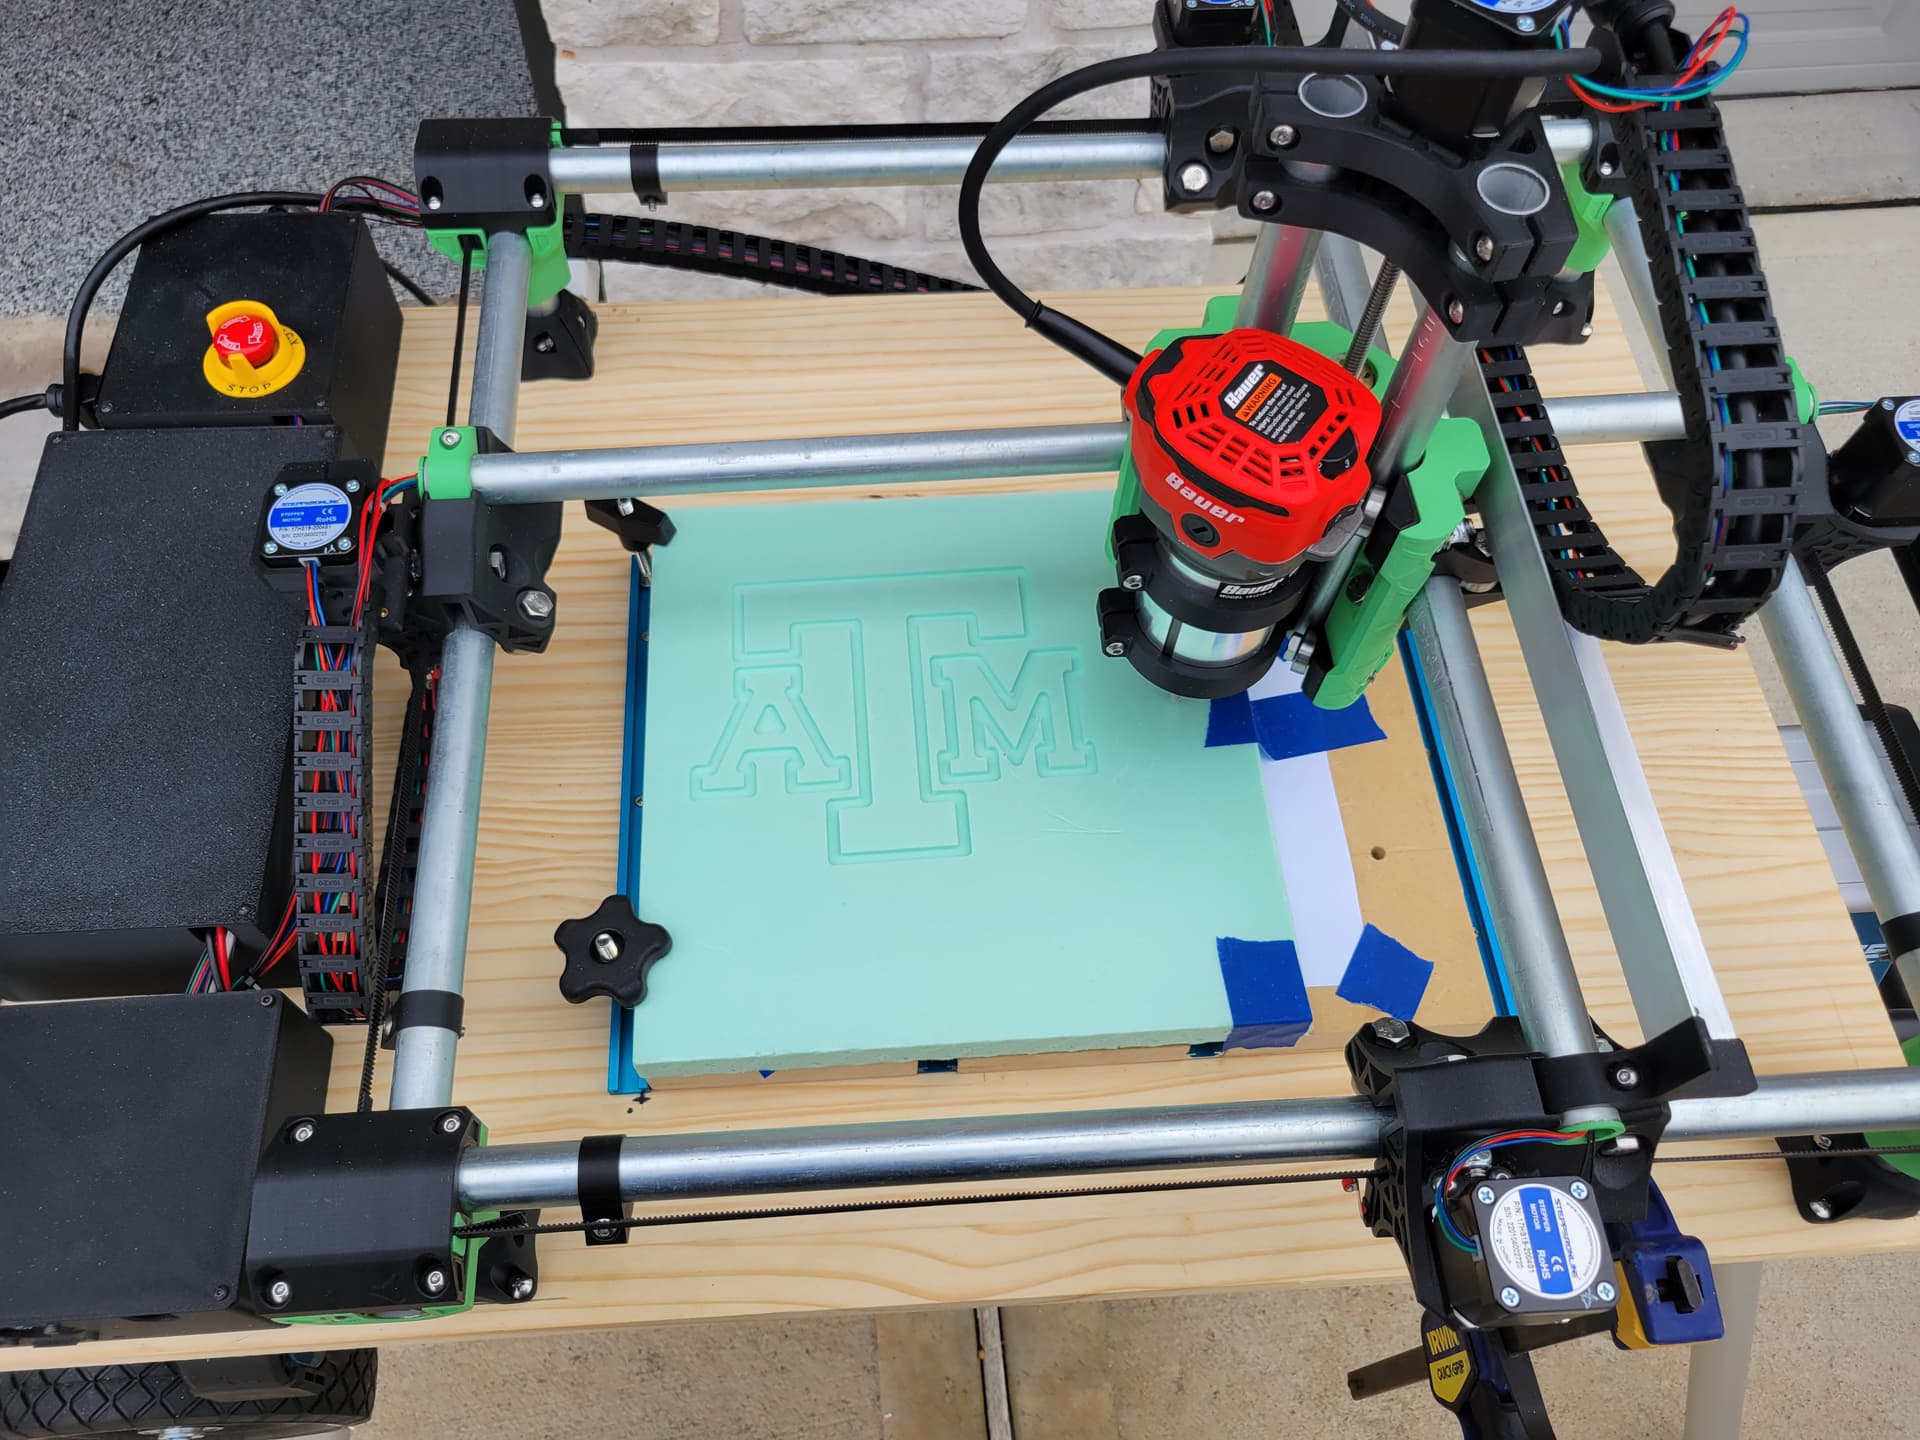
We have chips! Well foam chips anyway! I am going to callthe build “complete” though from having 3d printers there really is no such thing but it’s cutting and mechanicals seem sound!

I still need to check the squareness. surface the spoilboard and I can already tellI’m going to want a dust management. I already have a shop vac and am thinking I just find a mount and modify if needed to hook that up. I cut the foam outside so no big deal but it still gets everywhere!

I’m really liking fluidnc interface so far. takes a bunch of steps out to be able to just save the CNC file from ESTLCam and upload it over Wifi to the SD card then fire the job off all from one webpage wihtout needing a middle step (repitier host, etc)

I would like to tackle dual endstops eventually and auto square etc but baby steps! My next tasks is really reading/reasearching more about CNCing in general. I am a total newb so want to learn about feed rates, cut depths, what the different bits do best, etc etc etc.

8 Likes

Congratulations!

ATM? Do you work at a bank? :slight_smile:

1 Like

Well finally cut some wood with it this weekend. Didnt take any pictures but performed fine. One thing I will likely do is cut legs that are 1.5" longer than current. With such a thick spoil board there just isn’t enough room for anything more than like an inch. Changing bits a major pain, etc . etc. Otherwise I’m pretty happy!

There isn’t much use for a thick spoil board, use that fancy robot to thin it down!

A shorter CNC is easier, faster, more accurate.

Just put the legs on boards and raise them so they are on the level of the spoilboard.

2 Likes

I am def interested. What all am I looking at to build such a Voron printer? I have yet to complete the cnc router b/c my laser cutting parts has consumed all my time. However, that project is about done for now and I can focus on completing the cnc router then jump into the 3d printer.

Awesome looking build! Maybe you already mentioned it and I missed it, but what size is your MPCNC? It looks like exactly the size I want to build mine, not too big but not too small