Following with interest!
3 Likes
@N7NJO I do like those stainless steel tubes. Could you provide the link of the exact ones you purchased from Metal Supermarkets? They have so many options. Thank you
I’m trying to follow along with all of this.
I put the cb1 on the manta and got it on my Wi-Fi. I can’t get the “make flash “ to work but Klipper will at least start. It always shows errors.
Because I don’t know what I’m doing I’m being really conservative. I haven’t connected the motors and when I do I’ll have the belts off.
So I keep starting Klipper and chasing errors. Each time it starts I see an error. I know I fixed it when I get the next error.
I put the hardware cfg files in a directory and the macros too. ( including Neil’s macros. ). Also I fixed a few duplicate pin used errors. The one that I am stuck on is “file has no header”
Maybe I started wrong. I used the generic klipper for the m8p board. Or is there another one that I should use?
Thank you for any clues.
Mark
Actually I followed the recommendations from many others and didn’t order online. I went in the store and asked to look what they had, for stainless tube with 1" outer diameter. I believe they called it “decorative”… and there wasn’t anything else to choose but it was just what I was looking for.
Beware, wasn’t cheap.
1 Like
Because it is decorative. ![]()
1 Like
I started with the generic klipper file for the m8p, then tweaked it to work with my set up. The contents of the files you see above are the result of my taking that modified generic and splitting it into separate files.
So when Klipper starts it looks for the printer.cfg, you can see mine then includes all the specific files. I no longer reference the generic mp8 file.
As for the “make flash” did you follow the steps on page 36 of the Manta manual?
Can you share more of the error you get for “file has no header”
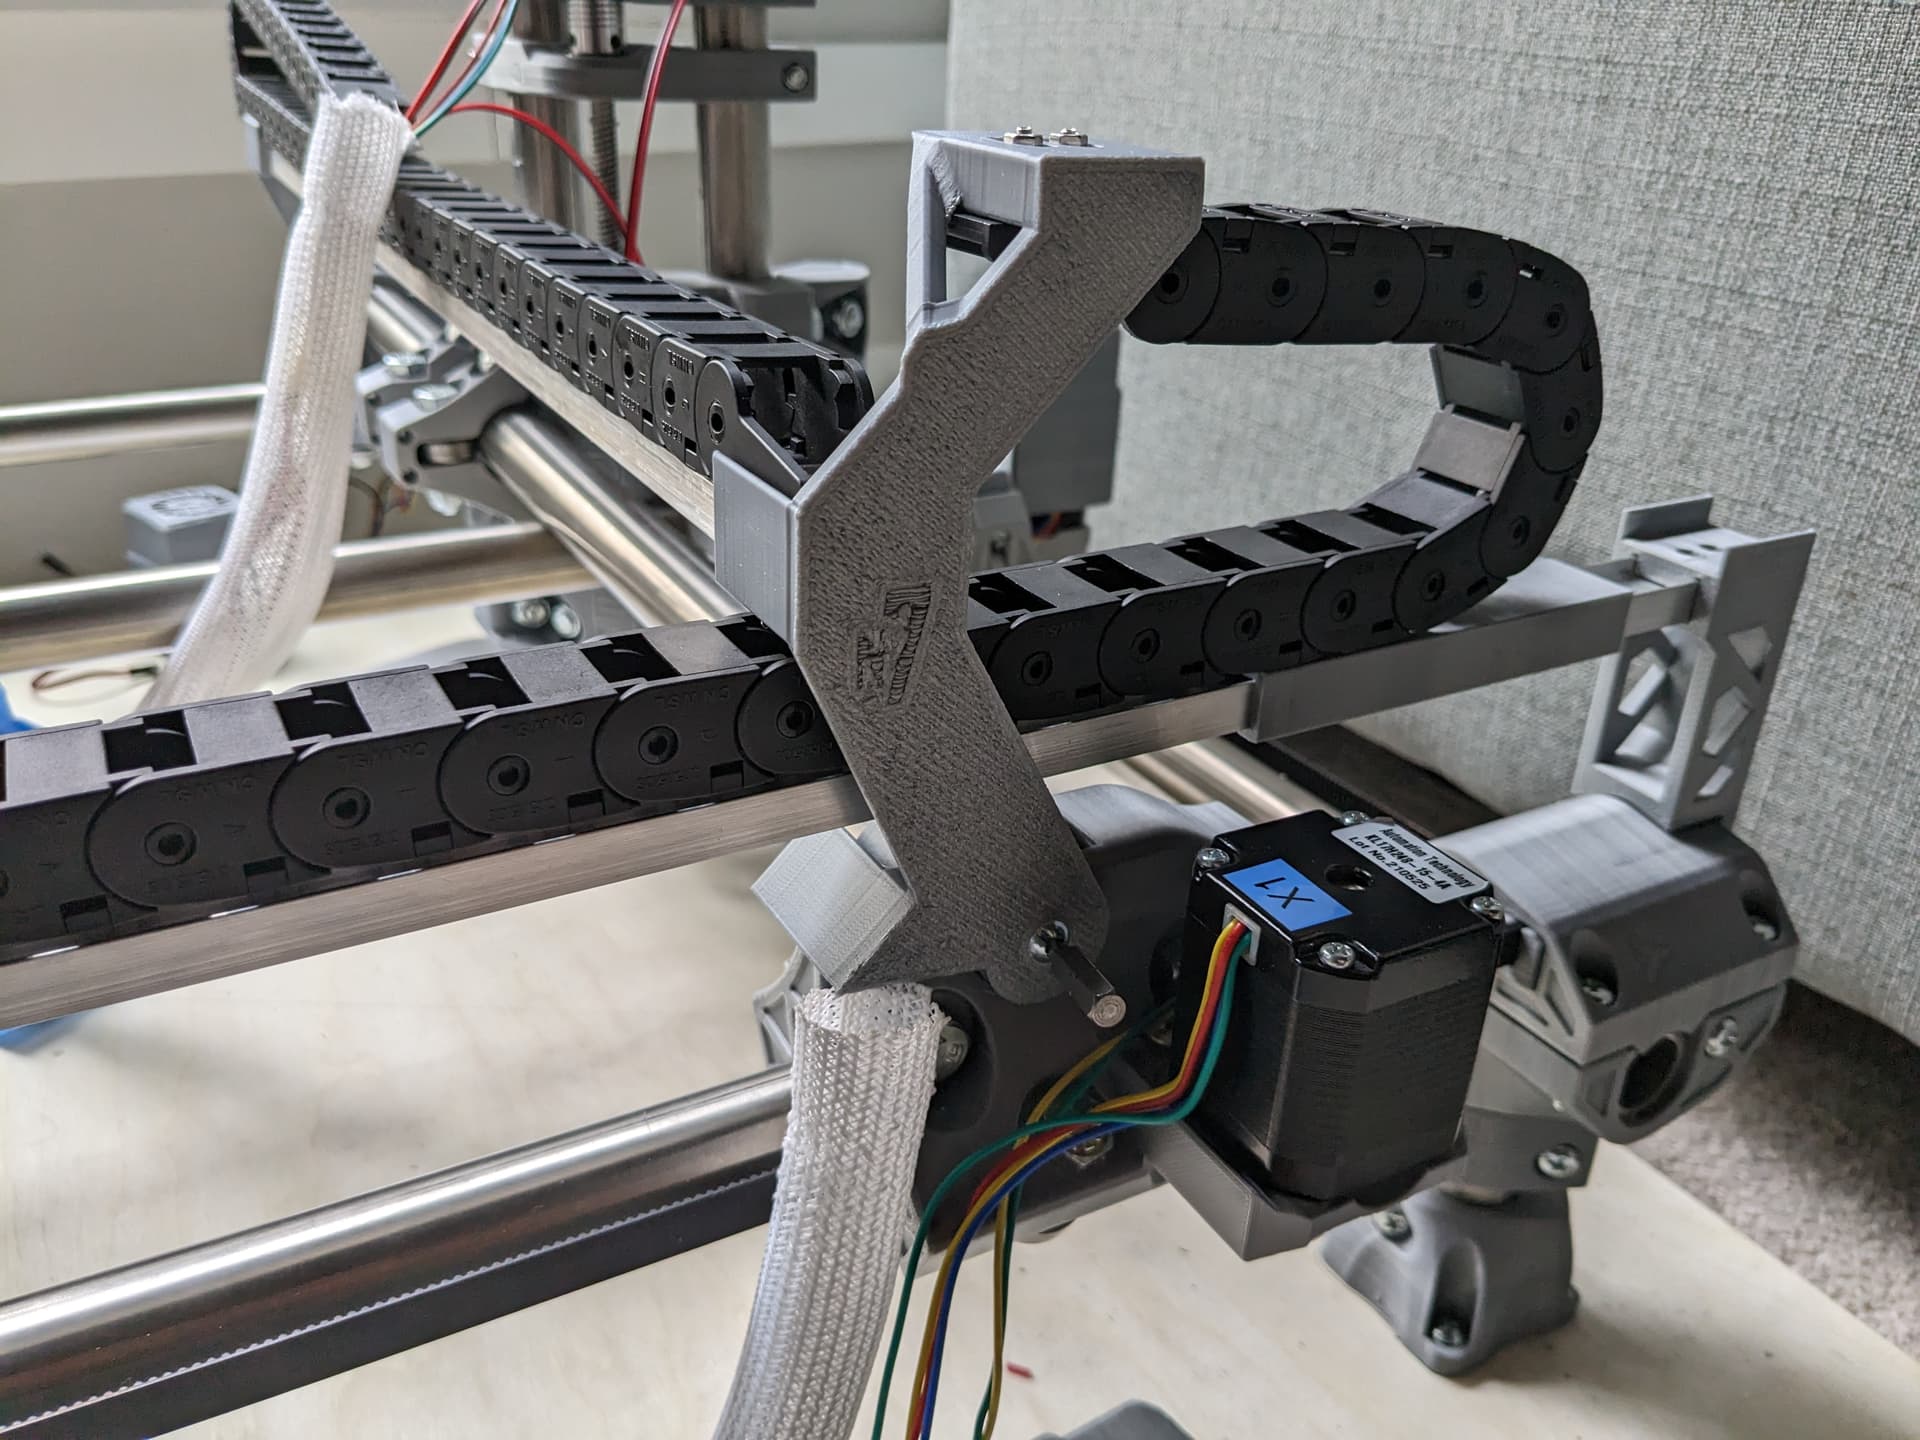
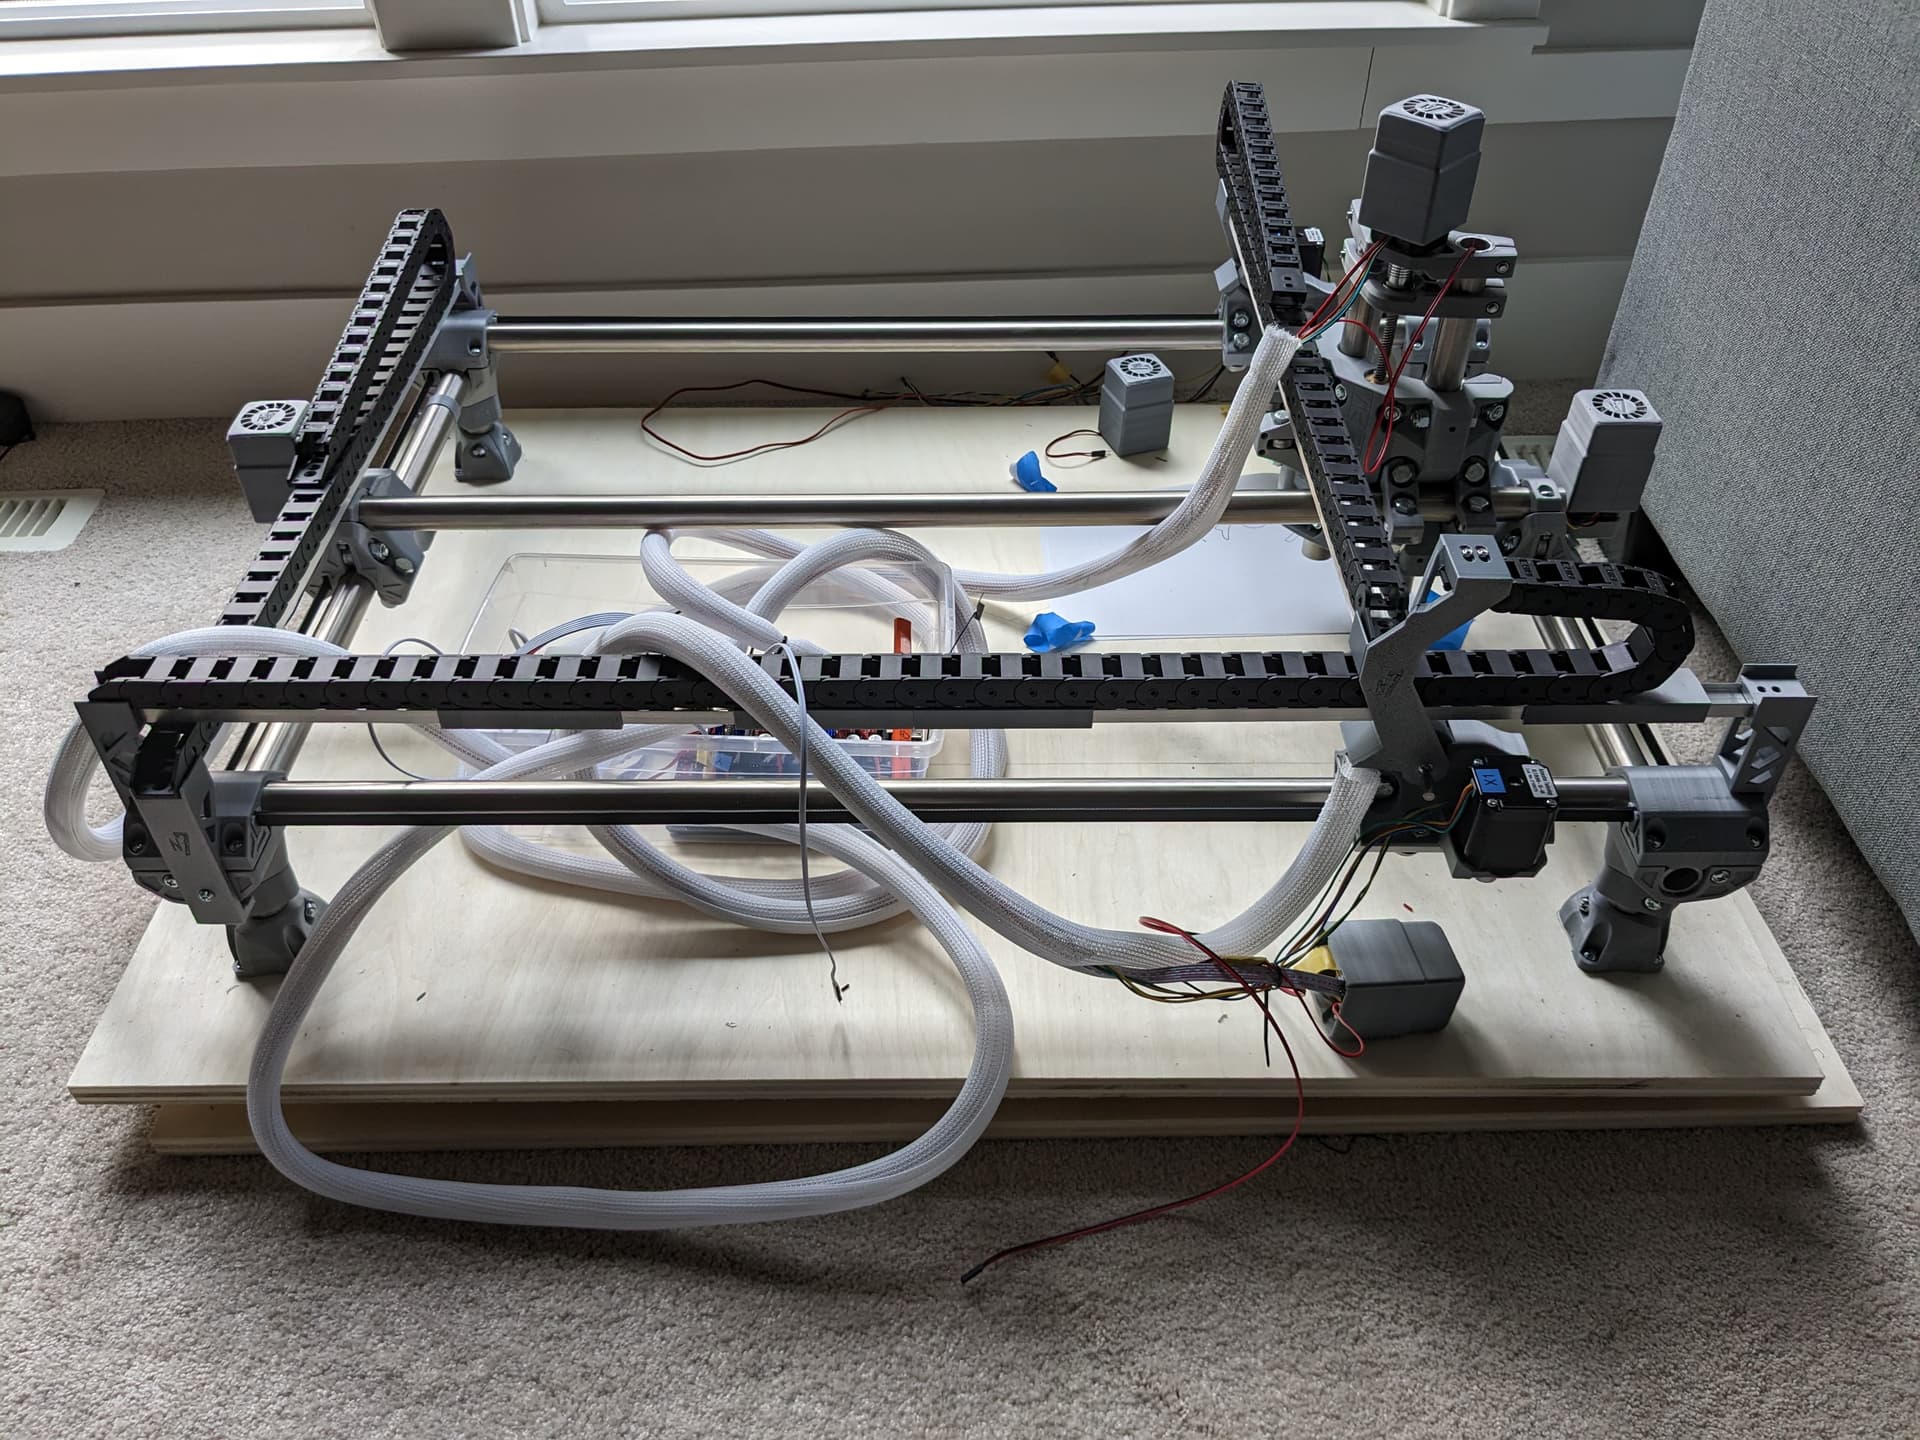
I’ve made more progress on the design of the drag chains mounts, although I’ve been slowed by having to troubleshoot some printer issues. I wanted a solution which kept the chains of the main surface, while not replacing any of the parts Ryan designed. So I’m taking most of the support from the tubes, while only resting on the CNC parts. I still have more to do, but once I have the cabling clear I’ll start working more with Klipper and plan to upload the parts if others want to use.

8 Likes
These look fancy. ![]()
Unrelated: I just figured out today that if you sear the edges of the mesh thingy (where you put the cables in) they can’t unravel. I can’t see whether you did that. ![]()
3 Likes
I had a similar experience. I called Metal supermarkets and asked for stainless 1 inch OD. 304 SS with a 0.65 wall. This is the common “plumbing” for Food and Pharma factories. (Plentiful in NJ).
I just read my cut list on the phone, and picked it up the next day. ~$105 for a 18 x 24 build area.
2 Likes
Only partially. I used MobaXterm instead of Putty because they had a portable version that ran without an install.
I did the first part 6.2 Compile firmware “make menuconfig. I adjusted the menu choices to match the image.
The “make” command worked and I copied klipper.bin, renamed and put firmware.bin in the/biqu. It won’t let me put it in the root of the SD card.
More to come, I should be typing this on laptop not iPad so I can copy and paste.
These ones haven’t started to unravel, yet, but thanks that’s a good tip.
1 Like
Ok, I didn’t use the method to update by SD card (6.3.1), instead I used the simpler method and did the update using DFU (6.3.2). The second is via the serial connection between the two boards which is the primary benefit of having the two integrated.
The SD method didn’t entirely work, because the FIRMWARE.BIN didn’t get renamed to FIRMWARE.CUR
I tried the second method, see below. Do you mean to say the second method is flashing the manta board via the CB1 board? Also, please confirm that all this is using only 1 SD card
login as: biqu
biqu@10.0.0.11’s password:
┌──────────────────────────────────────────────────────────────────────┐
│ • MobaXterm Personal Edition v22.3 • │
│ (SSH client, X server and network tools) │
│ │
│ ⮞ SSH session to biqu@10.0.0.11 │
│ • Direct SSH : ✓ │
│ • SSH compression : ✓ │
│ • SSH-browser : ✓ │
│ • X11-forwarding : ✓ (remote display is forwarded through SSH) │
│ │
│ ⮞ For more info, ctrl+click on help or visit our website. │
└──────────────────────────────────────────────────────────────────────┘
| __ )_ | | / | __ )/ |
| _ \ | | | |__| | | _ | |
| |) || | | || || |) | |
|/ || || _|___/||
Welcome to BTT-CB1 2.2.1 Bullseye with Linux 5.16.17-sun50iw9
System load: 2% Up time: 22:24
Memory usage: 25% of 987M IP: 10.0.0.11
CPU temp: 29°C Usage of /: 28% of 15G
Last login: Sat Jan 21 16:00:54 2023 from 10.0.0.90
biqu@BTT-CB1:~ ls /dev/serial/by-id/
usb-Klipper_stm32g0b1xx_m8p-if00
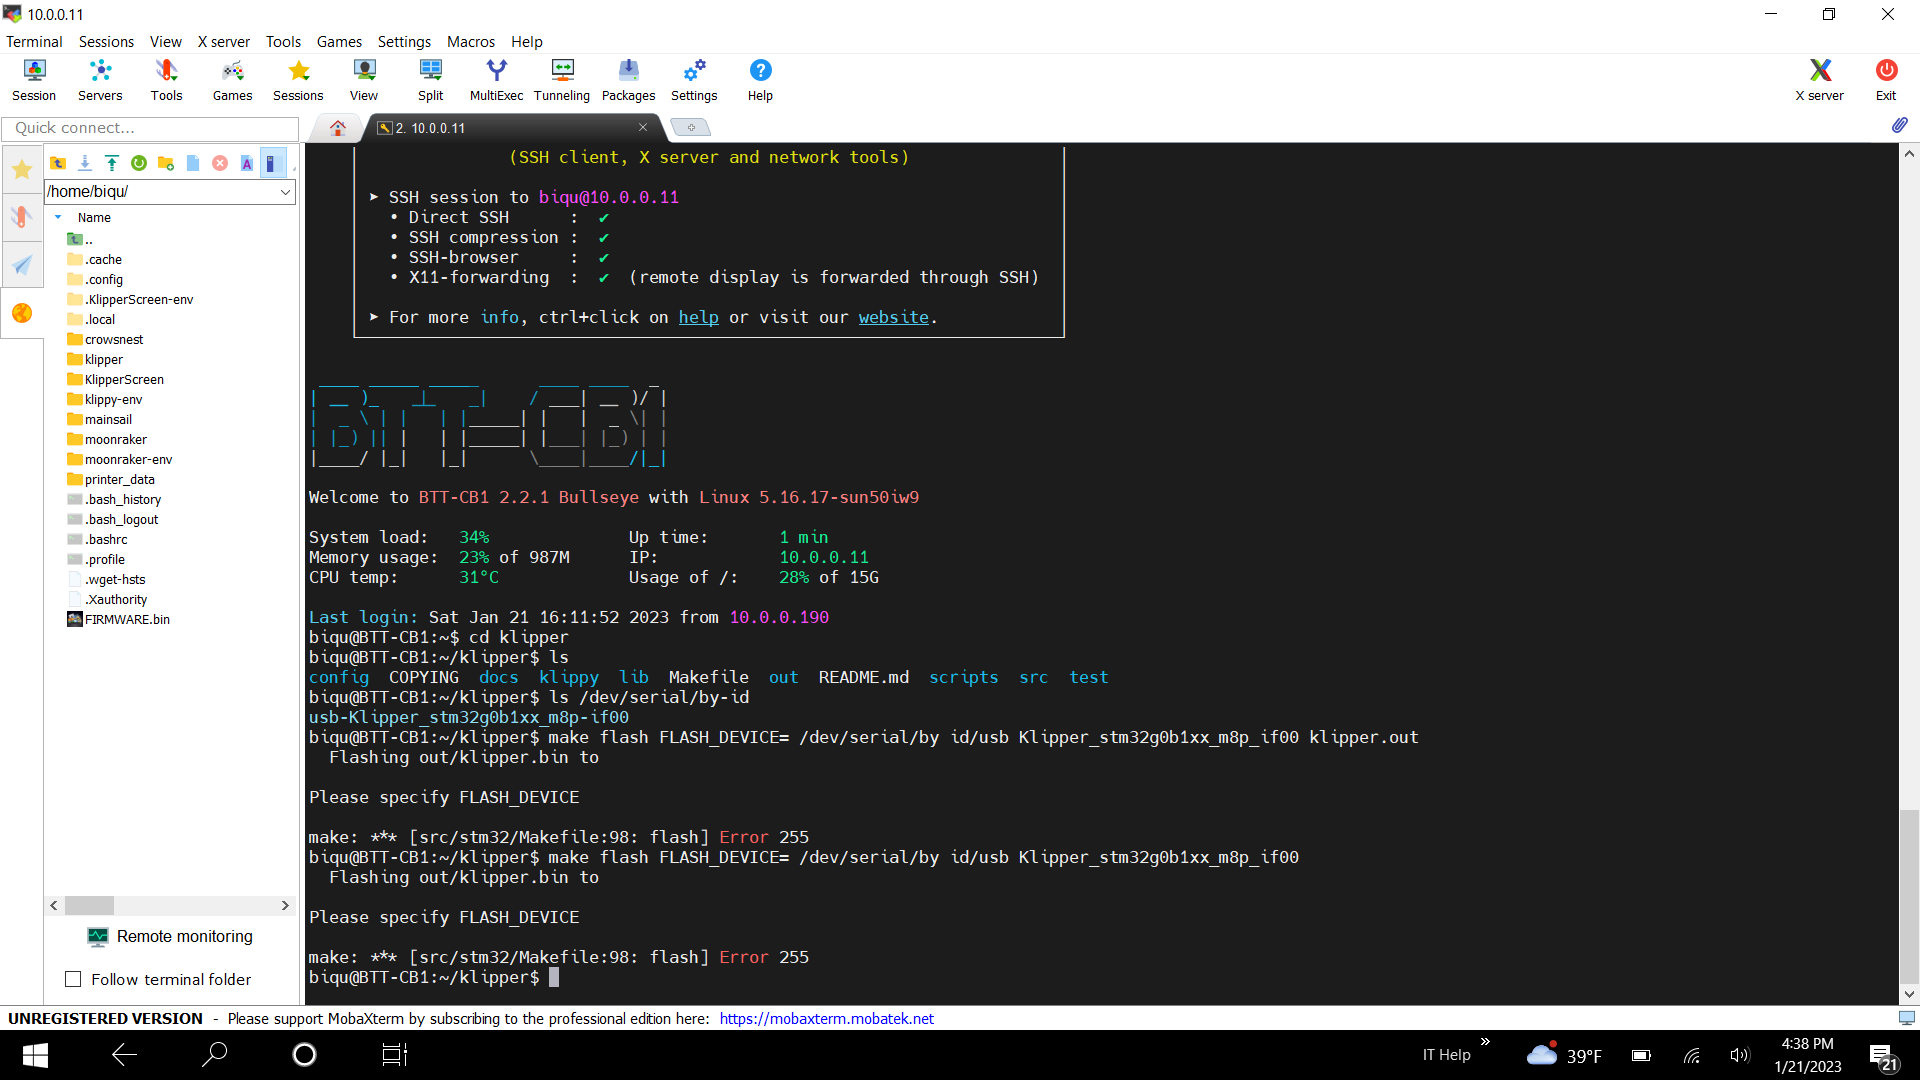
biqu@BTT-CB1:~ make flash FLASH_DEVICE=0483:df11
make: *** No rule to make target ‘flash’. Stop.
biqu@BTT-CB1:~ make flash FLASH_DEVICE= /dev/serial/by id/usb Klipper_stm32g0b1xx_m8p_if00
make: *** No rule to make target 'flash'. Stop.
biqu@BTT-CB1:~ cd klipper
biqu@BTT-CB1:~/klipper$ make flash FLASH_DEVICE= /dev/serial/by id/usb Klipper_stm32g0b1xx_m8p_if00
Flashing out/klipper.bin to
Please specify FLASH_DEVICE
make: *** [src/stm32/Makefile:98: flash] Error 255
biqu@BTT-CB1:~/klipper$
also, here is what I see regarding headers:
File contains no section headers.
file: ‘/home/biqu/printer_data/config/Hardware/thermistors.cfg’, line: 1
‘sensor_type: temperature_mcu\n’
Once the underlying issue is corrected, use the “RESTART”
command to reload the config and restart the host software.
Printer is halted
thermistors.cfg:
sensor_type: temperature_mcu
max_temp: 100
[temperature_sensor cb1]
sensor_type: temperature_host
max_temp: 70
Your copy and paste looks a little garbled, so not sure if you added klipper.out to the end of your make flash line, but I don’t think that’s needed. Can you try pasting again or maybe a screenshot?
I’ll be able to spin up my laptop later this evening to confirm the syntax of the line I used.
As for the headers issue, you don’t need the thermistors line to get going, so you can edit printers.cfg and either comment that line out or remove it.
If it complains about another line comment that out, although if that is the case you may not have the files in the right sub folders of Macros and Hardware under printer_data/config folder.
Here is a try with and without Klipper.out added
In the instructions, the device has a long serial number. I just get m8p
6.3.2 Update using DFU If the MCU klipper device ID can be found by ls /dev/serial/by id/id/, we can input: make flash FLASH_DEVICE= /dev/serial/by id/usb Klipper_stm32g0b1xx_190028000D5041583332 3520 if00
to update firmware (NOTE: Replace /dev/serial/by id/xxx with the actual ID found in the previous step)
Thanks !!
Hi Mark,
From the screenshot it looks like you are missing the - symbol between parts of the path. It’s unlikely there should be any spaces from the ‘flash_device=/’ right the way to the end.
Don’t include klipper.out, that’s for when you want to generate a file which you would transfer manually with an SD card, you are trying to write directly to the device over “USB serial”.
So after a fair amount of head banging I’ve got the manta flashed. I started over with a new SD card image.
It turns out that you have to do both of the methods; the SD card and then the make flash. The BTT written instructions were not too clear but I found a video. The video shows that for the SD card part you use a SECOND card and then put it in the “mcu “ card slot near the camera connection. Only then did I get the serial number for the m8p board, and make flash worked.
Next I need to put your config files back in and pay attention to pin outs.
So only a couple questions:
Is there a reason why you used motor drivers 1,2,4,5,6 for x,x1,y,y1,z?
Where did you get the speeds and acceleration values, or are they just guess placeholders?
Thanks!
Congrats Mark!
Do you have a v1.1 or a v1.0 board?
I have the 1.0, and I did the initial set up powering the board with the USB connector, which meant I had to have the VUSB jumper pin in place. I know I didn’t have to use the SD card in the second slot, so I’m wondering if powering from USB or having that jumper closed on a v1.0 board allows you to flash. For the v1.1 version of the board, there’s a set of steps in the manual under 4.3.2 where you change the DIP switch positions for flashing (not sure if that’s what you meant by the pins). I don’t have any DIP switches on a V1.0 board… but in that position on my board is the VUSB jumper location… hmmmm
Of course if you have a V1.0 board and tried the same steps as I, that completely blows my idea out of the water!
As for the reasoning for the stepper motors, yes there is a reason, the numbers refer to the socket numbers. If you look at the board you’ll notice you have 9 sockets but we know the board is only capable of driving 8 steppers. That’s because the board is based on people using for a 3d printer with X and Y on stepper drivers 1 and 2, while stepper driver 3 can drive to steppers with identical steps in the Z axis.
Depending on what future enhancements I choose to do, I figured I’d bypass using the “dual motor” driver incase that’s useful in the future.
As for the speeds and acceleration, basically, I started slow and slowly increased until my setup started making a noise I didn’t like ![]()
Guys & Gals, Loving this build and just starting mine with the same plan. Was tossing up between building a Voron 0.1 or an MPCNC giveb the amount of spares I have left over from my ever developing V2.4 and am going to join the MPCNC club.
Going to be using an Octopus 1.0, LDO 2504’s and a Makita router. Will keep following this one with interest.
Well done.
Adrian
4 Likes