Thank you for the Teaching Tech recommendation. I went through all the tuning, and most things didn’t change. I did however find that increasing the nozzle temp to 230 bonds this PLA enough to fix the area in question.
So to whoever’s is having issues with this particular area, increase the temp to allow the layers to bond stronger and not break at the thin/weak area.
just because temp was your issue, does not mean it is someone elses. Cooling can play an effect as well, especially with pla. So many factors to consider when doing this. I am glad you were able to fix your problem.
Old and moistured filament can affect a lot the print quality, after long time the use of filament dryer for few hours helps a lot to make it good again.
Hi,
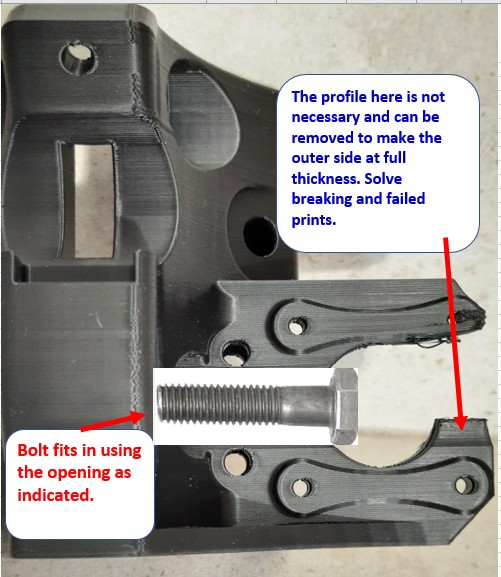
I also have the print failure on the truck as described above. I am using the the recommended settings and two of my prints broke off at the thinnest part. I am stuck now with all the parts printed except the trucks. I dont see the point of extending the hollow profile of the bolt through to the outer side of the motor mount. The bolt is short enough to slide without having to use the hollow profile on the outer part of the motor mount. Is there someone who has modified the outer side to be thicker so that it prints easier. Hi,
I also have the print failure on the truck as described above. I am using the the recommended settings and two of my prints broke off at the thinnest part. I am stuck now with all the parts printed except the trucks. I dont see the point of extending the hollow profile of the bolt through to the outer side of the motor mount. The bolt is short enough to slide without having to use the hollow profile on the outer part of the motor mount. Is there anyone who has modified the truck to make the outer side thicker to make printing easier or at least possible.
You can try orienting the thin part to the best flow from your fan, use Z hop, and print a bit slower to give your parts time to cool, I also suggest layers at 80% thickness/nozzle diameter. While some have had an issue printing this I assure you this in not very common (this thread is a year old).
You can add material if you would like, you can edit the stl in most cad programs.
Hi Ryan,
Firstly, I must thanks and admire you for the effort you have put in on these projects and thanks for the advice. It looks like turning the piece 90 deg will get the thin part under the fan as suggested. I am using a .4mm nozzle so with your recommendation of 80% layer height i should be at about .32mm.
Could you please look at my settings and see if there are recommendations you can make.
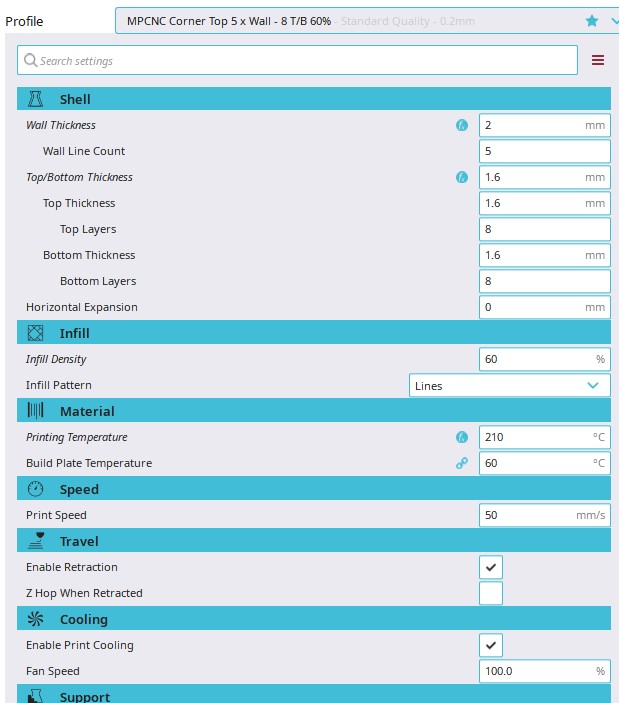
I am a bit of a novice and dont fully understand the Z hop, but here are my current settings. Maybe something I need to do extra here.
Please look at the print temperatures, as some on the forums have suggested up to 230 deg on PLA
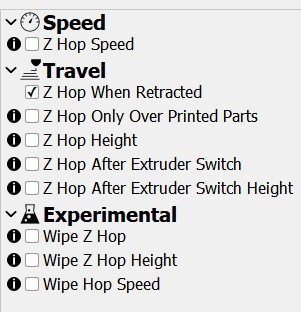
Print a bit slower, 40-45mm/s. I am not sure what slicer that is or what those different zhops are. If the information doesn’t help for each for them what you have selected should help.
As for temp you have to print a temp tower for that.
In the end it is just a printer /slicer calibration causing your print to fail, but if you want to take the time to tune it you need to follow a guide like teaching techs printer calibration.
I am using the Creality slicer that comes with the Ender 3 S1 I just bought. Thanks to Ryan for the suggestion which I will follow. Can you please share your print settings to compare with mine and maybe comment on mine.
Layer Height - .2mm
I have 3 creality printers and use Cura on all of them. I don’t have any experience on the creality slicer but i do believe its an offshoot of cura, but it doesn’t get the updates that cura does. So you might think about switching to Cura as it will have a profile for your printer in it already.
Im printing my trucks on my MP3DP V4 so my settings might differ from yours. Also I’m running a .6 nozzle as well. Also I use Super Slicer for this printer.
I use 3 Perimeters at 1.2mm wall thickness, Also 3 bottom and 3 top layers
.3mm layer height (this is achievable with a .4mm nozzle if that is what you are using. I could go up to .4 or .5 just never have)
I’m using 50% rectilinear infill
Printing at 50mm/s
Hopefully this helps you some. If you are using a .4mm nozzle then i would bring your wall thickness to .4mm. If you are using a .2mm nozzle then I have to ask why??? also if that’s what you are using then you are pushing it way too hard with a .2mm layer height. no more than 75-80% nozzle size to layer height.
What filament are you using? Think Ryan and others use Hatchbox PLA. Am using Overture PLA. Some filament blends, finish styles, and specific colors even, don’t seem to be a good match for making reliable inherently serviceable rigid machines like these. See CNC Kitchen videos for details.
What’s humidity like in your area? Printing in a dry warm environment without airflow/vents close by? I print PLA/PETG in a closet, with smoke alarm. Would do more toxic stuff (e.g.ABS) out in a garage.
Consider 0.6mm nozzle and 0.32mm layer height for decent mix of speed, detail resolution and strength. CNC Kitchen has a bunch of great videos, including some analyzing how layer height effects part strength/adhesion…
Ditch Creality’s slicer and use latest Cura. Personally tried Prusa slicer but not enough to prefer it, yet. I know some folks here use Prusa slicer when they’re not busy smashing F5 to see when their MK4 will arrive
I used 3 walls for my parts, so 1.8mm. same for top/bottom layers. Used recommended infill plus additional 10%. Shared Cura settings used on my Ender 3 Max in my lowrider 3 build topic.
Seen and used Teaching Tech’s calibration website?
Temperature, flow and retraction are important too. So many variables… Personally ran into delamination for low temps. Guessing you’ve already done dimension test cube calibration (Dial in dimensions and flow), and test tower prints. Hope we’re helping you (and other readers) with getting some great parts printed, that are dimensionally correct, horizontally square and vertically straight (i.e. not racked/tilted).
I use PrusaSlicer and mostly run on automatic. It has very good profiles included that seem to just work (even on my grandson’s Creality machine). Just find one with an interface you are happy with it and eventually all these strange words will become familiar.
Personally, I’d ditch the Creality slicer too as it’s pretty much an older ported version of someone else’s work, and choose from the likes of PrusaSlicer, SuperSlicer, Cura or Orca all of which are in a constant state of development with a large group of expert users.
Thanks for the advice on the slicer as well as the typical settings. I have some direction now as to what to research. Just for interest sake, The filament I am using is “SA Filament” locally made here in South Africa. A tad difficult to benchmark against your guys products. It seems to work OK though. I will definitely change my slicer to Cura or Prusa. Just need to familiarize myself with them. I am using a .4mm nozzle (Only one I have for now. Dont live in a major city so everything I need must be an online purchase with delivery charges). Will try some of the recommendations. The suggestions are appreciated and I will give an update in a few days time.