So, some time has passed, I’ve done a few projects and I thought I’d do an update about my build and what I’ve learned. Again to review it’s a default size MPCNC with a DeWalt router. It’s mounted on a harbor freight cart which lets me roll it outside and create sawdust there…
The biggest time sink I ran into prior to doing more than driving a pen was cable management. The MPCNC build plan didn’t include a specific solution for that and you’re kinda left on your own.
I reviewed the forums and ended up using a hybrid approach of two solutions. I used drag chains for x & y, and I used the “tape measure trick” combined with anchorable baskets for z.
X, Y1, Y2
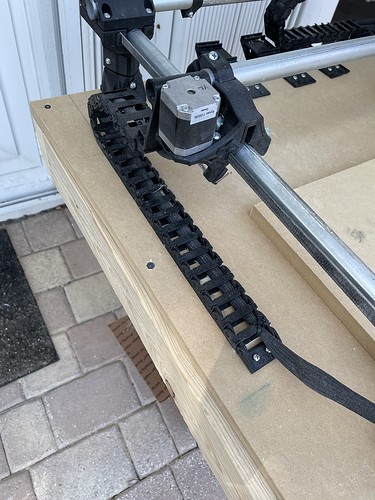
I used a drag chain design from Thingverse and though a little fragile I’ve been pleased with the results. In particular you could print a little, try it, and print more till you had a solution you were happy with. The parts sometimes get broken and printing spares is no big deal.
The learning curve on working with drag chains was that the way they are intended to be used is to constrain cable bundle motion into a fixed predictable area and need to be anchored on both ends.
For the axis pictured here I anchored one end to the mdf table and the other end to a custom part I designed that friction fits into the EMT conduit and gave me a place to interface with the standard end piece for the drag chain.
