MP3DP V4 Build

I’m also starting to wonder if this extremely high quality liner rail I got could be causing any of these issues…

https://www.amazon.com/gp/product/B07ZDRXVXJ/ref=ppx_yo_dt_b_asin_title_o00_s02?ie=UTF8&th=1

Finally made it back from school last night. First thing this morning I cut out the right side panel. One thing I noticed is there aren’t any screw holes down lower on the side. @vicious1 is this how you meant it to be or did it just not move right when I adjusted the parameters in the cad? If its right I’m good but if i need to add more holes i want to do it before I move it from the LR3 lol.

Well I got impatient and ended up going in estlcam and making a few more screw holes toward the bottom. Figured more couldn’t hurt anything even if they weren’t truly needed. I was able to select a row of tool paths for the holes, then copy and pasted them and moved it down. This allowed me to zoom in close and make sure I was placing it directly over an already placed hole and make sure they were dead in line where they should be. I know I could have went in and added more in fusion but every time I mess with that I end up screwing it up more than fixing it. I just didn’t have the patients for it this morning lol.

1 Like

I wonder how this is going to look when it’s all edge lit. Thanks to @robertbu for all the help with the lighting. Hopefully it will stand out nicely with the logo on the front.

2 Likes

Still a bit of clean up left to do on it but all in all I think it turned out well. Had some skipped steps due to the bit wearing out on me but I was able to catch it and save it. Its the back panel so no one will ever see the slight messed up edges. The logo came out great I think. Cant wait to see it lit up!!

4 Likes

PSA…. Check your heater cartridges. Seems mine decided to back out some. Thankfully I was up late last night. Had it printing some cable chain parts for the primo and I was in the room. Smelled some burnt plastic and got up to check. Watch the flame start. Easily blew it out and shut the printer down. I know for a fact I had that tight tight. But I didn’t go back and retighten after a few heat cycles. I’ve never had that happen before but will definitely be checking all my printers regularly now. Looks like I’ll have to reprint the core and the fan mount.
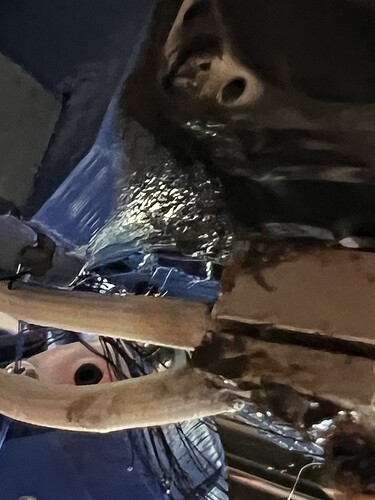
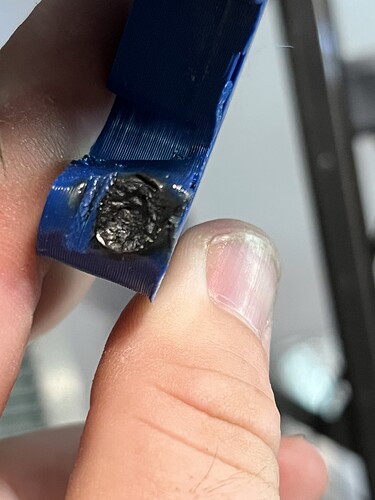
Yeah. I had a nozzle back out after a few heat cycles with the latest build too.

This is a good reminder for me to go check all the other ones.

2 Likes

Glad to hear you caught things before they got out of hand.

Cheers for the PSA!

Did the nozzle loosen from hotend, or did heater loosen from hotend, or did entire hotend assembly loosened from the printed X carriage? Or something else?

Were these regular nozzles that were hot tightened, or REVO (which E3D instructions say not to hot tighten), or something else?

Wonder if any free open source camera AI tools running on a Pi would help catch something like this, as well as spaghetti incidents?

Cheers!

1 Like

The heater cartridge had loosed and slid back from the hot end

1 Like

Crazy…

I have had my hotends back out on the Hemeras about 1/10 of a tuen and melt the cooling fan duct on the V3. So far the V4 has been good. The V3 has been good too since I switched to the titanium heatbreak (but it was the tightening proceedure that I adjusted that I credit with it being good.)

Yikes.

1 Like

Well for one positive…. I’d say the dry box I made is doing it’s job

Well guys I thought the printer was running great. Printed a few struts and everything came out beautiful and square so I decided to start printing a few replacement parts I needed. A new core and braces for the original LR3…


Then wanted to clean up the bearings and get my color match correct on the primo before mounting the laser. Needed 2 trucks for that. But figured since I had used the dreaded pla+ on the originals and had a brand new spool of regular pla I would go ahead and print all 4. And that’s were things started to go down hill…


Layer shift city. I don’t get it. Grub screws are tight (blue Locktite also) belts don’t feel over tight at all. The core looks great to me. So what am I missing???

2 Likes

Perhaps your build plate moved somehow?

Did you get a picture of the tops of those parts?

Is it possible the nozzle is dragging on the unevenness that appears to be present in those pictures and causing missed steps?

What happens if you print them one at a time?

1 Like

Hadn’t thought of that. will double check that one

I don’t think this is it. I had this problem early on but now have z hop enabled and that hasn’t been an issue since.

Winner Winner chicken dinner. Reset the the clips and just made another print and it came out great!! Thanks for the suggestion!

3 Likes

Curious which clips caused later shift, thought you had magnetic PEI bed? Was wondering about cause being skipped step given the consistent distance when shift happened🤷‍♂️

Originally yes I had the PEI sheet. But switched to glass a while back when I couldn’t get anything to print correctly. The glass has been great so far. But I didn’t notice that I had knocked 2 of the 3 clips loose when I look a part off so I guess it was able to move around. Thinking about taking some glue stick and running it between the aluminum and the glass to see if that will hold it down better than the clips.

1 Like

Doh, was so focused on prints in your pics that completely missed the glass bed :man_facepalming:

LOL no problem I sure didn’t point it out in the post.