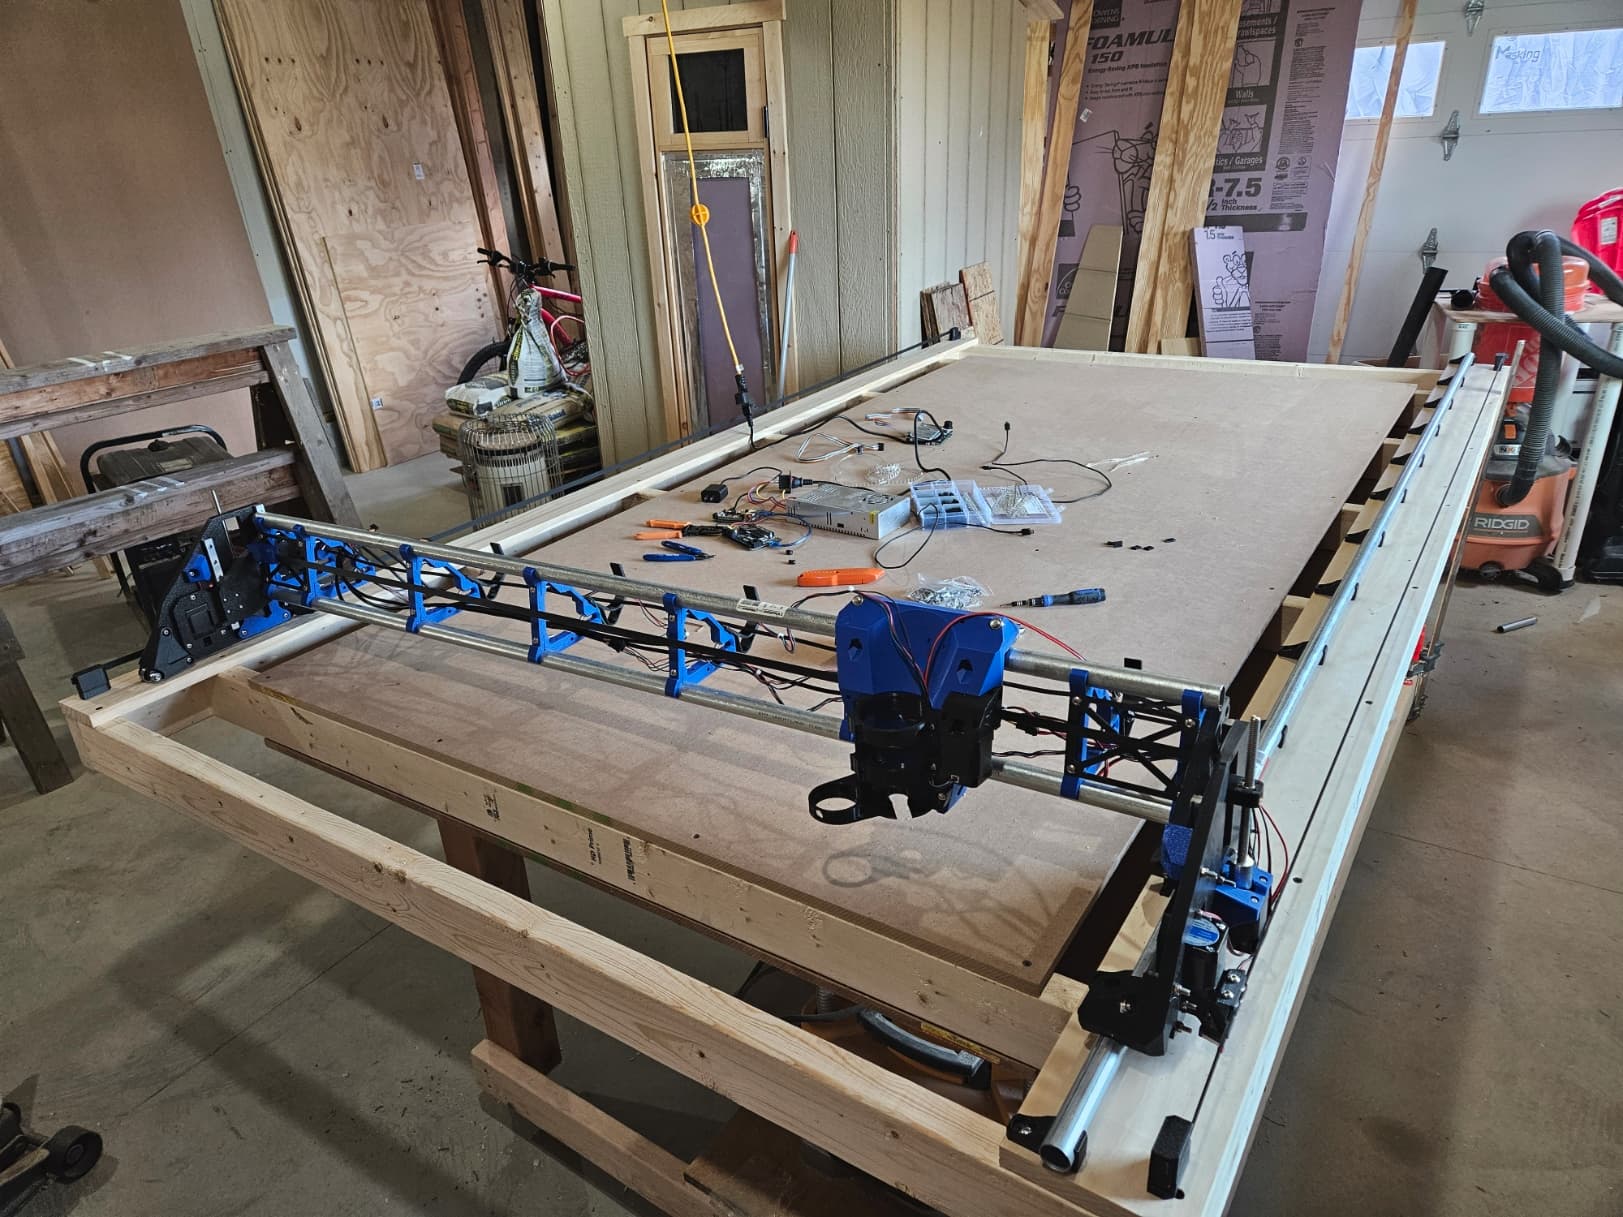
I guess it’s time to share my build! Lowrider V3 build by a hard headed gent from Maryland!
The build is for a Lowrider V3 that can break down sheet goods for me in my hobbies and possible side hustles. I’ve got a few years of 3D printing behind me, I’ve got a cheapo 3018 desktop CNC that I’ve attached a 20W diode laser to and have been tinkering with quite a bit. But time for the big one to be made!
The plan is 4’x8’ (and then some) for the build area. I had some conversations in another thread about tables, I settled for something in between those conversations. The table currently is as cheap and reusable as possible. I’ll be able to reuse the sheets on the final table (future torsion box), as well as the 1x material that are the planks on each side. The frame was done in 2x4 and it’s cheap and I use 2x4’s quite often so I’ll be able to put them to use in the future.
For the electronics, I’m mostly using the BOM provided by Ryan, but wanted to reuse some of the electronics I have already. I’ve got a Skr Mini E3 V3, a 24v PSU, a bunch of screens (haven’t landed on which one I will use) as well as a BTT Pi. As I’ve alluded to, this is going to be a hard headed build. I’m planning on running Klipper as I’ve got a lot of experience with Klipper on my printers including many custom builds.
Currently I’ve got the mechanics of the machine running, Klipper is running, homing and rotational distances are all good. I’m working on some enclosure designs to fit my electronics, and I’ve got wire looms and a new dust hose on order.
In the far future, I’d like to change the location of the belts so they are less vulnerable and design a large rolling workbench that will be the base for the future torsion box.
What is the layout of the 2x4 bracing under your spoil board? It sort of just looks like braces that run across every couple feet? Is there anything that connects them under the spoil board? 2x4 framing is what I think I am going to do for my build. Did you have any issues with keeping the table flat? I built mine small, 2x4 cut area, to learn and am now building my full size table to make it bigger, 4x8 cut area.
Also, are your rails that the machine runs on at the same level as the spoil board? or higher? lower?
Just braces every couple of feet, has a top and bottom “skin” but nothing between the braces. I haven’t put the spoil board on yet, but it’s just another 1/2" mdf sheet. I haven’t done any cutting yet or crown test, but jogging it around everything seems good. It’s all meant to be temporary right now, I plan on building a wicked table for it that I haven’t designed yet, but needed something to start with.
It also doesn’t hurt that it’s sitting on top of a known good table. I plan on sliding it off onto some saw horses, I can do a crown test before and after to see how it does if it flexes too much but just letting at the corners, it seems not horrible.
My rails are on 3/4 material and the top skin is 1/2 and my spoil will be 1/2 so the bottom of my cut piece will be about 1/4 higher than my rails. Not sure if that’s good or a bad thing yet, should know by the end of this week.
Nice build (wish I had that amount of room). I might follow up with you on how you got Klipper going with your workflow, once you complete the build and start doing jobs. I switched to the Jackpot controller using FluidNC and am liking it. It works for the workflow I use for the little (learning) jobs I’ve been doing.
From one Marylander to another - welcome to the ‘club’
During the 2020 fun, we decided we wanted to build a detached “garage”. It’s 24x36’ back 1/3 of it is split between tractor storage and home gym, front 2/3 are my “workshop” area and apparently dumping ground of stuff I can’t get rid of haha.
I actually wanted to try the jackpot but I wanted to start the build asap and they were out of stock when I ordered. Haven’t ordered one since cause I’m a sucker for free shipping and don’t have enough I want to buy right now to get there haha.
I have a lot of tidying up to do but hope to try out some gcode in klipper today with a pen and paper, so happy to report back what I find!
So far, I’ve tried a few of the solutions that are floating around online but they all seem horribly documented, outdated, and I just couldn’t seem to get them working at all.
So last night I decided to start writing my own answers. So far I’m able to do this:
Start the machine and home with the endstops.
Jog the bit (or pen in my case for the time being) to the work piece origin.
I click on a macro button i created that stores the current toolhead location into a variable that is then used as the offset.
Start the gcode program (I tested this by exporting something from easel)
Make the cut/draw (a simple 500x500 square for me to pull tape from the corners to see how square my gantry actually is.
Behind the scenes I also rewrote G0 and G1 commands to essentially add in the work piece offset before moving. I know there are a lot of commands to go, I really wish klippy-cnc was complete with instructions but this won’t be too bad to write out myself.
Awesome to hear another Klipper unit is running! I wish I was better with macros because I would love to know how to store a workspace location and maybe some smarter z homing. I’m using the bit to touch Ryans touch plate but not sure how to use klipper homing techniques to auto generate other offsets. (ie touching the sides of a work piece to get origin) Was also going to dabble with sensorless homing but dont think that will work on z…
So after my short stint dabbling into the macros (making about half of what was needed last night and this morning) I found a gentleman who has his own set of them already made. I commented out my macros and fired up his, they work great! Some tweaking needed but if you’re interested, this is his work:
He told me this morning he’s diving back in to update some instructions and whatnot, from what I found there are some naming changes he’s made and some of the instructions are missing things. Easy enough to figure out on the fly though.
Storing workspace locations are super easy. I set mine up with variables, and actually so did this guy. His workspaceMacro.cfg has all the macros for setting the workspace, clearing the workspace, loading the workspace, as well as his “adjusted_move” macro that all of the G commands point to for compensating for those workspace offsets that are being set.
He’s got a section in his work for probing that I haven’t looked through yet, might give you some ideas. I do plan on using that in the future but I think maybe I should have a working machine first before I start adding other stuff in. I highly doubt it will be able to use klipper’s homing techniques, would likely need to custom written macro new endstop port. None of which should be too difficult (might already be done in the git project above)
So far this morning, I’ve also set up my skew calibration and some rules for homing. My wire looms come in today so once I button those up I’ll feel more comfortable running this thing around the table. Going to keep generating some gcode for the pen to make sure all the motions are accounted for in the macros and everything is going swimmingly before I start spinning sharp pointy objects very fast.
Awesome, ill check it out this weekend. I found I didnt need any skew correction and if so it was so minimal I didnt want to bother. Since I level off the bed I do use the z-tilt calibration built in upon turning it on.
Ah your Z tilt calibration is actually a good reminder for me too, I think I’m going to order a Manta M5P with CB1 to replace what I have, might grab one of the touchscreens too for klipper screen. Quick access to my macro buttons and jogging. The skr mini e3 v3 is nice, but doesn’t allow me to home both sides of the gantry in Z (since there are only 4 drivers). Current workflow is turning off motors and dropping the gantry all the way down until both sides bottom physically before turning on and homing up. What I have isn’t accurate enough yet for Z tilt calibration.
I was in the exact same boat with 4 drivers and got the manta board. I may get a screen because currently have to open up phone browser to do everything. Just added a PC to the garage which has also helped tremendously with T/S and sending gcode to mainsail. I have been very happy with the manta ez and their controller.
I love those controllers, I have a few M8Ps for my printers, super convenient having a CB1 snapped right in too. Great products for sure can’t see myself buying a different board when it comes to Klipper.
I’ve been sending a bunch of drawings so far straight out of Easel and everything has been flawless, I feel super confident with this setup so if you do get around to testing it out, feel free to reach out with questions. Next up for me, clean up these wires and slap a router on this thing!
Alright, installed the router today and made a few test engravings and cuttings. Zero problems, everything went smoothly!
Although, now I’m wondering if I really want the touchscreen over on the side of the device and not in front of the machine. My new plan, mount the 24v PSU to the table, run a drag chain up to the gantry of the LW for power to the board that will be there (keeps the gantry cleaner) and mount an old android phone or tablet I have laying around to the front of the machine with a magsafe charger. That way when I’m jogging the gantry around I can plug the tablet/phone off the front and walk with it.
Idk, I might change my mind again but that’s what I’m thinking so far
But she lives and breaths, and it was honestly a lot simpler than I thought it would be. Need to pick up some 1/4" hardwood for the strut plates next!
I hear you there. The problem is that the cables from the touchscreen to the board are picky about length. The serial line (touchscreen mode) are maybe a bit less so than the 10 pin cables where Marlin mode talks to the 12864 LCD and reads the SD card are super picky and the leads in the V1 kit are about as long as you can reasonably get away with.
The serial line has no error correction on it, so it is also not good to get too long. Not like USB.
So, if you want to move the LCD to the front of the table, you may need to also need to move the board. This isn’t insurmountable, but then you need to run all the motor wires, end stops and whatnot to a drag chain (or tape measure trick) to the machine, for an 8’ build that is a lot of wire.
Edit: an ESP01S module gives you wifi, so you could just use a cheap tablet instead…
Yeah my board definitely isn’t moving, that’s staying on the gantry for sure.
But I think, at least for right now, I think I’m mounting an old LG G4 to the front of my machine. I’ll print a little case for the phone that will snap into a fixed mount on the machine but still pop off when I want to walk with it. The phone has wireless charging so I’ll have a wireless charger built into the mount so it charges whenever it’s snapped into it’s mount.
Mainsail for klipper will allow me to jog the machine, tweak config, set workspace origin, choose start and stop jobs from any browser which is convenient, I’m not required to connect my device directly to the Klipper device like a lot of other controllers require.
So it’s running, and it’s running great! Cutting at 1500mm/m 1.5mm depth of pass. First cut had me scared of the world of post processing cnc cuts, but changed to a decent and sharp bit and what a world of a difference.
Klipper is super easy, the scare that has been hyped up isn’t founded to be honest. There are a few things you have to do differently, but it’s really not bad at all. If more people weren’t scared away from it there’d be a lot more CNC friendly information out there for it.
Overall, I’m super happy. I’m cutting out my strut plates now and they are clean and accurate. I’ve also got a Manta M5P on order to clean up my electronics a bit and give myself dual Z (instead of the shared Z I have currently with the Skr Mini E3V3).
Happy to share my Klipper knowledge and guide others who want to go down that path.
I am halfway done installing the strut plates… and boy does this feel like a punishment, a very personal punishment. I wish I had seen the captured nuts remix of the struts before I printed all these. I was very excited about being able to swap out strut plates in the future, but I think something catastrophic would need to happen to get me to ever take these strut plates off again. Highly recommend anybody building one new, use the strut remix with all the nuts captured, you will thank yourself later!