Ordered parts right off the website, hardware kit, Jackpot board, and side pieces.
Day 8:
Arrived at Menards 10 minutes after they opened. Wanted to get there early while it was dark out since I would have 3 feet of stuff hanging over my tail gate (and could sneak home with little traffic). Checked 1 1/4" conduit for kicks too big, measured ~38mm. Printed off the 29.5mm rail mount so I could check fitting before buying conduit. Loaded up 4 pieces of 1" with 2 pieces of Unistrut. If I don’t use it for this, I have a plan for something else. How I’m going to the panel saw is going to be interesting as I’m going to just build the standard LR4 and then the saw around (in?) it.
The design8 Boostrap table looks promising so I’m going to focus in that direction. I’ll have to make some modifications to get it into the basement this winter then move it back to the garage where it will stay. I’m thinking I’ll mod the ribs so they are removable. (Pics to come when I get to that part) Either that, or just not glue the torsion table while the LR4 is in my basement.
Flashforge printer arrived yesterday, need to set that up today and run Cantilantern. Going to run it on the X1Cs and Minis I have as well. Not sure if I’ll do that today or not. Going to be a busy day. I’ll post photos tonight with a conclusion message for today. Wish me luck.
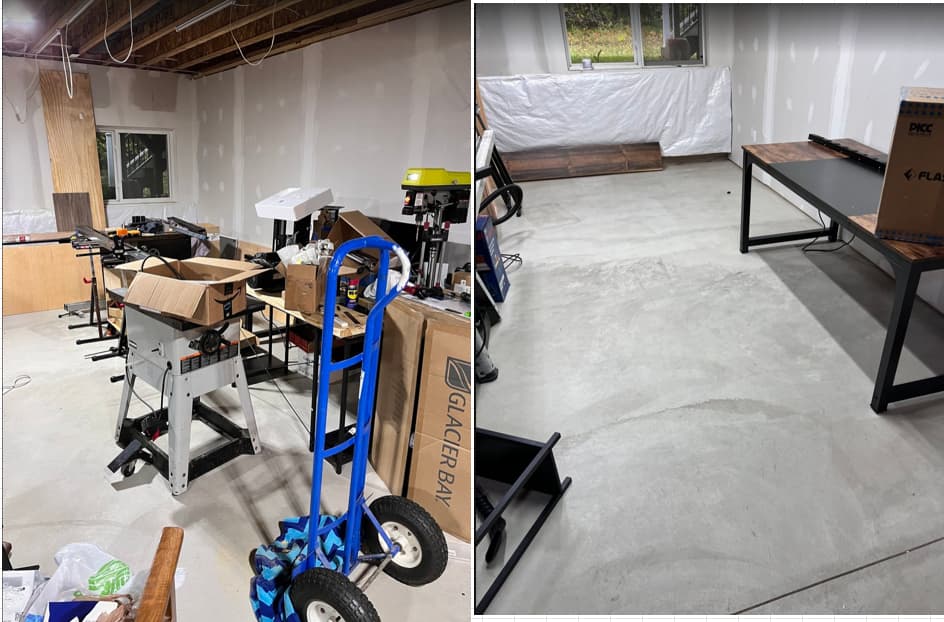
Didn’t get very far. I’m running 5-7 projects on any given day simultaneously. However today the priority is clearing out the area in the basement the machine will go for temporarily. I can at least post a pic of that! What did I do instead? Skip to the bottom if you don’t care, for Day 9’s insight.
Printed out labels and priced stuff for the local craft store where I sell 3d printed stuff.
Continue ripping new DVDs/Blu-Rays for my media server from all the stuff that came in on Prime day.
Worked in ZBrush on some practice model and talked to my professor about it.
Did a lot of thinking about the machine.
Bought Cantilantern and skimmed the directions in case I could run it while I ran to the library and the store.
Researched Multiboard some so I could print some function items.
Compared the rail mount of LR4 to the Unistrut to see how far off the new conduit will sit. (It’s more than I would like, so I might redesign the mounts and see if I can get them to fit. Just need to be mindful of the clearance on the current ones.)
Day 9: Clear the corner of the basement. Get the table saw I bought off Marketplace put back together. Get Flashforge out of the box and onto its temporary location.
I remixed the Y rail clips to get the rail over the unistrut while also screwing into the unistrut. Could share for testing.
I’m currently prepping to test printed table extenders that have the belt tensioners attached to them. Prefer to test before sharing. Seem solid and promising.
Day 9 conclusion: Got the area where the LR4 will be sitting during winter cleared out. Got the Delta tablesaw put back together. I’m thinking the wall to the right is where I might try and mount the table saw/LR4 contraption.
@DougJoseph I watched your Klipper video, and am getting ready to install Klipper, Mainsail etc. Question: Was there a certain order for everything?
Klipper/Mainsail/KlipperScreen seem to be all done at once, but the title mentions Moonraker and Fluidd. At which point were those installed and what order?
Way more to research in these areas than I thought!!
I think all the install options always contain both the two browser UI’s, Mainsail and Fluidd, as well as the behind the scenes interface, known as Moonraker. The Moonraker interface is like an API, and is essential.
The “choice” is whether or not to have a UI on the touch screen on the printer, and if so, which one. The choices are none, or yes, Klipperscreen, or yes, Guppyscreen.
I really like Klipperscreen but it pushes the resource limits and I got some lockups.
I then switched to Guppyscreen, which is more streamlined and uses less resources, and I have not had any more lockups.
At times, such as a job that got paused because of filament runout, I realized that navigating away from the resume button, to get to a load filament button, left me unable to get back to resume on the touch screen. Thus it’s helpful that there are buttons on the browser interface (such as Mainsail) that work, and even console commands there that can be entered, such as Load_Filament and Resume.
Awesome, I’ll give it a go tomorrow night. Was it much of a loss in features going from Klipperscreen to Guppyscreen? Other than getting back to resume it sounds like.
I don’t know for certain. I only know that the guppyscreen version seems to have more space between the buttons so it’s easier to not accidentally hit something you didn’t want to tap, and also seems to have fewer buttons. I don’t actually know that I could’ve found my way back to resume on either one of them, although I suspect if one of them had an easier path back, it probably was the Klipperscreen version. I had already gotten to liking very much the browser-based interfaces and you can do everything from those quite easily — and if push came to shove, you could even load up one of the browser based interfaces on a Wi-Fi enabled smart phone or tablet, so that you could have it right near you in case your a computer was some distance from the printer.
@DougJoseph , HI Doug, OK so I got Klipper installed.
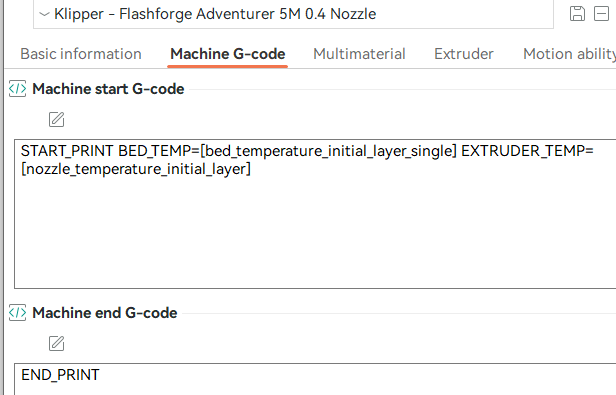
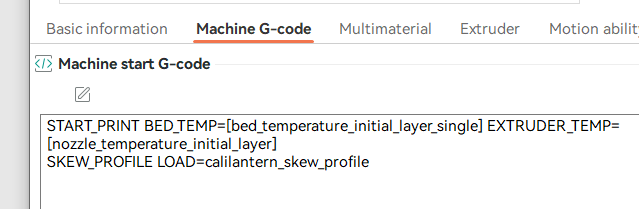
Updated Machine G-Code:
Now the next part is a little confusing to me. XBlax replies to one of your comments and says to home the head then lower it until it touches the plate. But I thought the printer had auto bed leveling?
Did you do a full walk through of all of Klipper with PID tuning etc, before you started printing or did you do a test print at this point (that I’m at now) to see if it worked?
Also, sorry for all the questions, but it seems Fluidd is an interface that is akin to the screen on the FlashForge whereas Klipper is an interface to the “hardware” functions of the printer itself. Would this be a correct assumption?
Thank you too BTW, I must’ve watched your Klipper video a dozen times now!
Cool! I will try to unpack a few tidbits that can help.
TLDR - short answer:
Type and send this command in the Console in Mainsail or Fluidd: PROBE_CALIBRATE — it will launch and run a macro for getting a Z_Offset value.
After getting Z_Offset value, type and send this command in the Console in Mainsail or Fluidd: SAVE_CONFIG — it will add the new Z_Offset to your printer.cfg file so it can be available for future use. I think you now need to reboot. ?
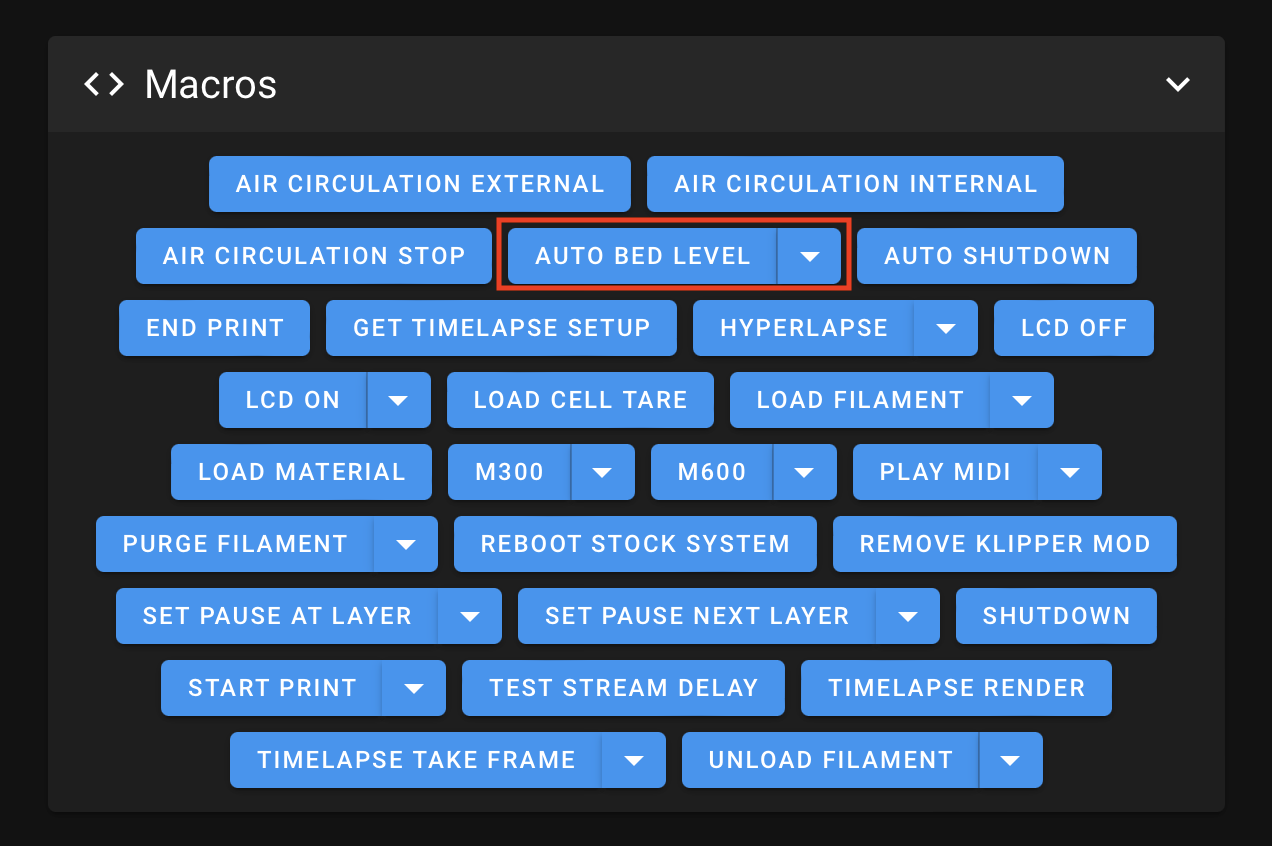
After getting and saving the Z_Offset value, run the macro to create a bed mesh, using the Auto Bed Level button, for instance, in Mainsail, scroll down to Macros, and there is a button for it.
Somewhere in the above, I think at the end of the PROBE_CALIBRATE process, the last step is to manually calibrate the Z_Offset by inserting a slip of copy paper between the nozzle and the bed, and lowering the nozzle using buttons, until it can be felt barely scraping on the paper.
A part that is not intuitive is that the new Z_Offset value, only ever gets utilized / honored by doing a bed mesh (Auto Bed Level) macro afterward! So if you do Auto Bed Level first, then Z calibrate, your new Z_Offset gets ignored, unless and until you finally do an Auto Bed Level process after.
… Now, to the “TLDR” answer I started typing, but realized it was too much!
Technically, Klipper is a firmware and it came installed on your AD5M’s main board from the factory. What you installed is a mod “for Klipper” that contains user interfaces (UI’s), config files, macros, and also (I think, if not already present) an unseen “API” communications type thing called Moonraker, and etc.
The mod does not replace the factory installed Klipper firmware, but adds UI elements that were missing because the manufacturer chose not to use them, but instead chose to provide their proprietary stuff.
The Klipper “name” also gets used for elements of the “eco system” that has sprung up around it. So, it’s certainly OK to say “I installed Klipper” instead of “the Klipper mod” and most people familiar with the situation will know what was meant.
All these UI’s mentioned below already existed before the mod was made, and they are usually installed on a Raspberry Pi or other small computing device. In the case of the AD5M Klipper Mod, these UI’s just needed to be “shoehorned” into an environment that does not have a lot of resources to spare (hence one reason why the printer is so affordable).
Two of the UI’s are always included in the Klipper mod: Mainsail and Fluidd. Both of these are browser-based UI’s — allowing remote control via a wifi-connected device. Both of these work well. I like Mainsail. Screen shots below are from Mainsail.
Two of the UI’s are not always included in the Klipper mod: Klipperscreen and Guppyscreen. These are not browser-based, but rather touchscreen based, and thus there are three choices when picking out a mod variant to install: (1) no touchscreen UI, (2) Klipperscreen, (3) Guppyscreen.
The “shoehorning” of the Klipperscreen variant was accomplished first, and later Guppyscreen was accomplished as an available choice.
Klipperscreen uses more resources, and seems to occasionally ride the line and a lockup happens. Rare, but it happens. I started with Klipperscreen and really like it, but I did have some lockups. Because of that, eventually I switched to Guppyscreen, which is more streamlined, and I have yet to see a lockup while using it.
So for anyone not familiar with Klipper (which I was in that group) the situation here was a bit confusing in two key areas, and by googling and reading I managed to get it sorted out.
When you go to do the Z offset calibrate thing, and the bed mesh thing, it’s easy to misunderstand how they are related and not related, and, as mentioned, there are at least two aspects that did not seem intuitive, and took some brief learning to get a grasp.
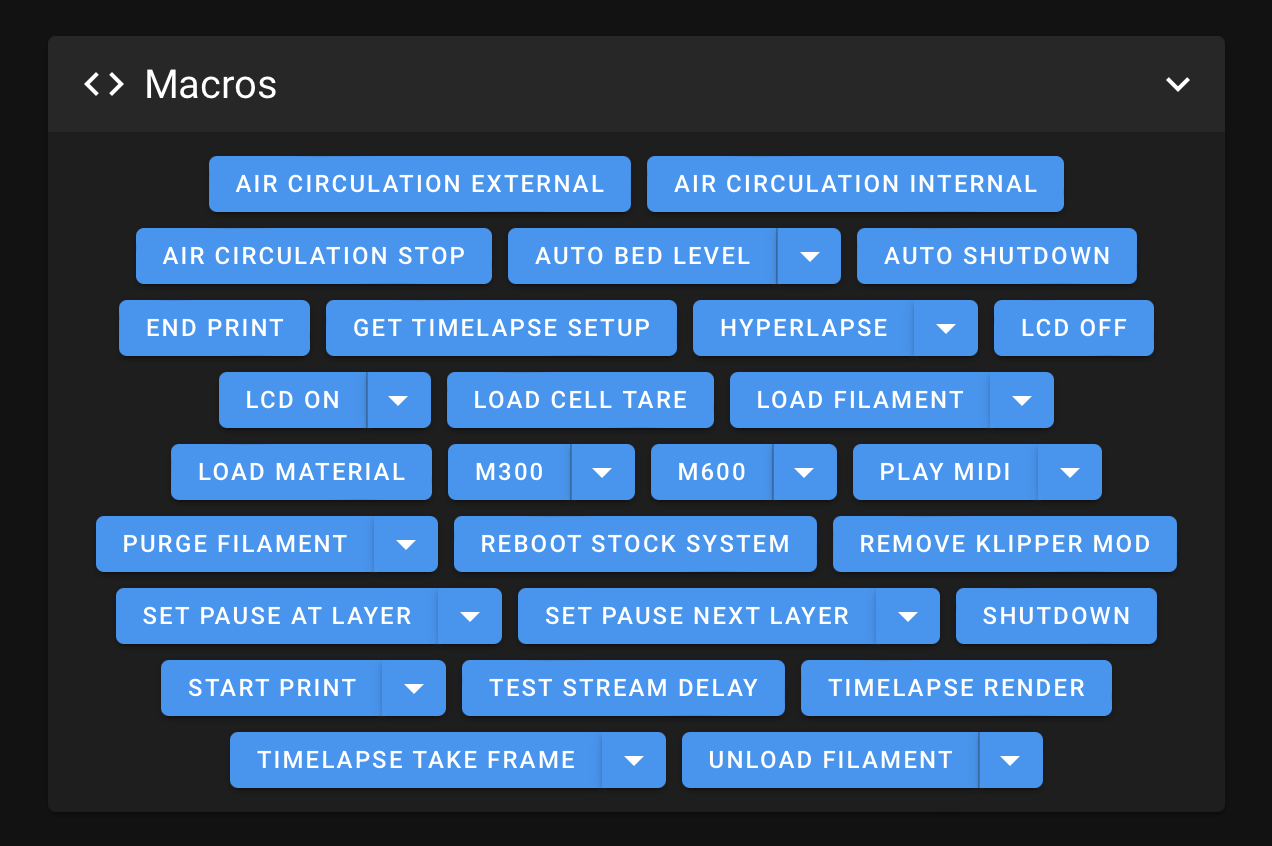
I’m going to make at least some reference to macros. Some have buttons included in the Mainsail UI, and for some that there is no button for it, but you can launch and run the macro by a command in the console.
Screen shot - macros that are included in the Mainsail UI:
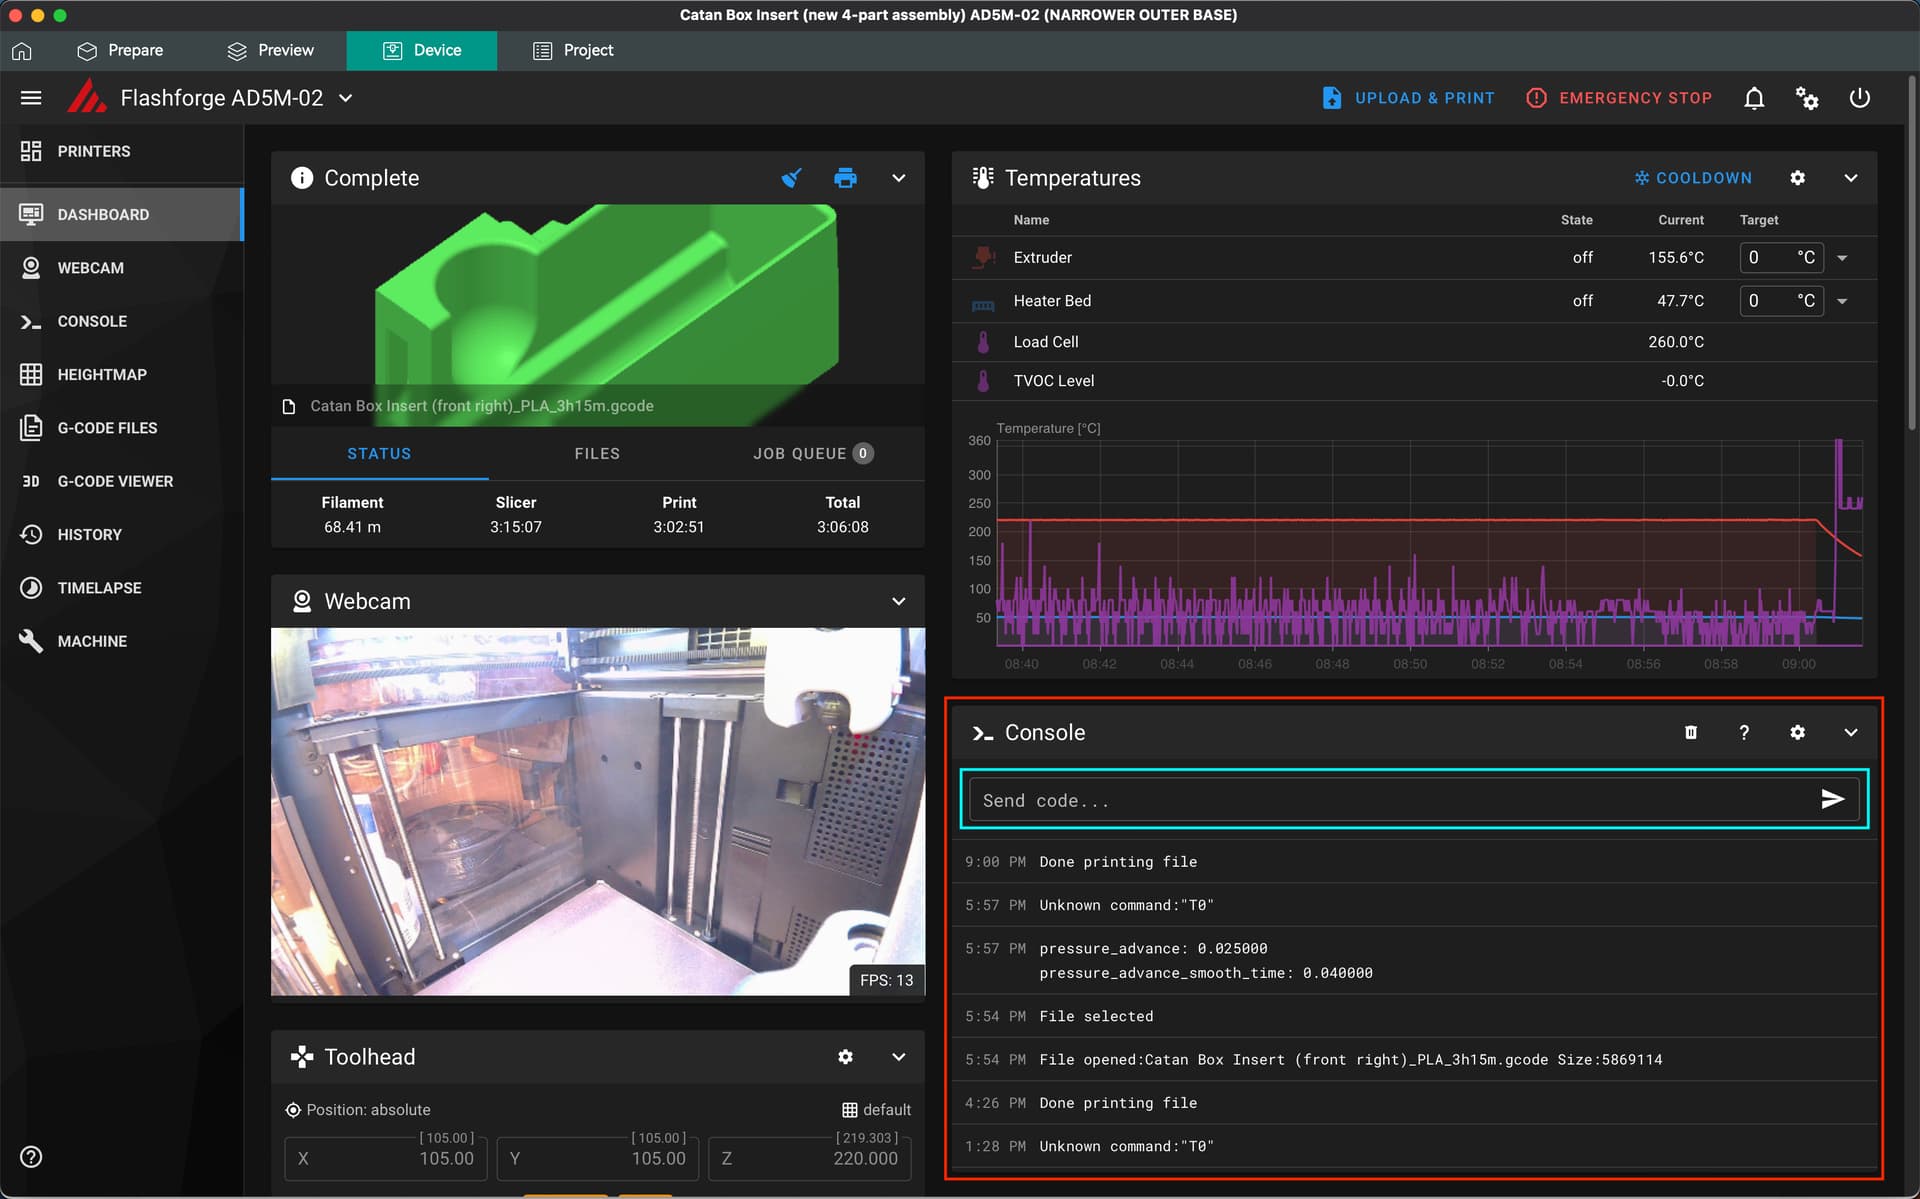
In the Mainsail and Fluidd browser-based remote interfaces the Console can serve as a “Terminal” where you can enter commands, and some of those commands launch macros, while others invoke core code that is not a macro per se.
Screen shot - console in red, command bar in blue:
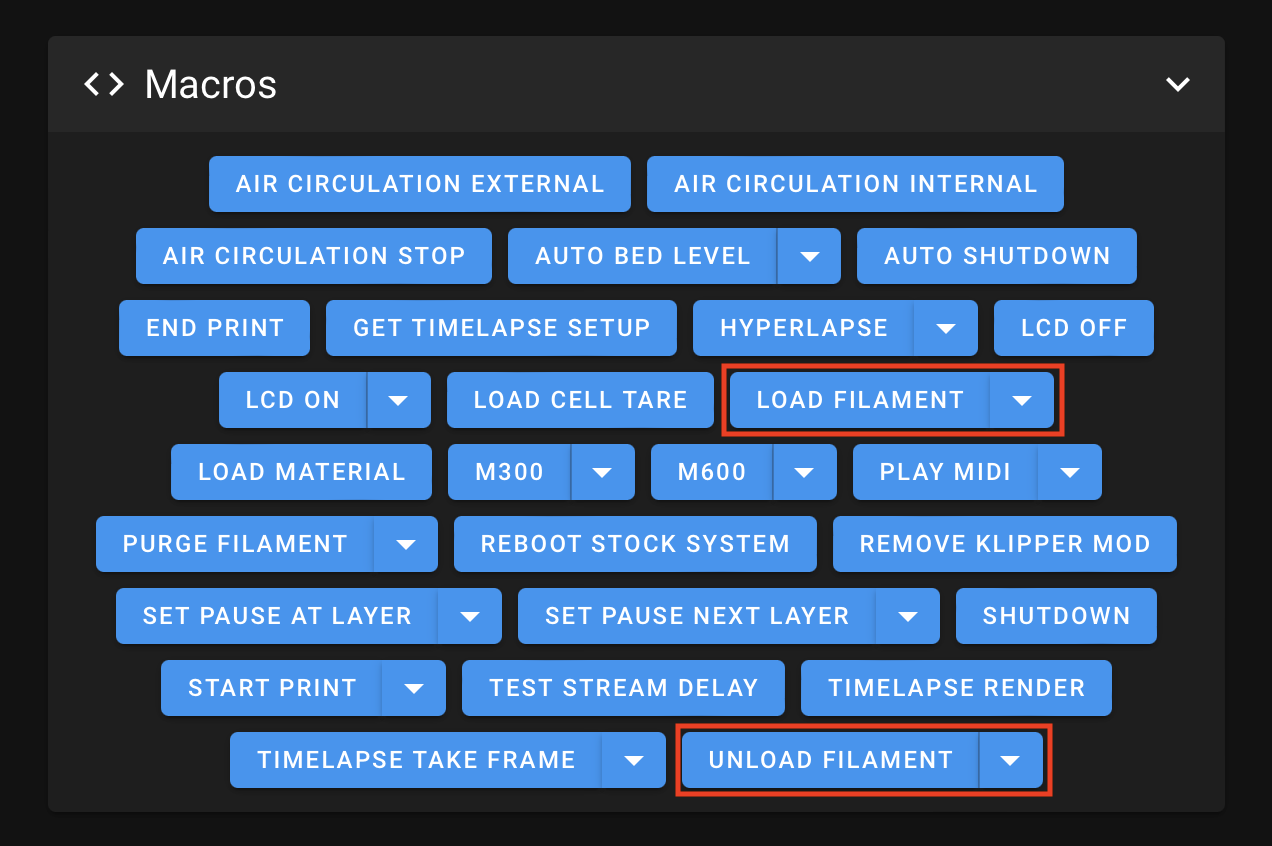
These macros have buttons, but can also be launched via the Console using either of these commands: LOAD_FILAMENT and UNLOAD_FILAMENT — and such commands are not case sensitive.
You’ll notice there is a button for the “Auto Bed Level” macro related to creating a bed mesh, which accommodates the auto leveling feature:
(And consider that, if I remember correctly, multiple meshes can be stored and saved, but that’s beyond the current scope here.)
However, while there is a Mainsail UI button for making a mesh, there is no Mainsail UI button for doing the Z_Offset calibration macro. I think there is a Klipperscreen UI button for it, but I will explain how to launch this macro via the Console.
At this point, I should mention there’s a lot of great documentation available, and good place to read about this is here: Probe calibration - Klipper documentation
Typing and sending this command: PROBE_CALIBRATE — will launch and run a macro for getting a Z_Offset value.
(… and now, the details I gave at the start, apply here.)
I just did
Z_offset calibration,
bed mesh (auto bed level)
resonance vibration calibration
I think that’s it.
Yes, I think you are onto the fact that Mainsail and Fluidd are user interfaces, while Klipper is firmware (unseen) and Moonraker is like an API for communication, and it’s also unseen.
I sure hope I remembered it right and explained it right!
When I first did the setup, I did bed mesh first, then did Z probe calibrate, and I could not for the life of me figure why my Z_offset changes were always ignored!
I think I did eventually ask about it on the Github Klipper Mod discussion area. There’s probably something there. It’s been awhile and I don’t remember for sure.
Well after messing with it for 3 hours I finally got it. Lots of issues. Probe kept saying it was triggered when the bed was 6 inches away. Lots of failed attempts at probe calibration not working because probe was triggered, bed mesh failures. I reinstalled Klipper once and seemed to get things working. Printing a cube now.
I didn’t do the resonance calibration yet. I’ll probably do that tomorrow along with the CaliLantern. I’ll have a dozen more questions I’m sure.
Thanks for your help. I think I was about to throw in the towel about 2 dozen times tonight and just print the parts on my X1Cs, but I really wanted something more accurate as I’m trying to do more precision printing.
So one interesting thing to be aware of is that the way the probe works on the AD5M is that the bed itself has some pressure sensitive mechanics in it. So if you touch the bed or even use too large of a piece of paper you can actually trigger the very sensitive pressure plate (whatever it is) in the bed. They recommend that instead of using a full sheet of typing paper you cut off a thin strip so that you are not bringing a lot of weight to bear on the print bed. I don’t know if that would’ve caused your issue but just thought I would mention it.
Yes. Be aware that there is a very handy macro button in the Klipperscreen user interface (for the touchscreen) that will launch and run the resonance compensation for you automatically.
I’m not sure if there’s a button like that in the Guppyscreen interface.
It’s a nice macro that does everything for you.
That means (I think) somewhere there should be a single command that can be entered in Console to run everything (if you are not using a Klipperscreen variant).
If you wanted to run Guppyscreen instead of Klipperscreen, and it does not have a button…
One thing you could do is load the Klipperscreen variant, run the resonance thing using that button, and watch the Console to see what command(s) the button entered for you.
Or run it in Klipperscreen, save everything, then open your printer.CFG file and copy the new resonance compensation values there, save those somewhere else, then, you could install the Guppyscreen variant of the mod, and then manually paste in your resonance values again.
Or you can go through the process of learning how to type in the right commands in the Console to make it work. I only did it by way of the button.
Also, the discussion area in the Klipper Mod’s github project is not only a good place to ask and get answers, but a bit of a treasure trove of searchable info.
Guppyscreen had a button for Input Shaper. I pressed that and then pressed calibrate. No clue if it did anything other than vibrate the printer as the screen looks the same when it finished as when it started. Suppose I’ll watch it next time.
I decided to move forward anyways and see how it went.
@DougJoseph is this where you put your Start GCode profile?
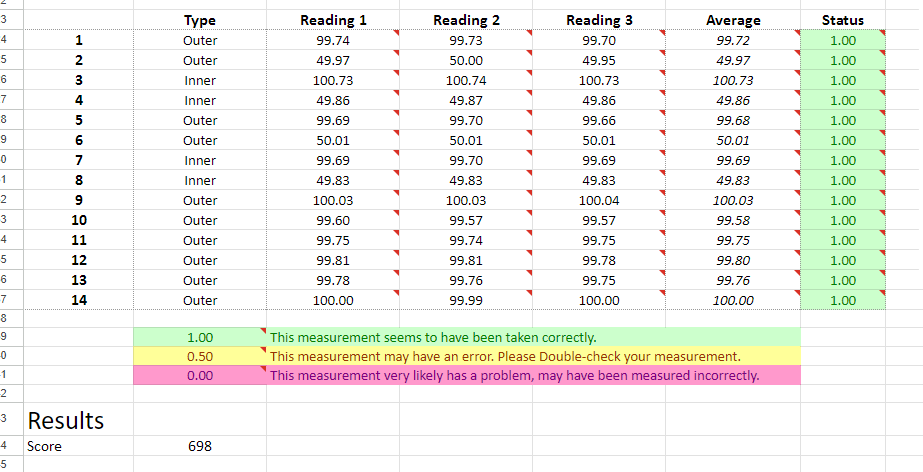
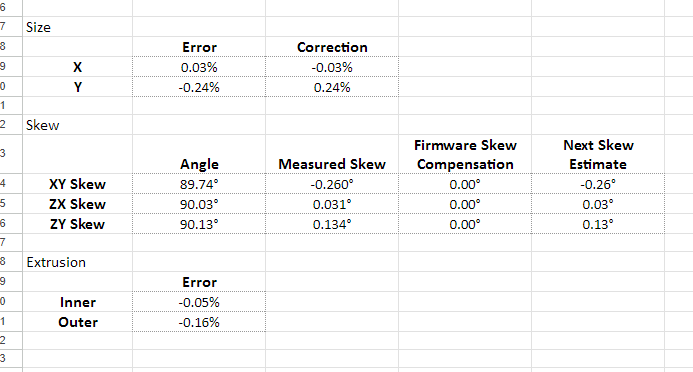
I couldn’t find any section in the actual Mainsail files that seemed correct. Printing another Calilantern, but I won’t be able to check skew on N2 until morning.