LowRider 3 - Plasma Build "On a Budget" - Clarksburg, WV

Another quick update, with a minor milestone reached: The control box is done!

See pics below.

I don’t yet have all the wiring done, which involves lengthening some wires, and installing the female sides of all the aviation style quick connects, which means lots more soldering. However, I did get all the male aviation style quick connects done on the control box, and the control box is complete.

My revised version of the wiring diagram still incorrectly states that the MESA card is a 7i96 (which Kyle used) instead of my actual 7i96S, which is very similar but has some crucial differences. Among those differences are: where the 5V power gets connected to the board (see an earlier post above), and which versions of LinuxCNC natively support both the newer board and the qtplasmac. Bottom line: you have to be targeting a LinuxCNC version of either 2.9 or 2.10. And that currently means you cannot just install from the default link on their download page. Those newer versions are currently only available from their buildbot, which involves adding some stanzas to your repository list, and yada yada. The good fellows on the LinuxCNC forum are telling me that, at present, some issue is preventing access to LinuxCNC 2.9 and that I should go for 2.10.

I had initially downloaded an ISO that facilitated creating a bootable USB stick that would install both a “pre-release” version of LinuxCNC 2.9 along with (and on top of) Linux Mint (instead of Debian Linux, the version known as Buster). That “pre” LinuxCNC 2.9 offered support for plasma, however, it lacked support for the newer card.

Side note: I liked and enjoyed the graphical user interface of Mint. I’m a bit of a novice with Linux, and did not realize at the time that nicer interface (default with Mint) is not default with Debian, which is an ancestor of Mint. The ancestral tree goes like this: Mint is forked off of Ubuntu, which is forked off of Debian.

I later learned both that (1) a nicer interface (which I came to realize is called Cinnamon) is available on Debian, but you have to install it and activate it, and (2) as far as LinuxCNC goes, being on Mint means you have no prospects for updates, unless you want to dig into compiling LinuxCNC yourself. Ugh. In other words, Mint is doable for LinuxCNC, but it is not mainstream. Mainstream is Debian.

In one of my threads on the LinuxCNC forum, I sought help for the Mint issues with the card, and was advised to switch to the main branch, which runs on Debian Linux, a version known as Buster, which for LinuxCNC was version 2.8.4. However, the kind fellow advising me of that was not taking plasma into account.

Based on the advice I scrapped my LinuxCNC 2.9, which meant scrapping Linux Mint, and downloaded an ISO for their mainstream Debian Buster version with LinuxCNC 2.8.4 — only to find out after installing that it does not support plasma! I was then advised to upgrade it to either 2.9 or 2.10, but also told that 2.9 is currently unavailable due to buildbot not yet catching up with some changes.

It seems the best, most direct approach at this stage is add the buildbot repositories and attempt an update from LinuxCNC 2.8.4 to 2.10. Again, I am now on Debian Linux, the ancestor to both Ubuntu and Mint, but I have taken the time to install and activate the Cinnamon interface, which is either the same as the default on Mint, or at least seems as nice as Mint’s default, whatever that default is. I’m not positive whether Mint’s default is Cinnamon or GNOME. (?)

At that point, hopefully I will have gained native support for both the MESA 7i96S interface card and the qtplasmac aspects of LinuxCNC.

Two last bits before the pics:

(1) I had not yet mentioned that I installed a “machine” type power switch onto the back of the control box (pics below). I also covered holes on the back of the control box with tape in order to channel airflow in from the front and out through the two big new fans in the back.

(2) The super nice wiring plan from the amazing @kd2018 calls for two inline fuses. I had bought a kit from Amazon with lots of different capacities of fuses, as well as some inline fuse holders (see pics), and one of the fuses, a 13A fast blow fuse, had to be bought separately.

Well, it turns out the 13A fast blow is quite a bit bigger that all the fuses in the kit, and it would not fit in the inline fuse holders from the kit. So, I tried out a printed inline fuse holder that I had downloaded from thingiverse, but while it had promise, I fought with it and could not get it to work. So I remixed it (remix available here) and got a working fuse holder. I also designed and printed a way to attach the fuse holder on the external back side of the control box, within its own little protective casing, so that I could access the fuse easily. Pic below. I have not published the little fuse outer case, as it was very specific to my situation.

Pics

The control box is done!

Revamped Acer Aspire Desktop PC tower:

What are the odds, that both the old gutted PC tower and the used laptop are Acer name brand? LOL

Plasma Control box (Complete) (with Acer Laptop)

Plasma Control box (Complete)

Plasma Control box (MESA 7i96S wired in)

Amazon 5V power supply for the MESA card

Plasma Control box (BACK)

Amazon Machine Power Switch

Amazon kit of fuses and inline fuse holders

Amazon 13A fast blow fuse

3D printed inline fuse holder for 13A fast blow fuse

Plasma Control box (BACK) (protective case for inline fuse holder)

Plasma Control box (INSIDE) (cooling fans, EMI filter, power supplies)

Plasma Control box (INSIDE) fan, power in, EMI filter (came with sticker on backwards!)

Plasma Control box (INSIDE) (internal backside of Machine Power Switch)

Note: Amazon affiliate links are included above where doable.

2 Likes

LowRider 3 CNC DIY Plasma Table PART 9 - Control Box from revamped PC tower!

1 Like

I know I’m double posting the following as I put it on @kd2018’s plasma build thread, but I wanted to include it here for my own build thread as well:

I had sent another email to Peter C. Wallace (founder of MESA) regarding my 1:1 undivided voltage being knocked down by a High Voltage resistor that he recommended (“2.4 Mohm for 250V full scale”), as I didn’t know what to enter in PNCconf on the THCAD tab for my “Divider Ratio or series resistance” — which defaults to 20, but I don’t even know what that means in my situation. I had also posted on the LinuxCNC forum about it.

Also in PNCconf, same page, it wants to know the model of THCAD, but the dropdown only offers 5, 10, 300, and I have the 2. I am researching whether I can choose the 10 and all be well, because the 2 is capable of both 0-5v range and 0-10v range. I had also posted on the LinuxCNC forum about that.

Peter (@PCW on the LinuxCNC forum) answered on their site, taking care of both questions for me. He wrote:

With the added resistor you have the equivalent of a THCAD10 with a divider ratio of 25.

So now I know how to set up the THCAD page in PNCconf! :slight_smile:

And thanks to the amazing Dec 21 post by @kd2018 in his plasma build thread, I’m not only upgraded to LinuxCNC 2.10, but I also have a working copy of QTPlasmaC setup and operational!

It’s really getting exciting now!!

I was getting some questions in the comments on my recent video (see above) and so I did some replying, and then amalgamated links and various answers into a reply that I pinned to the top of the video’s comments. Here is that pinned response:

LINKS to MESA store (for the items mentioned) are below in this comment!

Kudos and many thanks to both Ryan, the founder of V1 Engineering (@vicious1 on the V1E forum), and Kyle (@kd2018 on V1E forum) for their invaluable help. In fact, both Ryan and I used, as guidance, Kyle’s immensely helpful plasma build thread which includes many tutorial type posts including both wiring schematic and LinuxCNC software setup info and help.

In response to questions in comments about the links for the MESA items, and whether or not a MESA card is available for 1:1 ratio where the plasma machine has no voltage divider, see below. Also regarding questions of whether or not MESA makes a card that does both control of steppers and THC (torch height control), to my knowledge two cards are required, one for each. Kyle used MESA 7i96 for stepper control and MESA THCAD-10 for torch height control. My setup is similar, but I am using MESA 7i96S and MESA THCAD-2. All these setups also require some device (usually a used laptop) running LinuxCNC. A touchscreen type laptop is helpful, but not a necessity.

MESA previously sold one THC A-to-D card for 1:1 ratio (THCAD-300), and two for divided (reduced ratio), a 5v option (THCAD-5) and 10v option (THCAD-10). The new THCAD-2 is able to emulate either a THCAD-5 (5v option) or a THCAD-10 (10v option) based on a jumper setting! So its ability to go either way seems to be the reasoning behind the “2” in its name.

WHICH RESISTER IS THAT? SEE HERE:

Finally, if you have a plasma machine with 1:1 ratio (no voltage divider) and you should find yourself wanting to reduce the voltage yourself in order to use a THCAD other than 300, either 5v, 10v, or a “2” acting as a 5v or a 10v, then per Peter, the founder of MESA (to me via email when I bought a THCAD-2 instead of THCAD-300):

“You could return the THCAD2 card for credit and re-order a THCAD-300. Another option would be to add an external resistor to the THCAD2 in the negative lead, say 2.4M for 250V full scale. For safety this should be a HV resistor like: HVR3700002404FR500 Vishay Beyschlag/Draloric/BC Components | Resistors | DigiKey
The 250 range improves the resolution somewhat (and continuous overvoltages up to 1000V are no problem).”

The following are copied and pasted from my replies in comments, placed here so I can pin this to the top. Happy making!

The Mesa board that I show inside the control box, 7i96S, is the one that controls the stepper motors. The only thing the Mesa THCAD-2 does is monitor & control the torch height. Mesa does indeed sell a torch height control board that can handle 1:1 ratio where the plasma machine does not have a voltage reducer. That is model THCAD-300. As soon as I get back to my computer I will post links to these items in the Mesa store.

You can indeed use either a 7i96 or 7i96S — combined together with a THCAD-300 — and not need a high voltage resistor. The only downside there is that you will have high voltage on a wire coming from the plasma machine to the THC module. You can do as I did by moving the THC module out of the control box and placing it on the plasma machine to minimize how far that high-voltage is traveling outside of a control box.

Because I moved my THC module over to the plasma machine, really the only thing I gained by using the HV resistor was not having to send back my THC module to buy another one. I selected and bought my THC module before I bought my plasma machine. Then when I bought my plasma machine, I was shopping all kinds of features versus price and lost track of paying attention to its voltage ratio, and wound up getting a mismatch where my plasma machine is a 1:1 ratio without a voltage divider or reducer.

LINKS to MESA store for the items mentioned:

MESA 7i96 — no longer listed for sale, use 7i96S instead.
MESA 7i96S — 7I96S picture
MESA THCAD-2 — THCAD2 picture
MESA THCAD-5 — THCAD picture
MESA THCAD-10 — THCAD picture
MESA THCAD-300 — THCAD picture
THCAD picture

Shop all MESA THC options: Search - thcad

1 Like

LowRider 3 CNC DIY Plasma Table PART 10 - MESA torch height control!

MESA THCAD-2 SCALE AND OFFSET:

Kudos again to Kyle, @kd2018 for his custom calculator as linked in his post here:

…which, as of today is still available here:
https://jscalc.io/calc/NTr5QDX6WgMThBVb

Since the THCAD-2 can (essentially) emulate a THCAD-10, I used the calculator with “10” selected.

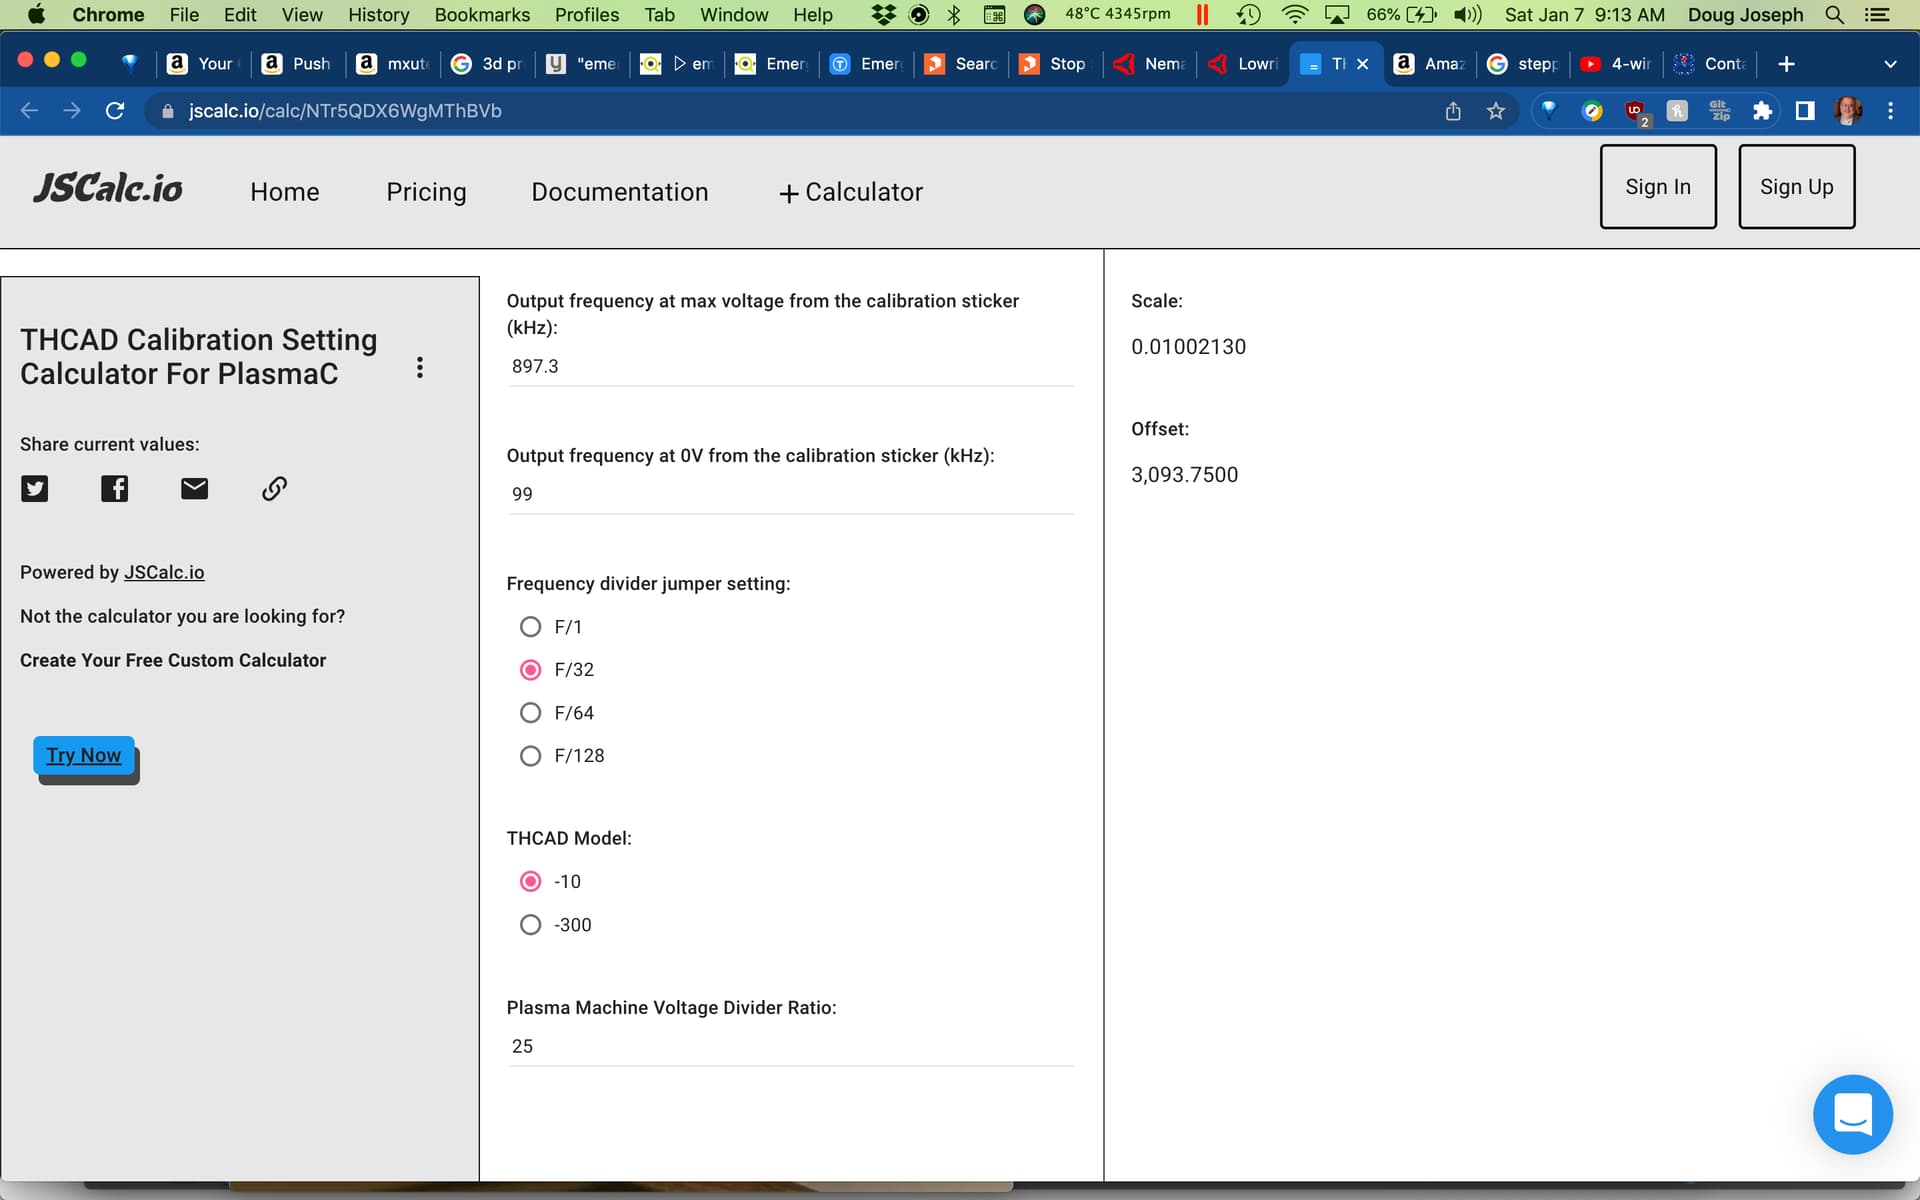
Here are the values, and a screen shot, for how I calculated the scale and offset for my THCAD-2:

Scale:		0.01002130
Offset:		3,093.7500

Based on:

Output frequency at max voltage from the calibration sticker (kHz):		897.3

Output frequency at 0V from the calibration sticker (kHz):				 99.0

Frequency divider jumper setting:
	F/1
	F/32	<- selected
	F/64
	F/128

THCAD Model:
	-10		<- selected
	-300

Plasma Machine Voltage Divider Ratio:							25 		
->	 "25" : For my 1:1 plasma machine with an HV resister (2.4M) inserted 
			externally on the negative lead, all based on guidance from 
			MESA's Peter C. Wallace ( @PCW ) on the LinuxCNC forum.

Isn’t that built into qtplasmac now? I don’t remember needing to do that step. I need to have a second look for sure, since I am not convinced my thc is working 100%. Looks like another week of storms here, so not testing for a while.

-edit-
I just checked, I was wrong it does not appear to be built in,

1 Like

I am definitely on qtplasmac now, and I was doing the calculation simply because I saw Kyle had and so I thought it would be needed somewhere! LOL

Sorry was editing when you replied. Those numbers you calculated are needed in QT, but I swear I just input my sticker values somewhere, maybe in the initial config. I am going to double check.

While I was just poking around I did see a see stepper config test, I want to see how fast I can push the machine. Plasma definitely benefits from fast moves and accels.

1 Like

@vicious1 and @kd2018

How do you have your dip switches set on the TB6600 stepper drivers?

Below is how @Trevor has his dip switches as per this thread:

My power supply is Mean Well LRS-200-24 — 200W 24V

Would I be presumed OK if I did mine the same as Trevor?

EDIT: I just noticed his power is 12v and mine is 24v. So I am guessing mine will be different.

Im looking at the chart on top of the TB6600 for the switches, and I’m struggling to understand it all.

No those set the current so voltage doesn’t matter. I can check when I go out to the shop in a couple hours, but it looks like I only have the top two off.

Thanks!

First three are microstepping, I used 16.
Next three are current, I used 0.5 with a peak of 0.7 - the reason I dislike these drivers. I would prefer 0.7 peak of 1a. If I find anything lacking in my speed tests I will swap these out for drv8825’s

1 Like

Okay maybe I did mess this up.


This doesn’t look right…

Nevermind it does seem to be right, QtPlasmaC, I can use that calculator to double check the values inserted into the qt screen though. I really need to test this on some longer cuts.

Here’s the back of my THCAD2, and a screen shot of what I inputted during PNCconf:

Nevermind it does seem to be right, QtPlasmaC, I can use that calculator to double check the values inserted into the qt screen though. I really need to test this on some longer cuts.

In that video it shows on and active, the voltage is all over the place though. I think I need to increase the Z axis accel and speed.
Sorry for doing this in your thread, but I think it might be relevant to your build. As mine sits I do not think it will do the corrugated test, but after some tweaks I hope it will. ramp or wavy

1 Like

I am very grateful for all your posts on my thread. It is hugely helpful to me!

That kicks out the same numbers you calculated automatically into the qt settings screen?

I have not yet had a chance to check, but I will.