I’ve built an MPCNC V1 (34" x 34" cutting area) and putting a list together for a 4’x8’ LowRider 2 build. Never used endstops for MPCNC and prob won’t on the LR2. Currently use ESTLCAM and Repetier and would like to keep the same workflow if possible, but avoid tethering a computer. Looks like I have multiple options for boards but 2 are out of stock rt now.
Can someone please verify that this is everything I’ll need? Is there a recommend vacuum adapter?
Why not cut your own on the mpcnc? I think most people use a Dewalt 611 or something similar with the LR2’s, the plate the router sits on is setup for them and the vacuum parts for the plate work with it as well.
For my vacuum adaptor I 3d printed one that just attaches to the port of the original parts. It may not be optimal for flow but it works just fine. I use the mini Rambo board with the lcd, non tethered and use the z touch plate without any issues. You just have to add gcode to your cut file to do so.
I’ve just finished putting all the base hardware (printed plastics ) together and have hooked up my SKR-Pro v1.2 board with TMC209 drivers. I feel this is the better option I am running the BTT TFT35-E3 screen. Both were easy to install and firmware update simple as well.
I’m using a Makita Router. Am not using any wood for Y axis plates - instead I 3D printed them (PLA+)
Thanks Brent - regarding the flat parts, I got them last year and didn’t have any bits that cut 3/4" deep at the time. Also wanted to help out a fellow maker who Ryan trusted to supply the parts.
You’re saying the flat parts are setup to fit the DWP611? That’s good to know.
Did you design the vacuum adapter yourself or are you using one from online? This adapter looks like it could work. So, you’re exporting gcode from repetier then copy/pasting calibration code in front of it to use the z-touch plate prior to the print? Can you share the code?
Sort of. I don’t use repetier at all. I just bring my dxf into estlcam and the gcode is preset in all my cnc programs from there. I imagine that you could do this different ways that suite you. I just wanted to mention it because of the untethered work question.
Yes I made the vacuum adaptor myself. There are lots of different hose sizes to deal with so I found making my own the easy way to get what I need. If you don’t have a 3d printer you can do pretty cool things with a heat gun and plumbing pipe.
Here’s a look at my adaptor, simple and effective.
I’ll print the vac adapter for the 2.5" hose, no prob.
I don’t mind going rt from ESTLCam to the CNC - I’m not attached to Repetier. Can you share the code you added via ESTLCam to use the touchplate? Beyond where to plug it into the SKR board, I see the lines in the v1 TFT ini file that reference the touchplate but that’s it. Is there something I’m missing in the instructions or is this info that you had to add on your own?
there’s a bit more info in the shop around the z-touch plate with the gcode in there and a few more details,
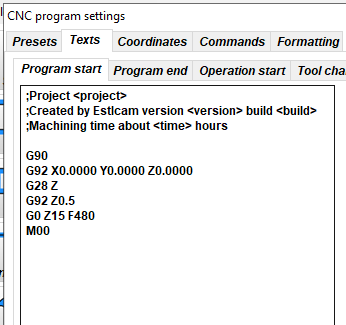
Here’s what it looks like in my presets in estlcam, you can see the snippet of the G28 Z which homes the z, and the 0.5 is the thickness of the tiny touch plate from the store, and unlike the store info I wanted my gantry up higher to get the alligator clip off my bit so I go up 15mm instead of 5mm.
I use the mini rambo but aside from where on the board the touch plate connects I think the gcode is all same same.
It’s pretty slick on mine and I use it for every program I run now. My only wish is for a longer clip, and thicker plate but for the few dollars Ryan charges it’s a great little tool and worth all the price paid.
Has anyone tried setting the LR2 with the SKR1.4 turbo. I know that there’s a great tutorial video of the skr1.3 pro but I brought the wrong one. Can anyone help me setup the firmware for the skr1.4 turbo with a tft35 v3.0 and end stops? I’m a complete noob at this. Any help will be greatly appreciated.