I’ve been planning to increase the number of maker events I go to, and once that involves leaving home in Colorado it starts to need some kind of decent way to take machines or subsets of machines with me. A little clue of what was to come is from my “department of redundancy department” topic in the random/off-topic section of the forum.
I did a test last week during a trip to see how bad using luggage or packaged shipping would be for getting things to/from an event.
This was domestic US travel, so not as many complexities for me as leaving the US.
What I learned:
Luggage sucks for trying to take a machine, even specialist stuff like pelican cases as they’re just not set up for packaging things like LowRider gantries.
Using domestic shipping might be viable if you have common box sized packaging and have good time to coordinate with the receive side. It’s horribly expensive if you need anything now or need an oversized package (like say a TAZ Workhorse printer).
So, what’s this thread supposed to be about?
I’m thinking of designing some kind of checked bagage sized travel container that can both be checked as luggage and which can also then be re-purposed on arrival as part of the maker event setup with the machine. I’m thinking of taking LR4, MPR&P and maybe a MP3DP in this way. (Not all at once!).
@jamiek had an idea on this front a while back, but for the life of me I can’t find that post.
What am I looking for?
does anyone have any good recommendations for materials? I’m looking at perhaps phenolic plywood or ACM style sheets as outer surfaces with aluminum extrusion as frame elements. What other options should I be thinking about?
Wheels. I really want the luggage to have some kind of fold-out wheels that let me use them as their own transport carts. Going though airports dragging pelican cases or large conventional luggage SUCKS. I have ideas about embedding these in the sides of the cases (imagine the phenolic ply being inside the extrusion frame, not outside)
Handles. Again- want to be able to flip something out so the whole stack is self-managable.
LowRider X axis packaging: I want to be able to have a semi-assembled system with an X axis gantry and built up YZ plates, a “Quick build” option for arrival. Something similar to the way @Jonathjon and North Woods Custom Creations package prebuilt LR4s, except truly in luggage form factor.
Ideas for a break-down MP3DP. I really likes the ideas that @azab2c had the last couple of RMRRFs. Again, how could we package things creatively to make an easily deployable MP3DP?
Sounds like a neat set of projects. If you had to prioritize/sequence, is a portable CNC or portable Printer more useful/fun for your personal/work travel events?
I appreciate Positron Printer and similar projects exist, but this is something I think would be neat to do too. Started a portable printer project, but didn’t get far, I made some caster shark wheels LOL. Having decent sized checked luggage machines would be neat if you’re away somewhere for weeks-months at a time.
I frequently need to travel with oversized bags. Usually golf bags but stuffed with kendo gear. I built a frame to go into a 48" duffel to keep the bamboo swords safer during handling, and it also kept the armour safe. Panels were corrugated plastic fit to spruce spars, in order to keep the total weight down, as the airlines start charging ridiculous fees over 22kg/50 lbs, so lightweight was the need. The duffel is ripstop nylon and provided the outmost layer.
Maybe. Though I’m a bit skeptical about overseas travel. I may do a pathfinder trip to the UK as I’m still seriously considering SMRRF next year.
I have good status on my preferred airline, so I get three free checked bags in the regular size. That’s probably my sweet spot for affordability.
I"d say an LR4 would be what I’d want to take, then maybe the MPR&P.
If I thought the event afforded a chance to make parts at the event, I’d probably see if I could find local community members or show attendees to help make parts. Though I’ve found a real connection when I was talking about Ryan’s MP3DP at RMRRF.
Being able to point to the 3D printer and note it was making parts for the CNC and then pointing to the CNC and showing how it was making parts for the 3D Printer really connects for a lot of folks.
One in particular had a lightbulb moment at RMRRF two years ago. “Oh, it’s like reprap but for CNC?” Yep. And I now know how to talk about both as a result.
I liked those wheels
Thing is, I sometimes do that. When I take my work hardware for it’s final earthbound event, I can be in a couple of different places in the world for up to months at a time. One thing kept me away for the better part of a year (mostly away, rotations home)
Thanks for the link. I’ve looked at road cases (have even bought some for work in the past), but wasn’t familiar with that supplier.
My maximum checked bag size is 62" combined dimensionally, 30" max x 20" max x 12" max.
(762mm x 508mm x 305mm). Notionally I’d want to shoot for 750mm x 500mm x 300mm max.
That particular case has wheels, but they’re the crappy integrated inline rollers.
A good starting point for thinking, but note also I want to be able to unwrap the shipping container into the basis of a table or other part of the machine.
Maybe an elongated box that meets the overall 62" criteria… For example, could you do 38+12+12, or, is 30" a max dimension limit for the long sidefor that checked baggage rate?
If so, maybe each of the 4 long panels dissemble and can be rearranged to make a square (using register pins/holes) frame. Or can you depend on destinations having a table you can mount to like RMRRF event?
Vaguely recall Jamie embarking on something similar to transport a LR to an inlaw/cousin/nephew?
I used to have a case that the top half separated and then had sockets in the corners for four legs that got stowed in the case. Used it as a table for the equipment that it housed.
This, unless doing oversized baggage as @SupraGuy mentioned above. I’m cheap enough that I’d rather do 3x of my “free” checked bags and not pay additional out of pocket for the oversized.
Yeah, I’m searching the forums for that, but my search-fu is failing me.
I was toying with having some extra extrusion inside the case, which would be both spare parts for the case and also could be reinstalled across the unfurled petals of the case to stiffen it for use as a table/work surface.
That might be a stretch goal, lots of events have folding tables of some kind. That might be fine for a demo LR to sit on.
I’ll look to see if I can find any. It’s been 20 years since I sold it. It was essentially square metal tube legs that slid into short pieces of the next size up square tube that was riveted into the corners of the top half of the case. Case top was latched on all sides, not hinged. I suppose you could do the same with a hinged case, hinged halfway up its height, and get twice the surface area. If you placed latches to latch perpendicular to the hinge when fully open you’d get some rigidity.
I remember, too, that another guy had a console case that had folding table legs integrated into the bottom half. Was good for small shows where he didn’t have other cases to place under it to support the mixing console.
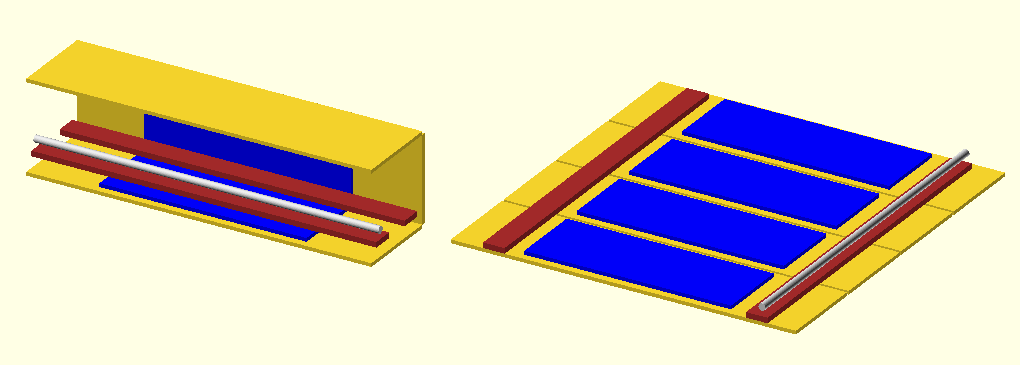
The rough dimensions I was looking for are about 12 x 12 x 48, which unwraps to 48 x 48. If it were shorter at 30" then it would be rather tiny for a LR. Oversize baggage might be worth it.
Also I think it’s worth thinking about how the weight is supported within the box. Everything can be padded but if some are more rigid than others, then a shock load will stress the attachment points. If the trucks are wrapped in bubble wrap and the center is stuffed with soft urethane foam, it might be relatively rigid support at the ends and compliant in the middle, and when someone drops it, the weight (intertia) of the gantry applies to the lead screw. But if the strut were supported near each end with a semi-rigid brace (I’m thinking a 3D printed custom brace for shipping) and the ends were suspended away from the sides and packed with compliant foam, then the same shock is the weight (inertia) of the trucks, not the gantry.
The strut support should still have quite a bit of compliance/padding to reduce the g forces, but the point is that the trucks should have more compliance so the stress is from the mass of the trucks and not the mass of the gantry.
Working backwards from 30" x 20" x 12", this would unwrap to 30" x 64". Using that as a base and adding “wings” with a larger MDF sheet over the full top (Locally procured) seems at least minimally viable.
I’ve been thinking about this. I think I’d put the two YZ plates into the sides of the case, making a foam cutout to receive them. The rest of the gantry would be a complete subassembly, also having a foam ends with foam protection at multiple places mid-span, with the core being retained on the gantry mid-span and bookended with protective foam.
The YZ plates would be offset from the rest of the gantry for shipping. The assembled gantry would be slightly longer than the length of the “Box”.
I’m toying with making foam inserts from laser cut foam.
For the Y rail, if this were locally procured then I’d need to swap the end parts on the YZ plates to the appropriate sized parts, and would need to bring Y rail clips printed in the correct size.
The trim router would need to be using appropriate power (e.g. 110 in US or Japan, 200 for the rest of the world).
If I made the “box” be an inner lining and put 2020 as an exoskeleton around it, then I could make the exoskeleton have 2020 parts that can be bolted from behind (inside the “box”) making them easy to remove and reposition once unfurled.
I like the deployable leg idea mentioned above. This could be made from nested EMT with a lock mechanism like a cane or like walking poles.
Time for me to start laying up some ideas in CAD or OpenSCAD.
What I have learned from assisting with shipping a few machines is the sturdier the box the better and YES cushioning on the inside is a must. Allow as little movement for the machine inside as possible. Airlines and such do not treat items with kid gloves, more like they are kicking around a hacky sack. (hmmm…did I just show my age there??LOL) Best of luck on your endeavor and keep us posted along the way please! Would love to see what you come up with!!
Having worked on some theatrical tours, I have a few suggestions:
Consider the operational configuration as well as the shipped configuration. Can you “stash” any required packing protective material in an unused area of the operating machine once it is set up? Keeping everything in a single location will ease set up and tear down immensely.
Include space for consumables, and establish a schedule for replenishing them. There are few things worse worse than getting the washing machine all set up and then realizing you don’t have any detergent.
Include alignment notches and locator pins to ease setup. Color coding can make things easier.
Try and build tool-less setup and teardown if at all possible (e.g. hair pin clips, loose pin hinges, clips, knobs, wing nuts, butterfly clasps, etc.). Establish a “parking location” for any hardware that holds the case together for shipping that’s not needed for the operational setup. Secure any removable component so it can’t be dropped. If it can’t be secured, include a reservoir of spares in the case.
If it’s not possible to be completely tool-less, build storage for the necessary tools into the case. Get duplicates even if all the setups need the same tool, that way each case can be considered “atomic” and you don’t need to worry about bringing one to support another.
Laminate and attach any setup and operation instructions inside the case. You can then have “smart hands” set up at the destination without having to micromanage.
Tom’s thoughts are awesome! Those lessons are clearly learned from a lot of struggle. There was a lot of borrowing screwdrivers at RMRRF set up days.
My thoughts are:
I see people bring full guitars as carry on on planes. How do they get away with that? Is that an extra fee? I swear I remember someone bringing a chello on board.
I also see skis and golf clubs checked in. I wonder if golf club storage would be a good thing to look into.
You should consider making the machine fit the box, instead of making a box that fits the machine. If you want to work within a hard limit of a good road box, then just adjust the LR4 to fit.
It is an interesting problem. I want to know more about which shows you’re going to. I loved RMRRF and OS2025. They fueled me and the challenges keep me focused (for a while). It’s nice to be an extrovert for a couple weekends per year.
Swapping to a local y rail may require a larger diameter bearing spread on the yz plate over the rail which would mean a newly printed yz plate. That could be problematic. Is there an x-axis machine size you want to ship? Based on dimensions, a 48" wide cuttable width gantry isnt in play. Would a y rail that can disassemble be a problem? My preference if I were shipping would be to ship with the gantry intact. Though you could take the yz plates off to buy cut size since you are talking about extended stays … Assembly could be a reasonable exercise with just the 3 xz bolts on each end. It wouldn’t be like shipping a disassembled printer in a suitcase -which has been done.
@MakerJim you having seen how I package a machine first hand, would the onshape cad for my box help you at all? Or is it too far off from what you are trying to acheive. My apologies as I just skimmed the thread for the most part. I do know my box ends up outside at 10”x12”xWhatever is needed for your beam length. And that includes a layer of 14mm foam (sheet of R3 (I think but not home to double check) insulation foam from the orange box store). It is all screwed together with washer head screws. So far that box has proved very well for me. Sad thing is the ONLY damaged part I have had on an LR4 since going to that box, was the one sent to y’all at RMRRF BUT… I am glad it was in very experienced and capable hands, and not to a customer who has zero experience with a V1 Machine
I would for sure plan for local Y rail purchase unless you are going for a short Y axis similar to RMRRF. Different size rails will just need different printed rail clips, easy to throw in a box or even in your other luggage.