Trochoidal gives you a larger slot for the chips to evacuate.
So you got it working perfectly, impressed the heck out of all of us, then tried to double the depth? All at similar speeds and step over? Killing me smalls.
You are allowed to take multiple passes.
I think the previous video is seriously pushing the maximum for a machine the size of yours. You had amazing results, stick with them and see how it goes. Don’t forget the deeper it goes the less rigid it is on the MPCNC, the lowrider is opposite.
A few things to consider. I would try the single flute again. The more flutes you have in a deep cut the less time you have for a chip to get out of the way of the next blade. A deeper cut also should be run a little slower for the same reason. Air could help but slowing down the feedrate or the spindle rpm will help as well.
Results at 2mm will not be the same as results at 8mm, CAM is a tricky tricky thing.
I pretty much gave up plunging. I tried pecking .5mm at a time, and on the last depth, it went really nasty. Made this low rumble but the bit didn’t break. I will just half predrill the holes then finish them on my hand drill. No biggie there.
The test was done on a single flute. Only now I only have 1 left… A 3mm slot 9mm deep doesn’t allow for any chip evacuation at all. I will remedy this by doing the wider deeper cuts. Technically this wastes more material but at this point I just want to finish the part without something going really bad.
True about the rigidity, but my z is so short as it is I don’t think it will make a difference. There is a diminishing return line like I said. At one point all the flex is not the z axis turning, it is the linear flex of the rails, zip ties, etc.
I got teased into my success lol. I think my cam was great for thin parts but I got to change it up now that I am trying to go all the way through 3/8". The further the bit goes into aluminum the more scared I get cause it’s hell down there D:
Still trying to fix the awkward chatter points. Picture a circular cut, the bit chatters at 12 o clock and 6 o clock. At 3 and 9, there is no chatter at all and the harmonics are great. I tried to test if it was the fact that my x axis conduit was twice as long by test cutting at the very corner of my machine. No luck.  This is by far the problem I am concerned with the most. It’s weird because even on light finish passes, at 12 and 6, this low rumble occurs. It get’s so bad you can actually see the bit vibrating back and forth. Yikes. I tried taking off my shims and it had no effect. I am able to run really aggressive settings with no chatter except when it hits 12 and 6. I don’t get this at all…
I am going to keep testing and trying until finally I get a finished part. 
Easy, there you go blaming zipties again.
Truly it is a CAM programming thing. This is people full time jobs that they go to a lot of schooling for and get paid insane amounts of money. You cut wonderfully and then more than doubled the load on the entire machine and are wondering why it isn’t working. I can barely cut 9mm of soft pine at once, I made a video to prove it.
Have a look through my previous post again, I gave you a full breakdown.
As for plunging, always peck if you can’t helical cut, never ever straight plunge unless you are using a drill bit. You can’t just jam a bit made to cut on its side faces into material and hope it works.
Wait, by double load do you mean the thickness of the workpiece? Maybe I wasen’t clear, but I didn’t ever try 9mm doc lol. That would be an instant disaster. I see load as the rate at which it is removing material combined with HOW you are doing it. I actually reduced my DOC and speeds a lot. In fact, in one test of my now butchered 3/8 inch plate, I reduced my doc to 2mm and my feed to something like 400mm/m with a .5mm radial cut. I am talking about adaptive clearing, not slots. It sounded better for sure, yeah. But that chatter at 12 and 6 was still there only lighter. So in short, I did go more conservative.
So let me do another test right now. It takes something like 10 minutes. I will be really conservative this time.
If you go too light you can work harden aluminum.
There is a sweet spot, why not use the exact settings you had before?
My very first 3/8 part test were my exact settings. The dimensions came out good, as expected. Finish was great. I was feeling really good like, hell yeah here we go!  But this was before I realized I cant just plunge into the material. I did peck it but too deep, 3mm each peck. So hard to watch. I should of stopped it but I didn’t so on the 4th and last hole it just snapped off I need to order more bits I keep ruining them. I. am on my last single flute. 4 dollars adds up fast for me…
I know I have said this 3 times already, but those weird chatter spots are really throwing me off. Like I said on the first test with my what I thought were perfected settings, ended up chattering super bad on 12 ad 6 areas. On my second test I went more conservative on doc thinking it would help and it actually ended up breaking on the finish pass. Confusing
Check for perpendicularity, sounds like you have an angle, in or out from 12&6. You almost never notice them until you get to metal.
I did try shimming with tape and I got really close along the Y. That’s why it didn’t make any sense to me. I just tried taking them off and it made little to no difference. But if we shim the dewalt mount, aren’t we just putting a bandage over the issue? Cause if I shim it and get it accurate, great. But won’t the z axis still not be perpendicular? Maybe this is coming out wrong.
So when we are shimming the mount, are we trying to fix the error in the mount or the entire z axis? Cause then if you shim it, your bit will be perpendicular, but your z will still feed at an angle.
If your z axis is not perpendicular you have to fix it, first.
Tape is just for the little tiny bits that are from the shape of the dewalt case.
Ok so I should adjust the tension bolts in the gantry. I have done it before but if it comes to taking it out and reassembling I will. My parts already have the break in thing, my xy squareness is spot on. I only can get at most 4cm of z pipe coming down, so the square is hard to see.
If you take the dewalt mount off you should be able to get a square in there pretty easily.
Or you can just figure out your cam. I feel like you want it to be something else. You can get things progressively more accurate but with your previous video I am telling you your machine is spectacular. Just work on your CAM program.
You are doing this the hard way and going hardcore into 3/8" aluminum, most of us have spent 99% of our time in wood, then some plastic and a bit of aluminum or brass, you are insisting on pushing the limits in the beginning. There are so many subtleties to learn. You seem to be frustrating yourself. Maybe you can step back and make some things out of wood, or even test your gcode in wood, then acrylic, then metal.
The MPCNC is going to take more precise CAM than a machine that has a few more zeros in the price tag, but honestly, not by much. Add a few more zeros still and then yes aluminum gets a bit easier. If we could do steel you would see it get exponentially harder still. Any time I have been around large machines, the program gets checked by another programmer before they try and run it if it is steel.
I have not run the same program twice yet. I run it, watch, take notes (seriously), tweak the CAM, Run the next job. So many sets of lowrider flat parts and I am still changing it every single time. And that is .25" wood.
I guess the only reason I am so concerned about it is that I know it is the little things that are taking away from really really good results. I have done really aggressive stuff with no issue at all until very specific points. I feel like if I can little by little improve things, that I can get the results I want. Honestly although it seems I am pushing it to the limits, I have done a lot of much lighter/slower cuts with the same fundamental issues.
Upon inspection my z is indeed off, in the Y direction. I am dissassembling right now to tension the bearings. One of them wasen’t gripping the conduit, bad sign.
I am switching to estl cam… Seems much more efficient for deeper cuts. I really like f360 but it doesn’t have the trochoidal milling I like. Adaptive clear only works for pockets. I am really close to getting a good test part out, I will post pictures when I get there.
I made this specifically for aluminum in mind. I knew going in I would have issues. I don’t want this to become a life story but, I am only in high school. Can’t get a job quite yet so my budget was low. The MPCNC was an attractive option. Even though I sound frustrated, I am having a lot of fun and would much rather mess with CAM then paying the extra 0 to make it more forgiving.
Okay, we are on the same page then. I just wanted to make sure the tweaking part was the fun part for you.
I just bought a big laser and I have spent 10 minutes cutting and etching and about 4 full days making changes. More on this in a different thread. So I like to get the most out of my machines as well.
And…For a high schooler you are killing it, you have a bright future for sure. Messing with a cnc at that age…If you were local I would offer you a job.
Thanks Yeah if I was in norcal I could bag the hardware in the kits for minimum wage! That actually sounds quite fun to me.
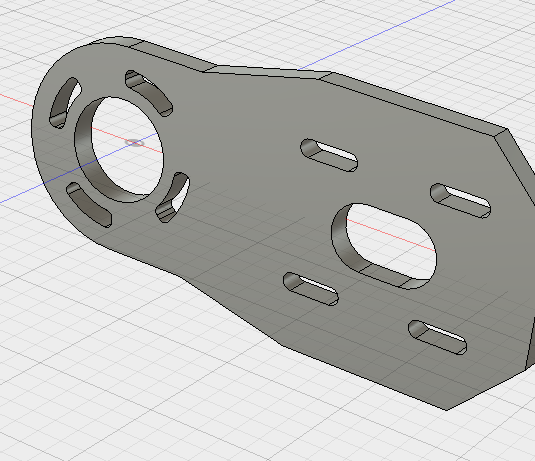
I just want to fix the little things. That video was really just a showcase, it wasen’t even properly edited or filmed. I don’t really care how long the part takes, I just want it accurate and most importantly, reliable. Included a pic of the part incase you’re curious. It is a motor mount system for an electric longboard conversion.
I wanted to do a small production run of 20 and sell them. If I could get one made per hour I would be happy, considering each one sells for about $40. Watched the interview you did which got me getting a little interested in making some quick cha-ching.

My college senior project was an electric skateboard, wirelessly control by muscle impulses. flexing your forearm made it go, like a small kick but smoother, regen braking all of the bells and whistles.
https://endless-sphere.com/forums/viewtopic.php?f=35&t=62689
Looks a lot more fancy than mine. If I ever made a lowrider I would want to carve out a new board.
I am visiting sdsu tomorrow, what are the odds. If only the mpcnc could make me perfect grades. Where are the toolpaths for the SAT?
I spent a lot of time in the machine shop downstairs. I think they just got a new engineering building though…
Okay, got everything mechanical fixed today. Spent hours with the wrenches messing with tension bolt C. Getting the z axis perpendicular was sort of a lost cause, so I just shimmed the hell out of the mount and it seemed to do the trick. Not ideal but as far as I can tell everything works great.
Besides making the bit actually perpendicular, I added another 1’x2’ particle board sheet to my bed, making it around half an inch taller. My z is now as short as it can be, with z pipes flush against the gantry.
All the chatter is gone, now it sounds like cutting butter again, yay!
How do I turn off estlcam tool changes? Everything just pauses forever in the middle of the toolpath. I put 2 different tools in my tool list, but they’re the same “tool” just different settings for different operations. One is the contour passes where I use trochoidal, the other is a pocket setting where I use parallel pocketing.