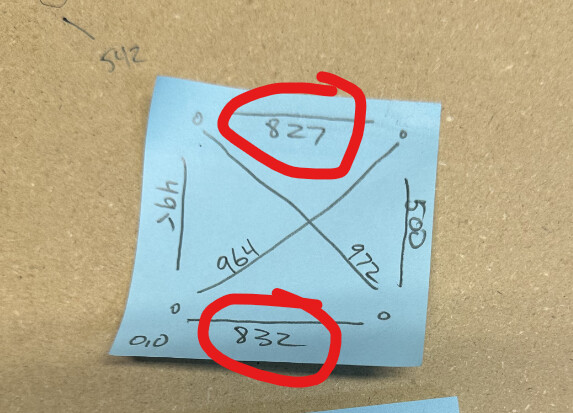
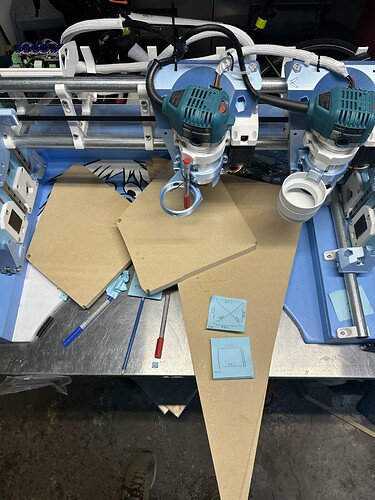
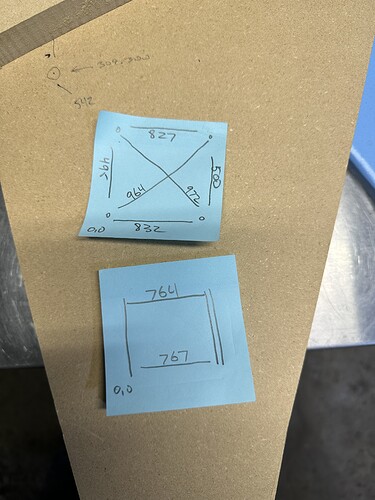
Yes, things seem amiss. Here is a full set of measurements taken from the exact points that the belts enter their corresponding blocks. And it’s definitely out. The stickie with only two measurements are the belt to rail outside edge measurements. 0,0 being the left of the gantry and corner “closest to the router” side of the gantry.

I can not think of a way this can happen.
Are your points at the furthest that can possibly be out? If so move them in about 20mm from each end. If they are already moved in I would check that X pulley grub screw again.
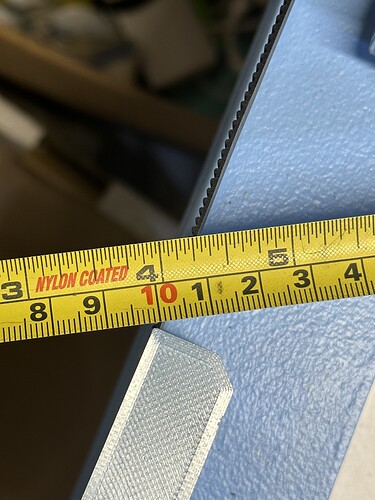
Those aren’t the “pen drawn points” those are the exact spots where the Y belts enter their respective blocks (measured from the inside surface of the belt). Measured like so:
HAHAHA shoot my bad!
The distance between where the belt enters the bock is pretty much irrelevant, as far as I can tell.
The belts need to be as parallel as possible, and a line drawn between the two blocks that the endstops trigger against should be exactly perpendicular to the Y belts at each angle (or as close as you can get them before using the offset to compensate for the minor inaccuracy).
The test is to actually draw out points at each travel limit ((XMin/YMin, XMax/YMin, XMax/YMax & XMin/YMax), and measure those diagonals. I’m not sure from reading your post, but it doesn’t seem that you have done that.
I had, yes and that started this tangent we’re on here currently. I did however forget to lay a carpenter’s square down on the machine. I’ll do that now and report back. I’ve been tied up today so haven’t had a lot of time to tinker but will shortly here. I think I’ll start by ensuring the rail is squared up to the world first - it’s where the most adjustment exists for me (the elongated holes in the clamps they use).
Can someone point me to setting the machine extents (soft limits)? I keep crashing the second router into the gantry and would like to not do that ; )
Right now I’m connected via AP using my laptop and Chrome. Not using USB at the moment but could. Looking through the configs I see /axes/soft_limits set to False and above that I see /axes/max_travel_mm set to 1220.000
Is that where is put in the machine maxes?
Yes but that only works after homing.
I am not understanding why it keeps crashing? I am pretty sure it is still going to cause an alarm and need to be rehomed, so it is better to just figure out how to not crash it to begin with. I have not used soft limits, so that is a guess without looking it up.
Maybe “crashing” is the wrong word. I mean literally crashing. Like physically. Like if the second core could keep going to the right, right through the end plates and to the other wall of the shop. Even though I have 20" of travel in the X direction I actually only have 20" minus the width of that second core.
Sorta the same as not running the machine off the table in the Y direction. Can I not use soft limits to set the physical limits of the machine travel?
I just tried the X axis and it seems to do what I think it should? I’ll assume so and get back to my squaring and let you know if the soft limits do anything odd to me.
One oddity I’ll add here as I’ve been battling it:
If my Z goes out of balance (like when cycling power) and I have to rehome the stepper on the side where the cores are start to grind. If I ever so gently “help” with the weight of the cores the homing goes just fine. Once the machine is z-homed I can freely go up and down no matter where the cores are. But if the cores are to the left and I have to rehome after a power cycle and gantry drop, the left stepper grinds. Ditto if the cores are to the right and the gantry drops. Interesting.
It’s not hard. However, I must confess, I don’t know the ramifications of a 2 core setup.
It’s a two step thing.
First, in config.yaml, you edit your max travel in mm’s for each axis. It’s a value already present, but set at defaults. The values below are from my Jackpot on my larger LowRider v4.
Under X:
max_travel_mm: 2495
Under Y:
max_travel_mm: 1228
Under Z:
max_travel_mm: 92.500
Then, enable soft limits by setting them to true for each axis you want them on. The following shows you where that is located in my X options (right above “homing”):
...
 x:
    steps_per_mm: 50.000
    max_rate_mm_per_min: 9000.000
    acceleration_mm_per_sec2: 200.000
    max_travel_mm: 2495
    soft_limits: true
    homing:
      cycle: 3
      positive_direction: false
      mpos_mm: 0
      feed_mm_per_min: 300.000
      seek_mm_per_min: 1500.000
      settle_ms: 500
      seek_scaler: 1.100
      feed_scaler: 1.100
    #X
    motor0:
...
I have this on my larger machine that’s been a v2, v3, and now a v4. I recently slathered more lubrication on the lead screw. Waiting to see if that helps.
Makes sense that you’d encounter this with the extra mass of the second router. You could try lubricating the lead screws like @DougJoseph has done and/or, since you’re using it in a freezer and can probably get away with it, increase the current settings for the Z-axis drivers; and by the sounds of it, you can probably just increase the homing current.
So I’m finding it difficult to get a framing square on this thing in such a way it’ll provide me any useful insights. I’m also wondering how much I need to worry given the work this thing will be doing. I’m going to just set it up to run and see how critical it’s going to be for me.
You can, but they only work after the machine has been homed. If the machine has been homed, what are you doing to continually drive them too far? What I am getting at is while it will stop you from hitting the end it is only after homing and then I am pretty sure you will need to rehome if you hit a soft limit. So it isn’t going to help all that much (why I don’t have anything about it in the instructions).
Meaning, it is better to figure out what you are doing procedurally to try to keep moving them too far.
There should be no issues with lifting whatsoever. I suggest using the newest config I uploaded there is a homing current issues since that is a new setting so there is a batch of boards out there with an extremely low homing current.
As much as I want to get it perfect, for what you do I hardly think it will matter.
If you want to get it more square I am willing to keep handing out questions and suggestions.
Ah! I’m with you. Yes - once CAM in involved then it’s my bad if I tell the machine to go too far. I kept running past the machine ends accidentally clicking +100 instead of +10 and the like.
It appears not - the machine retains the 0,0,0 info. It just simply stops at the soft limit. No alarm or anything in the dashboard. If I tell Y to go 400 it stops at 326 and then waits. No rehoming required. But you’re right (above) - there should’t actually be a need for soft limits in the end.
How recent? I think these boards arrived here early this summer.
I’ll definitely take you all up on that but for now let’s make some ice cubes and see how the machine handles the next steps (the cold and the dual core engraving). I’ve literally just released the California air from the USPS flat rate box here and am looking at the touch plate and collets.
I’m going to get back into ESTLCam and get a test file to run. I’ve never run using FluidNC so more learning to come here still. Feel free to point me in the direction of “here’s how to run a file” instructions but I’ll find them I’m sure. The weather here is turning in the right direction for me after this weekend so I’ll be able to do some “not -13F” tests outside of the freezer to make sure things are working before I commit the machine to the subzeroes.
GCode help?
I’ve got a test file set up but it’s clear I need to address the start and end sequences.
Is GCode the same for FluidNC/Jackpot as it was for the Rambo/Marlin? Here’s what I need to or would like to do with my start and end GCode for this machine. It homes to the front left (closest to me) corner but the ice slabs load to the back left corner. I’d like the following to happen when starting a job:
Home all axis
Move to Max Y (324mm in this case) and pause so I can load the slab of ice
Probe the surface (this will be a long way down with the tall XZ plates I’m using)
Pause so i can remove the probe
Begin the job
At the end I’d like to rehome Z to get the gantry up and out of the way and then return to X0, Y324
[ Also - I had a look at ESTLCam 12. Is anyone using it yet? Looks great! ]
I think most of us do nowadays. Some things have changed, carving toolpaths are generated a lot better.
I enjoy having the X and Y soft limits. Prevents me from jogging into an endstop. The Z soft limit causes issues with my workflow though, while probing it will trigger. Not sure why I do so much jogging, but it’s fun with the pendant.
Exactly, That is most likely the issue. Change your config homing current, and holding current on all 5 drivers to 0.7 if you do not want to use the new files.
No, I have the equivalents on the milling basics page.
No re-homing cleans the probe, you can move up, but not rehome.
You think of EVERYTHING ; )
Question - with the tall XZ plates will I need to change this:
G38.2 Z-80 F200 P0.5 (Probe set thickness)
to a longer Z travel for probing?


