My table will be in the basement, prototype style until I can build a completely 2 year old safe enclosed table. I think I have all the parts, but I don’t know how to use this RAMBO thing, so I’ll be slowed down trying to figure that out. That, and I don’t know what the direction of this giant belt is.
I don’t have to work tomorrow though, so as long as my son is interested, I’ll make some progress (so probably just during his nap )
Yup, with the exception of it is 1 single belt continuous at the back of the center assembly over the belt clamp. The belt clamp part gets a zip tie as the very last step. It lets you equalize tension and align your axis.
The other side is where they connect and tension. So the endstop side gets looped to itself as small as you can get it and then ziptie though the loop to the post, the 2" bolt with the spacer. The other open end is where you have lots of room for the zip tie tension technique.
This is where the two zipties will also cross each other. Both ends get tied to the post, but if you do it side by side they will both be at an angle…let me take a picture.
Made some progress. I have Ryan’s Rambo code built and ready to flash. No LCD yet, but I might yank the one from my MP3DP if pronterface doesn’t work right away.
Then it’s the belt. I think I have a handle on it.
I am really excited for this thing. Just installing the idlers showed off the thought in the design. I am going to claim this as your most elegant work yet Ryan.
[attachment file=41313]
[attachment file=41314]
I’m well aware that the carriage rides on the other side. This is just so I can work on it.
I haven’t got my magnet yet.
I have only 6 zip ties left. So I might have to go to home Depot tomorrow.
Thanks for saying that. I’m not too sure about this one yet but for the most part it is solid.
I need to put that in the instructions how you have it upside down like that is what I think is the best way to tighten up the rollers and set the right width. Unfortunately the width is supercritical or it makes a lot of noise that’s the part I’m unsure about. I’m thinking if this doesn’t work right either a third set of roller bearings or just two on each side but top and bottom instead of side by side.
What size is your sand table going to be and the length of your belts? Is there a way to calculate how much belt you need based on the size? I am probably going to build one of these this winter. By then, ya’ll will have all the little problems flushed out.
This is end table sized. The glass is about 19x19". From the corexy design it’s 4xWidth + 4xHeight. So I figured I’d need about 16 feet. The closest thing Ryan sells is about 19.5 feet.
I’m sure Ryan will have a better calculator at some point.
Those boards are 1x4 S4S, so 3/4"x3.5". I think I can manage to use one board all the way around, but the glass can’t sit on the left/right sides, just the front/back.
That’s not really how I did it. I tightened the rollers first, then I put it up right, and moved the gantry to one side and screwed down the cross piece. I suppose when I make the more finished version, I will do the rollers last.
Ok, I have the belts installed, temporarily. I am understanding what you’re saying now a bit more.
I flashed the firmware with your sample code. I am having direction problems though… Something I’m not understanding, I’m sure.
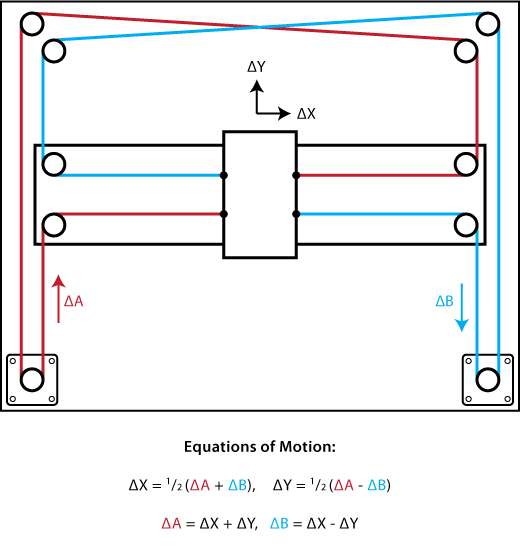
+x and +y should be away from the endstop corner. When I first started, +x was towards the endstop corner, and +y was away, then I reversed both motors and +x was away from the endstop corner and +y was towards the endstop corner.
If I reverse only one motor, I think I will switch which axis is x and which is y. I guess I didn’t try swapping which motor was in which port. Maybe I got that backward.
It’s confusing as hell right? So for me the endstop side stepper plugs into X, and the Other Y. From there the both plugs should face the same direction.
Yeah, swapping the motors fixed it. I haven’t tied the belt in place with zip ties yet. I have to install the hardboard to keep the sand in. I will also print slightly larger spacers. So I have to take it apart at least one more time.
I didn’t see my united nuclear order info, so I called them today (with a phone! Well, google hangouts). Apparently, their email went to my spam folder. I haven’t checked my spam folder in probably a year. I learned two things:
I'm getting my magnet today
There are several v1engineering.com forum posts in my spam folder. Of the ones I found, they were all from Barry, with links to his google photos. Weird.
I haven't missed anything else that's been in my spam folder in a long time. It didn't even occur to me to look in the spam folder. Also, the woman on the phone that looked up my order said, "Just a few little magnets?". It was deflating.
Compared to some of their other magnets, these things look like fridge magnets.
One of the high school kids at one of my school’s made a stick with a 2x4 and two of the hockey puck sized magnets and stuck it in a classmates locker. Maintenance pretty much destroyed the door prying it open. As far as I know, no one has fessed up to it.

 )
)