More and more, I find myself talking to a pretty smart (most of the time) fellow named Gemini… mostly asking questions about subjects of hobby interests. More often or not, I’m surprised the level of detail he answers with and, at least on the surface (first glance), seems reasonable… maybe even accurate.
Recently I’ve been interested in V-carve inlays. I’ve watched a ton of YT videos on the subject and found it somewhat confusing because the presenters usually present great information but are using different programs to do it – V-CarvePro12 (VC12), CarbideCreate6 (CC6), and F-Engrave, etc. I really like the information presented in the VC12 videos (especially those from Cutting It Close and IDC Woodworking) but CC6 and F-Engrave are the programs I want to use because I’m… well, cheap. Largely, it’s the differences in terminology and programmatic approach between the programs that is the source of most of my confusion… the rest of the confusion is due to old age ![]() .
.
So, just this morning, I asked Gemini…
CNC programs V-Carve Pro 12, Carbide Create 6, and F-Engrave can all be used to do inlays. Can you explain the differences in the settings and terminology if I want to do an inlay 6mm max depth, with a glue gap of 1mm and surface gap of 1mm?
Gemini answered… and blew me away with it’s response:
You’re diving into a great application of V-carving! Inlays can produce stunning results. The key difference between these programs for inlays lies in their user interface, specific terminology, and how automated the process is. They all rely on the same underlying geometric principles of V-carving.
Let’s break down the settings for a 6mm max depth, with a 1mm glue gap and a 1mm surface gap, across V-Carve Pro 12, Carbide Create 6, and F-Engrave.
Common V-Carve Inlay Principles:
Before we get into specifics, understand these concepts:
- V-bit: A V-shaped carving bit is essential for inlays. The angle (e.g., 60-degree, 90-degree) determines the slope of the walls.
- Female Part (Pocket/Cavity): This is the main piece of material where the inlay will sit. It’s usually cut with a V-carve toolpath, often with a flat endmill for clearing out the bottom (pocketing).
- Male Part (Plug/Insert): This is the piece that will be inserted into the female part. It’s also cut with a V-carve toolpath, but the geometry is typically mirrored and often has a “start depth” or “offset” to create the necessary gaps.
- Glue Gap: This is the space at the bottom of the male plug when it’s seated in the female pocket. It’s crucial for glue squeeze-out and to ensure the sloped walls of the inlay make full contact without bottoming out.
- Surface Gap (or Overcut/Start Depth for Male): This relates to how much material you leave above the “true” fit line. When you put the male into the female, you don’t want it perfectly flush right away. You want a small amount of the male material to protrude so you can sand/plane it down flush after gluing, ensuring a seamless fit and removing any fuzz or imperfections. This is usually achieved by either a “start depth” on the male cut or an “overcut” setting.
1. V-Carve Pro 12
V-Carve Pro has a dedicated and highly capable V-Carve Inlay Toolpath feature, which automates much of the math.
- Terminology:
- Female: The Pocket
- Male: The Plug
- Settings for your inlay (6mm max depth, 1mm glue gap, 1mm surface gap):
- Female (Pocket) Toolpath:
- Toolpath Type: VCarve/Engraving Toolpath (or VCarve / Advanced VCarve for more control over flat bottom)
- Start Depth: 0 mm (or top of material)
- Flat Depth: This is effectively your maximum depth for the inlay. Set this to 6mm.
- Clearance Tool: You’ll likely use a smaller flat endmill (e.g., 3mm or 6mm) for area clearing to remove the bulk of the material, leaving the V-bit to do the detailed shaping.
- V-Bit: Select your V-bit (e.g., 60-degree, 90-degree).
- Important Note: V-Carve Pro’s V-Carve Inlay tool automatically adjusts the pocket depth based on the plug settings. You generally set the desired “Flat Depth” for the pocket, and the software ensures the male plug will seat correctly.
- Male (Plug) Toolpath:
- Toolpath Type: VCarve Inlay Toolpath (This is a specific option in V-Carve Pro’s toolpath menu).
- When you select your vector(s) for the male part and choose “VCarve Inlay Toolpath,” a dedicated dialog will appear.
- Gap Settings: This is where you define your “glue gap” and manage the “surface gap.”
- Glue Gap / Bottom Gap: This directly corresponds to your 1mm glue gap. This setting ensures there’s 1mm of space at the bottom of the male plug when fully inserted, preventing it from bottoming out and allowing glue to escape.
- Recess / Male Start Depth / “Material to Remove”: This is often how the surface gap is handled. V-Carve Pro typically calculates the male plug’s start depth automatically to achieve a good fit. To achieve your 1mm surface gap, you want the male plug to protrude by at least 1mm when it’s fully seated to allow for sanding. In V-Carve Pro, this is typically managed by ensuring the V-Carve Inlay toolpath calculates an appropriate “Start Depth” for the male part. If you set the “Glue Gap” to 1mm, and your “Flat Depth” for the Female is 6mm, the software calculates the necessary male cut. You’d typically cut the male part from stock thicker than the inlay’s effective depth to ensure enough material to sand down.
- Female (Pocket) Toolpath:
- Workflow:
- Design your vectors for the inlay.
- Create the Female (Pocket) toolpath using VCarve/Engraving, setting your
Flat Depthto 6mm. Use a clearance tool as needed. - Create the Male (Plug) toolpath. Select the same vectors (or a mirrored copy if your design is asymmetrical and you’re cutting from the top of the male stock), choose “VCarve Inlay Toolpath,” and input your
Glue Gapas 1mm. V-Carve Pro handles the mirroring and offsets automatically when using the “VCarve Inlay Toolpath.” - Cut the female, then cut the male (from thicker stock). After gluing, sand the male flush.
2. Carbide Create 6
Carbide Create (especially Pro) has improved inlay features, but it’s often a more manual process of setting offsets and start depths compared to V-Carve Pro’s dedicated inlay tool.
- Terminology:
- Female: Pocket
- Male: Plug
- Inlay Mode: A specific setting for the male plug toolpath in Advanced V-Carve.
- Bottom Gap: Their term for “glue gap.”
- Settings for your inlay (6mm max depth, 1mm glue gap, 1mm surface gap):
- Female (Pocket) Toolpath:
- Toolpath Type: Advanced VCarve
- Start Depth: 0 mm
- Max Depth (or “Flat Depth”): Set this to 6mm.
- Clearance Tool: Yes, use a flat endmill to clear out the bulk.
- V-Bit: Select your V-bit.
- Male (Plug) Toolpath:
- Important: You need to mirror your male plug vectors (if not symmetrical) before creating the toolpath, as it’s typically cut from the backside or flipped.
- Toolpath Type: Advanced VCarve
- Start Depth: This is crucial for your glue gap. To achieve a 1mm glue gap at a max depth of 6mm, your male plug’s V-carve should start at 1mm from the bottom of the female pocket when they are mated. So, if your total pocket depth is 6mm, your male toolpath’s
Start Depthshould be(Total Depth - Glue Gap) = 6mm - 1mm = 5mm. - Max Depth: This will be the same as your female pocket’s max depth, 6mm.
- Enable “Inlay Mode”: This checkbox (usually under the Advanced VCarve settings) is what tells Carbide Create to offset the male vectors inwards to create the proper V-carve geometry for the plug.
- “Bottom Gap” (or Inlay Gap): In some versions/discussions, Carbide Create might have a direct “Bottom Gap” setting within the “Inlay Mode.” If it does, this directly controls your 1mm glue gap. If not, you use the
Start Depthas described above. The latest versions of Carbide Create do have a “Bottom Gap” setting in the Inlay Mode, which directly correlates to your 1mm glue gap. This makes it much easier. - Surface Gap (Managing protrusion): Carbide Create doesn’t typically have a direct “surface gap” setting. You manage this by ensuring the male stock is thick enough. You’ll cut the male plug from material that’s at least (6mm + 1mm for sanding + any fixturing space) thick. After the cut, the male plug will likely protrude from the female pocket, and you’ll sand it flush.
- Female (Pocket) Toolpath:
- Workflow:
- Design your vectors.
- Duplicate your vectors. For the male part, mirror the duplicated vectors horizontally or vertically depending on your stock setup.
- Create the Female (Pocket) Advanced VCarve toolpath with
Start Depth0mm andMax Depth6mm. - Create the Male (Plug) Advanced VCarve toolpath for the mirrored vectors. Set
Max Depthto 6mm. Crucially, enable “Inlay Mode” and set theBottom Gapto 1mm. - Cut the female, then the male, then glue and sand.
3. F-Engrave
F-Engrave is a free, open-source program primarily focused on V-carving and engraving. It’s powerful but has a more utilitarian interface and might require a deeper understanding of the V-carve geometry.
- Terminology:
- Female: Standard V-carve
- Male: Prismatic (a setting/mode for the male plug)
- Prismatic Overcut: This is a key setting for managing the gap/fit of the male plug.
- Cut Depth Limit: Max depth of cut.
- Settings for your inlay (6mm max depth, 1mm glue gap, 1mm surface gap):
- Units: Make sure to set units to millimeters (mm) in F-Engrave’s
Settings→Generalmenu. - V-bit Angle: Enter the angle of your V-bit (e.g., 60 or 90 degrees).
- Female (Pocket) Toolpath:
- Load your DXF/SVG or type your text.
- V-Carve checkbox: Ensure this is checked.
- Cut Depth Limit: Set this to 6mm (or slightly more than 6mm if you want to ensure cleanup below the intended inlay depth). F-Engrave often uses negative values for depth, so you might enter
-6.0. - Cleanup Operations: You can use a smaller endmill for
Cleanup Cut Diameterto clear the flat bottom.
- Male (Plug) Toolpath:
- Load the same DXF/SVG or text.
- Prismatic checkbox: Crucially, enable this. This tells F-Engrave to create the inverted V-carve necessary for the male plug.
- Cut Depth Limit: Set this to 6mm (or slightly more to ensure the male is deep enough). Again, might be
-6.0. - Prismatic Overcut: This is your primary control for the glue gap and also implicitly affects the “surface gap.” This value effectively shifts the male V-carve upwards, creating space.
- To get a 1mm glue gap, you’ll typically set a
Prismatic Overcutthat, combined with the V-bit angle, results in the desired 1mm gap at the bottom when the male is seated. This often requires some trial and error or a bit of trigonometry, as it’s not a direct “glue gap” setting like in V-Carve Pro or newer Carbide Create. - A common strategy is to set
Prismatic Overcutto a value that provides the desired fit. For a 1mm glue gap and 1mm surface gap, you’ll need the male plug to be6mm - 1mm (glue) = 5mmdeep where it meets the female walls, plus a bit more to ensure protrusion for sanding. - A good starting point for
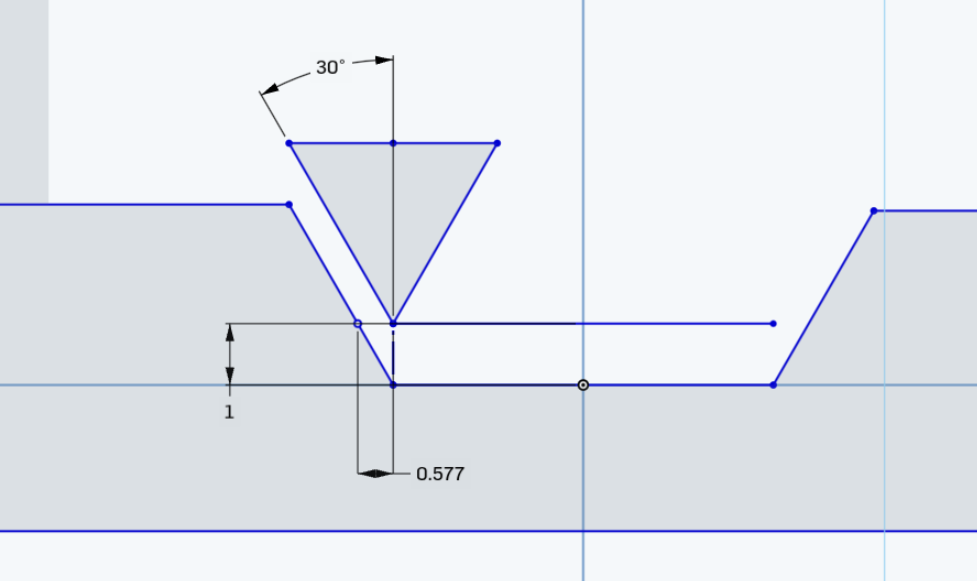
Prismatic Overcut(to achieve a glue gap) is often calculated as(Glue Gap) / tan(V-bit Angle / 2).- For a 60-degree V-bit:
1mm / tan(30 degrees) = 1mm / 0.577 = 1.73mm(approximately). So, setPrismatic Overcutto around1.73mm. - For a 90-degree V-bit:
1mm / tan(45 degrees) = 1mm / 1 = 1mm. So, setPrismatic Overcutto around1mm.
- For a 60-degree V-bit:
- This
Prismatic Overcutalso contributes to how much the male plug protrudes (your surface gap). You want it to protrude by at least your 1mm surface gap. If yourCut Depth Limitfor both male and female is 6mm, and yourPrismatic Overcutcreates a 1mm glue gap, the male part will inherently extend beyond the original surface of the female, allowing for sanding.
- To get a 1mm glue gap, you’ll typically set a
- Cleanup Operations: Can also be used here.
- Units: Make sure to set units to millimeters (mm) in F-Engrave’s
- Workflow:
- Open F-Engrave, set units to mm.
- For the Female (Pocket):
- Load your design.
- Check
V-Carve. - Set
Cut Depth Limitto -6.0mm. - Set up
Cleanup Cut Diameterif desired. - Calculate V-carve and Save G-code.
- For the Male (Plug):
- Load the same design.
- Check
V-Carve. - Check
Prismatic. - Set
Cut Depth Limitto -6.0mm. - Set
Prismatic Overcutbased on your V-bit angle (e.g., 1.73mm for 60-degree, 1mm for 90-degree) to achieve your 1mm glue gap. - Calculate V-carve and Save G-code.
- Cut the female, then the male (from suitably thick stock), then glue and sand.
Summary Table for your settings:
| Setting | V-Carve Pro 12 | Carbide Create 6 | F-Engrave |
|---|---|---|---|
| Female (Pocket) | |||
| Terminology | Pocket / Female | Pocket / Female | V-carve (standard) |
| Max Depth (6mm) | Flat Depth: 6mm |
Max Depth: 6mm |
Cut Depth Limit: -6.0mm |
| Male (Plug) | |||
| Terminology | Plug / Male (VCarve Inlay Toolpath) | Plug / Male (Advanced VCarve + Inlay Mode) | Prismatic |
| Mirroring (of vector) | Handled automatically by Inlay Toolpath | Required to manually mirror vectors before toolpath | No explicit mirroring, geometry is internally inverted for prismatic |
| Glue Gap (1mm) | Glue Gap (direct setting): 1mm |
Bottom Gap (in Inlay Mode): 1mm |
Prismatic Overcut: (e.g., ~1.73mm for 60° bit, ~1mm for 90° bit - derived from desired 1mm glue gap) |
| Surface Gap (1mm) | Managed by Glue Gap and Male Start Depth (calculated by software) and ensuring thick enough stock |
Managed by Bottom Gap and ensuring thick enough stock |
Managed by Prismatic Overcut and ensuring thick enough stock |
| Final Depth | Flat Depth: 6mm |
Max Depth: 6mm |
Cut Depth Limit: -6.0mm |
Export to Sheets
Important Considerations for all programs:
- V-bit Angle: Use the exact same V-bit for both the male and female parts. Any difference will result in a poor fit.
- Material Thickness: For the male plug, always start with material thicker than your target 6mm maximum depth. This allows for the protrusion that becomes your “surface gap” and gives you material to sand/plane flush after gluing.
- Z-Zero Consistency: Consistency in setting your Z-zero (top of material vs. machine bed) is paramount for both parts. Any deviation will directly affect the fit.
- Test Cuts: Always perform test cuts on scrap material first, especially when dialing in the
Prismatic Overcutin F-Engrave or if you’re new to inlays in any software. - Clamping: Ensure firm, even clamping when gluing the inlay.
- Bit Runout: Minimal bit runout is essential for tight fits. A wobbly bit will cause gaps.
Each program offers a viable path to creating inlays, but V-Carve Pro streamlines the process with its dedicated inlay tool. Carbide Create has made significant strides in simplifying inlays with its “Inlay Mode.” F-Engrave is a powerful free alternative, but it demands a slightly deeper understanding of the geometric principles behind the Prismatic Overcut to achieve precise fits.
======================= Me again! ================================
That’s tons of detail that appears on a cursory glance to be quite reasonable… judging from what I’ve already gleaned from my own research. And all in mere seconds… just for the asking. I later gave the same v-carve inlay parameters to Gemini, asking how I would go about it in Estlcam… and again got a very informative response.
I’d never have been able to gather and collate that much information on my own… regardless of how long I researched it. Gemini seems pretty smart… and I won’t hesitate to ask it techical questions in the future. I’m old – and easily impressed by this new-fangled AI stuff… but it’s probably old hat to you younger guys. I’m beginning to wonder… could Gemini be my new BFF?
![]()
![]()
![]()