I miss a tool that has the functionality of “sketch mode” in Fusion 360. Drawing plans in Fusion is great when you manage to wrap your head around constraints and so on. Doing 3d models are great when that’s needed, but I wish f360s sketch mode and Inkscape would get a love child!
2 Likes
Your point about belt tension is well taken. I hadn’t thought about that. I’ll sure keep this in mind as I make plans to get a LowRider tucked into my shop. Thanks.
Will try and put up some photos of my Hadron build in the next few days. I’ve only got a few hundred of them! Would love to see more photos of your build. I’m sure they’d inspire and help me. Feel free to send them to my email address.
1 Like
Rhino has a sketch command and a 90 day free trial. 
2 Likes
Hello James,
I’m getting nervous because it’s time to start painting the inside of the hull.
Specifically, I want to paint the inside of the forward and aft buoyancy tanks before I glue down the lids. Actually, I wonder if it’s really even necessary to paint inside these tanks, since they will never see the light of day after the lids are installed. Both tanks are amply coated with epoxy.
I painted the outside of the hull with a 2-part PU paint and it nearly killed me. Stupid expensive, hard to mix, hard to apply, dried too fast and the vapors --even with a good respirator-- were just awful. My wife fled the house! And the results were very so-so. I vowed I would never again use anything but a water-based paint.
Frankly, I’m giving serious thought to just putting down a good porch paint and let it go at that. I mean, what’s the worst that could happen? Once every year or two I might have to spend a weekend sanding and re-painting my little boat because I didn’t use some fandangle space-age “coating” (the preferred word these days among manufacturers for “paint”). This doesn’t scare me.
Please tell me about your painting experience on the Hadron. What products did you use and where? Happy with the results? Any suggestions? What, if any, primer should I use? How much sanding did you inflict on the epoxy before painting?
Anyone else reading this, please feel free to jump in with suggestions/observations/questions. Any help appreciated. I don’t get paint, and paint knows this about me!
Cheers,
Steve
I’ve used regular hardware store Rust-Oleum on both my home-builds, the 1/4" ply Bolger Gypsy and the dacron-covered BoardYak designed by Dave Gentry. Easy to use, and I just threw the foam brushes or roller covers away most of the time rather than try to clean them out. The paint held up longer than the ply on the first, and the second is still going strong after several years.
Now that’s what I’m talking about. I’m not at all surprised you got decent results using simple off-the-shelf paint products. Thanks for sharing, Tom. Makes me feel better.
Steve,
Painting is a total a pain! I’m sorry. It’s taken me a while to get comfortable with it. I think an enclosed cheap car tent (for dust) and a nice respirator is a must. I know it seems ridiculous and tedious at first but it does hold up after serious abuse better than any other household paint.
I use Interlux two part perfection. I prime first with their primekote which is really pleasant stuff to fair. I use ther watertite epoxy filler for anything very minor towards the end.
In terms of painting - apply thinly with a bit of their solvent. I get a large quantity of one use solvent resistant rollers and a nice synthetic brush and do the roll and tip method. Roll several feet than brush out bubbles. Wet sand lightly between coats. It takes several coats to get to where you are happy. You can’t be impatient. But if you prep properly - each session shouldn’t take more than 50 mins. I mix small amounts so there is no waste and I have plenty of time. As you get better and more efficient you will find that one can of paint goes a long way.
I wet out the floor with water to keep dust out of air and the temp down. I paint around 11am.
For the foils which I sand and fair so much I’m a bit lazy and use one part enamel - interlux brightsides. This paint is close to rustolium I suspect.
The tanks don’t need to be painted. You could add pigment into epoxy for appearance. I added black. Not a big deal. I recommend a hole and plug between that forward tank and one under vang…I accidentally filled front tank with rain water and it was tedious to empty. If I could have moved the water one tank back it would have been easier to sponge out.
The two part perfection has a clear varnish for wood and carbon fiber.
There is also epifanes which is clear, one-part and less durable but way more user friendly and less toxic. I used that for my old boat mast, dog haus, and other outdoor garden items. It has to be sanded and reapplied every couple of years. The historic preservation folks like it because it has a light touch.
Hope that helps!
J
2 Likes
Hey James, thanks for your usual swift and highly informative reply.
When I read ,“Painting is a total pain!”, I knew I was in for solid, no bullshit information. I thought: this man has been there, done that.
Yes, at the bottom of my discontent is a vast pool of impatience, an unwillingness to bring together all the necessary items (the temporary paint booth, good quality paint, the special rollers and brushes, roll and tip technique, the attention to details like time of day, wetting the floor, etc., etc…), all of which, if added together and taken seriously, would make for an excellent paint job, as clearly evidenced by your beautiful Hadron. I salute you!
So, I got knocked down in the first round of my fight with paint. I need to get off the mat and start swinging again, this time with more intelligence and patience.
Your message to me is: yes, painting is no fun, but with planning and careful use of resources, especially in carefully dosing out the paint in small but numerous layers (something I learned the hard way with epoxy, by the way), excellent results can be achieved, even by the complete amateur.
And thank you for confirming that the buoyancy tanks really do not need painting inside, but that a tinted epoxy would be good esthetically. With no painting on the inside of any of the tanks (fore, aft and central) that’s well over half the inside hull I won’t have to worry about.
Thanks! You’ve been very helpful, and I feel motivated to try again, this time with feeling. Later on, when it’s time to varnish the deck, I’d like to have another conversation with you, but that seems like a long way off right now.
Cheers!
Steve
1 Like
Oh, I forgot: what kind of pigment did you add to your epoxy?
i don’t have it at hand. i think it was something like this: https://shop.kremerpigments.com/us/shop/pigments/47250-furnace-black.html.
to be clear, you can use a one part enamel such as rustolium (i was reading they have heavier marine grade stuff) or brightsides on interior. with all the hard to get to places it is a lot easier to apply. and as you are hashing out the fitting positions later you will find yourself doing touch-ups. and honestly, if i did this again i would probably use brightsides.
i just don’t want you to rule out the two part…it is unmatched when it works!
you are familiar with https://www.storerboatplans.com ? his blogs posts were very helpful for me. storer focuses on making a wooden boat suitable for heavy use. how do you make a boat that can be abused as much as a laser or sunfish? so there is a lot of info on what actually works over time…his OzGoose project is quite admirable. that was my first boat.
Thanks, James. Highly useful information, especially about storer boat plans. I will surely read the blog posts. I’m not giving up on 2-part PU paint just yet, but kind of heading in that direction.
I’m going to take a real hard look at what my options are for marine grade enamels around here. I’m not optimistic, but I may be able to order some quality product from Rio de Janeiro, which has a huge yachting community. More later. Thanks again.
1 Like
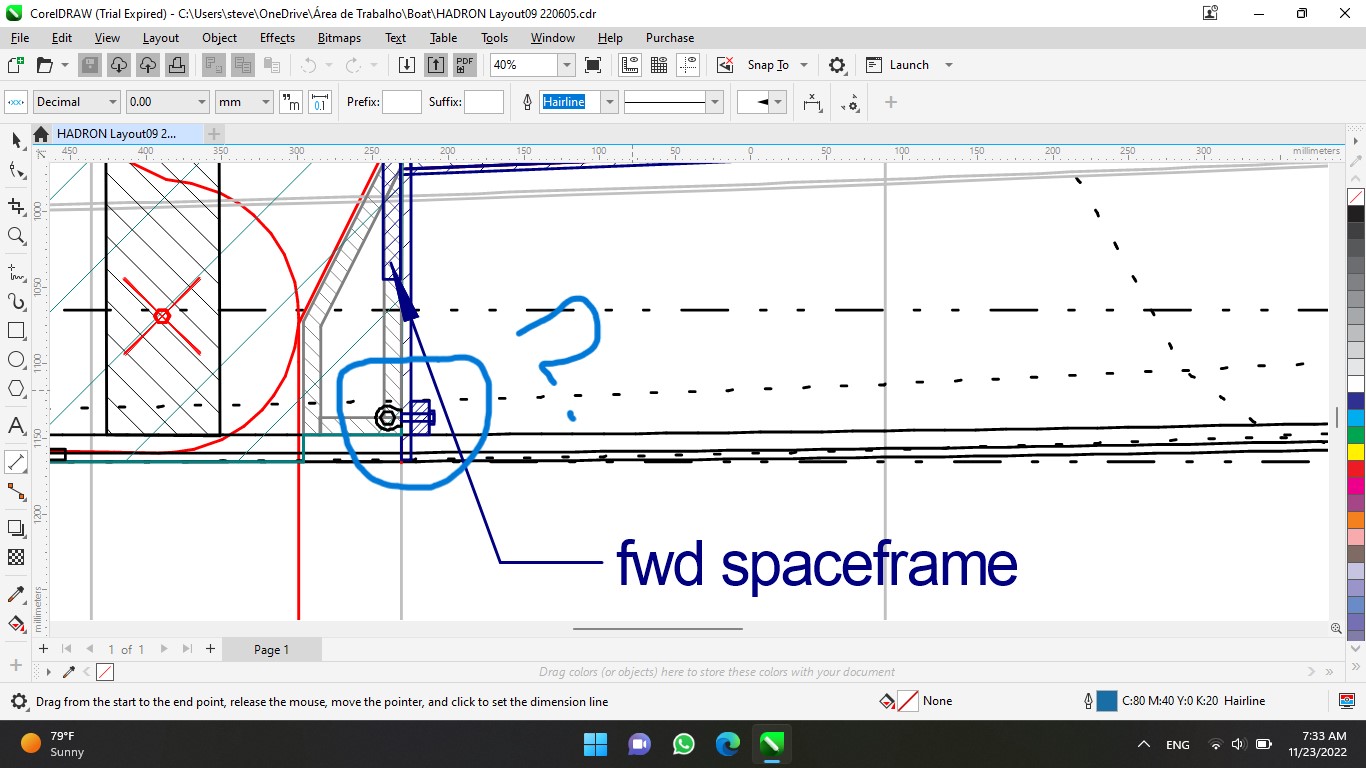
Howdy. I’m just minutes away from gluing down the lids to the forward and aft buoyancy tanks. I take one final look at Keith’s layout drawing to make sure I’m not closing up an area that I will want to access later. The eyebolt for the vang, passing through the kingpost, is installed and all seems right with the world.
But as I scrutinize the drawing one more time before gluing, I notice this other eyebolt at the very bottom aft portion of the aft buoyancy tank. Somehow, I had never seen it before. It seems impossible, but it appears to be mounted right into the centerboard case, about where the centerboard would come to rest.
It does not appear in the overhead view on the same drawing. Keith gives us no information about it.
Before I embarrass myself and ask Keith, I thought maybe you might know: What the hell is it?
1 Like
Those bolts are for the toestraps! I don’t think they are in best position. i ended up affixing the straps to top of tank. it seemed cleaner that way.


1 Like
Hi James,
Hope launch day is nigh upon you. Your Hadron looks fabulous. With all the go-fast mods you made, have you considered bolting seat belts onto the deck?
I wanted to talk shop about the centerboard, specifically, the pivot bolt. Curious to know how you handled this detail.
Here are my thoughts. I’d like yours.
Keith, in typical fashion, hasn’t much to say: M10 x 70 bolt, 12 mm reinforcement pad on each side of the case in way of the bolt. Done.
I think we can agree, the bolt needs to be stainless or maybe bronze, yes? Maybe this was so obvious, Keith didn’t feel the need to specify it.
I’d like to use a nut on each end of the bolt that has an internal nylon bushing for a better grip.
I want to drill out the hole in the centerboard itself to accept some kind of bushing (brass/bronze/stainless), through which the bolt will pass snugly. Ditto on each of the reinforcement pads. The idea of a bolt working against wood, especially in such a high stress area, is unthinkable, yes?
I want to put a very thin nylon disk/washer (or maybe formica), something like 4" in diameter, between the CB and the CB case, threading the bolt through it at installation (tricky). This will reduce wear and tear in that area, reduce CB play/flutter, facilitate raising and lowering of CB.
I want generous, fat, stainless washers under the nuts with nylon bushings, pressing against some kind of squarish rubber gasket to keep the sea from pouring in around the bolt holes in the reinforcement pads. It has been suggested that, 1) inner tubes and, 2) those little round rubber rings on fancy beer bottle caps make good gaskets.
Your thoughts, please. I’m sure I missed a few things.
Cheers,
Steve
I think nylon would also be perfectly acceptable as bushing material, maybe even better than metal because of its workability and slipperiness.
Hey! I think your intuition on this is correct. The 4” washer might be overkill?
Hi James, and thanks for your reply.
Yeah, you’re probably right about the 4" washer/spacer. I’m just worried about the wear and tear in that pivot bolt area, perhaps needlessly. Lots of force and chafing wandering around in there.
I know a builder who lined the entire inner face of his centerboard case with Formica. A great idea. It’s slick, durable, very thin and glues well. Unfortunately, I only learned of this after I had already built and installed my CB case. Oh well, save it for the The Next Boat!
The enemy of the Good is always the Better.
Cheers,
Steve

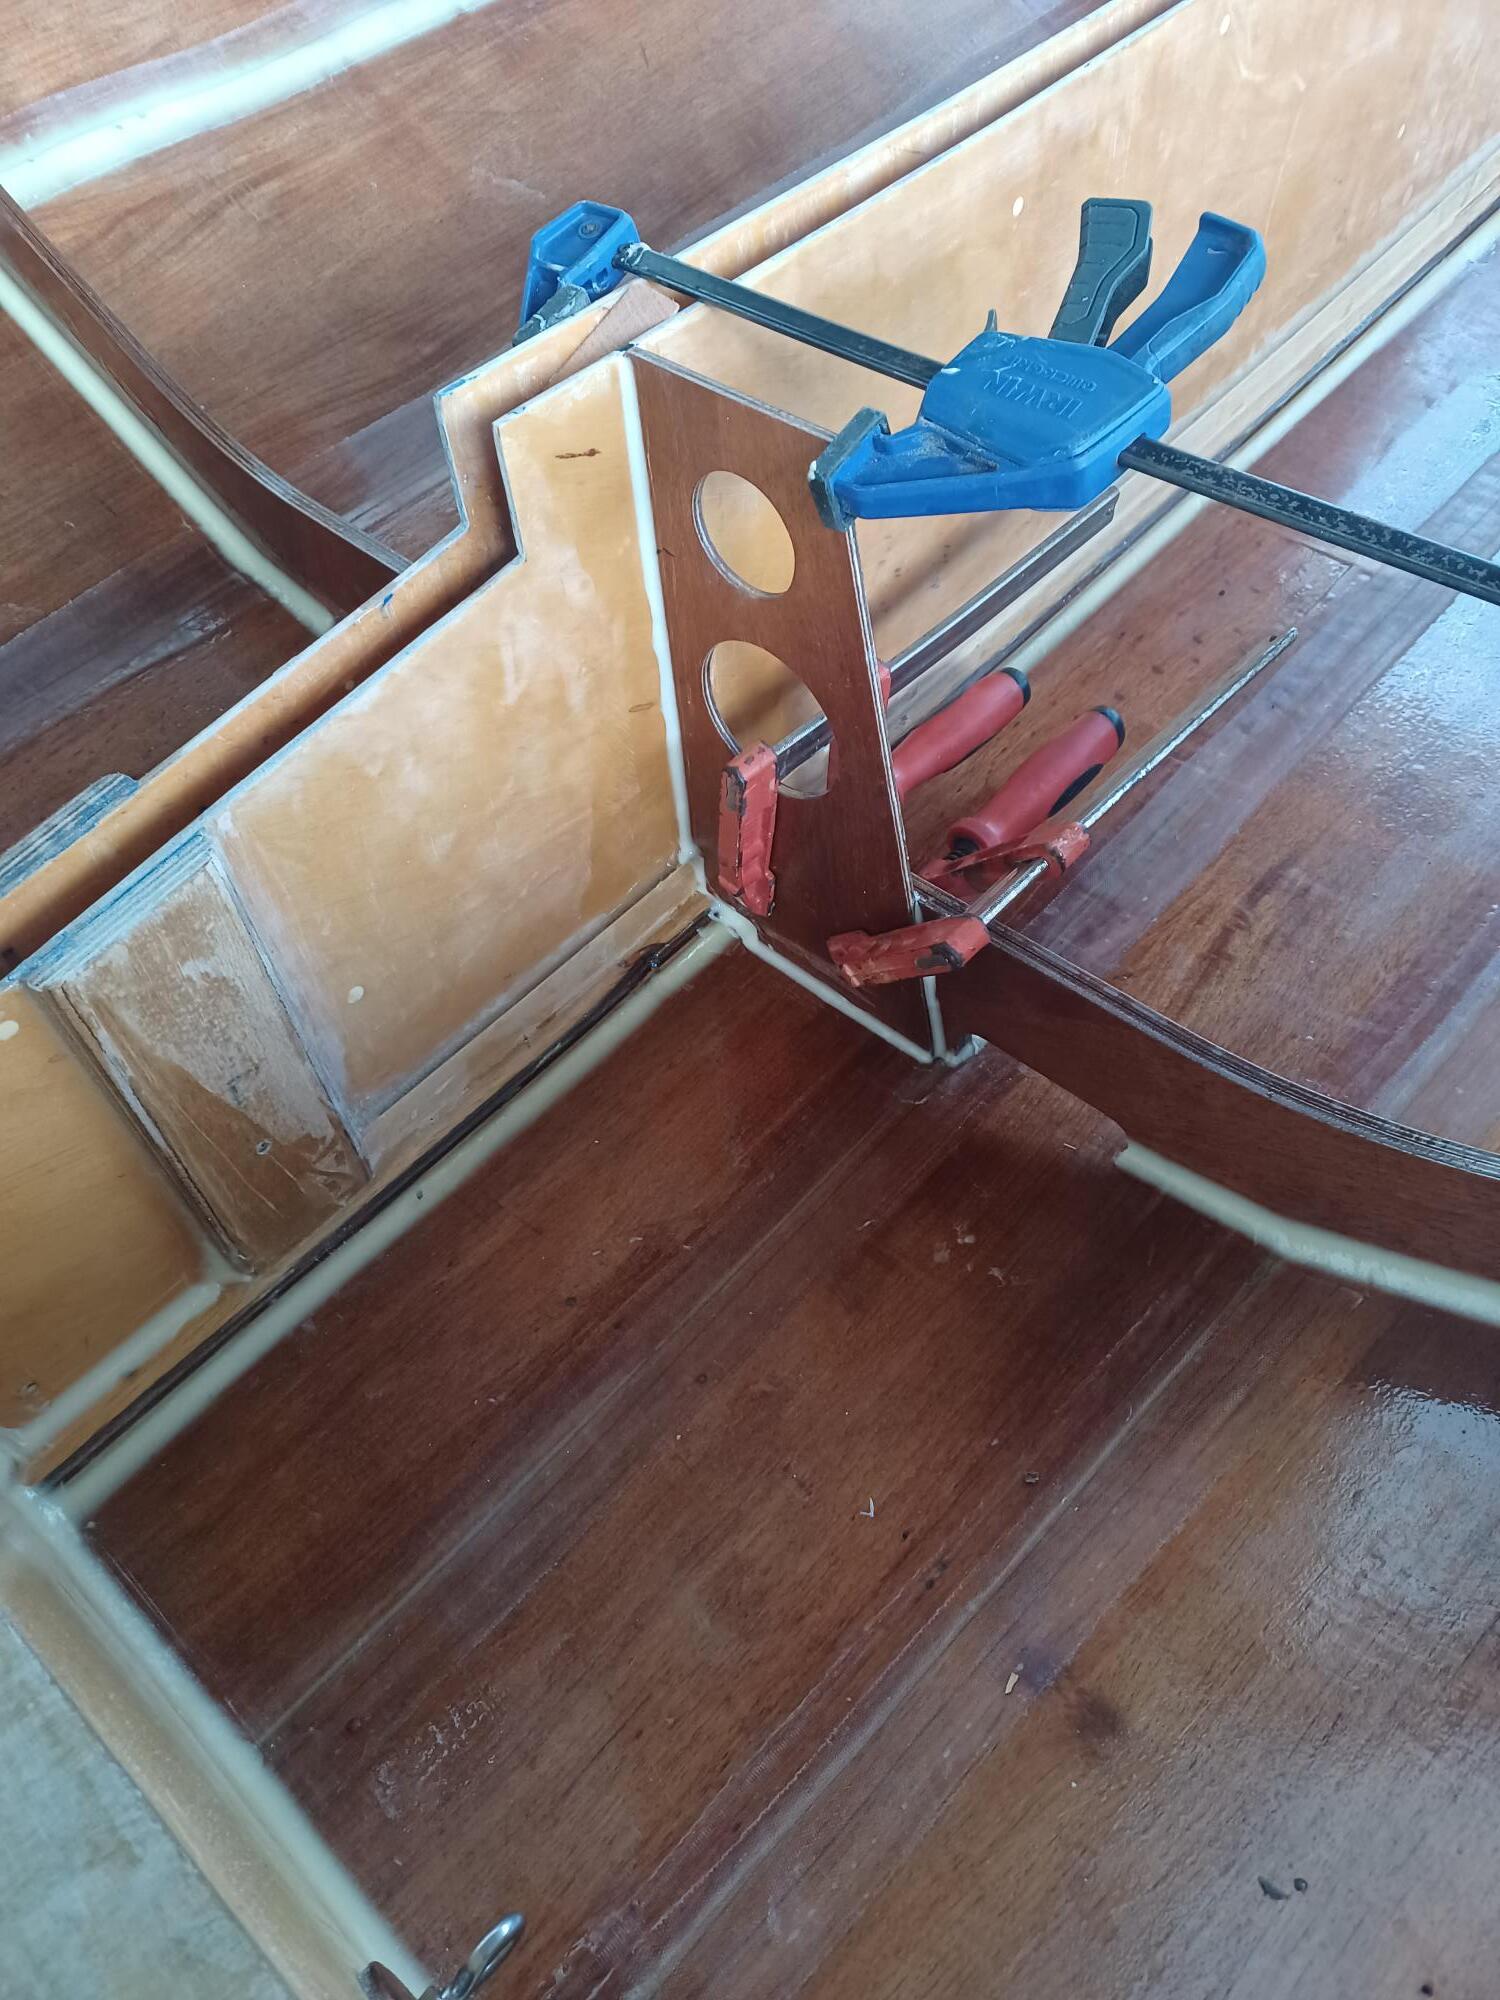
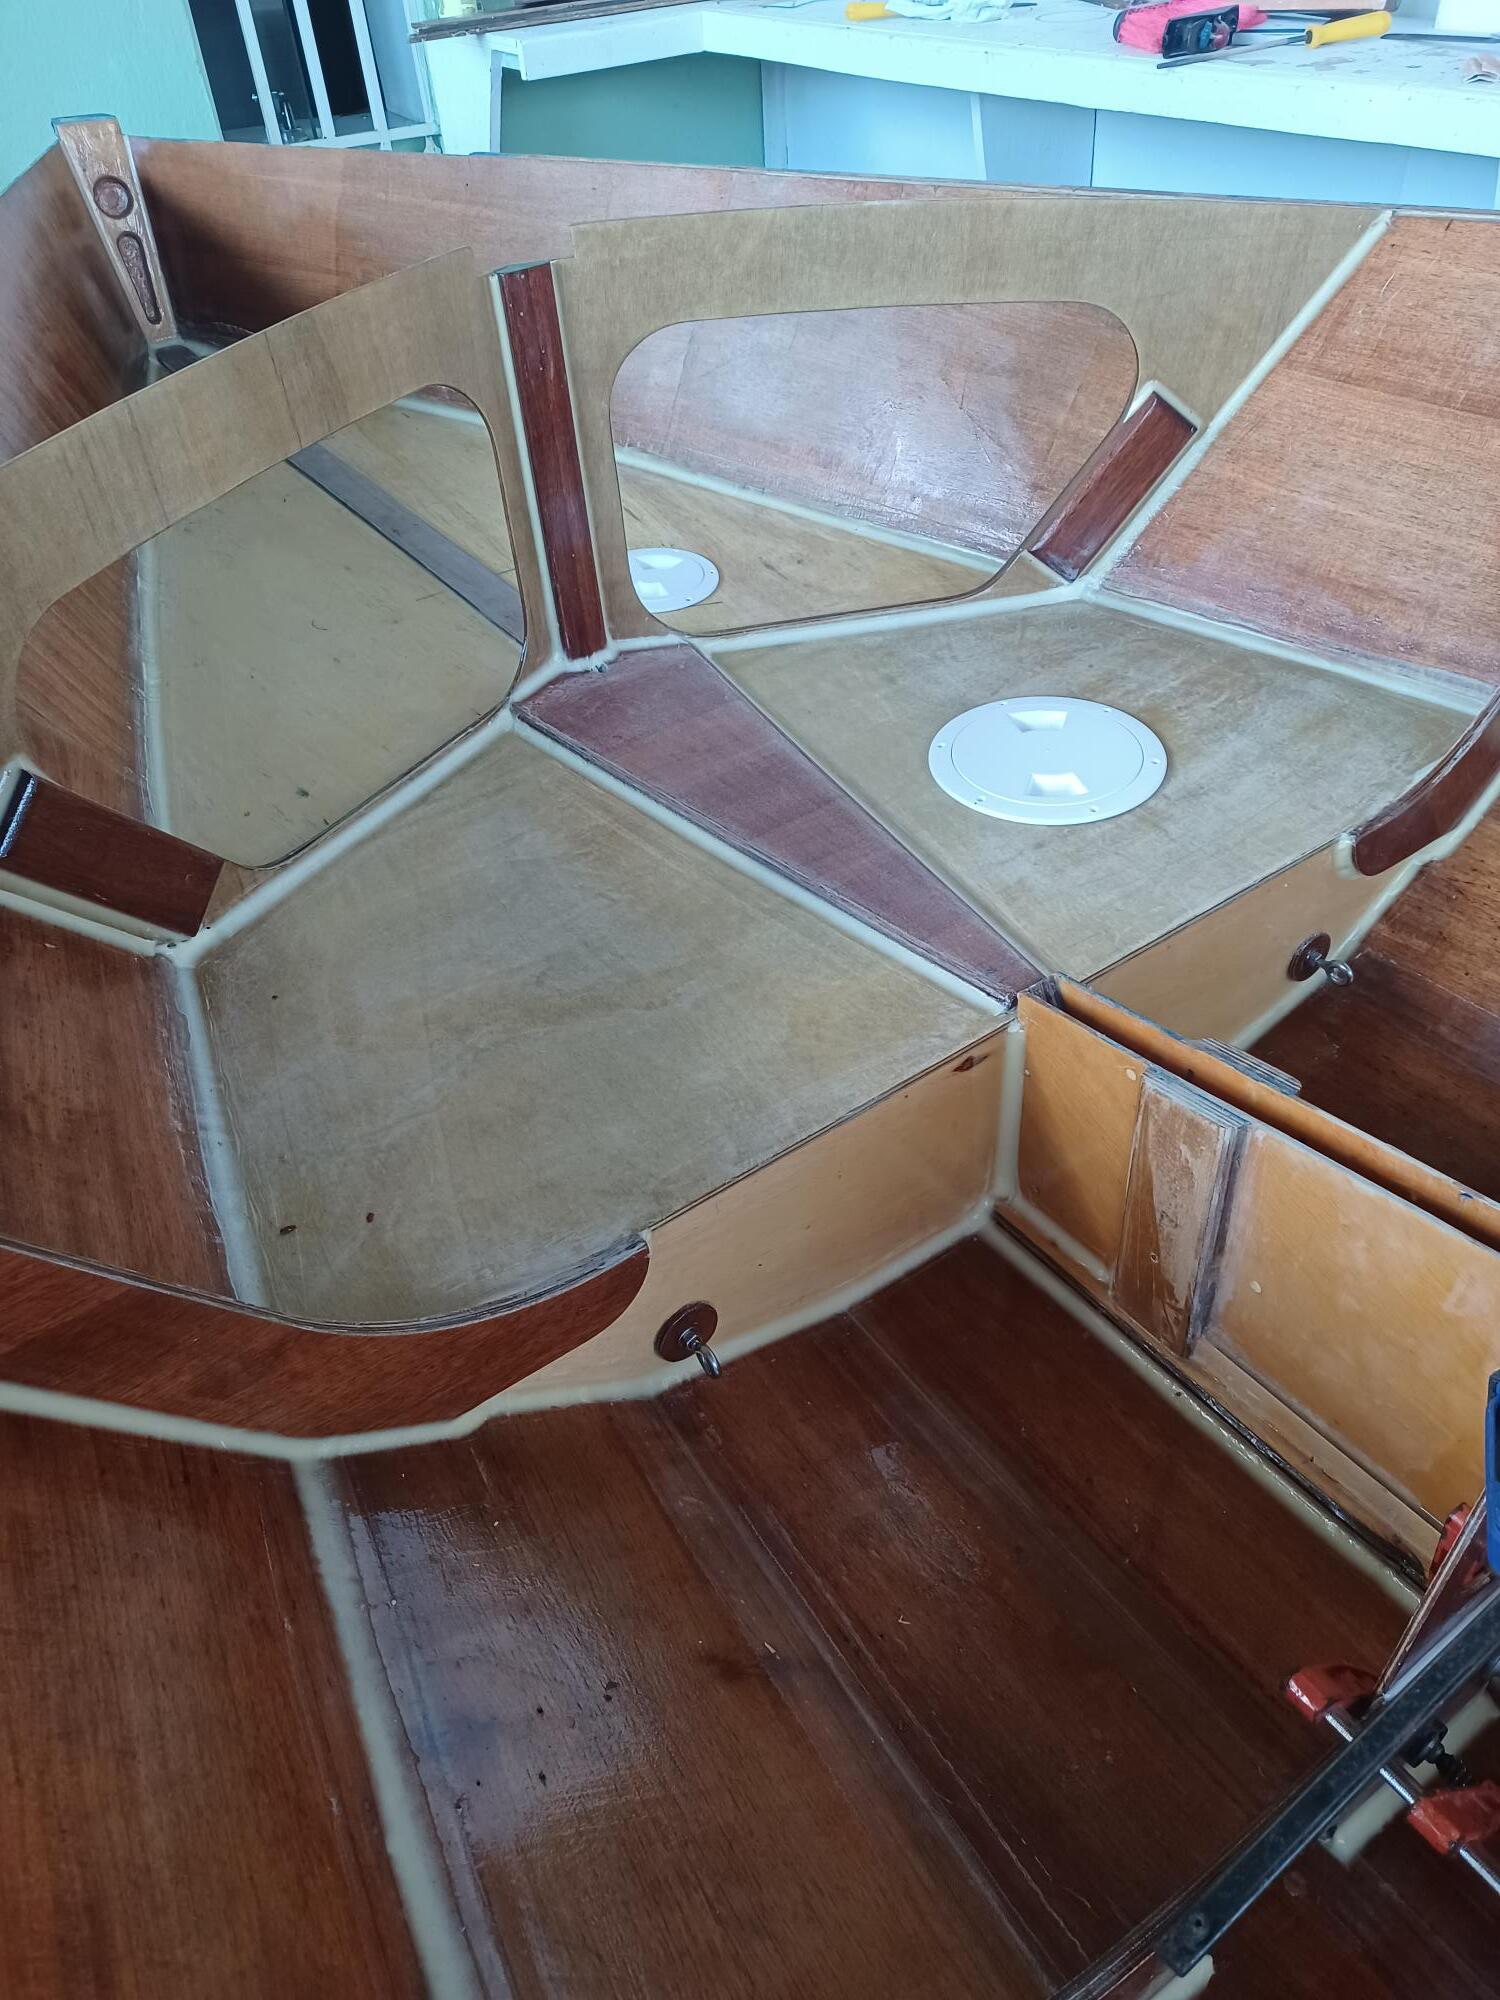
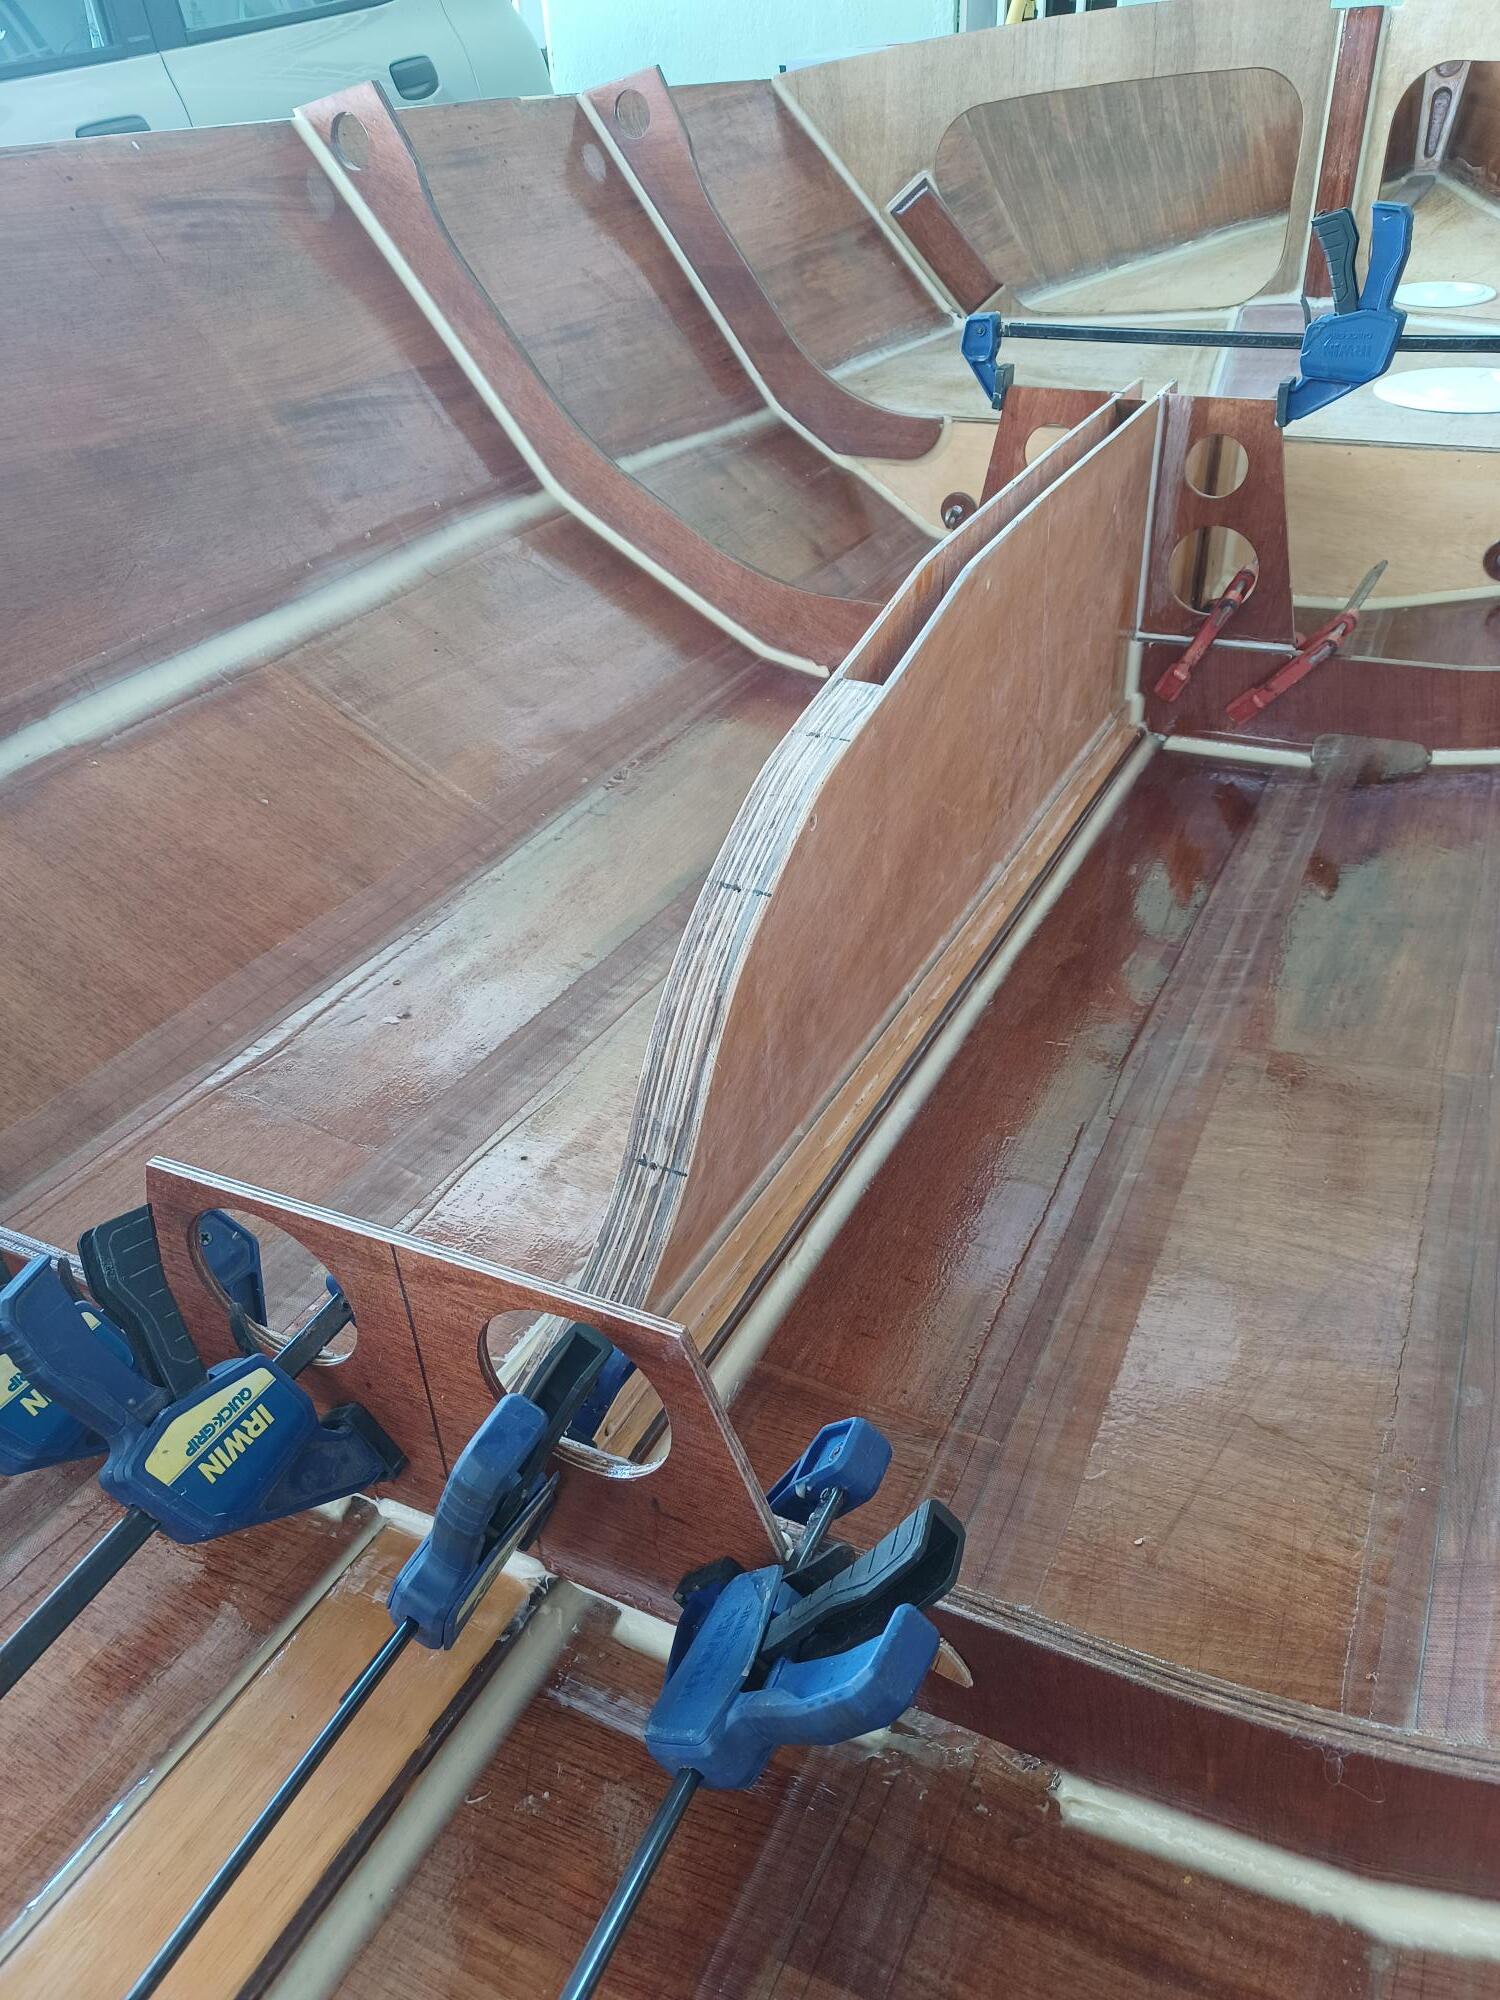

This is where I’m at on my Hadron project. Sneaking up on the central buoyancy tank. I made a trolley for my boat so that I can move it around in my garage. Very helpful for sweeping up the floor, repositioning the boat for better lighting or easier clamping.
The different colors of plywood kind of show the evolution I went through in selecting material. The lighter colored plywood, frankly, is lesser quality. I started with this, but soon discovered much better plywood, though heavier. Eventually, it will all get painted white, but it’s kind of pretty to look at for now.
3 Likes
Looks great! Yeah, I like the plain plywood look. Always a pity to paint over. If I did it again and was confident that there wouldn’t be any glaring mistakes I would keep it clear.
I am just going to wait and see with the centerboard. I was thinking of just screwing some metal plates into side of casing so the bolt rested on those and wouldn’t turn the wood into mush.
I did this to rudder and centerboard. How to Build Rudder Blades & Centerboards - Classic Moth Boat Association
Another good resource there!
You don’t have to have affix the shrouds onto the shroud knee reinforcements. The drawings are a little confusing there. In the later edits Keith points out that you can just use a u-bolt going through deck as with later H2. Also I think you are missing the ‘transom pad’ for the rudder. Not a huge deal - you can just cut a piece of wood to fit snugly over that circular reinforcement. I was moving around clumsily on another boat and cracked the transom back there when my full weight was leaning on tiller…
As I recall the top forward panel wasn’t the correct on the plans. Double check that and/or measure off the side wall.
Also put in some solid reinforcement for the mainsheet block. Have it extend back further than the plans. Check out the H2 mainsheet systems that don’t go back to transom. You could consider having a thwart in there for a traveller.