Be sure and give me a heads up when you’re going to be meeting… That’s only a couple of hours away. 
This is incredible! What was your “clearance” in the fingers? I didn’t see any mention of how you actually secured them together. Are you seeing much flex or movement? What kind of winds do you see? Sorry for peppering you with questions. But it is quite fantastic!
Big update…
We took off to the Philippines for a year, because reasons. This dempanic has been a bitch.
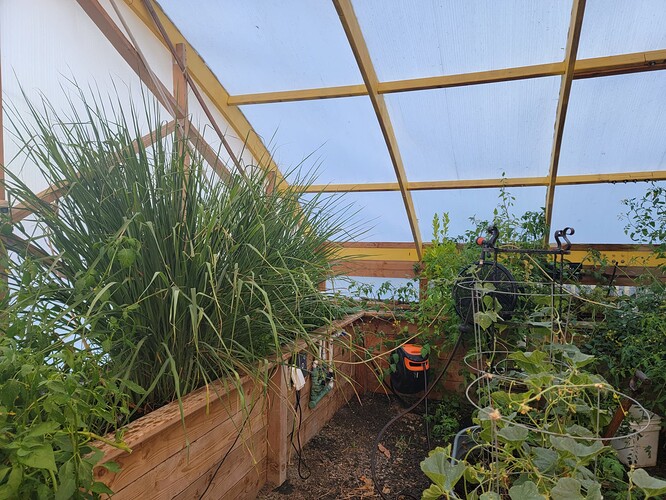
The greenhouse is doing fine. Spent quite a bit of time and $$$ coating the plywood spars. They seem to stay pretty dry, maybe because the space heats up readily when the sun light arrives, and there’s no opportunity for moisture to hang around on the ceiling.
It’s really great, and we can keep various crops my Filipina wife enjoys, growing all year.
We are here in Vantucky until at least January, so visitors welcome.
Jeff, to answer your questions…
The finger joints aren’t super tight. I had trouble getting consistent results from the lowrider across so many parts, so I ended up selecting the most perfect parts and using them as templates for hand-routing with a big 1/2" bit and top-bearing. Man, that made a lot of sawdust.
Some of the spars are three layers, and some are two, because of pandemic plywood availability. The joints are offset. I laminated them with titebond III, and lots of clamps.
I put holes through all the pieces, just a straight through-hole. The original plan was to thread steel cable through them, but it turned out that I used them to ensure all parts were correct and in alignment.
I’d take the parts comprising a single spar, lay them out on the floor, and insert stainless 1/4" pegs through all the layers at the registration holes. Bang, now I know I got all the correct pieces, in the correct spots, ready to glue.
With the benefit of hindsight, next time I do it, I will make the finger joints slightly different, so they can only fit together properly. And probably encode some symbols into the pieces. I spent way too much time organizing the pieces and assembling the giant jigsaw puzzle I’d made for myself.
Each spar ended up being about 26’ long. They are quite flexible laterally, obviously. I was surprised by the amount of longitudinal flex.
I cut the lateral spars the old-fashioned way, with a circular saw from 2x4 lumber. Very carefully. Once those were fit to the curved spars, everything became quite stiff. I built the roof in our (empty) winery parking lot, in two halves.
Discovered there was a good 6" of flex along the curve, so installed steel cables and turnbuckles to bring everything into spec.
Meanwhile, I’d leveled the location, dug a trench for the base, installed the vertical posts for the low (south) side.
Moved the two halves into position one at a time. Bolted them together.
Used my tractor forks and a total hillbilly death trap to raise the upper (north) half, and get half of that vertical lift. Half, you ask? Well, I still needed to attach the solexx roof material which involves a great deal of caulk and screws.
I rented a boom lift and did unnatural, dangerous things to access the entire area and attach the roof. With the benefit of hindsight, the Solexx material is pretty tough and I could have just used a ladder. Sorta. That part of the project was fraught with danger, any way you slice it. Please, God, may Henry roofing caulk perform as promised! I fear ever having to work on that roof from above, ever again.
The roof attached, I then raised the high (north) side up to spec, adjusted the tension cables, built the north side wall, and dropped the roof into place.
And you know what? It came pretty dang close to matching my fusion 360 drawings! Holy crap!
The roof in place, I then proceeded to build walls, planter boxes, etc, underneath it. Took extra time and effort to build triangular lattice walls on east and west faces that match and attach to the curved roof.
We are located as the ass end of the Columbia River Gorge, and get some fierce wind. Lost a walnut tree a few years ago, and we have Very Old family lore of massive wind storms that blew down the entire old-growth forest that used to exist here.
We had vacated to the South Pacific, but I’m told that we had some considerable wind and weather here last year while I was gone, and the greenhouse structure is just fine.
In conclusion, you’ve built a giant cnc machine. Good for you! What’re you gonna do with it? Make signs? Plywood deck chairs?
Do architecture!
LOL, thank you for the inspiration. Stopping by https://www.englishestatewinery.com next time we visit Portland. Cheers!
Really nice work. I just love CNC. If you can dream it up, you can probably cut it out.
Very cool! I love the finger joint idea.
Hmm… I’m happy this thread got necroed since I’m in need of some shade over my patio area, and have been brainstorming ideas that won’t piss off the neighbors. The flowy look is definitely aesthetically pleasing, and giving me inspiration… thanks for sharing!
Definitely not greenhouse related, but you might consider checking out the Sailrite youtube channel for videos about making outdoor shade and upholstery projects. One example - How to Make a Temporary Sun Shade for a Patio - YouTube but they have several.
While they do make sure you know exactly how to order all the specific tools and supplies they use from them, the techniques are applicable, and they have a lot of real-world examples.
