First carving with the new LR4

It can be argued of course that doing small pieces on the LR4 (42" x 72" capacity) doesn’t make too much sense.

However there is a ton that can be learned in preparation for doing a large piece.

For example, if the piece is going to take 12 hours, you are going to need to pause at some point, almost certainly. If you pause overnight, your motors are likely to dis-enable which will mean that the slightest touch of the gantry will shift your zero. Or if the z-axis is dis-enabled, the gantry may fall.

Or if you need to do a tool change, shifts can happen.
Anyway, all this stuff can be tested on a small piece without needing to use a large amount of material.

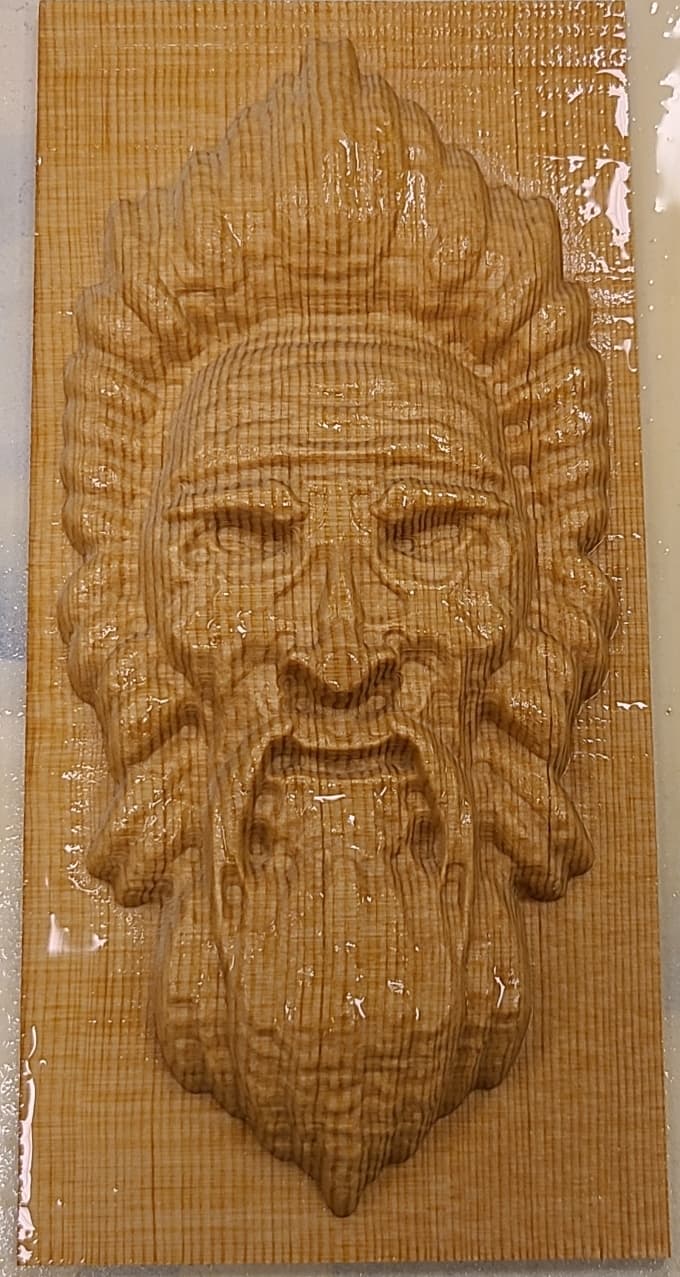
So, to that end, I tackled this guy:

(This piece is about 4.75" x 8". Wood is redwood. Maximum depth is 15 mm. Entire CAM done in EstlCAM)

As can easily be seen, there are some defects, nearly all of which are the result of a long pause (a few hours to overnight) and the resulting slight falling of the z-axis.

In addition, some detail was lost because of a slight “y shift” (~1mm?) due to an unlocked y-axis. And there are some tooling marks that also probably came from the y shift before the final finishing pass.

So, this little demo is offered as a learning exercise and to demonstrate that “it will cut” for any of you who may be “Forged in Fire” fans.

17 Likes

4 posts were split to a new topic: Photos not working

Very cool and thanks for explaining. I have been wanting to attempt a 2.5 d project. Just not quite there yet, pause seems a bit nerve racking maybe running like say some cuts then have it go home and then start back from home again?

very nice!

are you using both x and y endstops? That way you would just need to be cautious with Z on new startup.

Yes, this can work, and, I’ve used it successfully. There are some advantages since, as you say, you can start each carving step from the same home position, especially if you are using the endstops on x and y.

Each carving will have a “roughing” step and at least one “finishing” step. The difference is that for a roughing step, the assumption is that you are starting with a flat piece so that you’ll need multiple passes to form the first rough approximation of the image.

In EstlCAM, there a setting that indicates how close to the final DEPTH you want to try to get. It’s typical 0.5 to 1mm and is determined by the amount of material you can remove in a single finishing step.

For finishing, the assumption is that there is only a single pass where the bit cuts to the final dimension. Obviously, this may not be possible if the bit is too large for the pattern. In this case, you may need a second finishing pass with a smaller bit, but it again assumes that it will cut to the final surface.

If you are using EstlCAM, it has the capability to set up the roughing pass and a single finishing pass as part of the same gcode. (They are actually two different runs, separated by your tool change procedure.) This can be convenient if you use a proper tool change procedure. It does involve pauses, but they are very short.

If you need additional finishing passes, it’s convenient to start back at your home position.

However, if your finishing passes are long, you’ll still need to handle extended pauses. In my piece, the finishing pass was several hours. Because of time availability, I had to pause overnight at least once, and for a few hours a couple of times. (I absolutely never run the machine unattended.)

Hopefully this gives you some insights into how this is done. I actually have another piece in progress as I write. It’s paused overnight at the tool change. We’ll see if the adjusted procedure does any better.

1 Like

Yes, I do use both endstops, but that’s not the problem.

First, the endstops only save you if you are using separate runs for each tool. This can work fine of course. But that’s not the issue with pauses.

For this sort of carving, there are two types of steps. There is a roughing step, which is typically done with a 1/4" or similar size bit. These are very crude and involve multiple passes to progress to the proper depth, but, depending on the size of the project, are an hour or less, so they can normally be completed with no need to pause the work.

The problem occurs with the finishing passes, which are done with a much smaller bit. (The final finishing pass for this piece was done with a 0.5mm ball nose bit with 5% overlay.) These passes are usually much longer… as long as 12 hours or more.

Since I NEVER run the machine unattended, and since I usually don’t have uninterrupted blocks of that much time, pausing is simply a requirement. A few minutes has not been a problem, but hours long or overnight is the issue.

I happen to use EstlCAM for all of my carving work. While it may exist, I know of no way in that environment to capture a position in the middle of a run and reliably go back to it to restart after a pause.

Other software may allow this, but I have no idea.

I’ve also found that aside from the x-y issue which can usually be managed by just being careful, the tendency for the LR4 gantry to fall when the motors are disengaged means that the z-height may not be preserved after a long pause. (This issue seemed to be less severe on my Primo where I have usually done this work. )

I actually have a project underway that is paused at the tool change for overnight. It’s again a small project, but the finishing tool is installed and is waiting to set the new z- height. I expect this will go smoothly, but the finishing step is going to take about 3 hours, so it could require at least a short pause. In principle the motors should be locked this time, so, I may pause for a couple of hours to test it.

Stay tuned.

so I recently had a project saved by endstops. I cannot remember what caused it, but I HAD to restart my machine. Since I used the endstops as my start point, they were guaranteed, that way I only had to worry about z. for me Z was easy, but for you it may not be. You may need to set up a way that you can reset z and continue.

But it would allow you to turn off your machine and continue the next day.

Since I used the endstops as my start point, they were guaranteed, that way I only had to worry about z.

I guess that could work if you are using the x and y endstops as the (0,0) position and you can simply bring the gantry back there manually, assuming no offsets for squaring was needed. Then the machine could successfully move to the next location in the next line of the gcode after the pause. But, I don’t see how that would be possible if you are using an offset from the x and y endstops for the origin, which on a large machine may be more convenient. In my case, for example, the bit cuts into negative x and y values as margin for the image.

But, if, as in my case, you don’t know the location at which it is paused and you can’t reference back to the endstops manually because an offset is needed to square the machine, then I don’t see how one could recover. It’s possible that a fancier control board could do this.

My control board, an SKR1.3, runs under Marlin and uses the BTT TFT display to monitor the job progress so there is no computer attached. As far as I know, this does not provide any way to provide the position and gcode line number so the job could be restarted as you describe. (But, if you know of a way to do this, please share. )

I believe that in my case, the solution will be to simply add gcode to the job at the beginning which will keep the motors enabled even during a pause, and then allow them to dis-enable them after the job is finally complete to save power and excess wear.

Maybe someday I’ll change the controller to the Jackpot or something fancier than the SKR board, but right now, it’s an “if it ain’t broke, don’t fix it” situation.

O.k. so what i did was move to a known spot. Say 50 x 50 y and set my corner zero there. When my machine stopped i was able to re home move to 50, 50 and zero xy and z probe. Very repeatable. It was nice as my mpcnc did not have endstops. So, if you write down your x y coordinates before you zero, you to can start stop. Now since you are relief carving, maybe zero z to your work surface (make sure you write down that cooordinate so you get same spot) and you can re setup next day. Now what i just said with zero ing to surface changes your cam. Maybe you could cut a piece same thickness as your start to zero to so cam can stay as is! Good luck, have fun!

What controller setup are you using?

What controller setup are you using?

The board is the simple SKR 1.3 running Marlin. The stepper drivers are the 2209s and there are dual endstops on Y and Z, of course. It’s basically the firmware supplied by V1 although I purchased the board separately and had to modify the FW slightly and upload it myself. I’ve actually used essentially the same setup on my Primo, the previous LR3 and now the LR4. (Of course, all this got started before Jackpot, Klipper and all this cool new stuff. And, someday, I may “upgrade” but right now, my familiarity with this platform is an overriding benefit.)

This is attached to the SKR TFT35 v3 display which can be switched between the Marlin and touchscreen modes. (the touchscreen mode gives access to a terminal for issuing gcode commands which sometimes is very convenient, like when squaring or testing gcode sequences for tool changing)

FInally, I use EstlCAM for all the CAM and gcode generation. For carving, there are some tricks that one should know (e.g. adjusting the size and depth of relief), but once the important parameters are learned it actually works very well and is a very modest cost compared to other solutions.

Hopefully, that covers it, but if not, please follow up.

I think that this is the rub. As far as I know, I have no way to know those coordinates exactly; I also don’t know what gcode line the machine is on, so if the machine is turned off, I have no way of knowing where to re-start.

I think you can change the motor shutoff timeout in marlin. I converted my marlin skrs to klipper and i know how to change it there, but my friend Google says M85 might be your ticket:

12 hours delay to shutdown would be:
(S is in seconds → 12 hours * 60 min * 60 sec = 43200 )

M85 S43200

Thanks for your comment.

Yes, exactly. I have a piece that is currently paused that is using exactly that. In fact, you can completely disable the timeout so that the motors never turn off. The test that I’m doing for carving is to add that line to the startup file, and then at the end, revert back to something like a 30 minute timeout. (I think the default is 10 or 20 minutes.) I think that reverting to shorter times after the work is completed is desirable so that you save a little electricity but also allow the motors to cool down, possibly extending their lifetimes. And, for the MPCNC, the adjacent plastic may eventually deform if the motor is always at 50° C.

Assuming this works, I’ll add that to the standard EstlCAM generated code whenever carving pieces that may have long pauses needed.

I expect to report the results of this small project within a few hours if there are no surprises.

2 Likes

One of the advantages to FluidNC is if you home x and y, then move to any point and set that as zero it persists even after a reboot, so you can crash, shut down, rehome and go back to the same point as zero where ever it was.

3 Likes

Wow thanks so much for the detailed explanation and yes it clarifies it. Must have been quite the processing time.

It’s not really that bad. For this piece, if done without pauses, it probably would have been about 6 hours. I actually used too fine a bit for the finishing. It depends on the feature size in the image, of course, but my 0.5mm ball nose was overkill.

The file prep can take a while, depending on your pc. And the newest version of EstlCAM seems to be quite a bit faster.

Further down in this thread, you can see a couple of brief videos of a similar piece under construction. It’s going to be about 4 hours, but it had a19 hour pause overnight.

I have to say, watching this LR4 can be hypnotic… this piece is a different design but similar size. It will be finished shortly after about 4 hours total with a 19 hour pause between roughing and finishing.

https://youtube.com/shorts/X-23qqjyqcE?si=7Zpkv4rn74e_0f75

Polyurethane is not dry yet. Wood is clear vertical grain fir.

2 Likes

Yeah…I expect that FluidNC may be in my future. But, there’s always some inertia since it would essentially mean starting over.

If my projects become sufficiently inconvenient in the current environment, something will have to change. But for now, it’s not really broke so I’m not ready to fix it. :slight_smile:

1 Like

That’s cool the grain is neat. The winter wood and summer growth is neat to see I saw a video on that a while ago. Have you ever sand blasted wood with a grain like that ? It’s really cool the effect it does.