I hope to get to this point soon but still trying to get everything tuned in. After the second SKR I haven’t had a bed drop sense. Amazing how looking up the price of one of those, then doubling it will help you remember LOL
1 Like
Smart move. Very smart.
Today I clicked on update all within Mainsail… To it’s credit it filled the browser with warning messages to check release notes before proceeding.
Said… Bring it on, and clicked ok. Turns out a 12 version was released 2023-11-10, and the Klipper service on Pi is not compatible with Klipper 11 currently running on Octopus and EBB36. So, am working through Frequently Asked Questions - Klipper documentation and rehydrating and paging my GitHub notes, related Docs and Forum topics into memory regarding how-to upload firmware to Octopus and EBB, again. Printer is currently a pretty desk ornament.
EDIT: Fixed… CANBoot was recently renamed to Katapult, turns out built binary files were renamed too… changed from canboot.bin to katapult.bin, so my ‘convenience’ scripts using dfu-util to flash controller were stale and needed updating… ![]()
2 Likes
oh man that sucks. But with your canbus all set up already you should be able to ssh into the pi and run new make menuconfig for the octopus and the ebb and then flash it from there as well. you already have your UUIDs so your a step ahead
1 Like
Can you downgrade?
Mine just started this new thing where it disconnects from wifi after a print… I haven’t touched the firmware in a long time (it sits on a pretty isolated vlan, so I don’t worry about updates).
I have been procrastinating poking at it.
1 Like
I believe he would have to wipe his pi and start over. But as long as he has all his configurations backed up that’s not a big deal now with KIAUH. And I’m pretty sure you can choose an older version of klipper to install. I could be completely wrong on all of that as well lol.
I remember reading something about it when I was trying to set my can stuff up. I’m 99% sure he can do make menuconfig and make a new klipper firmware for both boards and be good to go. And the canbus guide I posted has all the settings he would need to select to keep his canbridge working
1 Like
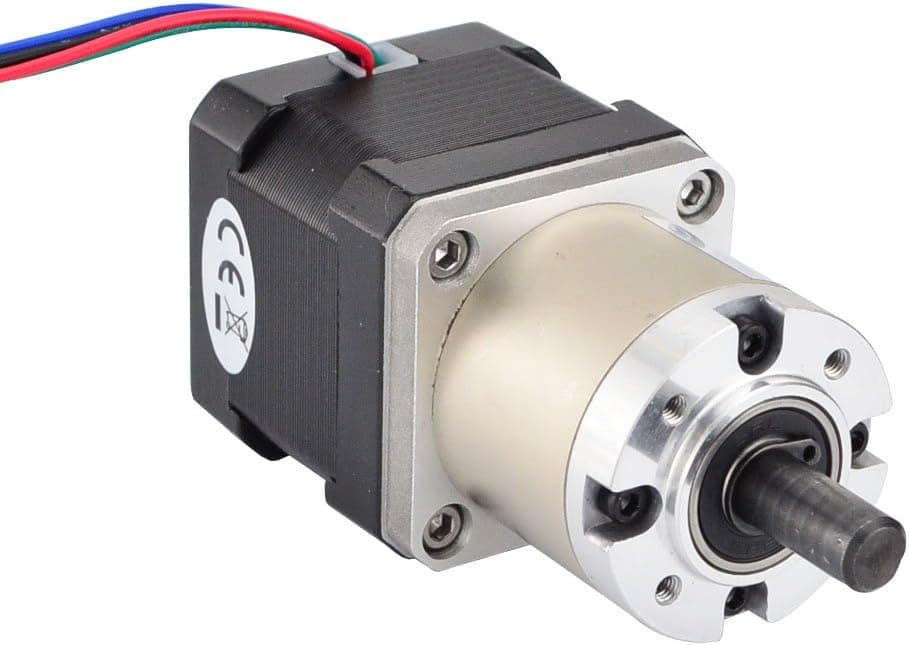
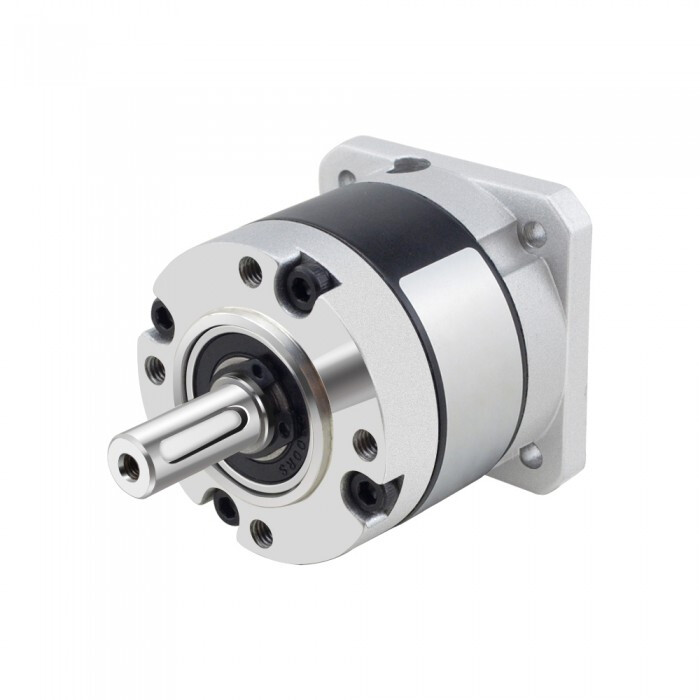
The ideal Z drive provides small, nice value steps so you can print in thin layers, can reliably lift the load of the bed assembly plus print, doesn’t create any Z axis artifacts in prints, doesn’t move when power is cut or restored, doesn’t require external motor driver(s) or complex configuration.
A worm gear reduced motor can provide all those characteristics (except for slight movement when power is restored). I used a 30:1 Ondrive Rino motor/gearbox in my printer’s 700 mm Z axis and it has worked flawlessly for 6 years. It moves the bed 20 um per full step, is driven by the Duet controller board’s driver chip, yields Z-artifact free prints, requires no config other than specifying steps/mm, motor current, speed, and acceleration. The bed doesn’t move at all when power is cut, which should allow for print resumption, though the motor and therefore the bed may jump a tiny bit when power is restored and create a small Z artifact when printing resumes.
The worm gear reducer doesn’t require extra pulleys and belts to achieve the reduction, no springs or counterweights, and there’s no possibility of backlash. It just works.
I used one of these. It requires a keyed 8mm shaft, like this one. About $150 solves all problems with belt lifted Z axis in the simplest and most reliable possible way. It’s even cheaper to make the keyed shaft yourself if you have access to machine tools. The Rino is an industrial part with very high quality gears that won’t cause repeating Z artifacts in prints.
You can get cheap planetary gearboxes for steppers, but they usually have odd gear ratios (ignore the large print- check the fine print in the specs) that will result in strange movement per full step. The quality of the gears is suspect and might result in Z artifacts. Regardless of gear ratio, they may allow the bed to drop when power is cut, so you’ll probably still need a brake, spring, or counterweight of some sort, and resuming prints after power failure is likely to be a bigger problem.
3 Likes
That looks like a great CNC 4th axis…just add a dead center and we have everything!
Too pricey adding three of them on a printer’s leveling bed though.
You only need three of them if you have an urge to use autotramming. Lifting the bed with a single motor prevents tilting when power is cycled. If the bed doesn’t tilt, you don’t need to keep retramming it, so you don’t need all the junk that is required to autotram. The purpose of autotramming is to make printing more reliable (by getting the first layer to stick) and less of a PITA (by eliminating manual tramming), but adding all that junk actually makes it less reliable. If any one piece fails, autotramming fails and you can’t print. Then you have a potentially complex problem to diagnose and solve.
I don’t have any autotramming in my printer. The kinematic mount supporting the bed plate makes manual tramming quick (about two minutes) and easy (just two screws to adjust). The last time I did it was when I reglued the PEI sheet on the bed plate about 6-8 months ago. I probably won’t have to retram it for another year or two, unless I modify the Z axis.
1 Like
I used to feel that way about it. Now I see it as no added hardware. A touch probe homes Z, Trams, and mesh levels. I understand it adds some firmware backend but the end user never sees it. Most importantly you never have to level the bed, not even once it is perfect. Shipped my fully built printer across the country and back twice last year and never touched anything. Pulled it out of the box and printed.
The real reason I added it through is just in case non-planer printing happens. Currently, we are set up for 10 degrees of tilt, but much much more is as easy as a longer slot in one part.
2 Likes
so you are saying we could tilt the bed and put on a conveyor?
1 Like
I would love to see that.
LOL, the front is open, and the bed does have some free space around it… Maybe conveyor belt, or solenoid actuated part scraper, or maybe just design the fan Duct and Core to be sturdy enough, with sturdy fender/snow-plow front face to knock cooled parts off? Conveyor with out-feeder would be cool for infinitely long prints.
That plus the enrage rabbit carrot feeder (or MMU) continuously feeding filament, plus some AI Fluff up detection seems useful for a print farm…
And given "Voron 2.4’s Z gearbox. A 16T pulley and an 80T pulley are coupled with a belt to provide an 80:16 gear ratio. " from Kyleisah on klipper forum
Maybe cheaper bulk bought flying Z Stepper with planetary gearbox with low ratios, e.g. 4:1 maybe?
Individually low (so z hop doesn’t suffer), but high enough resistance when 3 are used together to resist violent drop of a ~4lb bed, ‘slow’ drop seems ok.
Special steppers might seem expensive, until you’ve killed a Controller board or 2… And weighed up pros/cons reliability/corner-cases/assembly/aesthetics of other alternatives? Hopefully something with less quirky ratios exist than this $40 0.067° step angle Stepperonline exist.
Or some 5:1 gearbox bolt-ons?
First search hit was this, I didn’t look at backlash specs, or shop around for better quality-price. Minor Z Stepper mount mod required, chamber has room. Aesthetically nice imo.
Guessing worm gear would be safest though, especially if planetary low ratio gear boxes are not resisting motion enough. Even if the plate falls slow-moderate speed, the geared stepper may still spin fast enough to create board killing back emf.
Still unfluffing my printer. I will make Klipper 12 work. Updating/cleaning up my personal notes on configuring Klipper with CAN Bus as I progress. This CAN Bus video and doc link that @Jonathjon shared is helpful, and his printer.cfg backup.
I was thinking another option is making a leadscrew optional. A stepper mount is simple, the only think that would need to be incorporated is a brass nut space in the Z trucks. Seems like an easy ask for those whom might want the leadscrews. That should have next to no effect of the first half of the print, only real tall prints might start showing Z screw wobble…if the coupler is on the bottom.
So optional plates and/or 3D printer part combo for top mounted Stepper driven lead screws? People needing aesthetically high quality tall prints, above and beyond stock build focused on reliable dimensionally accurate prints, can optionally invest in some anti Z wobble/artifact solution?
No. I am not making options for everything. That would require the bed to fit with steppers under the gantry.
2 Likes
IF the CoreXY steppers end up moving to the back, then does that free up enough space for top mounted Nema 17 (for Z Axis leadscrew steppers) without resorting to Pancake steppers. Personally have no idea how you thread the rear LeadScrew like a needle through the twisted belt madness concept you’re currently experimenting with.
That is just it, they have to go below the belts or they have to be outside the rials to not collide. They have to be under the belts, or go through holes drilled in the extrusion.
1 Like
That is why they are always on the bottom or on the moving bed.
Still looking to have flying Z Steppers? If so, I don’t know how large the tension springs are, but if widths are comparable to 9-10mm belt, then maybe, a bulk of the coil could mount to the Z truck, spooled tension spring could ride with the Z Stepper. Hopefully no noticeable vibrations/print-artifacts.
Then you’d only have the end of the tension spring being mounted up top, maybe mounts to a modified version of the Z belt end. A compact setup might actually look decent depending on spring width/dimensions?
Am still curious to see a connector extension board with overvoltage protection actualize
Unbricked my printer. Figured out and doc’d cause/fix details in earlier post. Updated my Klipper CANBus setup notes too. Will be watching, but not pushing further, for Config Save macro support on the Klipper Discourse/Repo. Mechanical and/or electrical solution seems to be the way…
The ones I got are 3/4" wide. They aren’t exactly small lol.