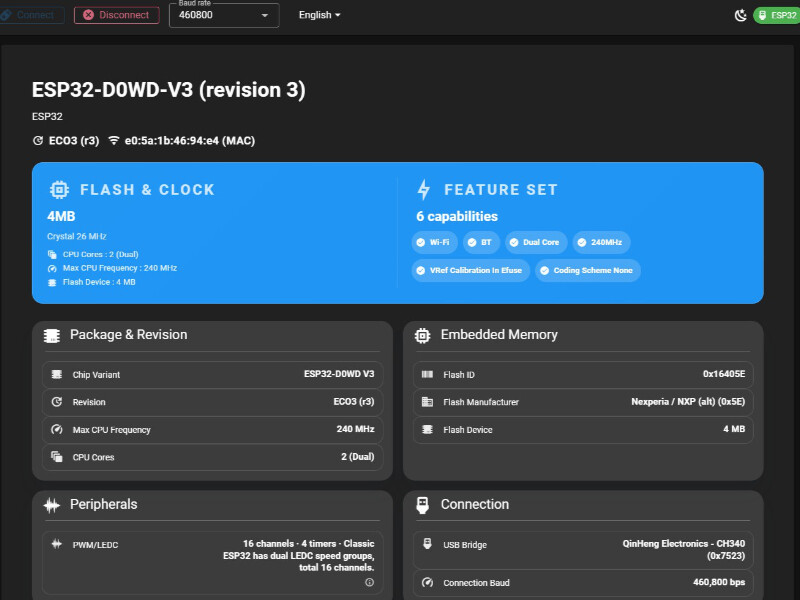
I decided not to get those TXS0108E as it seemed like they probably would be finnicky since you mentioned it. The more I started looking into this, seems like the wiring is getting to be more than I want with this design. I am now starting to think about using an ESP32 that I originally bought last fall in the beginning of this project, but at the time the UNO seemed like a simpler solution and has worked really well. This is the ESP32 board I have and ESPConnect gives me this info. I might have all the parts I need to start working on this if this ESP32 is good enough model to use for this.
Are you using the ADCs directly? They’re a bit more of a challenge on the ESP32 but nothing too bad.
From memory, the issue is that they run off something like a 1.1V reference so they use internal attenuators in order to be compatible with signals above that. The attenuators aren’t very accurate or linear and so there’s a bit of calibration required, ideally with multiple points across the range you’re interested in. If you only care about accuracy at one point (say, around the drop temp) then a single point calibration at that point should be fine.
If you’ve got a relatively low-noise environment, just going into the ADC channels at 1.1V is also possible, that’s what I’ve done in the past.
I can’t remember ‘how’ much of a problem that is, though, unfortunately.
Seems like if I use the ESP32, I do not have to worry about 5v logic since the ESP32 is 3.3v. I am not sure if the 3.3v will hurt in other ways. Looks like the MAX6675 will work with it. I might have to get a different buzzer but seems like the switches would work also. It just seems like I kept chasing limitations of the Arduino UNO when the EPS32 seems to solve all those problems and gives room for growth.
I had not even considered drilling that mesh until you mentioned it. I was starting to think that was a good idea until looking at how close that disc is to the mesh just a little distance from center. If I was going to drill, I might would try some small flush wire cutter. It does not look like there is enough room for the sensor though. Maybe drilling a hole in the side below the mesh and putting the thermocouple close to the center, but that would probably get too high a temperature as it would be more in the heat stream and not in the beans. This design just does not seem to lend itself to the perfect place to put that sensor. Guess I will just leave mine where it is. Thanks for the idea though.
I’d be using side cutters for the actual mesh hole. And I’d be cutting a slot in the disk to accommodate the probe. Like wobble disk clearance of the old one, it’ll be a balance of too much clearance versus beans pinning themselves, getting stuck. I did get a whole other $20 flour sifter for this experiment, not wanting to sacrifice my working one.
We’ll see…. but not this week
I have a spare flour sifter also that still has my original paddle wheel agitator. I will be interested to see what yours looks like when you are done. I was looking at my spare one today and can see a distinctive burn area on the mesh about 1.5” diameter where the heat gun’s main heat hits. i was thinking I might could drill the side below the screen at a height where I could set the probe just against the bottom of the screen maybe about 1.5” from the center. I could use 1 or more M5 or M6 SS spacers to get the thermocouple positioned to the right spot. Not sure I want to try that yet. I will see what you come up with. I will start working on my new ESP32 controller tomorrow. After I bought that, I realized I have a Makerbase DLC32 V2.1 which I bought for a previous project and has an ESP32 on it. That will be a lot more compact design and has all the connections I need right on that 1 board. I should be able to create a webpage interface for it also. This might be the perfect controller to run my coffee roaster.
What about trying to mount a thermocouple to the bottom side of the sifter and using the metal mesh of the sifter to take an ‘indirect’ measurement? Might need a heat shield or insulator of some kind to stop it being heated directly by the airstream. Could potentially even just poke the thermocouple through the mesh.
You have me thinking more about this. @jono035 mentioned this also about putting pressing against the bottom of the screen and I think this might be doable with a SS tube like this one: M METERXITY 2-Pack 250mm 316 Stainless Steel Tube, 14mm OD 0.5mm Wall Thickness Seamless Stainless Steel Tubing for Construction/Machining/DIY Crafting, Metal Straight Pipe [0.55x0.02x9.8IN]: Amazon.com: Industrial & Scientific
I am using this on the top of my roaster but seems like it will work from underneath with some sort of SS clamp, maybe a big alligator clip. If the other end of it is far enough away a plastic clip will work. I have another one of these SS tubes. I might try designing a clamp to attach it to the 2040 v-slot. Thanks for pointing out this idea.
After diving into this MKS DLC32 board, looks like it is not going to work well for me after all as it handles the stepper drivers differently. I have a EPS32 with a breakout board coming today and work with that. I am also starting to think around the lines of designing a custom PCB for this after I figure out what all connections I need for this setup then I group them together for each connection like the TFT and thermocouple(s). Seems like there should be a custom board design out there already for this, but I have not found one.
Why do you need the steel tube? Why not just tape the thermocouple directly to the mesh? Or trying to widen a gap to stick a thermocouple through?
The tube gives me a rigid support for the thermocouple to press against the mesh. I can pull the end of the thermocouple back to catch end of the inside of the tube and tension it with a clamp at the cold end of the tube giving it a tight fit against the bottom of the mesh, at least I think it will since it works sort of like that on the thermocouple I have at the top. Is there a food safe tape that can withstand those high temperatures?
I wouldn’t bother with the tube outside. They’re great for reading air temps and being immersed in things but not for taking spot measurements. If you use that tube, your reading will likely be an average of 95% air temp and 5% bean mass temp. The strength of thermocouples is low thermal mass and a very tiny and defined point of measurement. It’s important to use that to your advantage.
Personally, I’d just use a little bit of kapton tape and then some copper wire as ties. My logic would be: It’s rated to well above the temps used here, there won’t technically be adhesive contact with the beans because it’ll be on the outside of the mesh and I can do a couple of dry runs to offgas stuff etc. If I’m worried beyond that, I’d put a layer of aluminium foil or something on the inside. Or find a way to mechanically restrain the thermocouple etc. like threading some thin copper wire through the mesh and tying the thermocouple in place with that. Or clip parts of the strainer mesh and thread the thermocouple cable through that. But then you’ve got food safety considerations with the thermocouple insulation, etc. etc.
Either way, I wouldn’t bother with using the tube, personally, at least not if you’re measuring through the wall of the tube… A food safe measurement that isn’t useful isn’t really any better than no measurement, in my opinion. On the other hand, if you’re just using the tube to get the thermocouple to the right point and then it sticks out and contacts the mesh, that’s a different thing. That’s basically how the Kaffelogic one does it: Short tube that sticks out into the middle of the roasting chamber with the bare thermocouple sticking out of it.
I’m also pretty unbothered by food safety considerations around small, incidental items like that, really. If I were selling this or roasting as a business then of course, but given that I’m not…
Thanks for your insights. I think I will just leave my placement alone for now. I have other things to work with this design for now. I will see how @Tuco does with his method.
1 Like