Does anyone have some thoughts on a DIY coffee roaster? I’m currently using a Nostalgia popcorn air popper for roasting, but it can only do about 2 oz. roasted at a time. I’ve tried green beans from 3 different online sources:
There are several advantages to fresh roasting. The green coffee beans have a long shelf life & you can roast just the amount you need. I also understand fresher roasted coffee beans are higher in antioxidants. I did a google search with “is fresh roasted coffee healthier“.
After roasting this way for a couple of months, I am searching for a more automated method & one that will roast more beans at a time. I was looking at maybe buying a dedicated roaster, but they are a little too costly for me. The method I like the best so far involves using a cranked flour sifter, heat gun & electric screwdriver to power the crank.
The method below using a bread machine with the heat gun is also interesting, but doesn’t seem to lend itself as well to automating
After looking at these ideas yesterday and bouncing some ideas off a friend, it occurred to me that an old 3d printer controller board could easily be used to control the temperature & speed of rotating the beans. With a google search of “what are ideal temperature for roasting coffee beans“, looks like the range is from180c to 250c within the range of a normal 3d printer thermistor. The heating part seems like it will be the most difficult and maybe dangerous for me, but I will be using this outside & not inside. I’m going to see if I can find a heat gun at a thrift store to take apart and see if I can go anywhere with this idea.
Anyone have some thoughts or concerns about this idea?
I like the physical setup of the Milwaukee one. You could make the heat gun work similar to an AC heat bed. You will still want a thermal fuse for over heat protection. The problem witha thermistor is that the air has no thermal mass. No matter what you set it to, the air is going to be hot when it’s on and cold when it’s off. You could make toggle the heating element and leave the air on all the time. But it will still heat and cool very fast. Where would you put the tememperature sensor? In the path of the air between the heat gun and the sifter?
You could easily attach a stepper motor through a gear to the sifter arm. Then programming different temperatures and durations would be pretty easy. Otherwise, skip the stepper motor and just attach a DC motor with a relay and drop the printer firmware all together. A PID loop would be about 15 lines of code and most of the rest would be the user interface.
I obviously didn’t know enough about the thermistor to realize it would not work in this way. For the flour sifter method, I would have to put it through the side near one of the connections of the rotating sifter as it would be in the way of it anywhere else. Guess I need a different kind of sensor though. I have not bought anything yet, so still have time to change my mind on what might work better.
I saw a video of someone using an airfryer, but you could not see the roasting progress or hear 1st crack. That makes it more of guessing game with it seemed like.
I ordered an ESP32 Development Board with 0.96 Inch OLED Display and a MAX6675 Module + K Type Thermocouple from aliexpress yesterday to play with. I have a little Wemos D1 Mini board with a display wired up as an octoprint monitor which I have not used in quite a while & was considering using that as board for the thermocouple, but I would have had to share the 1 ground & power connector between screen & sensor.
After pondering it some more & seeing this probe, Amazon.com on a flash sale yesterday, I ordered that. It was $23 yesterday. I want to see if this popcorn popper is actually capable of getting hot enough to get to 2nd crack. From a google search, 2nd crack should be between 225c-232c
I was roasting some beans for espresso yesterday & was hoping to hit 2nd crack. They did come out well by the smell of them & do seem dark, but I never heard 2nd crack. I went 13 to 14 minutes for these roasts. I usually only go 9 - 10 minutes. 1st crack starts around 5 minutes and ends about 7 minutes.
Another interesting thing I have noticed with the fresh roasted beans as the taste can change quite a bit from one day old to several days. I have an India bean that had a slightly spicy taste after 1 day & then intense, almost cayenne taste after several days. Another Ethiopian bean had a sharp lemon taste after 1 day & a lot more mellow lemon taste after several days.
Here is a google AI definition of 1st & 2nd crack for those wondering about this.
“The first crack sound in coffee roasting is caused by a rapid buildup of internal steam pressure and carbon dioxide within the bean”
“The second crack in coffee roasting is caused by the fracturing of the bean’s brittle cellulose structure due to internal carbon dioxide (CO2) pressure, leading to oils migrating to the bean’s surface and creating a faster, shallower “snap” or “sparking” sound, unlike the deeper “pop” of the first crack. This stage signifies the transition to a dark roast, characterized by diminished acidity and more prominent bitter, smoky flavors”
I’m still just testing to see what the differences are. New beans I have been trying it first the day after I roast it & then a few days after. 2 to 3 days is probably the optimum for the beans. I have also read that the fresher coffee should have higher antioxidants as they diminish over time. I’ve watched some youtubers trying it right after they roast it.
This project sounds a little like building a reflow oven, except you want to control the cycle on a sound rather than just on a temperature profile, and (I assume) you need to constantly be agitating the beans.
Here is my current method & seems to be working well for me.
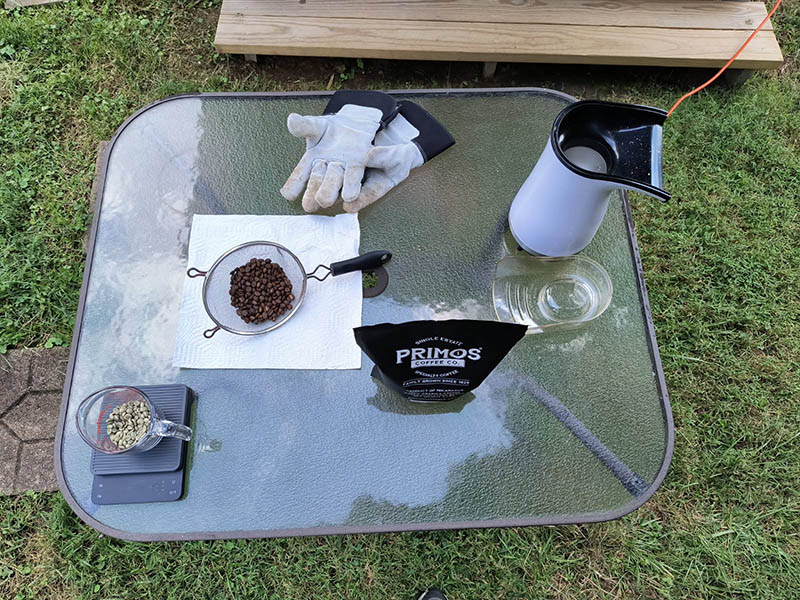
I measure 76 grams of green beans which is supposed to be about the most you can do with a popcorn popper & 76 grams splits a 1 lb bag into 6 batches. I usually do 2 - 3 batches. 1 lb of green beans comes out close to 12 oz of roasted beans.
I turn the popcorn popper on & let it heat up for about 10 seconds, then pour the beans in & shake it for the 1st 10 seconds & leave the popcorn popper plastic top off for the 1st minute.
For the first 2 minutes I shake the beans every 30 seconds. After that, once every minute for about 5 seconds.
I wait for the 1st crack to end which is usually less than 7 minutes. Some beans, I have hardly heard crack at all.
I’ve been going at least 9 minutes because if they are roasted too lightly, I have noticed too much earthy taste to them. I err on the side of going too dark, but I have not burned any yet. I also watch the color & make sure it looks about the way I want them. The last 2 types I roasted were 13 and 14 minutes to final.
10 seconds before the time I have decided to stop the roast, I pull the cover off, turn the power off & dump the beans in a stainless-steel colander.
I then hold them over a small fan shaking them. It takes about 3-4 minutes for them to cool to room temperature.
It is actually quite easy to roast with the popper & the only thing I had to buy other than the green beans, was a $20 popcorn popper, a $20 coffee scale & timer & a $5 colander. I would just like the automate the process a little bit & be able to roast 2 - 3 times more at one time. Interesting thing I discovered about the coffee scale/timer is the timer will shut off after about 13 minutes if I don’t tap the scale & it doesn’t say that anywhere. It must be a normal thing because I sent back a different brand because it did that.
After roasting a couple of batches of Guatemalan beans while monitoring with a digital thermometer, looks like I will not be able to get it hot enough for 2nd crack. It was mostly in the 160-180c range an occasionally dropped down to 110-120c which I am sure is the safeguard circuitry. I did see it go in the low 200c range & spiked to 220c once or twice. There are quite a few people that have modified the circuitry on these to get them hotter, but I’m not going to do that.
I’m glad I bought this thermometer as it did give a better idea of what is going on with the roasting & limitations of the popper. I did adjust my procedure after discovering this. I stop shaking the popper once a minute after the 4 minutes to keep it hotter. Most of the chaff has also flown off by then.
I am using a 25-foot 14AWG extension wire. I do have an outside plug I could test plugging it in directly to the wall with just to see if I am losing any power. Doing a google search on the specs for 14AWG seemed like I was ok with that. Any thoughts on that.
My current setup is a TC4 which goes on top of an Arduino Uno. It is controlled via USB to PC running Artisan Roaster Scope. A popper element stacked with a heat gun element is barely sufficient for colder weather 50-60 F. so I’m recirculating the heat.
Cool project! We’ve been roasting our own coffee for about 12 years or so. We originally roasted with a popcorn popper for about a year before I gave up and bought a Behmor 1600. That lasted almost a decade of weekly use before developing some control board issues that made it randomly turn off while running so we replaced it with the Behmor 2020 that we’re currently using.
One thing to bear in mind with the popper approach is that you’re running at fixed power, so temperature will vary with airflow. More airflow means lower temperatures, less airflow means higher temperatures. If you’re not reaching high enough temperatures then you can slow down the airflow a bit. That may stop the beans circulating so you can then either manually stir, add a stirring mechanism or lower the quantity you’re doing at a time.
We also weren’t able to get ours to run nicely with the thermal protection switch in place. The thing you really don’t want to do, apparently, is have the beans ever decrease in temperature which they will as soon as the thermal switch kicks in. I would definitely be either bypassing that or replacing it with a higher temperature one if you can. If you’ve got something like a plug-in power meter you should be able to watch the power drop as the temperature cutout is reached.
Thanks for the info. I was not familiar with the TC4. I had to look that up. I figure I will only be able to roast outside another month or so before winter.
Yeah, absolutely. Testing a newly roasted batch vs one at a week old gives a very different flavour profile, even to my relatively unsophisticated palate.
We roast for espresso and I notice a huge change as the beans age in how they grind and how the espresso runs. Typically I’ll be tightening the grinder up little by little over the course of a week and then resetting it once we switch to a newer batch.
Our current process is that we have 2 airtight canisters, one that’s for resting and one that we’re using the beans from. When we finish the ‘using’ canister, we fill that from the resting canister and run another batch through the roaster. Doing that had a huge difference on how reliable the espresso was and reduced how much the grinder needed to be adjusted over the course of a week.
Thanks for popping in. I do have a kill a watt meter & that would be a good verification.
I’ve looked at that Behmor 2000AB. How is clean up after each roast? I saw someone mentioning cleanup was not easy. I was thinking with the increase in coffee prices, there might be some more low-end roasting solutions coming available. If I found one I really liked, I would just as soon buy one as try to diy one.