OK, now that I have written this up, I am re-analyzing things. There are 4 roads of traffic here:
control.html ----- Cloudflare
nodejs ws -------- Cloudflare
ESP32-CAM ----- Cloudflare
FluidNC ----------- ESP32-CAM
If you are connecting with a browser, then everything is handled. For instance, I can use wss in the javascript of the control.html page and it works, so connection 1 is easily secured. The traffic in the tunnel between Cloudflare and your LAN is secure even though your LAN is not using wss or https internally. Cloudflare handles that, so 2 is secure by default. I think the issue here is with the ESP32-CAM connection with Cloudflare (3). I assume that a cert needs to be loaded on the ESP32 in order to use wss, and since the socket connection between the ESP32-CAM and FluidNC (4) can not use wss, I’m not sure what there is to gain by doing that? Protection from man in the middle attacks I guess?
I went ahead and made the necessary adjustments to secure the communications with WSS and it was much easier than I thought it would be. As I mentioned, on the PC or phone/tablet that is running control.html, you just need to switch the socket connection from ws:// to wss:// in the javascript and the browser handles the encryption. On the ESP32-CAM, you need to use the root CA certificate (that Cloudflare uses) when making that connection. Cloudflare uses GlobalSign as their Root CA, so that’s what you need to include in the ESP32 sketch. An additional three lines of code and your done. The communications between FluidNC and the ESP32-CAM must remain unencrypted, but since those are limited to a LAN, that isn’t really an issue unless the LAN is open to the public.
As Jeff mentioned, Cloudflare has several options to restrict access to your tunnels. The method I use on my 3d Printers and a few other devices is email verification. If that option is selected, anyone trying to access the tunnels gets prompted to enter a code (similar to 2 factor authentication). The code gets sent to an email or emails of your choosing and is good for a preset amount of time like 24 hours or something). That is obviously not an option for a remote ESP32, so I use a passkey that gets sent in the header of the connection request. If the passkey doesn’t match the one set on the nodejs websocket server, the connection is refused.
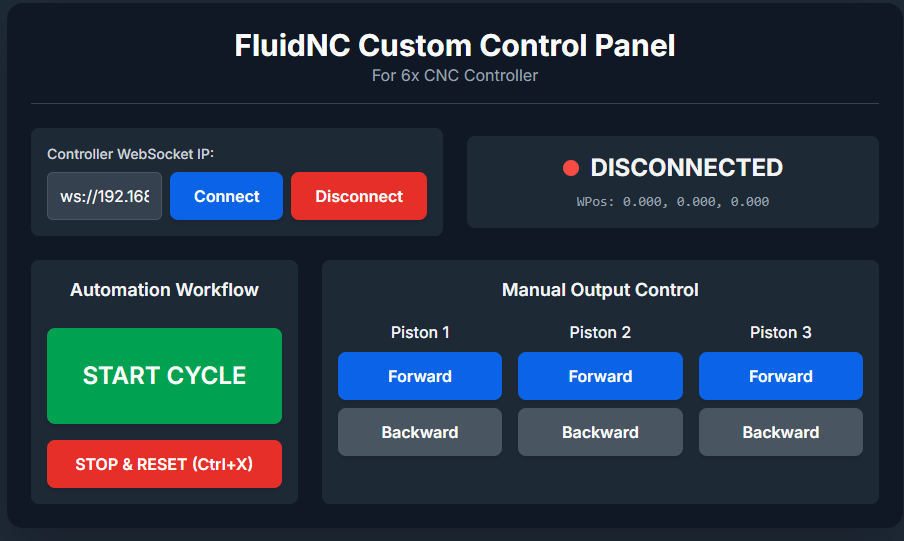
Hi guys. I see a lot of people contributed and shared their experience here. I need some help from you guys. I have a 6x cnc controller (wiki ,fluidnc en/hardware/official/6x_CNC_Controller ). I made a custom automation build with pneumatic cylinders etc. I made a html file with javascript(thanks to AI) it connects through the websocket and sends commands. M codes mostly. What I want is load this html into the board so wont need my computer. I can connect with a tablet. How can I do it?
You should create a new thread but FluidNC won’t quite do what you probably want it to. While you can upload the HTML file, it won’t serve it as a webpage unless you name it index.html or index.html.gz. However, that’s going to completely replace the existing WebUI.
With WebUI v3, you could create a custom extension. That would require changes to what you have because you wouldn’t manage a websocket yourself. Honestly, you could just use the existing WebUI and create some macros.
There are not much documents and tbh i dont know how to do it. I saw tablet tab section on fluidnc. I thought i can just replace it.
I can change the name as index.html.gz. I dont mind to lose fluidnc interface. My build is not a cnc machine. In the future i will add a stepper but i will send command on my end. basic commands go 20mm forward etc.
On WebUI v3, this can be done, but you need to use the extension API.
So, if you do this, you lose the ability to easily configure FluidNC. You would only name it index.html.gz if you gzipped the index.html file. I haven’t actually tried this but it should work in theory. However, I’m not sure if there are other things you’d need to deal with then. You could leave the existing index.html.gz file (which is the WebUI) and upload it as index.html. Then you could rename index.html or delete it to get the WebUI back.
Normally, I would say to upload the file via the WebUI but you’re going to lose that. So, you would want to do it through either the web installer or FluidTerm. It needs to go on Flash memory.